
Service Guide
Page 63
Step Upper Cover (Red callouts) Size M2*6 Upper Cover (Cyan callouts) M2*4 Quantity 7 4 Screw Type 3. See "Removing the Hinge Covers" on page 52. 2. Chapter 3 53 Removing the Upper Cover 1. Remove the 11 screws securing the Upper Cover to the Lower Cover. Turn the computer over and disconnect the following cable from the Mainboard.
Step Upper Cover (Red callouts) Size M2*6 Upper Cover (Cyan callouts) M2*4 Quantity 7 4 Screw Type 3. See "Removing the Hinge Covers" on page 52. 2. Chapter 3 53 Removing the Upper Cover 1. Remove the 11 screws securing the Upper Cover to the Lower Cover. Turn the computer over and disconnect the following cable from the Mainboard.

Service Guide
Page 64
Remove the eight securing screws from the Upper Cover. Step Upper Cover (red callout) Size M2*4 Quantity 8 Screw Type 54 Chapter 3 Release the locking latch and disconnect the FFC as shown. 4.
Remove the eight securing screws from the Upper Cover. Step Upper Cover (red callout) Size M2*4 Quantity 8 Screw Type 54 Chapter 3 Release the locking latch and disconnect the FFC as shown. 4.

Service Guide
Page 122
2. Step Upper Cover (red callout) Size M2*4 Quantity 8 Screw Type 112 Chapter 3 Lightly press the edges of the cover in place to connect it to the Upper Cover. Replace the eight securing screws to the lower cover., 3.
2. Step Upper Cover (red callout) Size M2*4 Quantity 8 Screw Type 112 Chapter 3 Lightly press the edges of the cover in place to connect it to the Upper Cover. Replace the eight securing screws to the lower cover., 3.

Service Guide
Page 124
Step Upper Cover (Red callouts) Size M2*6 Upper Cover (Cyan callouts) M2*4 Quantity 7 4 Removing the Hinge Covers 1. Connect the Hinge Covers to the Lower Cover. Screw Type 114 Chapter 3 Turn the computer and replace the eleven screws securing the Upper Cover to the Upper Cover as shown. 6.
Step Upper Cover (Red callouts) Size M2*6 Upper Cover (Cyan callouts) M2*4 Quantity 7 4 Removing the Hinge Covers 1. Connect the Hinge Covers to the Lower Cover. Screw Type 114 Chapter 3 Turn the computer and replace the eleven screws securing the Upper Cover to the Upper Cover as shown. 6.
Service Guide
Page 138
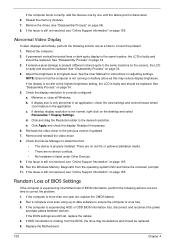
... Manual for instructions on page 34. 4. There are no red Xs or yellow exclamation marks. • There are still lost, replace the cables. 4. Run a complete virus scan using up-to-date software to determine that the computer is still not resolved, see "Online Support Information" on the...highest brightness setting, the LCD is too dim at a time to the desired resolution. If the computer is missing from the operating system DVD and follow the onscreen prompts. 11. If HDD information is experiencing HDD or ODD BIOS information loss, disconnect and reconnect the power ...
... Manual for instructions on page 34. 4. There are no red Xs or yellow exclamation marks. • There are still lost, replace the cables. 4. Run a complete virus scan using up-to-date software to determine that the computer is still not resolved, see "Online Support Information" on the...highest brightness setting, the LCD is too dim at a time to the desired resolution. If the computer is missing from the operating system DVD and follow the onscreen prompts. 11. If HDD information is experiencing HDD or ODD BIOS information loss, disconnect and reconnect the power ...

Service Guide
Page 142
Reboot the computer. 2. b. Navigate to Start´ Control Panel´ System and Maintenance´ System´ Device Manager. NOTE: If Speakers does not show, right-click on the taskbar and drag the slider to 50. Ensure that : • The device is properly installed. • There are no red Xs or yellow exclamation marks...
Reboot the computer. 2. b. Navigate to Start´ Control Panel´ System and Maintenance´ System´ Device Manager. NOTE: If Speakers does not show, right-click on the taskbar and drag the slider to 50. Ensure that : • The device is properly installed. • There are no red Xs or yellow exclamation marks...

Service Guide
Page 162
N/A N/A N/A N/A N/A N/A N/A N/A N/A ZA8 RAM DOOR ASSY S.P N/A ZA8 3G DOOR ASSY S.P ZA8 LCD COVER 3G-WIFI GW RED ASSY S.P ZA8 LCD COVER 3G-WIFI GW BK S.P ZA8 LCD COVER WIFI GW BK ASSY S.P ZA5 LCD BEZEL ASSY-BK S.P ZA6 LCD BEZEL ASSY-BK S.P N/A N/A N/A N/A ....BA307.008 ZA5 HINGE-L(FBZA5001,REV3A)S.P 33.WDP07.00 1 152 Chapter 6 CATEGORY QUANTA DESCRIPTION CASE/COVER/BRACKET ASSEMBLY ZA8 TOP CASE WIFI RED ASSY S.P ZA8 TOP CASE 3G-WIFI RED ASSY S.P ZA8 TOP CASE WIFI BK ASSY S.P ZA8 TOP CASE 3G-WIFI BK S.P ZA8 BASE CASE 3G-WIFI-BT BK S.P ZA8 BASE...
N/A N/A N/A N/A N/A N/A N/A N/A N/A ZA8 RAM DOOR ASSY S.P N/A ZA8 3G DOOR ASSY S.P ZA8 LCD COVER 3G-WIFI GW RED ASSY S.P ZA8 LCD COVER 3G-WIFI GW BK S.P ZA8 LCD COVER WIFI GW BK ASSY S.P ZA5 LCD BEZEL ASSY-BK S.P ZA6 LCD BEZEL ASSY-BK S.P N/A N/A N/A N/A ....BA307.008 ZA5 HINGE-L(FBZA5001,REV3A)S.P 33.WDP07.00 1 152 Chapter 6 CATEGORY QUANTA DESCRIPTION CASE/COVER/BRACKET ASSEMBLY ZA8 TOP CASE WIFI RED ASSY S.P ZA8 TOP CASE 3G-WIFI RED ASSY S.P ZA8 TOP CASE WIFI BK ASSY S.P ZA8 TOP CASE 3G-WIFI BK S.P ZA8 BASE CASE 3G-WIFI-BT BK S.P ZA8 BASE...


