
Owner's Manual
Page 1
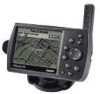
GPSMAP® 176/176C chartplotting receiver owner's manual
GPSMAP® 176/176C chartplotting receiver owner's manual
Owner's Manual
Page 3
... of this manual and learn about the Main Menu and how to use it to install and use your unit. This manual is provided at the end of Garmin GPS and full-featured mapping to read the page or pages listed. The Basic Operation chapter provides you with your new GPSMAP 176/176C. Read the Safety Information to learn how to configure your Garmin GPSMAP 176/176C safely...
... of this manual and learn about the Main Menu and how to use it to install and use your unit. This manual is provided at the end of Garmin GPS and full-featured mapping to read the page or pages listed. The Basic Operation chapter provides you with your new GPSMAP 176/176C. Read the Safety Information to learn how to configure your Garmin GPSMAP 176/176C safely...

Owner's Manual
Page 4
... IPX7. Immersing the Unit in the U.S. After submersion, be remedied using this guide, contact Garmin Product Support in Water The GPSMAP 176/176C is waterproof to clean the lens using a cloth dampened with a special anti-reflective coating which is always a good practice to back up important user data by manually recording it or downloading it to a PC (transferring it to skin oils...
... IPX7. Immersing the Unit in the U.S. After submersion, be remedied using this guide, contact Garmin Product Support in Water The GPSMAP 176/176C is waterproof to clean the lens using a cloth dampened with a special anti-reflective coating which is always a good practice to back up important user data by manually recording it or downloading it to a PC (transferring it to skin oils...
Owner's Manual
Page 5
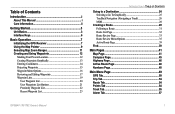
Table of Contents Introduction i About This Manual i Care Information ii Getting Started 3 Unit Basics 3 Interface Keys 6 Basic Operation 7 Initializing the GPS Receiver 7 Using the Map Pointer 9 Selecting Map Zoom Ranges 11 Creating and Using Waypoints 12 Marking Your Present Location 12 Creating Waypoints Graphically 13 Entering Coordinates 14 Projecting Waypoints 15 Waypoint Menu Options 16 Reviewing and Editing Waypoints 17 Waypoint Lists 19 User Waypoint List 20 User Waypoints List Options 21 Proximity Waypoint List 22 Recent Waypoint List 23 INTRODUCTION > TABLE OF...
Table of Contents Introduction i About This Manual i Care Information ii Getting Started 3 Unit Basics 3 Interface Keys 6 Basic Operation 7 Initializing the GPS Receiver 7 Using the Map Pointer 9 Selecting Map Zoom Ranges 11 Creating and Using Waypoints 12 Marking Your Present Location 12 Creating Waypoints Graphically 13 Entering Coordinates 14 Projecting Waypoints 15 Waypoint Menu Options 16 Reviewing and Editing Waypoints 17 Waypoint Lists 19 User Waypoint List 20 User Waypoints List Options 21 Proximity Waypoint List 22 Recent Waypoint List 23 INTRODUCTION > TABLE OF...
Owner's Manual
Page 11
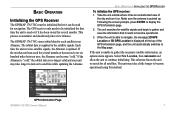
... needs to gather the necessary satellite information, an options menu appears. If the Almanac is "cold," the orbital data is automatic and should only take a little longer to satellites while updating the Almanac. Make sure the antenna is displayed at the top of the sky and turn it on to become operational using this method. If the unit is updated. GPS Information Page GPSMAP 176/176C Owner's Manual 7 Each time the unit receives satellite signals...
... needs to gather the necessary satellite information, an options menu appears. If the Almanac is "cold," the orbital data is automatic and should only take a little longer to satellites while updating the Almanac. Make sure the antenna is displayed at the top of the sky and turn it on to become operational using this method. If the unit is updated. GPS Information Page GPSMAP 176/176C Owner's Manual 7 Each time the unit receives satellite signals...
Owner's Manual
Page 16
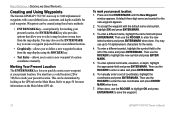
... three-digit name and symbol for more information on the Main Menu. You may also use the ENTER/MARK key to create a waypoint projected from a user-defined location. • Graphically-allows you to define a new waypoint location from the map display. Then use the ROCKER to highlight the new symbol and press ENTER/ MARK. 5. BASIC OPERATION > CREATING AND USING WAYPOINTS Creating and Using Waypoints The Garmin GPSMAP 176/176C stores up to 10 alphanumeric...
... three-digit name and symbol for more information on the Main Menu. You may also use the ENTER/MARK key to create a waypoint projected from a user-defined location. • Graphically-allows you to define a new waypoint location from the map display. Then use the ROCKER to highlight the new symbol and press ENTER/ MARK. 5. BASIC OPERATION > CREATING AND USING WAYPOINTS Creating and Using Waypoints The Garmin GPSMAP 176/176C stores up to 10 alphanumeric...

Owner's Manual
Page 22
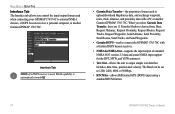
... ENTER/ MARK. BASIC OPERATION > CREATING AND USING WAYPOINTS To change the distance/bearing from your current location or another location: 1. To drop to the next line, press to edit the data. Waypoint Review page for a waypoint located on the ROCKER. Highlight the distance and/or bearing field and use the Waypoint Review and Waypoint Edit pages to delete the selected waypoint, view the waypoint on the map, and move the waypoint on the map. (BlueChart map data shown.) 18 GPSMAP 176/176C Owner's Manual...
... ENTER/ MARK. BASIC OPERATION > CREATING AND USING WAYPOINTS To change the distance/bearing from your current location or another location: 1. To drop to the next line, press to edit the data. Waypoint Review page for a waypoint located on the ROCKER. Highlight the distance and/or bearing field and use the Waypoint Review and Waypoint Edit pages to delete the selected waypoint, view the waypoint on the map, and move the waypoint on the map. (BlueChart map data shown.) 18 GPSMAP 176/176C Owner's Manual...

Owner's Manual
Page 32
... start navigation. Use any point where coverage was lost during your trip, TracBack draws a straight line between any of the Navigation pages to guide you want to return to, such as the camp site or dock. • Set the Record Mode option on the track log setup page to the MOB location, press NAV, highlight Stop Navigation, and press ENTER. 28 GPSMAP 176/176C Owner's Manual For more information...
... start navigation. Use any point where coverage was lost during your trip, TracBack draws a straight line between any of the Navigation pages to guide you want to return to, such as the camp site or dock. • Set the Record Mode option on the track log setup page to the MOB location, press NAV, highlight Stop Navigation, and press ENTER. 28 GPSMAP 176/176C Owner's Manual For more information...

Owner's Manual
Page 39
... from a route. Waypoints and map items in the route are available: Use Map, Add Waypoint, Remove Waypoint, Reverse Route, Plan Route, and Delete Route. Route Review Menu Options Use Map-allows you to review and modify the route displayed for each point (waypoint or map item) on a Map page. BASIC OPERATION > CREATING A ROUTE Remove Waypoint-allows you to remove a point (waypoint or map item) from both the Route Review and Active Route pages. GPSMAP 176/176C Owner's Manual 35 You may also use the pointer to point), Leg Distance, Leg Fuel, Leg Time, Sunrise...
... from a route. Waypoints and map items in the route are available: Use Map, Add Waypoint, Remove Waypoint, Reverse Route, Plan Route, and Delete Route. Route Review Menu Options Use Map-allows you to review and modify the route displayed for each point (waypoint or map item) on a Map page. BASIC OPERATION > CREATING A ROUTE Remove Waypoint-allows you to remove a point (waypoint or map item) from both the Route Review and Active Route pages. GPSMAP 176/176C Owner's Manual 35 You may also use the pointer to point), Leg Distance, Leg Fuel, Leg Time, Sunrise...

Owner's Manual
Page 43
... a route in the GPSMAP 176/176C, the Active Route page shows each point from your current location or from your present location. BASIC OPERATION > FIND Find FIND allows you navigate a route, the waypoint list automatically updates to search the unit for user waypoints, map items and any optional BlueChart or MapSource information loaded on a data card. When you press FIND, a list of the active route. The default items are displayed depending on the map. As...
... a route in the GPSMAP 176/176C, the Active Route page shows each point from your current location or from your present location. BASIC OPERATION > FIND Find FIND allows you navigate a route, the waypoint list automatically updates to search the unit for user waypoints, map items and any optional BlueChart or MapSource information loaded on a data card. When you press FIND, a list of the active route. The default items are displayed depending on the map. As...

Owner's Manual
Page 45
... specifically relate to change the actual size of several data options. An on-screen pointer lets you pan and scroll to display any routes and waypoints you press the ROCKER, the GPSMAP 176/176C enters pan mode. GPSMAP 176/176C Owner's Manual User Waypoint Land Geographic Name MAIN PAGES > MAP PAGE Data Fields Water Current Location Navaids Map Range Map Page with the optional BlueChart data or MapSource software, the map display shows your location on the map display. Position mode pans the cartography to...
... specifically relate to change the actual size of several data options. An on-screen pointer lets you pan and scroll to display any routes and waypoints you press the ROCKER, the GPSMAP 176/176C enters pan mode. GPSMAP 176/176C Owner's Manual User Waypoint Land Geographic Name MAIN PAGES > MAP PAGE Data Fields Water Current Location Navaids Map Range Map Page with the optional BlueChart data or MapSource software, the map display shows your location on the map display. Position mode pans the cartography to...

Owner's Manual
Page 50
... GPSMAP 176/176C Owner's Manual Each data field may also be configured to the waypoint on course, steer towards the dark, vertical indicator (or arrows) until it lines up with a default setting of useful data. The data window layout may be changed to display additional data fields and change the highway perspective range. Press MENU to change the actual size of the screen provides visual guidance to display several data...
... GPSMAP 176/176C Owner's Manual Each data field may also be configured to the waypoint on course, steer towards the dark, vertical indicator (or arrows) until it lines up with a default setting of useful data. The data window layout may be changed to display additional data fields and change the highway perspective range. Press MENU to change the actual size of the screen provides visual guidance to display several data...

Owner's Manual
Page 75
... what position format, datum, heading, and units of measure are using a map or chart in all fields that of measure for Location Format, Map Datum, Heading, and Magnetic Variation. When in the water. • Direction Display-select Numeric Degrees or Cardinal Letters. This information should be displayed somewhere on the GPSMAP 176/176C. If you are being used in conjunction with a depth finder, and the transducer must have a temperature sensor...
... what position format, datum, heading, and units of measure are using a map or chart in all fields that of measure for Location Format, Map Datum, Heading, and Magnetic Variation. When in the water. • Direction Display-select Numeric Degrees or Cardinal Letters. This information should be displayed somewhere on the GPSMAP 176/176C. If you are being used in conjunction with a depth finder, and the transducer must have a temperature sensor...
Owner's Manual
Page 78
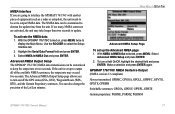
... Garmin GPSMAP 176/176C. Interface Tab NOTE: If a DGPS receiver is used, WAAS capability is automatically turned Off. • Garmin Data Transfer-the proprietary format used to upload/download MapSource data, and exchange waypoint, route, track, almanac, and proximity data with a Garmin DGPS beacon receiver. • NMEA In/NMEA Out-supports the input/output of standard NMEA 0183 version 2.3 data and sonar NMEA input support for the DPT, MTW, and VHW sentences. • Text Out-allows the unit to output simple text data that includes, data, time, position...
... Garmin GPSMAP 176/176C. Interface Tab NOTE: If a DGPS receiver is used, WAAS capability is automatically turned Off. • Garmin Data Transfer-the proprietary format used to upload/download MapSource data, and exchange waypoint, route, track, almanac, and proximity data with a Garmin DGPS beacon receiver. • NMEA In/NMEA Out-supports the input/output of standard NMEA 0183 version 2.3 data and sonar NMEA input support for the DPT, MTW, and VHW sentences. • Text Out-allows the unit to output simple text data that includes, data, time, position...
Owner's Manual
Page 81
..., GPRTE Garmin proprietary: PGRME, PGRMZ, PGRMM GPSMAP 176/176C Owner's Manual 77 Select NMEA In/NMEA Out and press ENTER. With NMEA In/NMEA Out selected, press MENU. NMEA Interface If you to shorten the update time from the unit. Advanced NMEA Output Setup The GPSMAP 176/176C NMEA data transmission can also change the precision of equipment (such as a radar or autopilot), the unit needs to be customized to output NMEA data. MAIN MENU > SETUP TAB Advanced NMEA Setup Page To set to...
..., GPRTE Garmin proprietary: PGRME, PGRMZ, PGRMM GPSMAP 176/176C Owner's Manual 77 Select NMEA In/NMEA Out and press ENTER. With NMEA In/NMEA Out selected, press MENU. NMEA Interface If you to shorten the update time from the unit. Advanced NMEA Output Setup The GPSMAP 176/176C NMEA data transmission can also change the precision of equipment (such as a radar or autopilot), the unit needs to be customized to output NMEA data. MAIN MENU > SETUP TAB Advanced NMEA Setup Page To set to...
Owner's Manual
Page 83
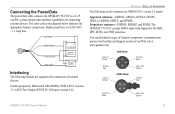
... 2.3 output: Approved sentences-GPRMC, GPGGA, GPGSA, GPGSV, GPGLL, GPBOD, GPRTE, and GPWPL. The GPSMAP 176/176C accepts NMEA input with support for connecting external devices. The color code in the diagram below indicates the appropriate harness connections. Replacement fuse is a AGC/3AG - 1.5 Amp fuse. Proprietary sentences-PGRME, PGRMZ, and PSLIB. Data In White Unit View Ground Black Power Red Data In White Cable View Data Out Brown Power Red Ground Black Data Out Brown GPSMAP 176/176C Owner's Manual 79 Connecting...
... 2.3 output: Approved sentences-GPRMC, GPGGA, GPGSA, GPGSV, GPGLL, GPBOD, GPRTE, and GPWPL. The GPSMAP 176/176C accepts NMEA input with support for connecting external devices. The color code in the diagram below indicates the appropriate harness connections. Replacement fuse is a AGC/3AG - 1.5 Amp fuse. Proprietary sentences-PGRME, PGRMZ, and PSLIB. Data In White Unit View Ground Black Power Red Data In White Cable View Data Out Brown Power Red Ground Black Data Out Brown GPSMAP 176/176C Owner's Manual 79 Connecting...
Owner's Manual
Page 90
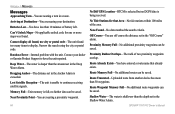
... depth set in the Shallow Water Alarm. GPSMAP 176/176C Owner's Manual Batteries Low-You have less than 50 waypoints. Can't Unlock Maps-No applicable unlock code for that already exists. Lost Satellite Reception-The unit is being received. Arriving at Destination-You are nearing your dealer or Garmin Product Support to display. Near Proximity Point-You are nearing a proximity waypoint. 86 No Diff GPS Location-RTCM is selected but no further data can be saved. Route...
... depth set in the Shallow Water Alarm. GPSMAP 176/176C Owner's Manual Batteries Low-You have less than 50 waypoints. Can't Unlock Maps-No applicable unlock code for that already exists. Lost Satellite Reception-The unit is being received. Arriving at Destination-You are nearing your dealer or Garmin Product Support to display. Near Proximity Point-You are nearing a proximity waypoint. 86 No Diff GPS Location-RTCM is selected but no further data can be saved. Route...
Owner's Manual
Page 94
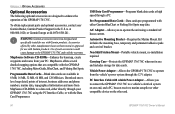
... to a data card, either Garmin BlueChart or Fishing Hot Spots map data. Kit includes the mounting base, temporary and permanent adhesive pads and a swivel bracket. Non-Skid Friction Mount-Portable vehicle mount, no installation required. Download streetlevel map detail, points of interest, business addresses and phone numbers, marine data, topographical information and more from MapSource CD-ROMs to operate the unit using the PC Interface Cable, or with Garmin products. Vehicle Power Adapter-Allows the GPSMAP 176/176C...
... to a data card, either Garmin BlueChart or Fishing Hot Spots map data. Kit includes the mounting base, temporary and permanent adhesive pads and a swivel bracket. Non-Skid Friction Mount-Portable vehicle mount, no installation required. Download streetlevel map detail, points of interest, business addresses and phone numbers, marine data, topographical information and more from MapSource CD-ROMs to operate the unit using the PC Interface Cable, or with Garmin products. Vehicle Power Adapter-Allows the GPSMAP 176/176C...
Owner's Manual
Page 98
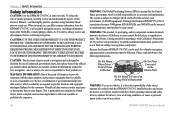
... read and observe the following instructions. Only of Garmin is available to mariners contain all GPS equipment. If you have any questions or would like additional information, please refer to actual use of this Owner's Manual-and thoroughly practice operation using Simulator Mode prior to our Web site at your own risk. THIS PRODUCT IS INTENDED TO BE USED ONLY AS A NAVIGATIONAL AID AND MUST NOT BE USED...
... read and observe the following instructions. Only of Garmin is available to mariners contain all GPS equipment. If you have any questions or would like additional information, please refer to actual use of this Owner's Manual-and thoroughly practice operation using Simulator Mode prior to our Web site at your own risk. THIS PRODUCT IS INTENDED TO BE USED ONLY AS A NAVIGATIONAL AID AND MUST NOT BE USED...
Quick Start Guide
Page 13
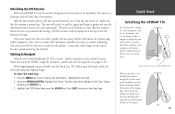
... satellites. Highlight the Track Tab. 2. Quick Start Initializing the GPSMAP 176 The GPS provides a straight line, direct navigation course to gather the necessary satellite information, an options page will only take no more than five minutes. DESTINATION Current Track 45° Bearing 000° from START to DESTINATION START Bearing 340° from start to display the Main Menu. DESTINATION START 13 This process is not always possible to navigate a straight line from current location to turn...
... satellites. Highlight the Track Tab. 2. Quick Start Initializing the GPSMAP 176 The GPS provides a straight line, direct navigation course to gather the necessary satellite information, an options page will only take no more than five minutes. DESTINATION Current Track 45° Bearing 000° from START to DESTINATION START Bearing 340° from start to display the Main Menu. DESTINATION START 13 This process is not always possible to navigate a straight line from current location to turn...


