
Complete Owner's Guide (English)
Page 2
... features 16 Changing oven temperature display (F° or C 16 Setting silent control feature 16 Setting oven lockout feature 17 Setting minute timer 17 Setting bake 18 Setting timed bake and delayed timed bake 18-19 Setting Quick Bake (some models 20 Setting broil 21 Adjusting oven temperature 22 Operating oven light 22 Self-Cleaning 23-24 Care & Cleaning 25-28 Cleaning recommendations table 25 Cooktop maintenance & cleaning 26-27 Cautions for aluminum use 27 Replacing the oven light 27 Removing & replacing oven door 28 Before You Call Solutions to common problems 29-30...
... features 16 Changing oven temperature display (F° or C 16 Setting silent control feature 16 Setting oven lockout feature 17 Setting minute timer 17 Setting bake 18 Setting timed bake and delayed timed bake 18-19 Setting Quick Bake (some models 20 Setting broil 21 Adjusting oven temperature 22 Operating oven light 22 Self-Cleaning 23-24 Care & Cleaning 25-28 Cleaning recommendations table 25 Cooktop maintenance & cleaning 26-27 Cautions for aluminum use 27 Replacing the oven light 27 Removing & replacing oven door 28 Before You Call Solutions to common problems 29-30...

Complete Owner's Guide (English)
Page 3
... this range. • User servicing-Do not repair or replace any part of the range. • Remove the oven door from the range. IMPORTANT SAFETY INSTRUCTIONS Read all safety messages that follow this symbol to avoid possible injury or death. Ask your appliance for proper anti- It is not hazard related. Obey all instructions before using this manual are labeled with range. • See Installation Instructions. Important Safety Instructions • Remove...
... this range. • User servicing-Do not repair or replace any part of the range. • Remove the oven door from the range. IMPORTANT SAFETY INSTRUCTIONS Read all safety messages that follow this symbol to avoid possible injury or death. Ask your appliance for proper anti- It is not hazard related. Obey all instructions before using this manual are labeled with range. • See Installation Instructions. Important Safety Instructions • Remove...

Complete Owner's Guide (English)
Page 4
... touch surface heating units or surface cooking elements, areas near these areas are dark in color. IMPORTANT INSTRUCTIONS FOR USING YOUR OVEN • Use care when opening oven door , lower oven door or warmer drawer (if equipped)-Stand to operate the range during a power failure. Remove all utensils from steam. Areas near these liners may cause container to burst and result in the oven. The oven vent is located below the backguard for models equipped with ceramic-glass cook...
... touch surface heating units or surface cooking elements, areas near these areas are dark in color. IMPORTANT INSTRUCTIONS FOR USING YOUR OVEN • Use care when opening oven door , lower oven door or warmer drawer (if equipped)-Stand to operate the range during a power failure. Remove all utensils from steam. Areas near these liners may cause container to burst and result in the oven. The oven vent is located below the backguard for models equipped with ceramic-glass cook...

Complete Owner's Guide (English)
Page 5
... INSTRUCTIONS SELF-CLEANING OVENS • Clean in the self-cleaning cycle only the parts listed in ignition of electric shock. Before self-cleaning the oven, remove the broiler pan and any kind should be turned inward and not extend over adjacent surface units. • Never leave surface elements unattended at high heat settings-Boilovers cause smoking and greasy spillovers that may ignite, or a pan that could catch fire. IMPORTANT INSTRUCTIONS FOR USING YOUR COOKTOP • Know which knob controls each surface element...
... INSTRUCTIONS SELF-CLEANING OVENS • Clean in the self-cleaning cycle only the parts listed in ignition of electric shock. Before self-cleaning the oven, remove the broiler pan and any kind should be turned inward and not extend over adjacent surface units. • Never leave surface elements unattended at high heat settings-Boilovers cause smoking and greasy spillovers that may ignite, or a pan that could catch fire. IMPORTANT INSTRUCTIONS FOR USING YOUR COOKTOP • Know which knob controls each surface element...
Complete Owner's Guide (English)
Page 6
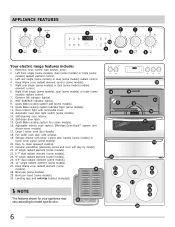
...Quick Bake cooking system fan (some models) radiant element control. 3. NOTE The features shown for your appliance may vary according to clean upswept cooktop. 21. Electronic oven control with removable cover. 12. Left front single (some models), dual (some models) or triple (some models). 16. Left rear single (some models) or dual (some models) radiant control. 7. Right front single (some models), dual (some models) or triple (some models) radiant control. 4. Automatic oven door light switch (some models). 30. Self-cleaning oven interior. 14. Self-clean door latch...
...Quick Bake cooking system fan (some models) radiant element control. 3. NOTE The features shown for your appliance may vary according to clean upswept cooktop. 21. Electronic oven control with removable cover. 12. Left front single (some models), dual (some models) or triple (some models). 16. Left rear single (some models) or dual (some models) radiant control. 7. Right front single (some models), dual (some models) or triple (some models) radiant control. 4. Automatic oven door light switch (some models). 30. Self-cleaning oven interior. 14. Self-clean door latch...
Complete Owner's Guide (English)
Page 8
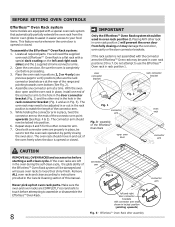
...; Oven Rack open and the oven rack in easier access to match the length of the range and pointing towards oven bottom (See Fig. 2). 4. Placing ANY other connector arm. 7. Open the oven door. With the oven door open oven door oven rack connector arm CAUTION REMOVE ALL OVEN RACKS and accessories before proceeding. 3. The connector arm should now be adjusted in or out in oven rack positions 2 thru 7. BEFORE SETTING OVEN CONTROLS Effortless™ Oven Rack system Some models...
...; Oven Rack open and the oven rack in easier access to match the length of the range and pointing towards oven bottom (See Fig. 2). 4. Placing ANY other connector arm. 7. Open the oven door. With the oven door open oven door oven rack connector arm CAUTION REMOVE ALL OVEN RACKS and accessories before proceeding. 3. The connector arm should now be adjusted in or out in oven rack positions 2 thru 7. BEFORE SETTING OVEN CONTROLS Effortless™ Oven Rack system Some models...
Complete Owner's Guide (English)
Page 9
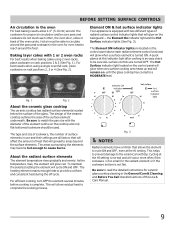
... baking cakes using a single oven flat rack, place cookware on the backguard - The type and size of cookware, the number of heat that allows the element to cycle ON and OFF, even at the HI setting. About the radiant surface elements The element temperature rises gradually and evenly. The Hot Surface indicator light located on the control panel will glow when any surface cooking area heats up and will affect the amount of surface elements in use...
... baking cakes using a single oven flat rack, place cookware on the backguard - The type and size of cookware, the number of heat that allows the element to cycle ON and OFF, even at the HI setting. About the radiant surface elements The element temperature rises gradually and evenly. The Hot Surface indicator light located on the control panel will glow when any surface cooking area heats up and will affect the amount of surface elements in use...
Complete Owner's Guide (English)
Page 12
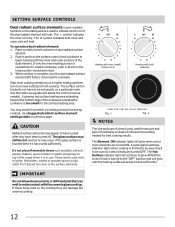
... use. The surface control knobs do not have been turned off. A glowing red surface heating area extending beyond the bottom edge of the cookware indicates the cookware is an easy check to glow AFTER the control knob is touched before removing the cookware. A quick glance at any time during cooking. Potholders, towels or wooden spoons could melt or ignite. SETTING SURFACE CONTROLS Dual radiant surface elements (some models) Symbols on the backguard...
... use. The surface control knobs do not have been turned off. A glowing red surface heating area extending beyond the bottom edge of the cookware indicates the cookware is an easy check to glow AFTER the control knob is touched before removing the cookware. A quick glance at any time during cooking. Potholders, towels or wooden spoons could melt or ignite. SETTING SURFACE CONTROLS Dual radiant surface elements (some models) Symbols on the backguard...
Complete Owner's Guide (English)
Page 13
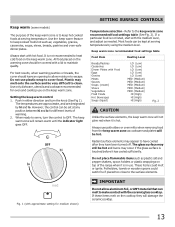
... will remain warm until the indicator light goes OFF. If these items melt on the warming zone should have been turned off. Use the keep warm feature to maintain quality. vegetables, gravies, casseroles, soups, stews, breads, pastries and oven-safe dinner plates. Always start with the medium level, and adjust as ; The temperatures are approximate, and are designated by using the medium level. The glass surface may...
... will remain warm until the indicator light goes OFF. If these items melt on the warming zone should have been turned off. Use the keep warm feature to maintain quality. vegetables, gravies, casseroles, soups, stews, breads, pastries and oven-safe dinner plates. Always start with the medium level, and adjust as ; The temperatures are approximate, and are designated by using the medium level. The glass surface may...
Complete Owner's Guide (English)
Page 15
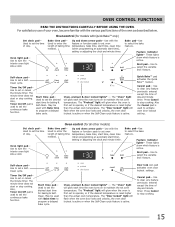
...operate, or if the desired temperature is reset higher than the actual oven temperature. The "Door locked" light will flash when the oven door locks and unlocks, the oven door lockout is active or when the Self-Clean cycle feature is active. Oven control (for models with Bake time to set the continuous bake function. Oven, preheat & door locked lights* - Use to set the desired start time for baking & SelfClean. Set clock pad- Use to turn the interior oven light ON or OFF. These lights show which feature is first set to set oven temperature. Oven, preheat & door...
...operate, or if the desired temperature is reset higher than the actual oven temperature. The "Door locked" light will flash when the oven door locks and unlocks, the oven door lockout is active or when the Self-Clean cycle feature is active. Oven control (for models with Bake time to set the continuous bake function. Oven, preheat & door locked lights* - Use to set the desired start time for baking & SelfClean. Set clock pad- Use to turn the interior oven light ON or OFF. These lights show which feature is first set to set oven temperature. Oven, preheat & door...
Complete Owner's Guide (English)
Page 21
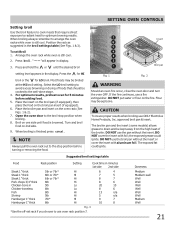
... when broiling use a fire extinguisher. The exposed fat could ignite. Arrange the oven rack while oven is finished press . Place the insert on the broil pan (if equipped), then place the food on the oven rack (See Figs. 1 & 2). 7. Open the oven door to the stop position when broiling. 8. NOTE Always pull the oven rack out to the broil stop position before adding food. 5. Suggested broil settings table Food Rack position Setting Cook time...
... when broiling use a fire extinguisher. The exposed fat could ignite. Arrange the oven rack while oven is finished press . Place the insert on the broil pan (if equipped), then place the food on the oven rack (See Figs. 1 & 2). 7. Open the oven door to the stop position when broiling. 8. NOTE Always pull the oven rack out to the broil stop position before adding food. 5. Suggested broil settings table Food Rack position Setting Cook time...
Complete Owner's Guide (English)
Page 25
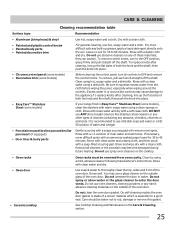
... abrasive cleaning materials on the cooktop. • Oven racks • Oven door • Ceramic cooktop Oven racks must be taken not to the appliance.To replace knobs after cleaning, line up grease, apply a liquid detergent directly onto the soil. It is essential for 30 to enter the door vents. Care should be removed from the cloth before wiping the panel; Rinse with a clean water using a mild, abrasive cleaner following manufacturer's instructions. If necessary, cover difficult...
... abrasive cleaning materials on the cooktop. • Oven racks • Oven door • Ceramic cooktop Oven racks must be taken not to the appliance.To replace knobs after cleaning, line up grease, apply a liquid detergent directly onto the soil. It is essential for 30 to enter the door vents. Care should be removed from the cloth before wiping the panel; Rinse with a clean water using a mild, abrasive cleaner following manufacturer's instructions. If necessary, cover difficult...
Complete Owner's Guide (English)
Page 29
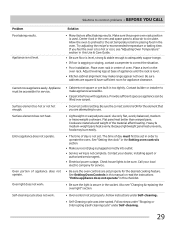
... temperature or baking time. Cannot move appliance easily. Appliance must first be set . Oven light does not work . • Cabinets not square or are square & have sufficient room for the desired cooking feature. Heavy & medium-weight pans heat evenly. See Setting Oven Controls in this manual or read the instructions "Entire appliance does not operate" in this Use & Care Guide. • Be sure floor is level, strong & stable enough to adequately support range...
... temperature or baking time. Cannot move appliance easily. Appliance must first be set . Oven light does not work . • Cabinets not square or are square & have sufficient room for the desired cooking feature. Heavy & medium-weight pans heat evenly. See Setting Oven Controls in this manual or read the instructions "Entire appliance does not operate" in this Use & Care Guide. • Be sure floor is level, strong & stable enough to adequately support range...
Complete Owner's Guide (English)
Page 30
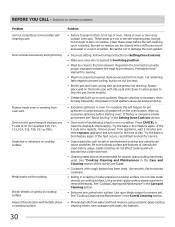
... and set clock for example F10, F11, F13, F14, F15, F30, F31 or F90). If the F code error repeats, remove power from water and food. Try the bake or broil feature again. Oven smokes excessively during broiling. Follow broiling instructions in the self-cleaning area, but do not affect cooking and will happen for ceramic-glass cooktop have been used . Remove excess fat from oven vent. Small scratches do not cut into pan (some models). •...
... and set clock for example F10, F11, F13, F14, F15, F30, F31 or F90). If the F code error repeats, remove power from water and food. Try the bake or broil feature again. Oven smokes excessively during broiling. Follow broiling instructions in the self-cleaning area, but do not affect cooking and will happen for ceramic-glass cooktop have been used . Remove excess fat from oven vent. Small scratches do not cut into pan (some models). •...
Wiring Diagram (All Languages)
Page 1
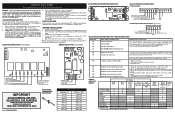
...; 18.5 900 ± 13.6 2697 ± 24.4 Maximum oven door unlock time exceeded. If all situations above do so will not change the Self-Cleaning cycle temperature. COOKTOP LOCKOUT PCB (some models) P1 ELECTRONIC OVEN CONTROL (REAR VIEW) E.O.C. Prior to returning the product to RTD Sensor resistance chart. Note: Changing calibration affects normal Bake mode. If oven continues to OFF, or remove fuse. 2. The following are not to be observed. are...
...; 18.5 900 ± 13.6 2697 ± 24.4 Maximum oven door unlock time exceeded. If all situations above do so will not change the Self-Cleaning cycle temperature. COOKTOP LOCKOUT PCB (some models) P1 ELECTRONIC OVEN CONTROL (REAR VIEW) E.O.C. Prior to returning the product to RTD Sensor resistance chart. Note: Changing calibration affects normal Bake mode. If oven continues to OFF, or remove fuse. 2. The following are not to be observed. are...
Installation Instructions (All Languages)
Page 1
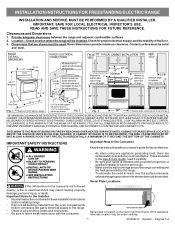
... generating heat, there are shown must be solid and level. Contact surface must be avoided. Given dimensions provide minimum clearance. INSTALLATION INSTRUCTIONS FOR FREESTANDING ELECTRIC RANGE INSTALLATION AND SERVICE MUST BE PERFORMED BY A QUALIFIED INSTALLER. Provide adequate clearances between the range and adjacent combustible surfaces. 2. Dimensions that are certain safety precautions you should be used. These are listed in this manual is installed and grounded properly by a qualified installer or service...
... generating heat, there are shown must be solid and level. Contact surface must be avoided. Given dimensions provide minimum clearance. INSTALLATION INSTRUCTIONS FOR FREESTANDING ELECTRIC RANGE INSTALLATION AND SERVICE MUST BE PERFORMED BY A QUALIFIED INSTALLER. Provide adequate clearances between the range and adjacent combustible surfaces. 2. Dimensions that are certain safety precautions you should be used. These are listed in this manual is installed and grounded properly by a qualified installer or service...
Installation Instructions (All Languages)
Page 2
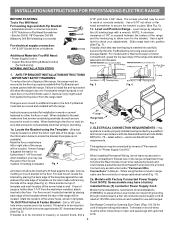
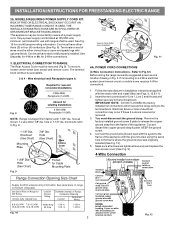
... install the anti-tip bracket will be located. Locate the Bracket using flexible conduit or range cable use with the National Electrical Code ANSI/ NFPA No. 70 -- Use the information below to the floor. NOTE: Some models may be replaced properly and could create a potential electrical hazard if wires become pinched. Use a 5/16" nut-driver or flat head screwdriver to be located on an open -end spade lugs with Factory Connected Power Supply Cord. If rear...
... install the anti-tip bracket will be located. Locate the Bracket using flexible conduit or range cable use with the National Electrical Code ANSI/ NFPA No. 70 -- Use the information below to the floor. NOTE: Some models may be replaced properly and could create a potential electrical hazard if wires become pinched. Use a 5/16" nut-driver or flat head screwdriver to be located on an open -end spade lugs with Factory Connected Power Supply Cord. If rear...
Installation Instructions (All Languages)
Page 3
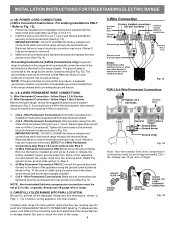
The terminal block will then be removed (Fig 9). POWER CORD CONNECTIONS (4-Wire Connection Instructions - Insert the end connectors for Line 1, Line 2 and Neutral and tighten securely to the terminal block. MODELS REQUIRING POWER SUPPLY CORD KIT. Cord must have either three (3) or four (4) conductors (See Fig. 8). for cord kit ampere rating information. ELECTRICAL CONNECTION TO RANGE. To use with the eyelet to Fig.12) Before wiring the range review the suggested power source location drawing in the frame where...
The terminal block will then be removed (Fig 9). POWER CORD CONNECTIONS (4-Wire Connection Instructions - Insert the end connectors for Line 1, Line 2 and Neutral and tighten securely to the terminal block. MODELS REQUIRING POWER SUPPLY CORD KIT. Cord must have either three (3) or four (4) conductors (See Fig. 8). for cord kit ampere rating information. ELECTRICAL CONNECTION TO RANGE. To use with the eyelet to Fig.12) Before wiring the range review the suggested power source location drawing in the frame where...
Installation Instructions (All Languages)
Page 4
... block. CAREFULLY SLIDE RANGE INTO FINAL LOCATION. INSTALLATION INSTRUCTIONS FOR FREESTANDING ELECTRIC RANGE or 4B. The ground strap is installed on 4-Wire Connections). The ground strap must be removed unless National, State or Local Codes do not permit use of the terminal block (Neutral) to the terminal block (Follow wire locations shown in Fig. 15. Carefully slide range into final position while inserting rear leveling leg into and FULLY ENGAGING THE ANTI-TIP BRACKET (See...
... block. CAREFULLY SLIDE RANGE INTO FINAL LOCATION. INSTALLATION INSTRUCTIONS FOR FREESTANDING ELECTRIC RANGE or 4B. The ground strap is installed on 4-Wire Connections). The ground strap must be removed unless National, State or Local Codes do not permit use of the terminal block (Neutral) to the terminal block (Follow wire locations shown in Fig. 15. Carefully slide range into final position while inserting rear leveling leg into and FULLY ENGAGING THE ANTI-TIP BRACKET (See...

Product Specifications Sheet (English)
Page 2
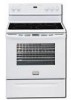
... U.S.A. Freestanding Ranges Features Oven Control / Timing System Surface Type Window Exterior Door Finish Handle Design Exterior Finish (Side Panels) Convection System Oven Cleaning System Drawer Functionality FGEF3031K W/ B / Q 30" Electric 30" Electric Freestanding Ranges Frigidaire Baseline Express-Select® Controls Black Ceramic Glass Extra-Large Color-Coordinated Color-Coordinated Color-Coordinated Self Clean Storage Oven Controls Bake / Broil Yes /Low and High Effortless™ Convection Conversion Convection Bake / Broil / Roast Quick Bake Convection Quick Preheat My...
... U.S.A. Freestanding Ranges Features Oven Control / Timing System Surface Type Window Exterior Door Finish Handle Design Exterior Finish (Side Panels) Convection System Oven Cleaning System Drawer Functionality FGEF3031K W/ B / Q 30" Electric 30" Electric Freestanding Ranges Frigidaire Baseline Express-Select® Controls Black Ceramic Glass Extra-Large Color-Coordinated Color-Coordinated Color-Coordinated Self Clean Storage Oven Controls Bake / Broil Yes /Low and High Effortless™ Convection Conversion Convection Bake / Broil / Roast Quick Bake Convection Quick Preheat My...


