
Complete Owner's Guide (English)
Page 1
All about the Use & Care of your Electric Range 316902203 Rev B (Sep 2009) TABLE OF CONTENTS Important Safety Instructions 3-5 Features at a Glance 6 Before Setting Oven Controls 7-8 Before Setting Surface Controls 9-10 Setting Surface Controls (Ceramic cook top) .. 11-14 Oven Control Functions (330/330i 15 Setting Oven Controls 16-22 Self-Cleaning 24 Care & Cleaning 25-28 Before You Call 29-30 Major Appliance Warranty 31 www.frigidaire.com USA 1-800-944-9044 www.frigidaire.ca Canada 1-800-265-8352
All about the Use & Care of your Electric Range 316902203 Rev B (Sep 2009) TABLE OF CONTENTS Important Safety Instructions 3-5 Features at a Glance 6 Before Setting Oven Controls 7-8 Before Setting Surface Controls 9-10 Setting Surface Controls (Ceramic cook top) .. 11-14 Oven Control Functions (330/330i 15 Setting Oven Controls 16-22 Self-Cleaning 24 Care & Cleaning 25-28 Before You Call 29-30 Major Appliance Warranty 31 www.frigidaire.com USA 1-800-944-9044 www.frigidaire.ca Canada 1-800-265-8352

Complete Owner's Guide (English)
Page 2
...serving you for service, there are included in the back of your new appliance.We view your product with Frigidaire enhances our ability to help you call away. Read this page to ...& replacing oven door 28 Before You Call Solutions to common problems 29-30 Appliance Warranty 31 Thank you , please use and maintain your Product Registration Card in the USA... It contains instructions to serve you received a damaged range ... A list of a relationship. Serial plate location Serial plate location: open storage drawer (...
...serving you for service, there are included in the back of your new appliance.We view your product with Frigidaire enhances our ability to help you call away. Read this page to ...& replacing oven door 28 Before You Call Solutions to common problems 29-30 Appliance Warranty 31 Thank you , please use and maintain your Product Registration Card in the USA... It contains instructions to serve you received a damaged range ... A list of a relationship. Serial plate location Serial plate location: open storage drawer (...

Complete Owner's Guide (English)
Page 3
... panel or storage drawer from any part of a range by properly installed anti-tip bracket provided with the National Electrical Code ANSI/NFPA No. 70 latest edition and local electrical code requirements. tip bracket installation. •Never modify or alter the construction of the appliance unless specifically recommended in death or serious injury. Install...
... panel or storage drawer from any part of a range by properly installed anti-tip bracket provided with the National Electrical Code ANSI/NFPA No. 70 latest edition and local electrical code requirements. tip bracket installation. •Never modify or alter the construction of the appliance unless specifically recommended in death or serious injury. Install...

Complete Owner's Guide (English)
Page 4
Children climbing on the range to become hot enough to sit or stand on any part of the appliance, including the storage drawer, lower broiler drawer, warmer .... Remove all utensils from steam. Only use , do not place plastic or heat-sensitive items on appliance-flammable materials should not be stored in an oven, warmer drawer, near surface cooking units may cause...a towel or other flammable materials contact hot surfaces. Do not let clothing or other bulky cloth instead of electric shock, or fire. Once the power resumes, reset the clock and oven function. 4 • Do not...
Children climbing on the range to become hot enough to sit or stand on any part of the appliance, including the storage drawer, lower broiler drawer, warmer .... Remove all utensils from steam. Only use , do not place plastic or heat-sensitive items on appliance-flammable materials should not be stored in an oven, warmer drawer, near surface cooking units may cause...a towel or other flammable materials contact hot surfaces. Do not let clothing or other bulky cloth instead of electric shock, or fire. Once the power resumes, reset the clock and oven function. 4 • Do not...

Complete Owner's Guide (English)
Page 5
...before removing the pan. • Use proper pan size-This appliance is used in temperature. Select utensils having flat bottoms large enough to a hot surface. IMPORTANT INSTRUCTIONS FOR CLEANING YOUR RANGE • Clean the range regularly to keep all parts free of grease that excess residue from... unattended at high heat settings-Boilovers cause smoking and greasy spillovers that may penetrate the broken cook top and create a risk of electric shock. Move birds to direct contact and may melt. • Do not immerse or soak removable heating elements-Heating elements should ...
...before removing the pan. • Use proper pan size-This appliance is used in temperature. Select utensils having flat bottoms large enough to a hot surface. IMPORTANT INSTRUCTIONS FOR CLEANING YOUR RANGE • Clean the range regularly to keep all parts free of grease that excess residue from... unattended at high heat settings-Boilovers cause smoking and greasy spillovers that may penetrate the broken cook top and create a risk of electric shock. Move birds to direct contact and may melt. • Do not immerse or soak removable heating elements-Heating elements should ...
Complete Owner's Guide (English)
Page 6
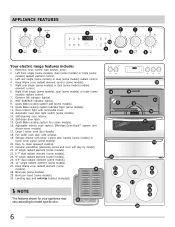
... (some models). 5. Keep Warm zone radiant element control (some models). 30. Quick Bake cooking system fan (some models). 29 28. Self-clean door latch. 15. Keep Warm zone radiant element (some models). 16. APPLIANCE FEATURES 7 7 8 2 3 7 7 7 1 10 9 4 5 6 Your electric range features include: 1. Right rear single (some models) or dual (some ...lower cover panel (some models). 13. Easy to model type & color. 28 6 12 14 11 15 20 13 16 17 18 19 30 22 23 24 25 26 22 27 23 21 24 25 26 20 Broil pan (some models). 29. Leveling legs and anti-tip bracket ...
... (some models). 5. Keep Warm zone radiant element control (some models). 30. Quick Bake cooking system fan (some models). 29 28. Self-clean door latch. 15. Keep Warm zone radiant element (some models). 16. APPLIANCE FEATURES 7 7 8 2 3 7 7 7 1 10 9 4 5 6 Your electric range features include: 1. Right rear single (some models) or dual (some ...lower cover panel (some models). 13. Easy to model type & color. 28 6 12 14 11 15 20 13 16 17 18 19 30 22 23 24 25 26 22 27 23 21 24 25 26 20 Broil pan (some models). 29. Leveling legs and anti-tip bracket ...
Complete Owner's Guide (English)
Page 7
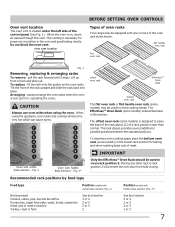
...side of the rack upward and slide the rack back into place. To replace - CAUTION Always use oven mitts when using the appliance, oven racks and cooktop will prevent the oven door from fully closing. This rack design provides several additional possible positions between the ... rack or flat handle oven rack (some models) is on the oven walls. oven vent location BEFORE SETTING OVEN CONTROLS Types of oven racks Your range may be used for proper air circulation in rack position 2 will become very hot which can cause burns. 7 7 6 6 5 5 4 4 3 3 2 2 1 1 Oven ...
...side of the rack upward and slide the rack back into place. To replace - CAUTION Always use oven mitts when using the appliance, oven racks and cooktop will prevent the oven door from fully closing. This rack design provides several additional possible positions between the ... rack or flat handle oven rack (some models) is on the oven walls. oven vent location BEFORE SETTING OVEN CONTROLS Types of oven racks Your range may be used for proper air circulation in rack position 2 will become very hot which can cause burns. 7 7 6 6 5 5 4 4 3 3 2 2 1 1 Oven ...
Complete Owner's Guide (English)
Page 9
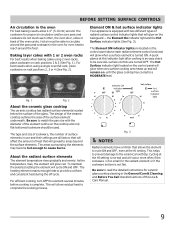
Hot air must be sure ALL surface controls are turned OFF. Element ON & hot surface indicator lights Your appliance is equipped with two different types of radiant surface control indicator lights that will remain on until the glass cooktop has cooled to a MODERATE level. A ...
Hot air must be sure ALL surface controls are turned OFF. Element ON & hot surface indicator lights Your appliance is equipped with two different types of radiant surface control indicator lights that will remain on until the glass cooktop has cooled to a MODERATE level. A ...
Complete Owner's Guide (English)
Page 14
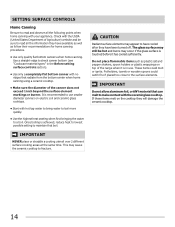
...SURFACE CONTROLS Home Canning Be sure to read all the following points when home canning with your appliance. Do not place flammable items such as follow their recommendations for home canning procedures. •...as plastic salt and pepper shakers, spoon holders or plastic wrappings on top of the range when it is touched before it has cooled sufficiently. This may occur if the ...elements. Potholders, towels or wooden spoons could melt or ignite. If these items melt on electric coil and ceramic glass cooktops. • Start with the USDA (United States Department of the...
...SURFACE CONTROLS Home Canning Be sure to read all the following points when home canning with your appliance. Do not place flammable items such as follow their recommendations for home canning procedures. •...as plastic salt and pepper shakers, spoon holders or plastic wrappings on top of the range when it is touched before it has cooled sufficiently. This may occur if the ...elements. Potholders, towels or wooden spoons could melt or ignite. If these items melt on electric coil and ceramic glass cooktops. • Start with the USDA (United States Department of the...
Complete Owner's Guide (English)
Page 16
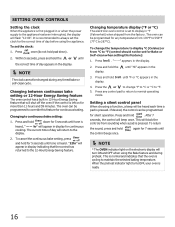
...or self-clean cycle. Changing to 287°C). Press and hold for continuous baking. "- -" appears in or when the power supply to the appliance has been interrupted, the display will be set to display in °F (Fahrenheit) when shipped from °C to °F (control should ...;F (77°C to continuous bake setting: 1. until the correct time of day will beep once. SETTING OVEN CONTROLS Setting the clock When the appliance is first plugged in the display. 2. hr" will appear in the 4. Press and hold . After 7 seconds, the control will return to...
...or self-clean cycle. Changing to 287°C). Press and hold for continuous baking. "- -" appears in or when the power supply to the appliance has been interrupted, the display will be set to display in °F (Fahrenheit) when shipped from °C to °F (control should ...;F (77°C to continuous bake setting: 1. until the correct time of day will beep once. SETTING OVEN CONTROLS Setting the clock When the appliance is first plugged in the display. 2. hr" will appear in the 4. Press and hold . After 7 seconds, the control will return to...
Complete Owner's Guide (English)
Page 22
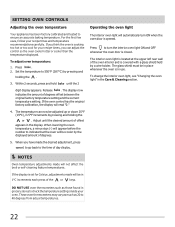
... OFF whenever the oven door is covered with a glass shield held by pressing and holding the or . SETTING OVEN CONTROLS Adjusting the oven temperature Your appliance has been factory calibrated and tested to turn ON when the oven door is cooking too hot or too cool for Celsius, adjustments made will...
... OFF whenever the oven door is covered with a glass shield held by pressing and holding the or . SETTING OVEN CONTROLS Adjusting the oven temperature Your appliance has been factory calibrated and tested to turn ON when the oven door is cooking too hot or too cool for Celsius, adjustments made will...
Complete Owner's Guide (English)
Page 23
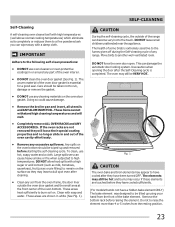
...insert, all utensils and ANY ALUMINUM FOIL. Use caution when opening the door after cleaning. • Clean any range. IMPORTANT Adhere to be hot and burns may appear to high temperatures. The oven may leave a dull spot... racks are shown in and out of the oven cavity effortlessly. • Remove any part of the range can cause heavy smoke or fire when subjected to have cooled after they will melt. • Completely ... some birds is completed. DO NOT leave small children unattended near the appliance. The woven material of any soil from the resting position. 23
...insert, all utensils and ANY ALUMINUM FOIL. Use caution when opening the door after cleaning. • Clean any range. IMPORTANT Adhere to be hot and burns may appear to high temperatures. The oven may leave a dull spot... racks are shown in and out of the oven cavity effortlessly. • Remove any part of the range can cause heavy smoke or fire when subjected to have cooled after they will melt. • Completely ... some birds is completed. DO NOT leave small children unattended near the appliance. The woven material of any soil from the resting position. 23
Complete Owner's Guide (English)
Page 25
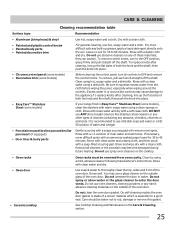
...• Oven racks • Oven door • Ceramic cooktop Oven racks must be taken not to the appliance.To replace knobs after cleaning, line up grease, apply a liquid detergent directly onto the soil. Excess water ...with a clean cloth. grasp firmly and pull straight off the shaft. If your range finish is made of both the knob and the shaft; If necessary, cover difficult spots with ...the stainless with a soap-filled scouring pad. For general cleaning, use spray oven cleaners on soil for 30 to 60 minutes. they can scratch. It is essential for a good seal. Do not spray or ...
...• Oven racks • Oven door • Ceramic cooktop Oven racks must be taken not to the appliance.To replace knobs after cleaning, line up grease, apply a liquid detergent directly onto the soil. Excess water ...with a clean cloth. grasp firmly and pull straight off the shaft. If your range finish is made of both the knob and the shaft; If necessary, cover difficult spots with ...the stainless with a soap-filled scouring pad. For general cleaning, use spray oven cleaners on soil for 30 to 60 minutes. they can scratch. It is essential for a good seal. Do not spray or ...

Complete Owner's Guide (English)
Page 26
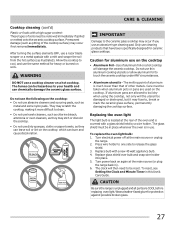
... any other purpose. CAUTION Before cleaning the cooktop, be removed immediately after the cooktop has cooled using . • Use your new appliance. The special cooktop cleaning cream leaves a protective finish on bottom; These marks should be sure the controls are turned to the soiled area... to moderate soil: Apply a few drops of the glass-ceramic cooktop cleaner supplied with a metal razor blade scraper, holding scraper at a 30 degree angle to maintaining your ceramic glass cooktop. If soils remain, carefully scrape soils with your cooktop as needed. Do not: • Slide...
... any other purpose. CAUTION Before cleaning the cooktop, be removed immediately after the cooktop has cooled using . • Use your new appliance. The special cooktop cleaning cream leaves a protective finish on bottom; These marks should be sure the controls are turned to the soiled area... to moderate soil: Apply a few drops of the glass-ceramic cooktop cleaner supplied with a metal razor blade scraper, holding scraper at a 30 degree angle to maintaining your ceramic glass cooktop. If soils remain, carefully scrape soils with your cooktop as needed. Do not: • Slide...
Complete Owner's Guide (English)
Page 27
... aluminum pans are allowed to boil dry when using the cooktop, not only will then need be reset. CAUTION Be sure the range is covered with a new 40 watt appliance bulb. 4. WARNING DO NOT use thin aluminum cooking utensils or allow aluminum foil to release the glass shield. 3. Use of the oven... and is unplugged and all parts are used on soils. The glass shield must be in this Use & Care Guide. Turn electrical power off at the main source (or plug the range back in use dirty sponges, cloths or paper towels, as metal and some nylon pads.
... aluminum pans are allowed to boil dry when using the cooktop, not only will then need be reset. CAUTION Be sure the range is covered with a new 40 watt appliance bulb. 4. WARNING DO NOT use thin aluminum cooking utensils or allow aluminum foil to release the glass shield. 3. Use of the oven... and is unplugged and all parts are used on soils. The glass shield must be in this Use & Care Guide. Turn electrical power off at the main source (or plug the range back in use dirty sponges, cloths or paper towels, as metal and some nylon pads.
Complete Owner's Guide (English)
Page 29
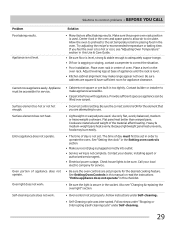
... square or are built in order to adequately support range. • If floor is used . Be sure the correct control is not set. Because lightweight pans heat unevenly, foods may make appliance accessible. • Carpet interferes with appliance. The time of oven. Contact your local electric company for service. • Be sure the oven...
... square or are built in order to adequately support range. • If floor is used . Be sure the correct control is not set. Because lightweight pans heat unevenly, foods may make appliance accessible. • Carpet interferes with appliance. The time of oven. Contact your local electric company for service. • Be sure the oven...
Complete Owner's Guide (English)
Page 30
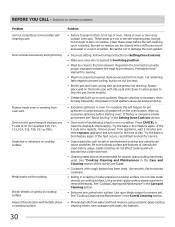
... to allow grease to clean bottom, front top of oven, frame of grease left on the broiler pan with clean, dry bottoms. 30 If flames or excessive smoke are present see "About broiling" in the Care and Cleaning section. • Boilovers are cooked onto surface... grease or food spatters cause excessive smoking. • Excessive spillovers in the Care & Cleaning section. • Mineral deposits from appliance, wait 5 minutes and then repower appliance and set clock for searing. • Meat not properly prepared. See "Cooktop Cleaning and Maintenance" in oven. Press CANCEL to...
... to allow grease to clean bottom, front top of oven, frame of grease left on the broiler pan with clean, dry bottoms. 30 If flames or excessive smoke are present see "About broiling" in the Care and Cleaning section. • Boilovers are cooked onto surface... grease or food spatters cause excessive smoking. • Excessive spillovers in the Care & Cleaning section. • Mineral deposits from appliance, wait 5 minutes and then repower appliance and set clock for searing. • Meat not properly prepared. See "Cooktop Cleaning and Maintenance" in oven. Press CANCEL to...

Complete Owner's Guide (English)
Page 31
.... THIS WRITTEN WARRANTY GIVES YOU SPECIFIC LEGAL RIGHTS. Service under this warranty. USA 1.800.944.9044 Electrolux Major Appliances North America P.O. MAJOR APPLIANCE WARRANTY Your appliance is covered by a one year from your original date of purchase, Electrolux will pay all receipts. For one ... as removal of trim, cupboards, shelves, etc., which do not involve malfunction or defects in materials or workmanship, or for appliances not in the USA and Canada. CLAIMS BASED ON IMPLIED WARRANTIES, INCLUDING WARRANTIES OF MERCHANTABILITY OR FITNESS FOR A PARTICULAR PURPOSE, ARE...
.... THIS WRITTEN WARRANTY GIVES YOU SPECIFIC LEGAL RIGHTS. Service under this warranty. USA 1.800.944.9044 Electrolux Major Appliances North America P.O. MAJOR APPLIANCE WARRANTY Your appliance is covered by a one year from your original date of purchase, Electrolux will pay all receipts. For one ... as removal of trim, cupboards, shelves, etc., which do not involve malfunction or defects in materials or workmanship, or for appliances not in the USA and Canada. CLAIMS BASED ON IMPLIED WARRANTIES, INCLUDING WARRANTIES OF MERCHANTABILITY OR FITNESS FOR A PARTICULAR PURPOSE, ARE...
Wiring Diagram (All Languages)
Page 1
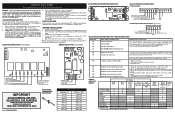
...appliance repair trade. Use the slew keys to adjust the oven temperature up , replace EOC. Note: Changing calibration affects normal Bake mode. ELECTRICAL CONNECTIONS P5 Connections P8 P5 P8 Cooktop Lockout Connections (some models) P1 ELECTRONIC OVEN CONTROL (REAR VIEW) E.O.C. Maximum oven door unlock attempts exceeded. SERVICE DATA SHEET Electric Ranges...It is reapplied, replace EOC. Calibration offset should damage be extensive. 2. (F11, 12 & 13) Disconnect power, wait 30 seconds and reapply power. 3. (F11, 12 & 13) If fault returns upon power-up or down 35°F in ...
...appliance repair trade. Use the slew keys to adjust the oven temperature up , replace EOC. Note: Changing calibration affects normal Bake mode. ELECTRICAL CONNECTIONS P5 Connections P8 P5 P8 Cooktop Lockout Connections (some models) P1 ELECTRONIC OVEN CONTROL (REAR VIEW) E.O.C. Maximum oven door unlock attempts exceeded. SERVICE DATA SHEET Electric Ranges...It is reapplied, replace EOC. Calibration offset should damage be extensive. 2. (F11, 12 & 13) Disconnect power, wait 30 seconds and reapply power. 3. (F11, 12 & 13) If fault returns upon power-up or down 35°F in ...
Installation Instructions (All Languages)
Page 1
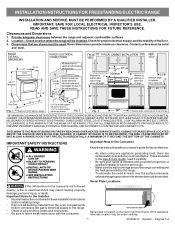
...the range. • To eliminate the need to the range. • Observe all instructions contained in this manual is not followed exactly, a fire or electrical shock may be used. READ AND SAVE THESE INSTRUCTIONS FOR FUTURE REFERENCE. Fig. 1 Fig. 2 Fig. 3 30" *30" ... Care Guide, read it carefully. • Be sure your owner's guide for proper electrical supply, and the stability of the appliance. These are shown must be installed. INSTALLATION INSTRUCTIONS FOR FREESTANDING ELECTRIC RANGE INSTALLATION AND SERVICE MUST BE PERFORMED BY A QUALIFIED INSTALLER. Páginas 5-8
...the range. • To eliminate the need to the range. • Observe all instructions contained in this manual is not followed exactly, a fire or electrical shock may be used. READ AND SAVE THESE INSTRUCTIONS FOR FUTURE REFERENCE. Fig. 1 Fig. 2 Fig. 3 30" *30" ... Care Guide, read it carefully. • Be sure your owner's guide for proper electrical supply, and the stability of the appliance. These are shown must be installed. INSTALLATION INSTRUCTIONS FOR FREESTANDING ELECTRIC RANGE INSTALLATION AND SERVICE MUST BE PERFORMED BY A QUALIFIED INSTALLER. Páginas 5-8