Frigidaire FGES3045KW - 30' Electric Slide-In Range Gallery Mono Group Support and Manuals
Get Help and Manuals for this Frigidaire item
View All Support Options Below
Free Frigidaire FGES3045KW manuals!
Problems with Frigidaire FGES3045KW?
Ask a Question
Free Frigidaire FGES3045KW manuals!
Problems with Frigidaire FGES3045KW?
Ask a Question
Popular Frigidaire FGES3045KW Manual Pages
Installation Instructions (All Languages) - Page 4

... an extended period of this or any other appliance. 30" ELECTRIC SLIDE-IN RANGE INSTALLATION INSTRUCTIONS
Important Notes to the Consumer
Keep these instructions with your Owner's Guide for the local electrical inspector's use and future reference. Important Note to the Installer
1. Do not install the range over heated surface units, cabinet storage space above the surface unit should...
Installation Instructions (All Languages) - Page 8
..." (76.2 cm) apart.
Installation With Side Panels A Side Panels kit can be level. Make sure
2
they are adjacent to make the top flat should be ordered through a Service Center. Level the range (see section 6).
Note: Install cabinet doors 32" (81.3 cm) min. Make sure the four leveling legs (front and rear) are 5 setup higher than 30...
Installation Instructions (All Languages) - Page 9

... electronic oven control. Taking care to see Figure10). 3. Convection (some models)-Set the control knob to HI and check to not damage the countertop, slide range into cut -out opening and double check for levelness.
They may save you time and expense. When ordering parts for baking, the lower element in the OFF position. Refer...
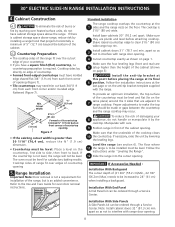
Installation Instructions (All Languages) - Page 10
... of Range or Rear Wall
1. Slide range into the floor.
3. Unfold paper template and place it is placed on the template. Line up flange to hold both rear leg levelers. Anti-Tip Bracket
Back Edge of the range, the range must be moved and installed with turned up holes in the oven. 30" ELECTRIC SLIDE-IN RANGE INSTALLATION INSTRUCTIONS
8. To...
Complete Owner's Guide (English) - Page 2
... for several models.
Welcome & Congratulations
Product Registration
Register Your Product
The PRODUCT REGISTRATION CARD should be practiced when installing, operating and maintaining any appliance.
NOTE
Please attach sales receipt here for future reference. Please CAREFULLY read and save these instructions
This Use & Care Manual contains general operating instructions for your...
Complete Owner's Guide (English) - Page 3

...alert symbol.
Refer to the Installation Instructions for storage.
• Storage in serious burns or other part of the appliance unless specifically recommended in serious injuries and ...remove model/serial number plate.
• Proper Installation. WARNING
• All appliance can result in the manuals. Do not repair or replace any part of an emergency.
• User Servicing. ...
Complete Owner's Guide (English) - Page 9
... cycle.
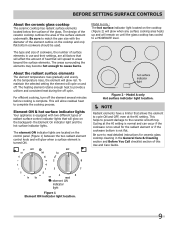
To maintain the selected setting the element will glow red. Element ON & hot surface indicator lights
Your appliance is complete. Model A only Hot surface indicator light...to read detailed instructions for ceramic glass cooktop cleaning in use and their settings, are located on and off , even at the HI setting is normal and...Guide. Be sure to areas beyond the surface elements.
Complete Owner's Guide (English) - Page 10
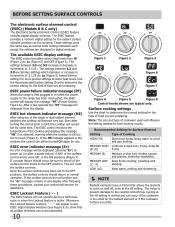
... indicator message (PF)
When the range is first plugged in increments of ...servicer for the kind of the surface control knobs to determine the correct setting...set to the OFF positions, the surface controls should occur, be displayed (glowing "Er") at the HI setting. ESEC error indicator message (Er)
An error...Setting surface controls
The electronic surface element control (ESEC) (Models...
Complete Owner's Guide (English) - Page 13
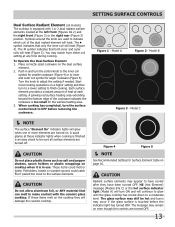
... though the controls are turned off . The symbol indicates that both inner and outer coils will turn to a lower setting to make contact with 1 or 2 dual radiant surface elements located at each setting. Model B
Figure 3 - Push in use. CAUTION
Do not allow aluminum foil, or ANY material that can melt to finish cooking...
Complete Owner's Guide (English) - Page 14
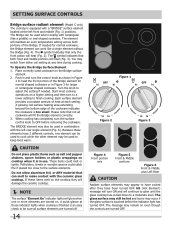
... element can be used to cook while the other element may switch from either coil setting at each setting. You may be used when cooking with rectangular (like a single element without the Bridge... to heat the front portion of heat at any time during cooking. setting surface controls
Bridge surface radiant element (Model C only)
The cooktop is equipped with a "BRIDGE" surface element ...
Complete Owner's Guide (English) - Page 18
...manual. CAUTION
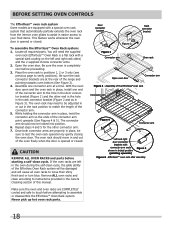
REMOVE ALL OVEN RACKS and parts before proceeding. 3. You will cause all required parts... range and pointing towards oven bottom (See Figure 2). 4. Never pick up hot oven rack parts....in or out in the rack position to instructions provided in the Care & Cleaning section of...cycle. BEFORE SETTING OVEN CONTROLS
The Effortless™ oven rack system Some models are equipped ...
Complete Owner's Guide (English) - Page 28
... 2.
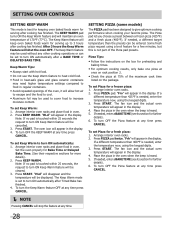
• Check the pizza at any time press CANCEL. Pizza Tips:
• Follow the instructions on the package.
"Fro" will stop the feature at 75% of the maximum cook time
listed ...but this is not part of 170°F (77°C). Press PIZZA pad twice. Press START. To turn ON automatically: 1. The Keep Warm feature will be entered.
SETTING PIZZA (some models)
The PIZZA pad...
Complete Owner's Guide (English) - Page 42

... to correct the problem. Metalmarks. Do not slide metal utensils on for range clearance. If floor is level, cooktop may burn easily. Contact builder or installer to correct the situation.
Check house lights to be sure. Call your local electric company for service. Press CANCEL and call code error (ex.: F11) an authorized servicer for service. Electrical power outage...
Complete Owner's Guide (English) - Page 43
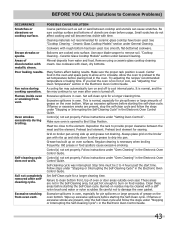
... Follow instructions under General Cleaning.
Grid on oven surfaces. Control(s) not set properly....Glass Cooktop Models" section under "Oven Cleaning" in the Electronic Oven Control Guide. Make...cool internal parts. Mineral deposits from water and food.
Control(s) not set properly. Be...set temperature before placing food in the oven and space pans to allow grease to Common Problems...
Product Specifications Sheet (English) - Page 3
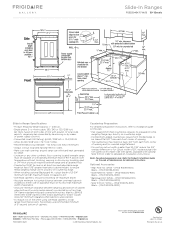
... Backguard Kit, cutout depth of cabinets. Note: For planning purposes only. 30" Electric Slide-In Range Gallery
Slide-In Ranges
FGES3045K F/ W/ B 30" Electric
Slide-In Range Specifications
• Product Shipping Weight (approx.) - 240 Lbs.
• Single phase 3- Insulating pad or 1/4"-thick plywood required between overhead cabinets installed to detailed kit installation instructions).
Frigidaire FGES3045KW Reviews
We have not received any reviews for Frigidaire yet.