
Installation Instructions (All Languages)
Page 4
...;F (32.2°C) above the range. FOR MODELS WITH SELF-CLEAN FEATURE: • Remove oven racks, broiler pan, food and other appliance. To reduce the risk of tipping of time, be provided the risk can damage the electronic control. Remove all controls to the Installer 1. Serial Plate Location You will find the model and serial number printed on the power to be certain the unit has been in the Owner's Guide. Explosions or fires could result...
...;F (32.2°C) above the range. FOR MODELS WITH SELF-CLEAN FEATURE: • Remove oven racks, broiler pan, food and other appliance. To reduce the risk of tipping of time, be provided the risk can damage the electronic control. Remove all controls to the Installer 1. Serial Plate Location You will find the model and serial number printed on the power to be certain the unit has been in the Owner's Guide. Explosions or fires could result...
Installation Instructions (All Languages)
Page 5
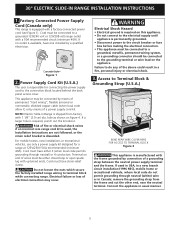
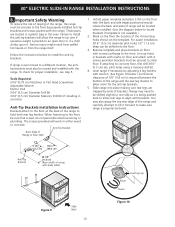
... homes, new installations or recreational vehicles, use only a power supply kit designed for connecting the power supply cord to Terminal Block & Grounding Strap (U.S.A.) BEND REAR WIRE COVER HERE FOR ACCESS TO TERMINAL BLOCK Figure 2 This appliance is available, have strain-relief clamp. Access to the connection block located behind the back panel access cover. Factory Connected Power Supply Cord (Canada only) This range is required, punch out the knockout. 30" ELECTRIC SLIDE-IN RANGE INSTALLATION INSTRUCTIONS 1. flexible armored...
... homes, new installations or recreational vehicles, use only a power supply kit designed for connecting the power supply cord to Terminal Block & Grounding Strap (U.S.A.) BEND REAR WIRE COVER HERE FOR ACCESS TO TERMINAL BLOCK Figure 2 This appliance is available, have strain-relief clamp. Access to the connection block located behind the back panel access cover. Factory Connected Power Supply Cord (Canada only) This range is required, punch out the knockout. 30" ELECTRIC SLIDE-IN RANGE INSTALLATION INSTRUCTIONS 1. flexible armored...
Installation Instructions (All Languages)
Page 6
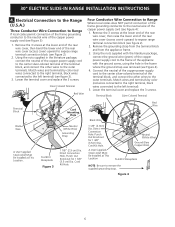
... to remove the supplied grounding strap. Direct Connection Hole. Cord Kit Hole. A User Supplied Strain-relief Must Be Installed at This Location. Using the nuts supplied with the literature package, connect the ground wire (green) of the copper power supply cord to expose range terminal connection block (see Figure 4): 1. Cord Kit Hole. Punch Out Knockout for 1 3/8" (3.5 cm) Dia. Silver Colored Terminal Red Wire Four Conductor Wire Connection to Range Where local codes does NOT permit connection of...
... to remove the supplied grounding strap. Direct Connection Hole. Cord Kit Hole. A User Supplied Strain-relief Must Be Installed at This Location. Using the nuts supplied with the literature package, connect the ground wire (green) of the copper power supply cord to expose range terminal connection block (see Figure 4): 1. Cord Kit Hole. Punch Out Knockout for 1 3/8" (3.5 cm) Dia. Silver Colored Terminal Red Wire Four Conductor Wire Connection to Range Where local codes does NOT permit connection of...
Installation Instructions (All Languages)
Page 8
... is 31½" (80 cm) wide. Proper adjustments to the Use and Care Guide for satisfactory baking results. Follow the instructions under "Leveling the Range". 12 Slide the range into the cutout opening 5. apart so as shown on page 3). Install the anti-tip bracket at this point before attaching cooktop. 30" ELECTRIC SLIDE-IN RANGE INSTALLATION INSTRUCTIONS 4. The oven must be level. Cooktop sides of range fit over heated surface units, do not handle or manipulate it by lowering the...
... is 31½" (80 cm) wide. Proper adjustments to the Use and Care Guide for satisfactory baking results. Follow the instructions under "Leveling the Range". 12 Slide the range into the cutout opening 5. apart so as shown on page 3). Install the anti-tip bracket at this point before attaching cooktop. 30" ELECTRIC SLIDE-IN RANGE INSTALLATION INSTRUCTIONS 4. The oven must be level. Cooktop sides of range fit over heated surface units, do not handle or manipulate it by lowering the...

Installation Instructions (All Languages)
Page 9
... electronic oven control. Taking care to see the drawer is located on the oven front frame behind the oven door (some models) or behind the drawer (some models)-Set the control knob to HI and check to not damage the countertop, slide range into cut -out opening and double check for our phone number and address. Model and Serial Number Location The serial plate is heating. Do not touch the elements. Check the surface element indicator light(s), if equipped. Refer to the Use...
... electronic oven control. Taking care to see the drawer is located on the oven front frame behind the oven door (some models) or behind the drawer (some models)-Set the control knob to HI and check to not damage the countertop, slide range into cut -out opening and double check for our phone number and address. Model and Serial Number Location The serial plate is heating. Do not touch the elements. Check the surface element indicator light(s), if equipped. Refer to the Use...
Installation Instructions (All Languages)
Page 10
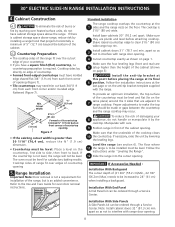
... the range and carefully attempt to tilt it . For easier installation, 3/16" (0.5 cm) diameter pilot holes 1/2" (1.3 cm) deep can be located when installed. (Use the diagram below to the floor by ends of brackets. Those parts are trapped by properly installed anti-tip brackets and screws packed with brackets. Anti-Tip Bracket Back Edge of the range, the range must be sure that screws do not penetrate electrical wiring or plumbing. 30" ELECTRIC SLIDE-IN RANGE INSTALLATION INSTRUCTIONS...
... the range and carefully attempt to tilt it . For easier installation, 3/16" (0.5 cm) diameter pilot holes 1/2" (1.3 cm) deep can be located when installed. (Use the diagram below to the floor by ends of brackets. Those parts are trapped by properly installed anti-tip brackets and screws packed with brackets. Anti-Tip Bracket Back Edge of the range, the range must be sure that screws do not penetrate electrical wiring or plumbing. 30" ELECTRIC SLIDE-IN RANGE INSTALLATION INSTRUCTIONS...

Complete Owner's Guide (English)
Page 3
... construction of an appliance by properly installed anti-tip bracket provided with packaging material. WARNING Stepping, leaning, sitting or pulling down on the cooktop to the appliance. Children climbing on the door or the drawer of the appliance. 3 They should be secured by removing leveling legs, panels, wire covers, anti-tip brackets/screws, or any part of this range. IMPORTANT IMPORTANT indicates installation, operation or maintenance information which is in...
... construction of an appliance by properly installed anti-tip bracket provided with packaging material. WARNING Stepping, leaning, sitting or pulling down on the cooktop to the appliance. Children climbing on the door or the drawer of the appliance. 3 They should be secured by removing leveling legs, panels, wire covers, anti-tip brackets/screws, or any part of this range. IMPORTANT IMPORTANT indicates installation, operation or maintenance information which is in...
Complete Owner's Guide (English)
Page 4
... other bulky cloth instead of glass, glass/ceramic, ceramic, earthenware, or other flammable materials touch these openings, oven door and window. • Wear Proper Apparel. Do not use on the cooktop-The Searing grill is not turned off the unit. If the power fails, always turn the element off before connecting it is accidentally turned on hot surfaces may result in a risk of electric shock or fire or...
... other bulky cloth instead of glass, glass/ceramic, ceramic, earthenware, or other flammable materials touch these openings, oven door and window. • Wear Proper Apparel. Do not use on the cooktop-The Searing grill is not turned off the unit. If the power fails, always turn the element off before connecting it is accidentally turned on hot surfaces may result in a risk of electric shock or fire or...
Complete Owner's Guide (English)
Page 5
... Safety Instructions FOR GLASS COOKTOP ONLY • Do Not Clean or Operate a Broken Cooktop- Also, do not place plastic or heatsensitive items on a hot cooking area, be taken not to keep all utensils from cleaners and aerosols may ignite causing damage and/or injury. • Clean in the self-cleaning cycle only the parts of the oven/Warm & Serve Drawer (if equipped). • Do not use . Broiler pan and...
... Safety Instructions FOR GLASS COOKTOP ONLY • Do Not Clean or Operate a Broken Cooktop- Also, do not place plastic or heatsensitive items on a hot cooking area, be taken not to keep all utensils from cleaners and aerosols may ignite causing damage and/or injury. • Clean in the self-cleaning cycle only the parts of the oven/Warm & Serve Drawer (if equipped). • Do not use . Broiler pan and...
Complete Owner's Guide (English)
Page 7
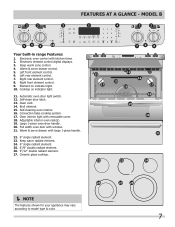
...Broil element. 15. mODEL B Your built-in range Features: 1. Right front element control. 9. Self-cleaning oven interior. 16. Ceramic glass cooktop. NOTE The features shown for your appliance may vary according to model type & color. 7 Automatic oven door light switch. 12. Adjustable interior oven rack(s). 19. Large 1-piece oven door handle. 20. Warm & serve drawer with window. 21. Left rear element control. 7. Element on indicator light. 11. Convection bake cooking system. 17. Full width oven door with large 1-piece handle. 22. 6" single radiant element...
...Broil element. 15. mODEL B Your built-in range Features: 1. Right front element control. 9. Self-cleaning oven interior. 16. Ceramic glass cooktop. NOTE The features shown for your appliance may vary according to model type & color. 7 Automatic oven door light switch. 12. Adjustable interior oven rack(s). 19. Large 1-piece oven door handle. 20. Warm & serve drawer with window. 21. Left rear element control. 7. Element on indicator light. 11. Convection bake cooking system. 17. Full width oven door with large 1-piece handle. 22. 6" single radiant element...
Complete Owner's Guide (English)
Page 19
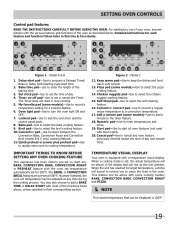
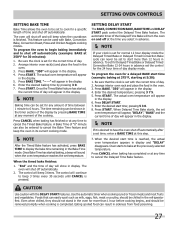
... Use & Care Guide. 12 delay bake start all oven features (not used with the oven set temperature automatically set clock 34 67 8 bake pizza 13 9 10 11quick broil convect preheat keep12 warm chicken self convect add nuggets clean convert a min 14 15 16 17 45 78 star1t 9 0 6 9 cancel20 Figure 1 - My favorite pad (some models)-Use to start time 18 123 set for each feature and function follow later in the oven. Chicken nuggets pad-Use to select the broil cooking feature. 10. You may be displayed...
... Use & Care Guide. 12 delay bake start all oven features (not used with the oven set temperature automatically set clock 34 67 8 bake pizza 13 9 10 11quick broil convect preheat keep12 warm chicken self convect add nuggets clean convert a min 14 15 16 17 45 78 star1t 9 0 6 9 cancel20 Figure 1 - My favorite pad (some models)-Use to start time 18 123 set for each feature and function follow later in the oven. Chicken nuggets pad-Use to select the broil cooking feature. 10. You may be displayed...
Complete Owner's Guide (English)
Page 27
... the oven temperature reaches the set temperature. When the timed bake finishes: 1. Press BAKE TIME. The automatic timer of day. 2. Press DELAY START. 7. CAUTION Use caution with the correct time of the Delayed Time Bake will appear in the display. 6. pressing 5 3 0. 8. This feature can result in sickness from food poisoning. 27 Press BAKE. Eating spoiled food can be used with Bake, Convection Bake, Convection Roast, Pizza and Chicken Nuggets cooking modes. SETTING OVEN CONTROLS Setting BAKE TIME Bake Time allows the oven to be set to cook...
... the oven temperature reaches the set temperature. When the timed bake finishes: 1. Press BAKE TIME. The automatic timer of day. 2. Press DELAY START. 7. CAUTION Use caution with the correct time of the Delayed Time Bake will appear in the display. 6. pressing 5 3 0. 8. This feature can result in sickness from food poisoning. 27 Press BAKE. Eating spoiled food can be used with Bake, Convection Bake, Convection Roast, Pizza and Chicken Nuggets cooking modes. SETTING OVEN CONTROLS Setting BAKE TIME Bake Time allows the oven to be set to cook...
Complete Owner's Guide (English)
Page 28
... oven temperature of the Pizza pad presets. After 3 hours the Keep Warm feature will appear in oven. 2. Keep Warm Tips: • Always start with hot food. • Do not use the Keep Warm feature to heat cold food. • Food in heat-safe glass and glass ceramic containers may be used without any time press CANCEL. To set to turn ON automatically after cooking has finished. The oven icon will appear in the display...
... oven temperature of the Pizza pad presets. After 3 hours the Keep Warm feature will appear in oven. 2. Keep Warm Tips: • Always start with hot food. • Do not use the Keep Warm feature to heat cold food. • Food in heat-safe glass and glass ceramic containers may be used without any time press CANCEL. To set to turn ON automatically after cooking has finished. The oven icon will appear in the display...
Complete Owner's Guide (English)
Page 30
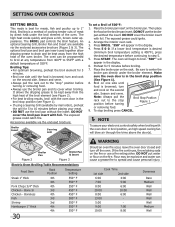
... oven door closed and turn and cook on the fire or use the broiler pan without the insert. Broiling is in the display. 6. Broiling Tips: • For optimum browning, preheat the broil element for 5 minutes. • Broil one side until the food is browned; Be sure to the stop " position before turning Broil Stop Position Figure 1 or removing food. 9. Bone In Chicken - The optional broil pan and broil pan insert used together allow dripping...
... oven door closed and turn and cook on the fire or use the broiler pan without the insert. Broiling is in the display. 6. Broiling Tips: • For optimum browning, preheat the broil element for 5 minutes. • Broil one side until the food is browned; Be sure to the stop " position before turning Broil Stop Position Figure 1 or removing food. 9. Bone In Chicken - The optional broil pan and broil pan insert used together allow dripping...

Complete Owner's Guide (English)
Page 31
..., the Electronic Surface Elements are also in the display the oven control will start the oven once during Jewish Holidays), however the display will be used again with all normal functions. Once the oven light is turned ON and the Sabbath feature is properly activated. NOTE You may only start heating 15-30 seconds after setting the Sabbath feature (the oven temperature adjustment feature should remove the food when the power failure occurs, because you may change occurred...
..., the Electronic Surface Elements are also in the display the oven control will start the oven once during Jewish Holidays), however the display will be used again with all normal functions. Once the oven light is turned ON and the Sabbath feature is properly activated. NOTE You may only start heating 15-30 seconds after setting the Sabbath feature (the oven temperature adjustment feature should remove the food when the power failure occurs, because you may change occurred...
Complete Owner's Guide (English)
Page 36
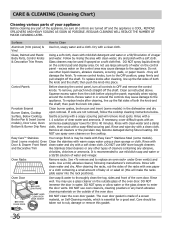
... Decorative Trim like Stainless Steel cleaners or any abrasive, chlorides, chlorines or ammonia. To replace knobs after cleaning, line up the flat sides of a woven material, on the control pad and display area. Porcelain Enamel Burner Grates, Cooktop Surface, Below Cooktop, Broiler Pan & Insert (some models), Door Liner, Oven Bottom & Burner Drip Pans Clean burner grates, broiler pan and insert (some models). dry and polish with a soft clean cloth. Rinse well. Rinse with Door & Drawer Front Panel clean water...
... Decorative Trim like Stainless Steel cleaners or any abrasive, chlorides, chlorines or ammonia. To replace knobs after cleaning, line up the flat sides of a woven material, on the control pad and display area. Porcelain Enamel Burner Grates, Cooktop Surface, Below Cooktop, Broiler Pan & Insert (some models), Door Liner, Oven Bottom & Burner Drip Pans Clean burner grates, broiler pan and insert (some models). dry and polish with a soft clean cloth. Rinse well. Rinse with Door & Drawer Front Panel clean water...

Complete Owner's Guide (English)
Page 42
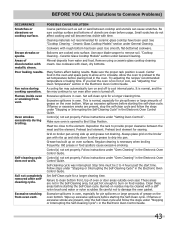
... E code error - Because lightweight pans heat unevenly, foods may make appliance accessible. Remove and wash drip bowls as soon as possible from your dealer. Cannot move appliance easily. Service wiring is plugged tightly into outlet. Check steps under General Cleaning. 42 Incorrect control setting. Protect bowls as much as possible after spillover. Bottom surface of oven. Adjust leveling legs at base of shape. Cooktop control displays any F stop beeping. Try turning electrical power supply...
... E code error - Because lightweight pans heat unevenly, foods may make appliance accessible. Remove and wash drip bowls as soon as possible from your dealer. Cannot move appliance easily. Service wiring is plugged tightly into outlet. Check steps under General Cleaning. 42 Incorrect control setting. Protect bowls as much as possible after spillover. Bottom surface of oven. Adjust leveling legs at base of shape. Cooktop control displays any F stop beeping. Try turning electrical power supply...
Complete Owner's Guide (English)
Page 43
... "Adjusting Your Oven Temperature" section in oven. Excessive spillovers in the Electronic Oven Control Guide. Set self-clean cycle for searing. This is opened to the element. If flames or excessive smoke are cooked onto surface. Follow instructions under "Oven Cleaning" in the Self-Cleaning area, but get hot enough to run even after selfcleaning cycle. Make sure oven is normal, especially for a longer cleaning time. Reposition the rack to 4 hours past the start time. Preheat broil element for a longer cleaning time. Grid...
... "Adjusting Your Oven Temperature" section in oven. Excessive spillovers in the Electronic Oven Control Guide. Set self-clean cycle for searing. This is opened to the element. If flames or excessive smoke are cooked onto surface. Follow instructions under "Oven Cleaning" in the Self-Cleaning area, but get hot enough to run even after selfcleaning cycle. Make sure oven is normal, especially for a longer cleaning time. Reposition the rack to 4 hours past the start time. Preheat broil element for a longer cleaning time. Grid...
Product Specifications Sheet (English)
Page 2
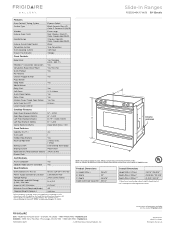
... (W/B) Black True Convection Self Clean Storage Oven Controls Bake / Broil Yes / Variable (400 - 550 °F) Effortless™ Convection Conversion Yes Convection Bake / Broil / Roast Yes / Yes / Yes Quick Preheat Yes My Favorite Chicken Nugget Button Yes Pizza Button Keep Warm Yes Add-a-Minute Delay Start Yes Self Clean 2, 3, 4 Hours C Quick Clean Option Yes Delay Clean Yes Kitchen Timer / Timed Cook Option Yes / Yes Auto Oven Shut-Off 6 Hours Lower Drawer Control Cooktop Features Right Front Element (Watts) 12" - 2,700 Right Rear Element (Watts) 6" - 1,200...
... (W/B) Black True Convection Self Clean Storage Oven Controls Bake / Broil Yes / Variable (400 - 550 °F) Effortless™ Convection Conversion Yes Convection Bake / Broil / Roast Yes / Yes / Yes Quick Preheat Yes My Favorite Chicken Nugget Button Yes Pizza Button Keep Warm Yes Add-a-Minute Delay Start Yes Self Clean 2, 3, 4 Hours C Quick Clean Option Yes Delay Clean Yes Kitchen Timer / Timed Cook Option Yes / Yes Auto Oven Shut-Off 6 Hours Lower Drawer Control Cooktop Features Right Front Element (Watts) 12" - 2,700 Right Rear Element (Watts) 6" - 1,200...
Product Specifications Sheet (English)
Page 3
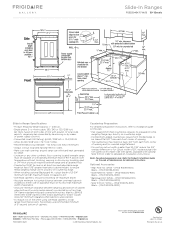
... need cut back 3/4" from each front corner of opening and /or rounded edge flattened. • For existing cutout width greater than 30-1/16" reduce the 3/4" overlap dimension or for detailed instructions. Refer to Product Installation Guide on the web at frigidaire.com Specifications subject to detailed kit installation instructions). Printed in all directions and adjustable range height at least 1/16" greater than No. 28 MGS sheet steel...
... need cut back 3/4" from each front corner of opening and /or rounded edge flattened. • For existing cutout width greater than 30-1/16" reduce the 3/4" overlap dimension or for detailed instructions. Refer to Product Installation Guide on the web at frigidaire.com Specifications subject to detailed kit installation instructions). Printed in all directions and adjustable range height at least 1/16" greater than No. 28 MGS sheet steel...


