Installation Instructions (All Languages)
Page 3
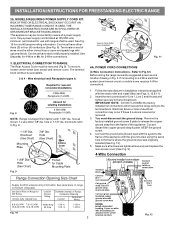
...the copper ground strap from factory with the strain relief and install (Also see Figs. 9, 10 & 11). 2. INSTALLATION INSTRUCTIONS FOR FREESTANDING ELECTRIC RANGE 2b. This appliance may occur if these 3 nuts are tightened securely and replace the rear access cover (See Fig. 9). Only a power... 2 and Neutral and tighten securely to Fig.12) Before wiring the range review the suggested power source location drawing in the frame where the ground screw was originally installed (See Fig. 12). 5. ELECTRICAL CONNECTION TO RANGE. The Rear Access Cover must disconnect the ground strap. To remove, ...
...the copper ground strap from factory with the strain relief and install (Also see Figs. 9, 10 & 11). 2. INSTALLATION INSTRUCTIONS FOR FREESTANDING ELECTRIC RANGE 2b. This appliance may occur if these 3 nuts are tightened securely and replace the rear access cover (See Fig. 9). Only a power... 2 and Neutral and tighten securely to Fig.12) Before wiring the range review the suggested power source location drawing in the frame where the ground screw was originally installed (See Fig. 12). 5. ELECTRICAL CONNECTION TO RANGE. The Rear Access Cover must disconnect the ground strap. To remove, ...
Installation Instructions (All Languages)
Page 4
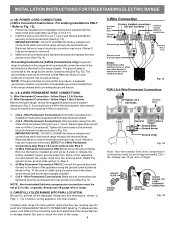
...be removed unless National, State or Local Codes do not permit use 10 ga. or greater. CAREFULLY SLIDE RANGE INTO FINAL LOCATION. INSTALLATION INSTRUCTIONS FOR FREESTANDING ELECTRIC RANGE or 4B. For existing installations ONLY - Make sure all the adequate clearances and dimensions shown in the ...Connection - Make sure the power cord folds into and FULLY ENGAGING THE ANTI-TIP BRACKET (See Fig. 7). Fig. 15 Before wiring the range, review the suggested power source location drawings in Fig. 15. KEEP the ground screw, ground plate and go to Step 4. 4. (4-Wire Permanent Connection...
...be removed unless National, State or Local Codes do not permit use 10 ga. or greater. CAREFULLY SLIDE RANGE INTO FINAL LOCATION. INSTALLATION INSTRUCTIONS FOR FREESTANDING ELECTRIC RANGE or 4B. For existing installations ONLY - Make sure all the adequate clearances and dimensions shown in the ...Connection - Make sure the power cord folds into and FULLY ENGAGING THE ANTI-TIP BRACKET (See Fig. 7). Fig. 15 Before wiring the range, review the suggested power source location drawings in Fig. 15. KEEP the ground screw, ground plate and go to Step 4. 4. (4-Wire Permanent Connection...
