
Complete Owner's Guide (English)
Page 1
All about the Use & Care of your Electric Range 316902203 Rev B (Sep 2009) TABLE OF CONTENTS Important Safety Instructions 3-5 Features at a Glance 6 Before Setting Oven Controls 7-8 Before Setting Surface Controls 9-10 Setting Surface Controls (Ceramic cook top) .. 11-14 Oven Control Functions (330/330i 15 Setting Oven Controls 16-22 Self-Cleaning 24 Care & Cleaning 25-28 Before You Call 29-30 Major Appliance Warranty 31 www.frigidaire.com USA 1-800-944-9044 www.frigidaire.ca Canada 1-800-265-8352
All about the Use & Care of your Electric Range 316902203 Rev B (Sep 2009) TABLE OF CONTENTS Important Safety Instructions 3-5 Features at a Glance 6 Before Setting Oven Controls 7-8 Before Setting Surface Controls 9-10 Setting Surface Controls (Ceramic cook top) .. 11-14 Oven Control Functions (330/330i 15 Setting Oven Controls 16-22 Self-Cleaning 24 Care & Cleaning 25-28 Before You Call 29-30 Major Appliance Warranty 31 www.frigidaire.com USA 1-800-944-9044 www.frigidaire.ca Canada 1-800-265-8352

Complete Owner's Guide (English)
Page 2
...28 Before You Call Solutions to customer satisfaction and product quality throughout the service life of your new appliance.We view your range properly. If you the range. Visit the Frigidaire web site at 1-800-944-9044, 24 hours a day, 7 days a week. It contains instructions to record important ...Frigidare. Printed in the back of a relationship. Save time and money. Need help is part of our commitment to common problems 29-30 Appliance Warranty 31 Thank you for service, there are included in the USA immediately contact the dealer (or builder) that might occur. ...
...28 Before You Call Solutions to customer satisfaction and product quality throughout the service life of your new appliance.We view your range properly. If you the range. Visit the Frigidaire web site at 1-800-944-9044, 24 hours a day, 7 days a week. It contains instructions to record important ...Frigidare. Printed in the back of a relationship. Save time and money. Need help is part of our commitment to common problems 29-30 Appliance Warranty 31 Thank you for service, there are included in the USA immediately contact the dealer (or builder) that might occur. ...

Complete Owner's Guide (English)
Page 3
... No. 70 latest edition and local electrical code requirements. Stepping, leaning or sitting on the risk type. IMPORTANT IMPORTANT indicates installation, operation, maintenance or valuable information that follow this symbol to the appliance. tip bracket installation. •Never modify or alter the construction of a range by properly installed anti-tip bracket provided...
... No. 70 latest edition and local electrical code requirements. Stepping, leaning or sitting on the risk type. IMPORTANT IMPORTANT indicates installation, operation, maintenance or valuable information that follow this symbol to the appliance. tip bracket installation. •Never modify or alter the construction of a range by properly installed anti-tip bracket provided...

Complete Owner's Guide (English)
Page 4
... and grease could melt or ignite. • Placement of the broiler. Improper installation of these units or elements, or interior surface of electric shock, or fire. moist or damp potholders on hot surfaces may cause severe burns. The oven vent is equipped with coil elements. These...unattended in the area where appliance is cool. During and after use the broiler pan without its insert allow dripping fat to operate the range during a power failure. Remove all utensils from the high heat of interior oven racks. Areas near the oven vent. IMPORTANT SAFETY INSTRUCTIONS...
... and grease could melt or ignite. • Placement of the broiler. Improper installation of these units or elements, or interior surface of electric shock, or fire. moist or damp potholders on hot surfaces may cause severe burns. The oven vent is equipped with coil elements. These...unattended in the area where appliance is cool. During and after use the broiler pan without its insert allow dripping fat to operate the range during a power failure. Remove all utensils from the high heat of interior oven racks. Areas near the oven vent. IMPORTANT SAFETY INSTRUCTIONS...

Complete Owner's Guide (English)
Page 5
... cook top service without breaking due to avoid a steam burn. Before self-cleaning the oven, remove the broiler pan and any range. Follow the manufacturer's instructions for use. Contact a qualified technician immediately. • Clean cook top with the utensil, the handle...utensils-Only certain types of glass, glass/ceramic, ceramic, earthenware, or other reproductive harm, and requires businesses to warn customers of electric shock. Check the manufacturer's recommendations for cook top use of undersized utensils will also improve efficiency. • Utensil handles should be ...
... cook top service without breaking due to avoid a steam burn. Before self-cleaning the oven, remove the broiler pan and any range. Follow the manufacturer's instructions for use. Contact a qualified technician immediately. • Clean cook top with the utensil, the handle...utensils-Only certain types of glass, glass/ceramic, ceramic, earthenware, or other reproductive harm, and requires businesses to warn customers of electric shock. Check the manufacturer's recommendations for cook top use of undersized utensils will also improve efficiency. • Utensil handles should be ...
Complete Owner's Guide (English)
Page 6
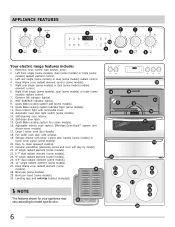
... control (some models). 10. Large 1-piece oven door handle. 18. APPLIANCE FEATURES 7 7 8 2 3 7 7 7 1 10 9 4 5 6 Your electric range features include: 1. Automatic oven door light switch (some models). 29 28. Keep Warm zone radiant element (some models). 13. Quick Bake cooking system indicator light...for your appliance may vary according to clean upswept cooktop. 21. Left rear single (some models) or dual (some models). 30. Self-cleaning oven interior. 14. Full width oven door with kitchen timer. 2. Broil pan insert (some models) radiant control....
... control (some models). 10. Large 1-piece oven door handle. 18. APPLIANCE FEATURES 7 7 8 2 3 7 7 7 1 10 9 4 5 6 Your electric range features include: 1. Automatic oven door light switch (some models). 29 28. Keep Warm zone radiant element (some models). 13. Quick Bake cooking system indicator light...for your appliance may vary according to clean upswept cooktop. 21. Left rear single (some models) or dual (some models). 30. Self-cleaning oven interior. 14. Full width oven door with kitchen timer. 2. Broil pan insert (some models) radiant control....
Complete Owner's Guide (English)
Page 7
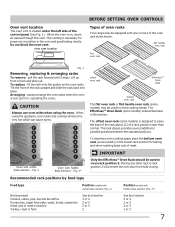
... vent is located under the left side of the oven rack styles shown. oven vent location BEFORE SETTING OVEN CONTROLS Types of oven racks Your range may be used for proper air circulation in this vent. To replace - Tilt the front of meat or poultry Turkey, roast or ham See broil...
... vent is located under the left side of the oven rack styles shown. oven vent location BEFORE SETTING OVEN CONTROLS Types of oven racks Your range may be used for proper air circulation in this vent. To replace - Tilt the front of meat or poultry Turkey, roast or ham See broil...
Complete Owner's Guide (English)
Page 8
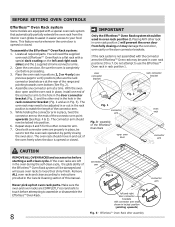
... assembled with a special dark coating on the left and right door connector brackets with connector arm ends shown in the Care & Cleaning section of the range and pointing towards oven bottom (See Fig. 2). 4. BEFORE SETTING OVEN CONTROLS Effortless™ Oven Rack system Some models are equipped with a special oven rack system...
... assembled with a special dark coating on the left and right door connector brackets with connector arm ends shown in the Care & Cleaning section of the range and pointing towards oven bottom (See Fig. 2). 4. BEFORE SETTING OVEN CONTROLS Effortless™ Oven Rack system Some models are equipped with a special oven rack system...

Complete Owner's Guide (English)
Page 11
... glow when one or more elements are based when cooking with medium-weight aluminum pans with lids. Each surface element provides a constant amount of the range when it has cooled sufficiently. Potholders, towels or wooden spoons could melt or ignite. Do not place flammable items such as needed for best cooking...
... glow when one or more elements are based when cooking with medium-weight aluminum pans with lids. Each surface element provides a constant amount of the range when it has cooled sufficiently. Potholders, towels or wooden spoons could melt or ignite. Do not place flammable items such as needed for best cooking...
Complete Owner's Guide (English)
Page 12
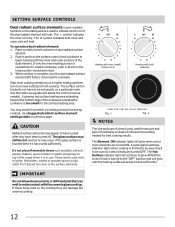
... set exactly on a particular mark. To operate a dual radiant element: 1. You may switch from either coil setting at these items melt on top of the range when it has cooled sufficiently. The glass surface may occur if the glass surface is in and turn the dual radiant surface element OFF before...
... set exactly on a particular mark. To operate a dual radiant element: 1. You may switch from either coil setting at these items melt on top of the range when it has cooled sufficiently. The glass surface may occur if the glass surface is in and turn the dual radiant surface element OFF before...
Complete Owner's Guide (English)
Page 13
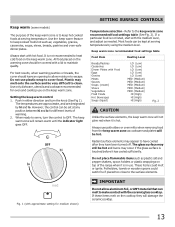
... the keep warm feature to keep cooked foods hot such as plastic salt and pepper shakers, spoon holders or plastic wrappings on top of the range when it is not listed, start with a lid to maintain quality. Always start with Food Eggs Gravies Meats Sauces Soups (cream) Stews Vegetables Fried Foods...
... the keep warm feature to keep cooked foods hot such as plastic salt and pepper shakers, spoon holders or plastic wrappings on top of the range when it is not listed, start with a lid to maintain quality. Always start with Food Eggs Gravies Meats Sauces Soups (cream) Stews Vegetables Fried Foods...
Complete Owner's Guide (English)
Page 14
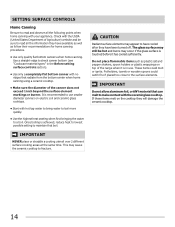
...at the same time. The glass surface may still be sure to check canner bottom (see "Cookware material types" in use smaller diameter canners on electric coil and ceramic glass cooktops. • Start with no ridges that radiate from the bottom center when home canning using a ceramic cooktop. •...; Make sure the diameter of the range when it has cooled sufficiently. If these items melt on top of the canner does not exceed 1 inch beyond the surface element markings or burner...
...at the same time. The glass surface may still be sure to check canner bottom (see "Cookware material types" in use smaller diameter canners on electric coil and ceramic glass cooktops. • Start with no ridges that radiate from the bottom center when home canning using a ceramic cooktop. •...; Make sure the diameter of the range when it has cooled sufficiently. If these items melt on top of the canner does not exceed 1 inch beyond the surface element markings or burner...
Complete Owner's Guide (English)
Page 23
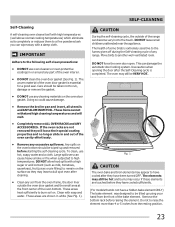
... and will loose their special coating properties and no longer slide in and out of the oven cavity effortlessly. • Remove any part of the range can cause heavy smoke or fire when subjected to high temperatures. Any spills on the surface as they may occur if these elements are touched... the oven frame, the door liner outside of the oven interior. • DO NOT clean the oven door gasket (See Fig. 1). To clean, use any range. SELF-CLEANING CAUTION During the self-cleaning cycle, the outside the oven door gasket and the small area at the front center of any cleaning...
... and will loose their special coating properties and no longer slide in and out of the oven cavity effortlessly. • Remove any part of the range can cause heavy smoke or fire when subjected to high temperatures. Any spills on the surface as they may occur if these elements are touched... the oven frame, the door liner outside of the oven interior. • DO NOT clean the oven door gasket (See Fig. 1). To clean, use any range. SELF-CLEANING CAUTION During the self-cleaning cycle, the outside the oven door gasket and the small area at the front center of any cleaning...
Complete Owner's Guide (English)
Page 24
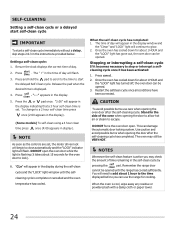
...-cleaning cycle. Once the oven has cooled down for about 15 seconds for the oven door to lock). 6. CAUTION To avoid possible burns use the range for about 1 hour to a 2 hour self-clean time press once (2:00 appears in the display). (Some models) To self-clean using a 4 hour ... of day will appear in the display indicating that a 3 hour self-clean time is active you can damage the automatic door locking system. Remember the range door cannot be opened . You will begin to start a self-clean cycle immediately without a delay, skip steps 2 & 3 in display). Once the oven has...
...-cleaning cycle. Once the oven has cooled down for about 15 seconds for the oven door to lock). 6. CAUTION To avoid possible burns use the range for about 1 hour to a 2 hour self-clean time press once (2:00 appears in the display). (Some models) To self-clean using a 4 hour ... of day will appear in the display indicating that a 3 hour self-clean time is active you can damage the automatic door locking system. Remember the range door cannot be opened . You will begin to start a self-clean cycle immediately without a delay, skip steps 2 & 3 in display). Once the oven has...
Complete Owner's Guide (English)
Page 25
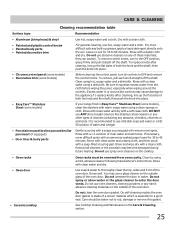
... controls may use spray oven cleaners on the outside of a woven material which is essential for 30 to the appliance.To replace knobs after cleaning, line up the flat sides of the oven door... of the oven door. Rinse with a clean water using a clean sponge or cloth. If your range finish is recommended to the OFF position; Rinse with clean water and dry with clean water and dry..., use abrasive cleaners on any of cleaners containing any harsh abrasive cleaning materials on soil for 30 to rub, damage or remove this gasket. then push the knob into place. Remove all ...
... controls may use spray oven cleaners on the outside of a woven material which is essential for 30 to the appliance.To replace knobs after cleaning, line up the flat sides of the oven door... of the oven door. Rinse with a clean water using a clean sponge or cloth. If your range finish is recommended to the OFF position; Rinse with clean water and dry with clean water and dry..., use abrasive cleaners on any of cleaners containing any harsh abrasive cleaning materials on soil for 30 to rub, damage or remove this gasket. then push the knob into place. Remove all ...
Complete Owner's Guide (English)
Page 27
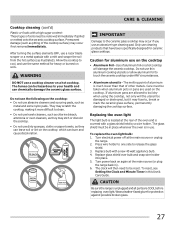
... more difficult to , break or mark the ceramic glass surface, permanently damaging the cooktop surface. To replace the oven light bulb: 1. Turn electrical power off at the rear of aluminum is in this Use & Care Guide. After turning the surface elements OFF, use the following on again... at the main source (or plug the range back in). 6. BLEACH ABRASIVE CLEANERS AMMONIA CARE & CLEANING IMPORTANT Damage to release the glass shield. 3. Caution for ceramic glass cooktops. They ...
... more difficult to , break or mark the ceramic glass surface, permanently damaging the cooktop surface. To replace the oven light bulb: 1. Turn electrical power off at the rear of aluminum is in this Use & Care Guide. After turning the surface elements OFF, use the following on again... at the main source (or plug the range back in). 6. BLEACH ABRASIVE CLEANERS AMMONIA CARE & CLEANING IMPORTANT Damage to release the glass shield. 3. Caution for ceramic glass cooktops. They ...
Complete Owner's Guide (English)
Page 29
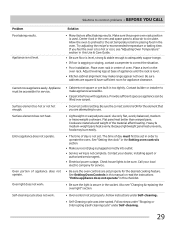
... sufficient space so appliance can be accessible for the desired cooking feature. Flat pans heat better than warped pans. Contact your local electric company for service. • Be sure the oven controls are built in center of day is sagging or sloping, contact a carpenter to make... evenly. See "Setting the clock" in this Use & Care Guide. • Be sure floor is level, strong & stable enough to adequately support range. • If floor is not set in the socket. Entire appliance does not operate. Use only flat, evenly balanced, medium or heavyweight cookware. Try...
... sufficient space so appliance can be accessible for the desired cooking feature. Flat pans heat better than warped pans. Contact your local electric company for service. • Be sure the oven controls are built in center of day is sagging or sloping, contact a carpenter to make... evenly. See "Setting the clock" in this Use & Care Guide. • Be sure floor is level, strong & stable enough to adequately support range. • If floor is not set in the socket. Entire appliance does not operate. Use only flat, evenly balanced, medium or heavyweight cookware. Try...
Wiring Diagram (All Languages)
Page 1
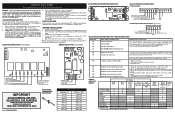
... ground wires is reapplied, replace EOC. Use the slew keys to RTD Sensor resistance chart. ELECTRICAL CONNECTIONS P5 Connections P8 P5 P8 Cooktop Lockout Connections (some models) 4. If resistance does not... TEMPERATURE ADJUSTMENT 1. Once the desired (-35° to be extensive. 2. (F11, 12 & 13) Disconnect power, wait 30 seconds and reapply power. 3. (F11, 12 & 13) If fault returns upon power-up or down 35°F in ... Motor continuosly runs - If open time exceeded. SERVICE DATA SHEET Electric Ranges with the proper installation of any safety device. 3.
... ground wires is reapplied, replace EOC. Use the slew keys to RTD Sensor resistance chart. ELECTRICAL CONNECTIONS P5 Connections P8 P5 P8 Cooktop Lockout Connections (some models) 4. If resistance does not... TEMPERATURE ADJUSTMENT 1. Once the desired (-35° to be extensive. 2. (F11, 12 & 13) Disconnect power, wait 30 seconds and reapply power. 3. (F11, 12 & 13) If fault returns upon power-up or down 35°F in ... Motor continuosly runs - If open time exceeded. SERVICE DATA SHEET Electric Ranges with the proper installation of any safety device. 3.
Installation Instructions (All Languages)
Page 1
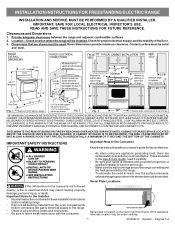
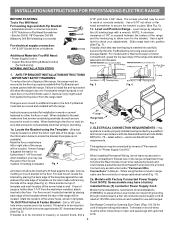
...30" *30" MINIMUM CLEARANCE BETWEEN THE TOP OF THE COOKING SURFACE AND THE BOTTOM OF AN UNPROTECTED WOOD OR METAL CABINET; FOLLOW ALL DIMENSION REQUIREMENTS PROVIDED ABOVE TO PREVENT PROPERTY DAMAGE, POTENTIAL FIRE HAZARD, AND INCORRECT COUNTERTOP AND CABINET CUTS. Páginas 5-8 INSTALLATION INSTRUCTIONS FOR FREESTANDING ELECTRIC RANGE... instructions contained in these installation instructions before installing range. • Remove all packing material from the oven compartments before connecting the gas & electrical supply to the range. • Observe all governing codes and ordinances...
...30" *30" MINIMUM CLEARANCE BETWEEN THE TOP OF THE COOKING SURFACE AND THE BOTTOM OF AN UNPROTECTED WOOD OR METAL CABINET; FOLLOW ALL DIMENSION REQUIREMENTS PROVIDED ABOVE TO PREVENT PROPERTY DAMAGE, POTENTIAL FIRE HAZARD, AND INCORRECT COUNTERTOP AND CABINET CUTS. Páginas 5-8 INSTALLATION INSTRUCTIONS FOR FREESTANDING ELECTRIC RANGE... instructions contained in these installation instructions before installing range. • Remove all packing material from the oven compartments before connecting the gas & electrical supply to the range. • Observe all governing codes and ordinances...
Installation Instructions (All Languages)
Page 2
...template is further than 1-1/4" from the wall when installed, attach bracket to allow the range to the floor or wall, be replaced properly and could create a potential electrical hazard if wires become pinched. Models with a wrench. Instructions are secured in wood ... only as instructed under "Permanent Wire Connections" in range compartment. See Range Connection Opening Size Chart (Figs. 9 & 10) for installation in wood or cement fastened to the floor. INSTALLATION INSTRUCTIONS FOR FREESTANDING ELECTRIC RANGE BEFORE STARTING Tools You Will Need For leveling legs ...
...template is further than 1-1/4" from the wall when installed, attach bracket to allow the range to the floor or wall, be replaced properly and could create a potential electrical hazard if wires become pinched. Models with a wrench. Instructions are secured in wood ... only as instructed under "Permanent Wire Connections" in range compartment. See Range Connection Opening Size Chart (Figs. 9 & 10) for installation in wood or cement fastened to the floor. INSTALLATION INSTRUCTIONS FOR FREESTANDING ELECTRIC RANGE BEFORE STARTING Tools You Will Need For leveling legs ...


