
English manual
Page 4
... 12 Expansion Slots 13 Connectors 15 Jumpers 21 Onboard Buttons 22 Onboard LED Debug 22 Chapter 3 BIOS Description Enter BIOS Setup 24 Main menu 24 Standard BIOS Features 26 Advanced BIOS Features 26 Advanced Chipset Features 32 PCI/PNP Resource Management 35 Boot Configuration Features 36 Power Management Features... 38 BIOS Security Features 42 Fox Central Control Unit 43 Hardware Health Configure 46 Load Optimal Defaults 47 Load Failsafe Defaults 47...
... 12 Expansion Slots 13 Connectors 15 Jumpers 21 Onboard Buttons 22 Onboard LED Debug 22 Chapter 3 BIOS Description Enter BIOS Setup 24 Main menu 24 Standard BIOS Features 26 Advanced BIOS Features 26 Advanced Chipset Features 32 PCI/PNP Resource Management 35 Boot Configuration Features 36 Power Management Features... 38 BIOS Security Features 42 Fox Central Control Unit 43 Hardware Health Configure 46 Load Optimal Defaults 47 Load Failsafe Defaults 47...

English manual
Page 5
Table of Contents Chapter 4 Directions for Bundled Software FOX ONE 50 FOX LiveUpdate 57 FOX LOGO 64 FOX DMI 65 Chapter 5 RAID Configuration Introduction 67 Installing Serial ATA Hard Disks 68 BIOS Configuration 68 RAID BIOS Configuration 68 Creating a RAID Driver Floppy Disk 74 Install OS on HDD with RAID set 74 Appendix CrossFireTM Technology 76
Table of Contents Chapter 4 Directions for Bundled Software FOX ONE 50 FOX LiveUpdate 57 FOX LOGO 64 FOX DMI 65 Chapter 5 RAID Configuration Introduction 67 Installing Serial ATA Hard Disks 68 BIOS Configuration 68 RAID BIOS Configuration 68 Creating a RAID Driver Floppy Disk 74 Install OS on HDD with RAID set 74 Appendix CrossFireTM Technology 76
English manual
Page 6
...in the future. Attention: 1. W e do not guarantee that the content of objects used in order to avoid damage to time, the BIOS description in this manual is suggested to select high-quality, certified fans in this motherboard. com) to your reference. Ensure that your device.... Attention: Please visit the Foxconn English website (http://www.foxconnchannel. It is just for this manual are upgraded from time to the motherboard and CPU due high temperatures....
...in the future. Attention: 1. W e do not guarantee that the content of objects used in order to avoid damage to time, the BIOS description in this manual is suggested to select high-quality, certified fans in this motherboard. com) to your reference. Ensure that your device.... Attention: Please visit the Foxconn English website (http://www.foxconnchannel. It is just for this manual are upgraded from time to the motherboard and CPU due high temperatures....

English manual
Page 27
... 21 To clear and reset the system parameters to modifying any jumper settings. Plug the power cord and turn on the computer, press to enter BIOS setup during POST to pins 2-3. 3.
... 21 To clear and reset the system parameters to modifying any jumper settings. Plug the power cord and turn on the computer, press to enter BIOS setup during POST to pins 2-3. 3.

English manual
Page 29
...This chapter includes the following cases occur: 1. Chapter 3 BIOS Description 3 Chapter This chapter tells how to change system settings through the BIOS Setup menus. Detailed descriptions of the BIOS parameters are also provided. An error message appears on ...the Setup Program when the following information: v Enter BIOS Setup v Main Menu v Standard BIOS Features v Advanced BIOS Features v Advanced Chipset Features v PCI/PNP Resource Management v Boot Configuration Features v Power Management Features v BIOS Security Features v Fox Central Control Unit v Hardware Health...
...This chapter includes the following cases occur: 1. Chapter 3 BIOS Description 3 Chapter This chapter tells how to change system settings through the BIOS Setup menus. Detailed descriptions of the BIOS parameters are also provided. An error message appears on ...the Setup Program when the following information: v Enter BIOS Setup v Main Menu v Standard BIOS Features v Advanced BIOS Features v Advanced Chipset Features v PCI/PNP Resource Management v Boot Configuration Features v Power Management Features v BIOS Security Features v Fox Central Control Unit v Hardware Health...

English manual
Page 30
...enter SETUP Note: W e do not suggest that you make. Main Menu The items in the BIOS Setup, and we shall not be set up through this menu. 2. Standard BIOS Features The basic system configuration can be responsible for the chipset can be changed through this menu, ... item by the menu. 3. Advanced BIOS Features The advanced system features can be optimized. 24 Chapter 3 BIOS Description Enter BIOS Setup The BIOS is the communication bridge between hardware and software, correctly setting up the BIOS parameters is critical to enter the BIOS CMOS Setup Utility. Main Menu The main...
...enter SETUP Note: W e do not suggest that you make. Main Menu The items in the BIOS Setup, and we shall not be set up through this menu. 2. Standard BIOS Features The basic system configuration can be responsible for the chipset can be changed through this menu, ... item by the menu. 3. Advanced BIOS Features The advanced system features can be optimized. 24 Chapter 3 BIOS Description Enter BIOS Setup The BIOS is the communication bridge between hardware and software, correctly setting up the BIOS parameters is critical to enter the BIOS CMOS Setup Utility. Main Menu The main...

English manual
Page 31
However, the stable default values may be affected. 11.Load Failsafe Defaults The Failsafe defaults BIOS settings can be loaded through this menu. 12.Discard Changes Give up through this menu. 8. BIOS Security Features The supervisor and user password can be set up. 7. Fox Central Control Unit This menu is used ...The menu is used for overclocking. 9. PCI/PNP Resource Management The system's PCI/PNP settings and parameters can be modified through this menu. 5. Chapter 3 BIOS Description 4. Power Management Features Through this menu all CMOS value changes and exit setup. 25
However, the stable default values may be affected. 11.Load Failsafe Defaults The Failsafe defaults BIOS settings can be loaded through this menu. 12.Discard Changes Give up through this menu. 8. BIOS Security Features The supervisor and user password can be set up. 7. Fox Central Control Unit This menu is used ...The menu is used for overclocking. 9. PCI/PNP Resource Management The system's PCI/PNP settings and parameters can be modified through this menu. 5. Chapter 3 BIOS Description 4. Power Management Features Through this menu all CMOS value changes and exit setup. 25

English manual
Page 32
... and date. Including [360KB, 51/4 in], [1.2MB, 51/4in], [720KB, 31/2 in], [1.44MB, 31/2 in], [2.88 MB, 31/2 in]. 2. Advanced BIOS Features Advanced BIOS Features Menu 26 Enter new values through the keyboard with and format. 1. Standard BIOS Features Chapter 3 BIOS Description Standard BIOS Features Menu vSystem Time / Date Use this item to be installed.
... and date. Including [360KB, 51/4 in], [1.2MB, 51/4in], [720KB, 31/2 in], [1.44MB, 31/2 in], [2.88 MB, 31/2 in]. 2. Advanced BIOS Features Advanced BIOS Features Menu 26 Enter new values through the keyboard with and format. 1. Standard BIOS Features Chapter 3 BIOS Description Standard BIOS Features Menu vSystem Time / Date Use this item to be installed.

English manual
Page 33
...type of seconds. vConfigure SATA#1 as The option uses to protect the hard disk drive from searching for faster boot times. Press to stop the BIOS from being overwritten. vIDE Detect Time Out (Sec) This item is used to configure SATA 1 / SATA 2. Basically, this allows you to... /Sixth IDE Slave Leave this item at auto to enable the system to allow for IDE devices within the specified number of SATA. Chapter 3 BIOS Description 2.1 IDE Configuration Scroll to this item and press to view the following screen: IDE Configuration Menu vSATA#1 / SATA#2 Configuration This item is...
...type of seconds. vConfigure SATA#1 as The option uses to protect the hard disk drive from searching for faster boot times. Press to stop the BIOS from being overwritten. vIDE Detect Time Out (Sec) This item is used to configure SATA 1 / SATA 2. Basically, this allows you to... /Sixth IDE Slave Leave this item at auto to enable the system to allow for IDE devices within the specified number of SATA. Chapter 3 BIOS Description 2.1 IDE Configuration Scroll to this item and press to view the following screen: IDE Configuration Menu vSATA#1 / SATA#2 Configuration This item is...

English manual
Page 34
... of USB power. 28 The EHCI ownership change should claim by EHCI driver. 2.2.1 USB Mass Storage Device Press to go to enable or disable the BIOS EHCI Hand-Off. vBIOS EHCI Hand-Off This item is used to the next page sub menu. vUSB Power Mode This item is a workaround for... OSes without EHCI hand-Off support . Chapter 3 BIOS Description 2.2 USB Configuration Scroll to this item and press to view the following screen: USB Configuration Menu vLegacy USB Support Legacy USB support refers to...
... of USB power. 28 The EHCI ownership change should claim by EHCI driver. 2.2.1 USB Mass Storage Device Press to go to enable or disable the BIOS EHCI Hand-Off. vBIOS EHCI Hand-Off This item is used to the next page sub menu. vUSB Power Mode This item is a workaround for... OSes without EHCI hand-Off support . Chapter 3 BIOS Description 2.2 USB Configuration Scroll to this item and press to view the following screen: USB Configuration Menu vLegacy USB Support Legacy USB support refers to...

English manual
Page 35
... address and interrupt request address of seconds POST waits for serial ports 1 and 2. 29 Note: Do not try to enable or disable floppy controller. Chapter 3 BIOS Description USB Mass Storage Device Menu vUSB Mass Storage Reset Delay Number of serial port 1 / 2.
... address and interrupt request address of seconds POST waits for serial ports 1 and 2. 29 Note: Do not try to enable or disable floppy controller. Chapter 3 BIOS Description USB Mass Storage Device Menu vUSB Mass Storage Reset Delay Number of serial port 1 / 2.

English manual
Page 36
... AHCI CD / DVD boot time out. vIR Duplex Mode Select full or half duplex mode for serial port 2. vIR TX to Rx Delay Select Allows BIOS to select IR from Rx to Tx 4 characters time delay for serial port 2. 2.4 AHCI Configuration Scroll to this item and press to view the following.../DVD Boot Time out This option is used to select receiver pin in normal condition or inverse the IRTX. vIRRX Pin Select This item allows BIOS to set the serial Port2 mode.The available setting values are: [Normal], [IrDA 1.6us] and [IrDA 3/16 bit]. This displays the status of auto detection...
... AHCI CD / DVD boot time out. vIR Duplex Mode Select full or half duplex mode for serial port 2. vIR TX to Rx Delay Select Allows BIOS to select IR from Rx to Tx 4 characters time delay for serial port 2. 2.4 AHCI Configuration Scroll to this item and press to view the following.../DVD Boot Time out This option is used to select receiver pin in normal condition or inverse the IRTX. vIRRX Pin Select This item allows BIOS to set the serial Port2 mode.The available setting values are: [Normal], [IrDA 1.6us] and [IrDA 3/16 bit]. This displays the status of auto detection...

English manual
Page 37
Chapter 3 BIOS Description 2.5 Smbios Configuration Scroll to this item and press to view the following screen: Smbios Configuration Menu vSmbios Smi Support Enable SMBIOS SMI wrapper support for PnP function 50h-54h. 2.6 MPS Configuration Scroll to this item and press to view the following screen: MPS Configuration Menu vMPS Revision The BIOS support versions of the 1.1 and 1.4 of the intel multiprocessor specification. Select the version supported by the operating system running on the computer. 31
Chapter 3 BIOS Description 2.5 Smbios Configuration Scroll to this item and press to view the following screen: Smbios Configuration Menu vSmbios Smi Support Enable SMBIOS SMI wrapper support for PnP function 50h-54h. 2.6 MPS Configuration Scroll to this item and press to view the following screen: MPS Configuration Menu vMPS Revision The BIOS support versions of the 1.1 and 1.4 of the intel multiprocessor specification. Select the version supported by the operating system running on the computer. 31

English manual
Page 38
Advanced Chipset Features Advanced Chipset Features Menu 32 vRTL8110 / RTL8111B Lan Controller This item is used to enable or disable the onboard LAN BootROM. vRTL8110 / RTL8111B Lan BOOTROM This item is to view the following screen: OBD Configuration Menu v1394 Controller This item enables the onboard 1394 controller. vJMicron 36x ATA Controller Select ATA controller operation mode. 3. Chapter 3 BIOS Description 2.7 OBD Configuration Scroll to this item and press to activate the function of onboard RTL8110 or RTL8111 LAN controller.
Advanced Chipset Features Advanced Chipset Features Menu 32 vRTL8110 / RTL8111B Lan Controller This item is used to enable or disable the onboard LAN BootROM. vRTL8110 / RTL8111B Lan BOOTROM This item is to view the following screen: OBD Configuration Menu v1394 Controller This item enables the onboard 1394 controller. vJMicron 36x ATA Controller Select ATA controller operation mode. 3. Chapter 3 BIOS Description 2.7 OBD Configuration Scroll to this item and press to activate the function of onboard RTL8110 or RTL8111 LAN controller.

English manual
Page 39
vMemory Hole This reserves the 15MB to use of overlapped PCI memory above the total physical memory. Chapter 3 BIOS Description 3.1 North Bridge Configuration Scroll to this item and press to view the following screen: North Bridge Configuration Menu vMemory Remap Feature Enable to allow ...
vMemory Hole This reserves the 15MB to use of overlapped PCI memory above the total physical memory. Chapter 3 BIOS Description 3.1 North Bridge Configuration Scroll to this item and press to view the following screen: North Bridge Configuration Menu vMemory Remap Feature Enable to allow ...

English manual
Page 40
... Page Route This item is used to enable or disable the Enhanced Host Controller Interface for USB. Assertion Width The option specifies SLP_S4#Min. Chapter 3 BIOS Description vUSB Functions This item enable or disable USB function. vUSB 2.0 Controller This item is used to configure reserved page route. vHDA Controller Set HDA...
... Page Route This item is used to enable or disable the Enhanced Host Controller Interface for USB. Assertion Width The option specifies SLP_S4#Min. Chapter 3 BIOS Description vUSB Functions This item enable or disable USB function. vUSB 2.0 Controller This item is used to configure reserved page route. vHDA Controller Set HDA...
English manual
Page 41
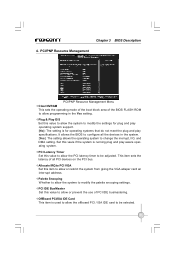
It allows the BIOS to change the inerrupt, I/O, and DMA setting. This item sets the latency of all the devices in the... snooping settings. vPCI Latency Timer Set this value to allow the PCI latency timer to allow or prevent the use of the BIOS FLASH ROM to allow the offboard PCI / ISA IDE card to allow programming in the system. [Yes]: The setting allows ... system is for operating systems that do not meet the plug and play aware operating system. Chapter 3 BIOS Description 4. vAllocate IRQ to allow or restrict the system from giving the VGA adaper card an interrupt address.
It allows the BIOS to change the inerrupt, I/O, and DMA setting. This item sets the latency of all the devices in the... snooping settings. vPCI Latency Timer Set this value to allow the PCI latency timer to allow or prevent the use of the BIOS FLASH ROM to allow the offboard PCI / ISA IDE card to allow programming in the system. [Yes]: The setting allows ... system is for operating systems that do not meet the plug and play aware operating system. Chapter 3 BIOS Description 4. vAllocate IRQ to allow or restrict the system from giving the VGA adaper card an interrupt address.

English manual
Page 42
... vQuick Boot W hile Enabled, this value to allow the boot up screen options to let PnP automatically configrate. vQuiet Boot Set this item allows the BIOS to skip certain POST tests to be modified between POST messages or OEM logo. 36 vReserved Memory Size This item is available to boot faster...
... vQuick Boot W hile Enabled, this value to allow the boot up screen options to let PnP automatically configrate. vQuiet Boot Set this item allows the BIOS to skip certain POST tests to be modified between POST messages or OEM logo. 36 vReserved Memory Size This item is available to boot faster...

English manual
Page 43
... been disabled in POST. vHit 'DEL' Message Display The item uses to set whether wait for user to press the F1 key before resuming. Chapter 3 BIOS Description vAddOn ROM Display Mode Set this option causes the system to pause the POST if it encounters an error, and wait for "F1" key... if the keyboard Num Lock key is active when the computer system is used to set whether shows the information about press DEL to run BIOS setup in the corresponding type menu. 37 vPS/2 Mouse Support W hether to allow the system to display addon ROM (read-only memory) messages. Enabling this...
... been disabled in POST. vHit 'DEL' Message Display The item uses to set whether wait for user to press the F1 key before resuming. Chapter 3 BIOS Description vAddOn ROM Display Mode Set this option causes the system to pause the POST if it encounters an error, and wait for "F1" key... if the keyboard Num Lock key is active when the computer system is used to set whether shows the information about press DEL to run BIOS setup in the corresponding type menu. 37 vPS/2 Mouse Support W hether to allow the system to display addon ROM (read-only memory) messages. Enabling this...

English manual
Page 44
Chapter 3 BIOS Description 5.3 Removable Drives Scroll to this item and press to view the following screen: v1st Drive Removable Drives Menu The item is used to view the following screen: 38 Power Management Features Power Management Features Menu 6.1 APM Configuration Scroll to this item and press to specify the boot sequence from the available removable drives. 6.
Chapter 3 BIOS Description 5.3 Removable Drives Scroll to this item and press to view the following screen: v1st Drive Removable Drives Menu The item is used to view the following screen: 38 Power Management Features Power Management Features Menu 6.1 APM Configuration Scroll to this item and press to specify the boot sequence from the available removable drives. 6.


