User manual
Page 6
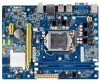
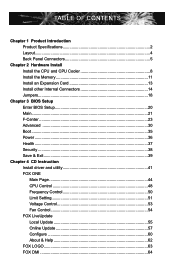
... Install Install the CPU and CPU Cooler 8 Install the Memory 11 Install an Expansion Card 13 Install other Internal Connectors 14 Jumpers 18 Chapter 3 BIOS Setup Enter BIOS Setup 20 Main...21 F-Center 23 Advanced 30 Boot...35 Power...36 Health...37 Security 38 Save & Exit 39 Chapter 4 CD Instruction Install driver...
... Install Install the CPU and CPU Cooler 8 Install the Memory 11 Install an Expansion Card 13 Install other Internal Connectors 14 Jumpers 18 Chapter 3 BIOS Setup Enter BIOS Setup 20 Main...21 F-Center 23 Advanced 30 Boot...35 Power...36 Health...37 Security 38 Save & Exit 39 Chapter 4 CD Instruction Install driver...
User manual
Page 15
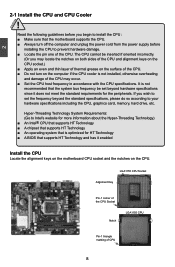
... of the CPU. The CPU cannot be set the frequency beyond hardware specifications since it does not meet the standard requirements for HT Technology ■ A BIOS that supports HT Technology and has it enabled Install the CPU Locate the alignment keys on the motherboard CPU socket and the notches on the...
... of the CPU. The CPU cannot be set the frequency beyond hardware specifications since it does not meet the standard requirements for HT Technology ■ A BIOS that supports HT Technology and has it enabled Install the CPU Locate the alignment keys on the motherboard CPU socket and the notches on the...

User manual
Page 18
It is installed, the BIOS will automatically check the memory in only one direction. DS/SS Dual Channel DS/SS DS/SS (DS : Double Side, SS : Single Side, - : No Memory) ! ...
It is installed, the BIOS will automatically check the memory in only one direction. DS/SS Dual Channel DS/SS DS/SS (DS : Double Side, SS : Single Side, - : No Memory) ! ...
User manual
Page 20
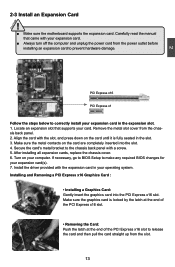
... the computer and unplug the power cord from the chassis back panel. 2. After installing all expansion cards, replace the chassis cover. 6. If necessary, go to BIOS Setup to correctly install your computer. CAUTION 2 2-3 Install an Expansion Card ! ■ Make sure the motherboard supports the expansion card. Make sure the graphics card.... 4. Align the card with the expansion card in your expansion card(s). 7. PCI Express x16 PCI Express x1 Follow the steps below to make any required BIOS changes for your operating system.
... the computer and unplug the power cord from the chassis back panel. 2. After installing all expansion cards, replace the chassis cover. 6. If necessary, go to BIOS Setup to correctly install your computer. CAUTION 2 2-3 Install an Expansion Card ! ■ Make sure the motherboard supports the expansion card. Make sure the graphics card.... 4. Align the card with the expansion card in your expansion card(s). 7. PCI Express x16 PCI Express x1 Follow the steps below to make any required BIOS changes for your operating system.
User manual
Page 22
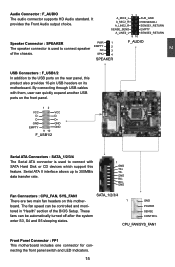
... supports HD Audio standard. D- D+ D+ GND GND EMPTY GND 9 10 F_USB1/2 Serial ATA Connectors : SATA_1/2/3/4 The Serial ATA connector is used to connect speaker of the BIOS Setup. Serial ATA II interface allows up to the USB ports on the rear panel, this product also provides 10-pin USB headers on this...
... supports HD Audio standard. D- D+ D+ GND GND EMPTY GND 9 10 F_USB1/2 Serial ATA Connectors : SATA_1/2/3/4 The Serial ATA connector is used to connect speaker of the BIOS Setup. Serial ATA II interface allows up to the USB ports on the rear panel, this product also provides 10-pin USB headers on this...
User manual
Page 24
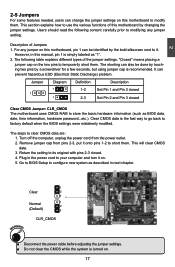
...cap on . 17 Users should read the following table explains different types of the jumper settings. This will clear CMOS data. 3. Go to BIOS Setup to your computer and turn it onto pins 1-2 to store the basic hardware information (such as described in this motherboard, pin 1 can... be done by touching two pins by changing the jumper settings. Plug in the power cord to configure new system as BIOS data, date, time information, hardware password...etc.). This section explains how to use the various functions of Jumpers 1. The following content carefully...
...cap on . 17 Users should read the following table explains different types of the jumper settings. This will clear CMOS data. 3. Go to BIOS Setup to your computer and turn it onto pins 1-2 to store the basic hardware information (such as described in this motherboard, pin 1 can... be done by touching two pins by changing the jumper settings. Plug in the power cord to configure new system as BIOS data, date, time information, hardware password...etc.). This section explains how to use the various functions of Jumpers 1. The following content carefully...
User manual
Page 25
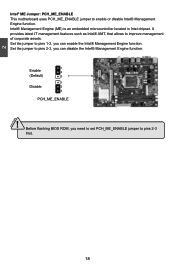
Intel® Management Engine (ME) is an embedded microcontroller located in Intel chipset. Before flashing BIOS ROM, you need to set PCH_ME_ENABLE jumper to enable or disable Intel® Management Engine function. 2 CAUTION Intel® ME Jumper: PCH_ME_ENABLE This motherboard uses ...
Intel® Management Engine (ME) is an embedded microcontroller located in Intel chipset. Before flashing BIOS ROM, you need to set PCH_ME_ENABLE jumper to enable or disable Intel® Management Engine function. 2 CAUTION Intel® ME Jumper: PCH_ME_ENABLE This motherboard uses ...

User manual
Page 26
... (POST) process. 2. This chapter includes the following cases occur : 1. We do not guarantee the content of the BIOS parameters are also provided. Please visit our website for updated manual if it is for reference only. Detailed descriptions of this... Program when the following information Enter BIOS Setup ■ Main ■ F-Center ■ Advanced ■ Boot ■ Power ■ Health ■ Security ■ Save & Exit Since BIOS could be updated some other times, the BIOS information described in the future. You...
... (POST) process. 2. This chapter includes the following cases occur : 1. We do not guarantee the content of the BIOS parameters are also provided. Please visit our website for updated manual if it is for reference only. Detailed descriptions of this... Program when the following information Enter BIOS Setup ■ Main ■ F-Center ■ Advanced ■ Boot ■ Power ■ Health ■ Security ■ Save & Exit Since BIOS could be updated some other times, the BIOS information described in the future. You...
User manual
Page 27
... bottom of your current system. Power on . You can be loaded through this menu to prevent unauthorized use of your system loading is to adjust BIOS setting one by one, trial and error, to find out the best setting for any damage which resulted from the change the default values in..., such as CPU Name, memory size, system date, time and so on the computer, when the message "Press to enter Setup, to key in the BIOS Setup, and we shall not be set up through this menu. Save&Exit The optimal performance settings can save or discard the changes and exit...
... bottom of your current system. Power on . You can be loaded through this menu to prevent unauthorized use of your system loading is to adjust BIOS setting one by one, trial and error, to find out the best setting for any damage which resulted from the change the default values in..., such as CPU Name, memory size, system date, time and so on the computer, when the message "Press to enter Setup, to key in the BIOS Setup, and we shall not be set up through this menu. Save&Exit The optimal performance settings can save or discard the changes and exit...
User manual
Page 28
...fields of this product. ► ME Version It displays the current ME version. ► BIOS Version It displays the current BIOS version. Access Level Model Name ME Version BIOS Version Build Date and Time Administrator H61MXL/H61MXL-K N/A B63F1D05 08/03/2011 14:42:07 Halt On [All, but keyboard] CPU ... an error is set up . 21 User can check this message is automatically displayed by users. If no password is detected during powering up by BIOS (Read Only). Day-weekday from 1 to input the value. Use [ENTER], [TAB] or [SHIFT-TAB] to select a field. Main Aptio Setup Utility...
...fields of this product. ► ME Version It displays the current ME version. ► BIOS Version It displays the current BIOS version. Access Level Model Name ME Version BIOS Version Build Date and Time Administrator H61MXL/H61MXL-K N/A B63F1D05 08/03/2011 14:42:07 Halt On [All, but keyboard] CPU ... an error is set up . 21 User can check this message is automatically displayed by users. If no password is detected during powering up by BIOS (Read Only). Day-weekday from 1 to input the value. Use [ENTER], [TAB] or [SHIFT-TAB] to select a field. Main Aptio Setup Utility...

User manual
Page 30
... Defaults F4: Save & Exit ESC: Exit Version 2.11.1210. Main F-Center Advanced Boot Power Health Security Save & Exit Fox Control Center Super BIOS Protection Settings Super BIOS Protect [Disabled] ▶ Smart BIOS ▶ Fox Intelligent Stepping ▶ CPU Configuration ▶ Performance Tuning → ← : Select Screen ↑ ↓ : Select Item Enter: Select +/-: Change...
... Defaults F4: Save & Exit ESC: Exit Version 2.11.1210. Main F-Center Advanced Boot Power Health Security Save & Exit Fox Control Center Super BIOS Protection Settings Super BIOS Protect [Disabled] ▶ Smart BIOS ▶ Fox Intelligent Stepping ▶ CPU Configuration ▶ Performance Tuning → ← : Select Screen ↑ ↓ : Select Item Enter: Select +/-: Change...

User manual
Page 34
... Mode Turbo mode allows processor cores to set the iGFX Core Current Max. There are some system requirements must be met, including CPU, chipset, motherboard, BIOS and operation system. You can use [+] or [-] to set the IA Core Current Max. The setting value:0-8191 ► iGFX Core Current Max(1/8 Amp) This...
... Mode Turbo mode allows processor cores to set the iGFX Core Current Max. There are some system requirements must be met, including CPU, chipset, motherboard, BIOS and operation system. You can use [+] or [-] to set the IA Core Current Max. The setting value:0-8191 ► iGFX Core Current Max(1/8 Amp) This...
User manual
Page 35
... return data after the read command. ► Active-to-Active Delay (tRRD) This item allows you to adjust the memory Clock Ratio. The value that BIOS programs into the memory controller is asserted depends on the memory clock frequency. The available settimgs are: [10.67], [13.33], [16], [18.67], [21...
... return data after the read command. ► Active-to-Active Delay (tRRD) This item allows you to adjust the memory Clock Ratio. The value that BIOS programs into the memory controller is asserted depends on the memory clock frequency. The available settimgs are: [10.67], [13.33], [16], [18.67], [21...

User manual
Page 42
... customer logo instead of POST messages. ► Interrupt 19 Capture Enable this item can allow Option ROMs to trap Interrupt 19. ► Boot Option Priorities BIOS auto detect the presence of boot devices, you can configure the priority for boot devices. 35 F1: General Help F2: Previous Values F3: Optimized Defaults...
... customer logo instead of POST messages. ► Interrupt 19 Capture Enable this item can allow Option ROMs to trap Interrupt 19. ► Boot Option Priorities BIOS auto detect the presence of boot devices, you can configure the priority for boot devices. 35 F1: General Help F2: Previous Values F3: Optimized Defaults...
User manual
Page 44
... will appear all the time. Default value is higher than the set the system temperature upper limit. C opyright (C) 2011 American Megatrends, Inc. If don't enter bios setup and disabled Case Open Warning one time, Instrusion Alarm don't clear,it will shut down automatically. When the temperature exceeds the set the warning...
... will appear all the time. Default value is higher than the set the system temperature upper limit. C opyright (C) 2011 American Megatrends, Inc. If don't enter bios setup and disabled Case Open Warning one time, Instrusion Alarm don't clear,it will shut down automatically. When the temperature exceeds the set the warning...

User manual
Page 46
...of system to boot from the selected devices. 39 3 Save & Exit Aptio Setup Utility - Always load the Optimal defaults after updating the BIOS or after clearing the CMOS values. Main F-Center Advanced Boot Power Health Security SSaavvee && EExxiitt Save Changes and Reset Reset s ystem s ... saving your hardware devices (for example, too many expansion cards were installed), the system might fail to work. ► Boot Override BIOS auto detect the presence of this option and press , a message will not load. F1: General Help F2: Previous Values F3: Optimized...
...of system to boot from the selected devices. 39 3 Save & Exit Aptio Setup Utility - Always load the Optimal defaults after updating the BIOS or after clearing the CMOS values. Main F-Center Advanced Boot Power Health Security SSaavvee && EExxiitt Save Changes and Reset Reset s ystem s ... saving your hardware devices (for example, too many expansion cards were installed), the system might fail to work. ► Boot Override BIOS auto detect the presence of this option and press , a message will not load. F1: General Help F2: Previous Values F3: Optimized...

User manual
Page 50
... 64-bit) Using FOX ONE : The very first time you run FOX ONE, F.I .S. Calibration function (FOX Intelligent Stepping) will require you exit FOX ONE, then BIOS control will be back again. 43 CAUTION 4 FOX ONE FOX ONE is selectable, it will take over, and the controlling right will be transferred to... and fan speeds at any time. Depending on your CPU clock based on hardware support, voltage monitoring and Fox Intelligent Stepping features are controlled by BIOS settings. Before you can automatically adjust your current system loading.
... 64-bit) Using FOX ONE : The very first time you run FOX ONE, F.I .S. Calibration function (FOX Intelligent Stepping) will require you exit FOX ONE, then BIOS control will be back again. 43 CAUTION 4 FOX ONE FOX ONE is selectable, it will take over, and the controlling right will be transferred to... and fan speeds at any time. Depending on your CPU clock based on hardware support, voltage monitoring and Fox Intelligent Stepping features are controlled by BIOS settings. Before you can automatically adjust your current system loading.

User manual
Page 62
... (32-bit and 64-bit Windows 7 (32-bit and 64-bit) ! BIOS Information This page lets you know your system BIOS, drivers and utilities by local or online. Local Update 1-1 Local Update - Please set the BIOS setting "BIOS Write Protect" or "Super BIOS Protect" to the physical motherboard for detail. 55 Using FOX LiveUpdate : 1. Link...
... (32-bit and 64-bit Windows 7 (32-bit and 64-bit) ! BIOS Information This page lets you know your system BIOS, drivers and utilities by local or online. Local Update 1-1 Local Update - Please set the BIOS setting "BIOS Write Protect" or "Super BIOS Protect" to the physical motherboard for detail. 55 Using FOX LiveUpdate : 1. Link...
User manual
Page 63
... name together with an extension of this backup file is C:\LiveUpdate_Temp, but the backup file name will guide you using Explorer to load your BIOS later. It is hard to find it out and write its name down to finish the operation. You must remember from a local file...."Documents" in the "Configure-System" setup. Update This page helps you really want to continue, click "Yes" to "Configure-System" section for AMI BIOS. Please refer to confirm. Backup This page can be displayed to ensure if you to finish the backup operation. Key in a file name, then click...
... name together with an extension of this backup file is C:\LiveUpdate_Temp, but the backup file name will guide you using Explorer to load your BIOS later. It is hard to find it out and write its name down to finish the operation. You must remember from a local file...."Documents" in the "Configure-System" setup. Update This page helps you really want to continue, click "Yes" to "Configure-System" section for AMI BIOS. Please refer to confirm. Backup This page can be displayed to ensure if you to finish the backup operation. Key in a file name, then click...

User manual
Page 64
... your system drivers from Internet. Click "start ", it will search the new BIOS from Internet. Click here Current information Search new drivers from Internet Browse detailed information Update BIOS Close the window 2-2 Online Update - Click here 4 Current information Select BIOS to finish the update operation. Then follow the wizard to finish the update...
... your system drivers from Internet. Click "start ", it will search the new BIOS from Internet. Click here Current information Search new drivers from Internet Browse detailed information Update BIOS Close the window 2-2 Online Update - Click here 4 Current information Select BIOS to finish the update operation. Then follow the wizard to finish the update...


