
Epson Scan ICM Updater v1.20 (PSB.2008.07.001)
Page 1
...tab and enable ICM. EPSON PRODUCT SUPPORT BULLETIN Date: PSB #: Reference: Product(s): Subject: 07/08/2008 Originator: RY PSB.2008.07.001 Authorization: TE08-0061 Rev A Total Pages: 1 All Scanners and All-in-One's using Epson Scan Epson Scan ICM updater v.1.20 for Epson Scan-affects all driver ...versions up to and including 3.4xA Note: Scanners/All-in-One's using ICM color profiles in Epson Scan when Adobe's Color Management Module (CMM) ...
...tab and enable ICM. EPSON PRODUCT SUPPORT BULLETIN Date: PSB #: Reference: Product(s): Subject: 07/08/2008 Originator: RY PSB.2008.07.001 Authorization: TE08-0061 Rev A Total Pages: 1 All Scanners and All-in-One's using Epson Scan Epson Scan ICM updater v.1.20 for Epson Scan-affects all driver ...versions up to and including 3.4xA Note: Scanners/All-in-One's using ICM color profiles in Epson Scan when Adobe's Color Management Module (CMM) ...
User Manual
Page 1
...specific scanning projects you may need to maintain and transport your scanner or its accessories. Scanning Special Projects Follow the instructions here for technical details about your original documents or photos using your scanner. Maintenance Follow the guidelines here to create. Solving Problems If... a problem using any of the available scanning methods. Placing Originals on the Scanner Follow the steps here to identify the parts of your scanner. User's Guide Overview of Your Scanner Features These features help you create the best possible scans, no matter what shape...
...specific scanning projects you may need to maintain and transport your scanner or its accessories. Scanning Special Projects Follow the instructions here for technical details about your original documents or photos using your scanner. Maintenance Follow the guidelines here to create. Solving Problems If... a problem using any of the available scanning methods. Placing Originals on the Scanner Follow the steps here to identify the parts of your scanner. User's Guide Overview of Your Scanner Features These features help you create the best possible scans, no matter what shape...
User Manual
Page 2
Home > Overview of Your Scanner Features Overview of Your Scanner Features These features help you create the best possible scans, no matter what shape your original is in. Text Enhancement Color Restoration Dust Removal Backlight Correction
Home > Overview of Your Scanner Features Overview of Your Scanner Features These features help you create the best possible scans, no matter what shape your original is in. Text Enhancement Color Restoration Dust Removal Backlight Correction

User Manual
Page 3
Scanner Parts Lights and Buttons Home > Guide to the Scanner Parts Guide to the Scanner Parts Check these sections to identify the parts of your scanner.
Scanner Parts Lights and Buttons Home > Guide to the Scanner Parts Guide to the Scanner Parts Check these sections to identify the parts of your scanner.
User Manual
Page 4
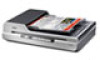
Placing Documents or Photos Loading Documents in the Automatic Document Feeder Home > Placing Originals on the Scanner Placing Originals on the Scanner Follow the steps here to place your original documents or photos on the scanner.
Placing Documents or Photos Loading Documents in the Automatic Document Feeder Home > Placing Originals on the Scanner Placing Originals on the Scanner Follow the steps here to place your original documents or photos on the scanner.
User Manual
Page 6
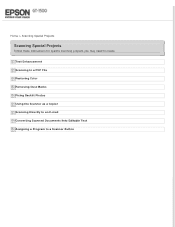
Home > Scanning Special Projects Scanning Special Projects Follow these instructions for specific scanning projects you may need to a Scanner Button Text Enhancement Scanning to a PDF File Restoring Color Removing Dust Marks Fixing Backlit Photos Using the Scanner as a Copier Scanning Directly to an E-mail Converting Scanned Documents Into Editable Text Assigning a Program to create.
Home > Scanning Special Projects Scanning Special Projects Follow these instructions for specific scanning projects you may need to a Scanner Button Text Enhancement Scanning to a PDF File Restoring Color Removing Dust Marks Fixing Backlit Photos Using the Scanner as a Copier Scanning Directly to an E-mail Converting Scanned Documents Into Editable Text Assigning a Program to create.
User Manual
Page 7
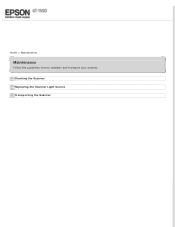
Home > Maintenance Maintenance Follow the guidelines here to maintain and transport your scanner. Cleaning the Scanner Replacing the Scanner Light Source Transporting the Scanner
Home > Maintenance Maintenance Follow the guidelines here to maintain and transport your scanner. Cleaning the Scanner Replacing the Scanner Light Source Transporting the Scanner
User Manual
Page 8
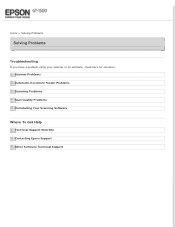
Home > Solving Problems Solving Problems Troubleshooting If you have a problem using your scanner or its software, check here for solutions. Scanner Problems Automatic Document Feeder Problems Scanning Problems Scan Quality Problems Uninstalling Your Scanning Software Where To Get Help Technical Support Web Site Contacting Epson Support Other Software Technical Support
Home > Solving Problems Solving Problems Troubleshooting If you have a problem using your scanner or its software, check here for solutions. Scanner Problems Automatic Document Feeder Problems Scanning Problems Scan Quality Problems Uninstalling Your Scanning Software Where To Get Help Technical Support Web Site Contacting Epson Support Other Software Technical Support
User Manual
Page 9
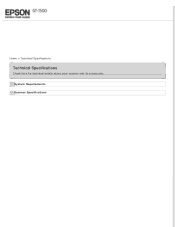
System Requirements Scanner Specifications Home > Technical Specifications Technical Specifications Check here for technical details about your scanner and its accessories.
System Requirements Scanner Specifications Home > Technical Specifications Technical Specifications Check here for technical details about your scanner and its accessories.
User Manual
Page 10
... into the wall outlet does not exceed the wall outlet's ampere rating. Also, make sure the total ampere rating of power source indicated on the scanner's label. Each connector has only one correct orientation. The AC power cord should be stepped on or run over. Use only the AC adapter that... regularly switch on and off. Do not place or store the scanner or the AC adapter outdoors, near an electrical outlet where the adapter can be followed carefully to reach it was included. Caution: Be sure the...
... into the wall outlet does not exceed the wall outlet's ampere rating. Also, make sure the total ampere rating of power source indicated on the scanner's label. Each connector has only one correct orientation. The AC power cord should be stepped on or run over. Use only the AC adapter that... regularly switch on and off. Do not place or store the scanner or the AC adapter outdoors, near an electrical outlet where the adapter can be followed carefully to reach it was included. Caution: Be sure the...
User Manual
Page 11
..., warrants of your legal advisor for Epson products This product will enter sleep mode after a period of energy efficiency, and cannot be as broad as they may not disassemble, decompile or otherwise attempt to ensure responsible and legal use liquid or aerosol cleaners. Contact your scanner. Restriction on Copying Observe the following...
..., warrants of your legal advisor for Epson products This product will enter sleep mode after a period of energy efficiency, and cannot be as broad as they may not disassemble, decompile or otherwise attempt to ensure responsible and legal use liquid or aerosol cleaners. Contact your scanner. Restriction on Copying Observe the following...

User Manual
Page 15
For instructions on using the Text Enhancement feature in Epson Scan. Home > Overview of Your Scanner Features Text Enhancement When you scan documents, you can sharpen the text and increase accuracy by using this feature, see Text Enhancement.
For instructions on using the Text Enhancement feature in Epson Scan. Home > Overview of Your Scanner Features Text Enhancement When you scan documents, you can sharpen the text and increase accuracy by using this feature, see Text Enhancement.
User Manual
Page 16
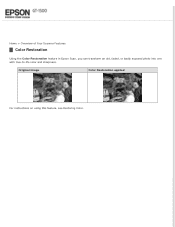
Home > Overview of Your Scanner Features Color Restoration Using the Color Restoration feature in Epson Scan, you can transform an old, faded, or badly exposed photo into one with true-to-life color and sharpness. Original image Color Restoration applied For instructions on using this feature, see Restoring Color.
Home > Overview of Your Scanner Features Color Restoration Using the Color Restoration feature in Epson Scan, you can transform an old, faded, or badly exposed photo into one with true-to-life color and sharpness. Original image Color Restoration applied For instructions on using this feature, see Restoring Color.
User Manual
Page 17
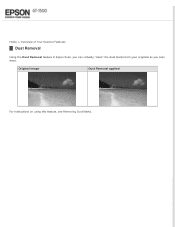
Original image Dust Removal applied For instructions on using this feature, see Removing Dust Marks. Home > Overview of Your Scanner Features Dust Removal Using the Dust Removal feature in Epson Scan, you can virtually "clean" the dust marks from your originals as you scan them.
Original image Dust Removal applied For instructions on using this feature, see Removing Dust Marks. Home > Overview of Your Scanner Features Dust Removal Using the Dust Removal feature in Epson Scan, you can virtually "clean" the dust marks from your originals as you scan them.
User Manual
Page 18
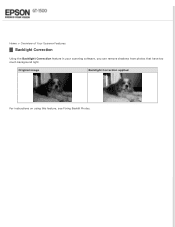
Original image Backlight Correction applied For instructions on using this feature, see Fixing Backlit Photos. Home > Overview of Your Scanner Features Backlight Correction Using the Backlight Correction feature in your scanning software, you can remove shadows from photos that have too much background light.
Original image Backlight Correction applied For instructions on using this feature, see Fixing Backlit Photos. Home > Overview of Your Scanner Features Backlight Correction Using the Backlight Correction feature in your scanning software, you can remove shadows from photos that have too much background light.
User Manual
Page 19
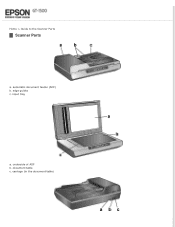
Home > Guide to the Scanner Parts Scanner Parts a. underside of ADF b. edge guides c. carriage (in the document table) automatic document feeder (ADF) b. document table c. input tray a.
Home > Guide to the Scanner Parts Scanner Parts a. underside of ADF b. edge guides c. carriage (in the document table) automatic document feeder (ADF) b. document table c. input tray a.
User Manual
Page 21
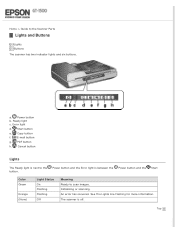
...information. Copy button f. Cancel button Lights The Ready light is next to scan images. An error has occurred. Ready light c. PDF button h. The scanner is between the Power button and the Start Color Green Orange (None) Light Status On Flashing Flashing Off Meaning Ready to the button. Initializing or... scanning. Top a. Error light d. Power button b. Power button and the Error light is off. Home > Guide to the Scanner Parts Lights and Buttons Lights Buttons The scanner has two indicator lights and six buttons. E-mail button g.
...information. Copy button f. Cancel button Lights The Ready light is next to scan images. An error has occurred. Ready light c. PDF button h. The scanner is between the Power button and the Start Color Green Orange (None) Light Status On Flashing Flashing Off Meaning Ready to the button. Initializing or... scanning. Top a. Error light d. Power button b. Power button and the Error light is off. Home > Guide to the Scanner Parts Lights and Buttons Lights Buttons The scanner has two indicator lights and six buttons. E-mail button g.
User Manual
Page 22
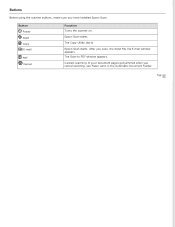
Epson Scan starts. If your document pages get jammed when you scan, the Send File Via E-mail window appears. The Scan to PDF window appears. Cancels scanning. Button Power Start Copy E-mail PDF Cancel Function Turns the scanner on. After you cancel scanning, see Paper Jams in the Automatic Document Feeder. Epson Scan starts. Buttons Before using the scanner buttons, make sure you have installed Epson Scan. Top The Copy Utility starts.
Epson Scan starts. If your document pages get jammed when you scan, the Send File Via E-mail window appears. The Scan to PDF window appears. Cancels scanning. Button Power Start Copy E-mail PDF Cancel Function Turns the scanner on. After you cancel scanning, see Paper Jams in the Automatic Document Feeder. Epson Scan starts. Buttons Before using the scanner buttons, make sure you have installed Epson Scan. Top The Copy Utility starts.
User Manual
Page 23
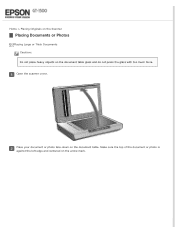
Place your document or photo face-down on the arrow mark. Open the scanner cover. Make sure the top of the document or photo is against the left edge and centered on the document table. Home > Placing Originals on the Scanner Placing Documents or Photos Placing Large or Thick Documents Caution: Do not place heavy objects on the document table glass and do not press the glass with too much force.
Place your document or photo face-down on the arrow mark. Open the scanner cover. Make sure the top of the document or photo is against the left edge and centered on the document table. Home > Placing Originals on the Scanner Placing Documents or Photos Placing Large or Thick Documents Caution: Do not place heavy objects on the document table glass and do not press the glass with too much force.
User Manual
Page 24
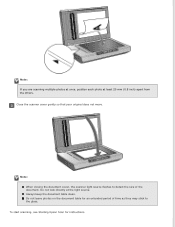
Note: If you are scanning multiple photos at once, position each photo at the light source. Do not look directly at least 20 mm (0.8 inch) apart from the others. To start scanning, see Starting Epson Scan for an extended period of the document. Close the scanner cover gently so that your original does not move. Do not leave photos on the document table for instructions. Always keep the document table clean. Note: When closing the document cover, the scanner light source flashes to detect the size of time as they may stick to the glass.
Note: If you are scanning multiple photos at once, position each photo at the light source. Do not look directly at least 20 mm (0.8 inch) apart from the others. To start scanning, see Starting Epson Scan for an extended period of the document. Close the scanner cover gently so that your original does not move. Do not leave photos on the document table for instructions. Always keep the document table clean. Note: When closing the document cover, the scanner light source flashes to detect the size of time as they may stick to the glass.

