
User Manual
Page 2
... herein. Centronics is assumed with Seiko Epson Corporation's operating and maintenance instructions. All rights reserved. While every precaution has been taken in any form or by any damages or problems arising from the use of any options or any liability assumed for errors or omissions. Seiko Epson Corporation shall not be liable to change without the prior written permission of this...
... herein. Centronics is assumed with Seiko Epson Corporation's operating and maintenance instructions. All rights reserved. While every precaution has been taken in any form or by any damages or problems arising from the use of any options or any liability assumed for errors or omissions. Seiko Epson Corporation shall not be liable to change without the prior written permission of this...
User Manual
Page 3
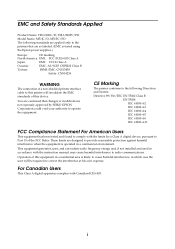
... a non-shielded printer interface cable to this printer will be required to radio communications. i This equipment generates, uses, and can radiate radio frequency energy and, if not installed and used in a commercial environment. You are cautioned that are designed to provide reasonable protection against harmful interference when the equipment is operated in accordance with the instruction manual, may cause harmful...
... a non-shielded printer interface cable to this printer will be required to radio communications. i This equipment generates, uses, and can radiate radio frequency energy and, if not installed and used in a commercial environment. You are cautioned that are designed to provide reasonable protection against harmful interference when the equipment is operated in accordance with the instruction manual, may cause harmful...

User Manual
Page 4
... instructions in this manual carefully before using logic seeking High reliability and long life through the use of stepping motors for both carriage return and paper feeding Two print colors (black or red) Selectable paper feeding increments for various print formats Command protocol based on the ESC/POS® standard Internal drawer interface that can control two drawers Two character fonts (7 X 9 or 9 X 9) Semi-automatic paper loading Compact AC adapter 1 line validation printing Roll paper...
... instructions in this manual carefully before using logic seeking High reliability and long life through the use of stepping motors for both carriage return and paper feeding Two print colors (black or red) Selectable paper feeding increments for various print formats Command protocol based on the ESC/POS® standard Internal drawer interface that can control two drawers Two character fonts (7 X 9 or 9 X 9) Semi-automatic paper loading Compact AC adapter 1 line validation printing Roll paper...

User Manual
Page 5
... Transportation Damper 2 1-4 Part Names and Functions 3 Chapter 2 Connecting the Cables 5 2-1 Connecting the AC Adapter to the Printer 5 2-2 Connecting the Host Computer to the Printer 6 Chapter 3 Installing the Printer Parts 8 3-1 Installing the Ribbon Cassette 8 3-2 Installing the Paper Roll 1 1 3-3 Adjusting the Paper Near-End Detector Location 19 3-4 Inserting a Cut Sheet (Validation Pape.r 21 Chapter 4 Setting the DIP Switches 23 Chapter 5 The Self Test 26 Chapter 6 Removing Jammed Paper 27 6-1 Removing Jammed Paper 27 Appendix ...28 Appendix A. Specifications 28
... Transportation Damper 2 1-4 Part Names and Functions 3 Chapter 2 Connecting the Cables 5 2-1 Connecting the AC Adapter to the Printer 5 2-2 Connecting the Host Computer to the Printer 6 Chapter 3 Installing the Printer Parts 8 3-1 Installing the Ribbon Cassette 8 3-2 Installing the Paper Roll 1 1 3-3 Adjusting the Paper Near-End Detector Location 19 3-4 Inserting a Cut Sheet (Validation Pape.r 21 Chapter 4 Setting the DIP Switches 23 Chapter 5 The Self Test 26 Chapter 6 Removing Jammed Paper 27 6-1 Removing Jammed Paper 27 Appendix ...28 Appendix A. Specifications 28
User Manual
Page 6
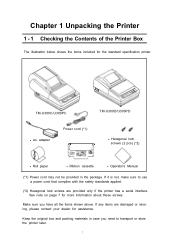
... about these screws. TM-U300C/U300PC TM-U300D/U300PD AC adapter Power cord (*1) Hexagonal lock screws (2 pcs) (*2) Roll paper Ribbon cassette Operator's Manual (*1) Power cord may not be provided in case you have all the items shown above. Keep the original box and packing materials in the package. See note on page 7 for the standard specification printer. If it is not, make sure to transport...
... about these screws. TM-U300C/U300PC TM-U300D/U300PD AC adapter Power cord (*1) Hexagonal lock screws (2 pcs) (*2) Roll paper Ribbon cassette Operator's Manual (*1) Power cord may not be provided in case you have all the items shown above. Keep the original box and packing materials in the package. See note on page 7 for the standard specification printer. If it is not, make sure to transport...
User Manual
Page 8
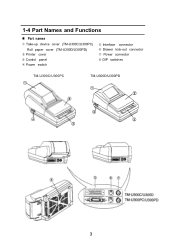
1-4 Part Names and Functions Part names ➀ Take-up device cover (TM-U300C/U300PC) Roll paper cover (TM-U300D/U300PD) ➁ Printer cover ➂ Control panel ➃ Power switch ➄ Interface connector ➅ Drawer kick-out connector ➆ Power connector ➇ DIP switches TM-U300C/U300PC TM-U300D/U300PD 3
1-4 Part Names and Functions Part names ➀ Take-up device cover (TM-U300C/U300PC) Roll paper cover (TM-U300D/U300PD) ➁ Printer cover ➂ Control panel ➃ Power switch ➄ Interface connector ➅ Drawer kick-out connector ➆ Power connector ➇ DIP switches TM-U300C/U300PC TM-U300D/U300PD 3

User Manual
Page 9
The line feed amount is used to turn the printer on and off. ➁ FEED Button The FEED button is set by the printer commands ESC 2 and ESC 3. The PAPER LED flashes when an error occurs, when validation paper must be inserted or removed, when the self test enters the printing standby state, or when printing has stopped due to exceeding the allowable print duty cycle. 4 Functions I Switches and Buttons ➀ POWER Switch The POWER switch is used to feed roll paper. Control Panel Lights (LEDs...
The line feed amount is used to turn the printer on and off. ➁ FEED Button The FEED button is set by the printer commands ESC 2 and ESC 3. The PAPER LED flashes when an error occurs, when validation paper must be inserted or removed, when the self test enters the printing standby state, or when printing has stopped due to exceeding the allowable print duty cycle. 4 Functions I Switches and Buttons ➀ POWER Switch The POWER switch is used to feed roll paper. Control Panel Lights (LEDs...

User Manual
Page 11
... printer's specifications. ■ Connecting the host computer to use an interface cable that matches the specifications of the printer and the host ECR (host computer). place the inch-type screws with inch-type hexagonal lock screws installed. nector. (You can remove the drawer kick-out cable by pressing in the connector's clip and pulling out the connector.) rawer Kick-out Connector Drawer Kick-out Cable Interface Connector Serial Interface Cable...
... printer's specifications. ■ Connecting the host computer to use an interface cable that matches the specifications of the printer and the host ECR (host computer). place the inch-type screws with inch-type hexagonal lock screws installed. nector. (You can remove the drawer kick-out cable by pressing in the connector's clip and pulling out the connector.) rawer Kick-out Connector Drawer Kick-out Cable Interface Connector Serial Interface Cable...

User Manual
Page 13
Follow these steps to install the ribbon cassette: ➀ Open the printer cover while lightly pressing the printer cover as shown below. ➁ Turn the ribbon-tightening knob in the direction of the arrow to take up any slack in the ribbon. 8 Chapter 3 Installing the Printer Parts 3-1 Installing the Ribbon Cassette ■ lnstalling the ribbon cassette Use Epson ribbon cassette ERC-34 (B/R).
Follow these steps to install the ribbon cassette: ➀ Open the printer cover while lightly pressing the printer cover as shown below. ➁ Turn the ribbon-tightening knob in the direction of the arrow to take up any slack in the ribbon. 8 Chapter 3 Installing the Printer Parts 3-1 Installing the Ribbon Cassette ■ lnstalling the ribbon cassette Use Epson ribbon cassette ERC-34 (B/R).
User Manual
Page 15
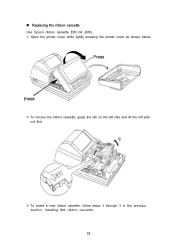
Replacing the ribbon cassette Use Epson ribbon cassette ERC-34 (B/R). ➀ Open the printer cover while lightly pressing the printer cover as shown below. ➁ To remove the ribbon cassette, grasp the tab on the left side and lift the left side out first. ➂ To install a new ribbon cassette, follow steps ➁ through ➄ in the previous section, Installing the ribbon cassette. 1O
Replacing the ribbon cassette Use Epson ribbon cassette ERC-34 (B/R). ➀ Open the printer cover while lightly pressing the printer cover as shown below. ➁ To remove the ribbon cassette, grasp the tab on the left side and lift the left side out first. ➂ To install a new ribbon cassette, follow steps ➁ through ➄ in the previous section, Installing the ribbon cassette. 1O

User Manual
Page 16
... device cover and remove the take-up spool from the printer. ➂ Load the paper roll while lightly pressing the left paper roll holder outward. Release the holder after fitting the roll paper core onto the holder. See Appendix A, Specifications. ➀ Using scissors, cut the leading edge of the roll paper so that it is perpendicular to use roll paper that matches the printer's specifications. Correct 11 Make...
... device cover and remove the take-up spool from the printer. ➂ Load the paper roll while lightly pressing the left paper roll holder outward. Release the holder after fitting the roll paper core onto the holder. See Appendix A, Specifications. ➀ Using scissors, cut the leading edge of the roll paper so that it is perpendicular to use roll paper that matches the printer's specifications. Correct 11 Make...

User Manual
Page 17
... roll paper into the printer (semi-automatic loading). ➅ Press the FEED button to continue feeding the paper until it extends about 20 cm (8 inches) beyond tear-off edge. ➆ Remove the side board of the take -up spool. 12 ➃ Turn on . ➄ While leaving some slack in the paper roll, insert the end of the roll paper straight into the paper inlet. The POWER...
... roll paper into the printer (semi-automatic loading). ➅ Press the FEED button to continue feeding the paper until it extends about 20 cm (8 inches) beyond tear-off edge. ➆ Remove the side board of the take -up spool. 12 ➃ Turn on . ➄ While leaving some slack in the paper roll, insert the end of the roll paper straight into the paper inlet. The POWER...

User Manual
Page 22
..., cut the paper straight across using the tear-off edge.) Then remove the roll paper core. ing to use roll paper that matches the printer's specifications. ■ Replacing the roll paper for TM-U300C/U300PC Be sure to the take -up spool, using scissors at the place shown in illustration below. ➂ While pressing the FEED switch, remove the remaining roll paper in the printer by pulling the paper lightly out in the TM...
..., cut the paper straight across using the tear-off edge.) Then remove the roll paper core. ing to use roll paper that matches the printer's specifications. ■ Replacing the roll paper for TM-U300C/U300PC Be sure to the take -up spool, using scissors at the place shown in illustration below. ➂ While pressing the FEED switch, remove the remaining roll paper in the printer by pulling the paper lightly out in the TM...
User Manual
Page 23
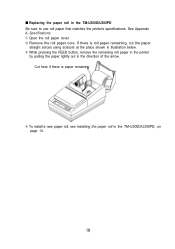
..., cut the paper straight across using scissors at the place shown in illustration below. ➂ While pressing the FEED button, remove the remaining roll paper in the printer by pulling the paper lightly out in the TM-U300D/U300PD, on page 14. ■ Replacing the paper roll in the TM-U300D/U300PD Be sure to use roll paper that matches the printer's specifications. See Appendix A, Specifications. ➀ Open the roll paper cover...
..., cut the paper straight across using scissors at the place shown in illustration below. ➂ While pressing the FEED button, remove the remaining roll paper in the printer by pulling the paper lightly out in the TM-U300D/U300PD, on page 14. ■ Replacing the paper roll in the TM-U300D/U300PD Be sure to use roll paper that matches the printer's specifications. See Appendix A, Specifications. ➀ Open the roll paper cover...

User Manual
Page 27
... optional validation detector is installed, do not use validation paper with no curls, folds (especially no curls or folds at the edges), wrinkles, or warps. Printing on validation paper. Select multi-ply paper carefully because the gluing conditions (glue quality, gluing method, glued length etc.) and the position of the paper. Notes on printing on validation paper The printer can print only one line on the ribbon.
... optional validation detector is installed, do not use validation paper with no curls, folds (especially no curls or folds at the edges), wrinkles, or warps. Printing on validation paper. Select multi-ply paper carefully because the gluing conditions (glue quality, gluing method, glued length etc.) and the position of the paper. Notes on printing on validation paper The printer can print only one line on the ribbon.
User Manual
Page 28
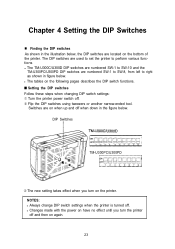
...; Setting the DIP switches Follow these steps when changing DIP switch settings: ➀ Turn the printer power switch off when down in the illustration below . Changes made with the power on have no effect until you turn the printer off . The DIP switches are used to set the printer to perform various functions The TM-U300C/U300D DIP switches are numbered SW-1 to SW-10 and the TM-U300PC/U300PD DIP switches are numbered SW-1 to SW-8, from left to right...
...; Setting the DIP switches Follow these steps when changing DIP switch settings: ➀ Turn the printer power switch off when down in the illustration below . Changes made with the power on have no effect until you turn the printer off . The DIP switches are used to set the printer to perform various functions The TM-U300C/U300D DIP switches are numbered SW-1 to SW-10 and the TM-U300PC/U300PD DIP switches are numbered SW-1 to SW-8, from left to right...
User Manual
Page 31
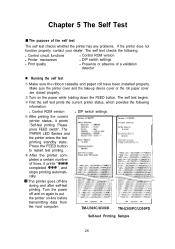
... TM-U300PC/U300PD Self-test Printing Sample 26 The self test begins. ➂ First the self test prints the current printer status, which provides the following : Control circuit functions Control ROM version Printer mechanism DIP switch settings Print quality Presence or absence of the self test The self test checks whether the printer has any problems. If the printer does not function properly, contact your dealer. pletes a certain number of lines, it prints "Self-test printing. Press the FEED button to put the printer on-line before transmitting data...
... TM-U300PC/U300PD Self-test Printing Sample 26 The self test begins. ➂ First the self test prints the current printer status, which provides the following : Control circuit functions Control ROM version Printer mechanism DIP switch settings Print quality Presence or absence of the self test The self test checks whether the printer has any problems. If the printer does not function properly, contact your dealer. pletes a certain number of lines, it prints "Self-test printing. Press the FEED button to put the printer on-line before transmitting data...

User Manual
Page 33
...: Serial impact dot matrix Serial-type, 9-pin Bi-directional (logic seeking) Approx. 3.5 LPS (40 columns, 16 CPI, single color, continuous printing) Approx. 5.8 LPS (20 columns, 16 CPI, single color, continuous printing) NOTES: When printing exceeds the allowable duty cycle, the actual printing speed may be slower than the black printing speed. (LPS: Lines Per Second) (CPI: Characters Per Inch) Characters per line: Characters per inch: Print color switching: Refer to Table A-1. Specifications 1. Selectable black or red printing 2. Character Specifications Number...
...: Serial impact dot matrix Serial-type, 9-pin Bi-directional (logic seeking) Approx. 3.5 LPS (40 columns, 16 CPI, single color, continuous printing) Approx. 5.8 LPS (20 columns, 16 CPI, single color, continuous printing) NOTES: When printing exceeds the allowable duty cycle, the actual printing speed may be slower than the black printing speed. (LPS: Lines Per Second) (CPI: Characters Per Inch) Characters per line: Characters per inch: Print color switching: Refer to Table A-1. Specifications 1. Selectable black or red printing 2. Character Specifications Number...
User Manual
Page 35
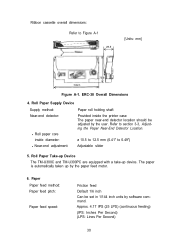
... inside the printer case The paper near-end detector location should be set in 1/144 inch units by software command. Roll Paper Take-up Device The TM-U300C and TM-U300PC are equipped with a take-up by the user. Ribbon cassette overall dimensions: Refer to 0.49") Near-end adjustment: Adjustable slider 5. Paper Paper feed method: Paper feed pitch: Paper feed speed: Friction feed Default 1/6 inch Can be adjusted by the paper feed motor. 6. Refer to section 3-3, Adjusting the Paper Near-End...
... inside the printer case The paper near-end detector location should be set in 1/144 inch units by software command. Roll Paper Take-up Device The TM-U300C and TM-U300PC are equipped with a take-up by the user. Ribbon cassette overall dimensions: Refer to 0.49") Near-end adjustment: Adjustable slider 5. Paper Paper feed method: Paper feed pitch: Paper feed speed: Friction feed Default 1/6 inch Can be adjusted by the paper feed motor. 6. Refer to section 3-3, Adjusting the Paper Near-End...

User Manual
Page 37
... of 7.5 million lines. 32 Receive Buffer Either 40 bytes or approx. 1 Kbyte, selectable using DIP switch. (TM-U300PC/U300PD) (Refer to the life of the Wearout Period. MCBF: 18,000,000 lines ❏ This is AC adapter, C. 9. Power Supply The supported power supply is an average failure interval based on failures relating to wearout and random failure up to Chapter 4, Setting the DIP switch.) 8. selectable using DIP switch. (TM-U300C/U300D...
... of 7.5 million lines. 32 Receive Buffer Either 40 bytes or approx. 1 Kbyte, selectable using DIP switch. (TM-U300PC/U300PD) (Refer to the life of the Wearout Period. MCBF: 18,000,000 lines ❏ This is AC adapter, C. 9. Power Supply The supported power supply is an average failure interval based on failures relating to wearout and random failure up to Chapter 4, Setting the DIP switch.) 8. selectable using DIP switch. (TM-U300C/U300D...


