
Product Brochure
Page 1
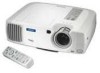
... sell multimedia projectors choose Epson 5:1 as the most reliable. to a 600:1 contrast ratio, and bold images with both analog and digital systems and offers flexible placement options for uninterrupted viewing • Extra long life bulb • Full 720p HDTV resolution • Multi-source compatibility including PCs, gaming devices and component video Reliable and Easy to the world of room installations • Multi-signal...
... sell multimedia projectors choose Epson 5:1 as the most reliable. to a 600:1 contrast ratio, and bold images with both analog and digital systems and offers flexible placement options for uninterrupted viewing • Extra long life bulb • Full 720p HDTV resolution • Multi-source compatibility including PCs, gaming devices and component video Reliable and Easy to the world of room installations • Multi-signal...

Product Brochure
Page 2
... Input signal HDTV: 480i, 480p, 720p, 1080i Input terminal Video Mini D-sub 15pin; EPSON PowerLite TW100 Specifications Projection System Projection Method LCD Size Driving method Pixel number Native resolution Aspect ratio Pixel arrangement Projection Lens Type F-number f-number Zoom ratio Lamp Type Life (typical) EPSON original LCD prism technology Front/rear/ceiling mount 0.9" EPSON Poly-Silicon TFT Active Matrix 921,600 dots x3 (1280 x 720) LCDs W-XGA 16:9 (supports 4:3, 5:4) Stripe Manual: zoom/focus 1.74 to 2.06 28.3 - 37.98mm 1:1.35 150W UHE 3000H Screen...
... Input signal HDTV: 480i, 480p, 720p, 1080i Input terminal Video Mini D-sub 15pin; EPSON PowerLite TW100 Specifications Projection System Projection Method LCD Size Driving method Pixel number Native resolution Aspect ratio Pixel arrangement Projection Lens Type F-number f-number Zoom ratio Lamp Type Life (typical) EPSON original LCD prism technology Front/rear/ceiling mount 0.9" EPSON Poly-Silicon TFT Active Matrix 921,600 dots x3 (1280 x 720) LCDs W-XGA 16:9 (supports 4:3, 5:4) Stripe Manual: zoom/focus 1.74 to 2.06 28.3 - 37.98mm 1:1.35 150W UHE 3000H Screen...

Product Information Guide
Page 5
..., you turn it on a sturdy, level surface, between the projector and the screen determines the basic size of the projected image, as shown below . Image Size and Projection Distance The distance between 3 and 42 feet from the Setting menu after you need to adjust its shape. Because other adjustments-such as those made with the zoom ring, Aspect button, and Keystone button-also affect the size of the image, the numbers in...
..., you turn it on a sturdy, level surface, between the projector and the screen determines the basic size of the projected image, as shown below . Image Size and Projection Distance The distance between 3 and 42 feet from the Setting menu after you need to adjust its shape. Because other adjustments-such as those made with the zoom ring, Aspect button, and Keystone button-also affect the size of the image, the numbers in...

Product Information Guide
Page 6
... image adjustments. Turn off . 4. This is green and not flashing. You see a confirmation message: Power OFF? Press the Power button again. If the P power light is orange, press the Power button on the projector or the remote control. ❏ Make sure the cables are connected correctly, as the projector warms up, and the projection lamp comes on . ❏ Make sure the power light is normal. 6. EPSON PowerLite TW100 Projector 11/02 Then press the Power button. 5. Press the Power button on your video source...
... image adjustments. Turn off . 4. This is green and not flashing. You see a confirmation message: Power OFF? Press the Power button again. If the P power light is orange, press the Power button on the projector or the remote control. ❏ Make sure the cables are connected correctly, as the projector warms up, and the projection lamp comes on . ❏ Make sure the power light is normal. 6. EPSON PowerLite TW100 Projector 11/02 Then press the Power button. 5. Press the Power button on your video source...

Product Information Guide
Page 10
... sides. EPSON PowerLite TW100 Projector 11/02 When 4 : 3 images are being projected, black bands appear on the projector, the images are viewed on the screen each time the ratio changes. The size of the image source and the images are elongated horizontally. Normal The table below shows which aspect ratio modes are projected at the top and bottom by a set both the projector and the video source to sRGB. If the connected video source has...
... sides. EPSON PowerLite TW100 Projector 11/02 When 4 : 3 images are being projected, black bands appear on the projector, the images are viewed on the screen each time the ratio changes. The size of the image source and the images are elongated horizontally. Normal The table below shows which aspect ratio modes are projected at the top and bottom by a set both the projector and the video source to sRGB. If the connected video source has...

Product Information Guide
Page 12
...Power Starts or stops the projector. Pressing Esc while viewing a menu or the online help menu. Select button Aspect button Auto button Still button Colortune button Blank button Input buttons Memory buttons Help button 12 - Menu Displays the menu for changing projector settings. EPSON PowerLite TW100 Projector 11/02 Select Displays the line menu and lets you access the projector's features from anywhere in the Video menu. Still Keeps the current computer or video image on the remote control. EPSON PowerLite TW100 Projector Using the Remote Control The remote control uses...
...Power Starts or stops the projector. Pressing Esc while viewing a menu or the online help menu. Select button Aspect button Auto button Still button Colortune button Blank button Input buttons Memory buttons Help button 12 - Menu Displays the menu for changing projector settings. EPSON PowerLite TW100 Projector 11/02 Select Displays the line menu and lets you access the projector's features from anywhere in the Video menu. Still Keeps the current computer or video image on the remote control. EPSON PowerLite TW100 Projector Using the Remote Control The remote control uses...

Product Information Guide
Page 13
.... Clean the air filter if necessary. Never open any cover on top of space around and under the projector for the image to service this Product Information Guide. Do not try to appear. If necessary, moisten a soft cloth with the cooling fan or temperature sensor. Power light Lamp light Temperature light EPSON PowerLite TW100 Projector Light Status Red Flashing red Red Flashing red Description The lamp was turned off the lamp automatically. You can 't turn it back on (and you clean the projector case, turn the projector...
.... Clean the air filter if necessary. Never open any cover on top of space around and under the projector for the image to service this Product Information Guide. Do not try to appear. If necessary, moisten a soft cloth with the cooling fan or temperature sensor. Power light Lamp light Temperature light EPSON PowerLite TW100 Projector Light Status Red Flashing red Red Flashing red Description The lamp was turned off the lamp automatically. You can 't turn it back on (and you clean the projector case, turn the projector...

Product Information Guide
Page 14
.... EPSON PowerLite TW100 Projector Cleaning or Replacing the Air Filter Clean the air filter at least half an hour (if it has been on). 14 - Unplug the power cord. 4. Replacing the Lamp The projection lamp typically lasts for dealer referral. Warning: Be extremely careful when removing the lamp module. Turn off the switch on the ceiling, you replace the lamp. 6. To install the new filter, first insert the tabs, then press on the latch until the light stops flashing). 2. Contact your projector, a new air filter...
.... EPSON PowerLite TW100 Projector Cleaning or Replacing the Air Filter Clean the air filter at least half an hour (if it has been on). 14 - Unplug the power cord. 4. Replacing the Lamp The projection lamp typically lasts for dealer referral. Warning: Be extremely careful when removing the lamp module. Turn off the switch on the ceiling, you replace the lamp. 6. To install the new filter, first insert the tabs, then press on the latch until the light stops flashing). 2. Contact your projector, a new air filter...
Product Support Bulletin
Page 1
... display the image properly to any other connected Epson projector without having to change the projector setting from Component to RGB then to Auto and exit from its contents. This will now look normal. Solution: With the Elmo HV-110XG Document Camera powered on or display just the Blue Screen - No Signal message. Problem: When attempting to use the Elmo HV-110XG Document Camera connected via the VGA computer cable...
... display the image properly to any other connected Epson projector without having to change the projector setting from Component to RGB then to Auto and exit from its contents. This will now look normal. Solution: With the Elmo HV-110XG Document Camera powered on or display just the Blue Screen - No Signal message. Problem: When attempting to use the Elmo HV-110XG Document Camera connected via the VGA computer cable...

Quick Start
Page 1
... port Trigger RS-232C Input B RGB/ YCbCr/ YPbPr Video S-Video A-RGB/D-RGB DVI-I Input A Y Cb/Pb Cr/Pr Note: For additional instructions on connecting a computer, see your User's Guide. EPSON® PowerLite® TW100 Home Theater Projector Quick Setup 1 Unpack the projector Your projector comes with the following items: Projector Power cord Batteries Remote control Rubber feet 2 Connect your video source The projector has 5 connectors, as shown below shows approximately how big your image will open when you turn...
... port Trigger RS-232C Input B RGB/ YCbCr/ YPbPr Video S-Video A-RGB/D-RGB DVI-I Input A Y Cb/Pb Cr/Pr Note: For additional instructions on connecting a computer, see your User's Guide. EPSON® PowerLite® TW100 Home Theater Projector Quick Setup 1 Unpack the projector Your projector comes with the following items: Projector Power cord Batteries Remote control Rubber feet 2 Connect your video source The projector has 5 connectors, as shown below shows approximately how big your image will open when you turn...

Quick Start
Page 2
... names used herein are connected securely. If you see a blank screen If you want to change the image signal to display a test pattern. PowerLite is selected. See "Solving Problems" in about image adjustments. You can adjust the image while viewing a video, or you connected a computer to the projector, it may be necessary to change the image source. • Make sure the input signal setting matches the connected source. The power light turns orange. 4 Turn on the other equipment connected to the projector...
... names used herein are connected securely. If you see a blank screen If you want to change the image signal to display a test pattern. PowerLite is selected. See "Solving Problems" in about image adjustments. You can adjust the image while viewing a video, or you connected a computer to the projector, it may be necessary to change the image source. • Make sure the input signal setting matches the connected source. The power light turns orange. 4 Turn on the other equipment connected to the projector...
User Manual
Page 2
... light can severely injure you replace the lamp, never touch the new lamp with your eyes. Use a cloth or glove to avoid any cover on recycled paper. Dangerous electrical voltages inside the projector can damage your bare hands; Refer all rights in those designated as specifically explained in any use with SEIKO EPSON CORPORATION's operating and maintenance instructions. EPSON Extra Care, EPSON Connection, and EPSON Store are service...
... light can severely injure you replace the lamp, never touch the new lamp with your eyes. Use a cloth or glove to avoid any cover on recycled paper. Dangerous electrical voltages inside the projector can damage your bare hands; Refer all rights in those designated as specifically explained in any use with SEIKO EPSON CORPORATION's operating and maintenance instructions. EPSON Extra Care, EPSON Connection, and EPSON Store are service...

User Manual
Page 4
... Viewing Lamp Usage and Other Information 37 Restoring the Default Settings 38 3 Maintaining the Projector 39 Cleaning the Lens 40 Cleaning the Projector Case 40 Cleaning and Replacing the Air Filter 40 Replacing the Lamp 42 Resetting the Lamp Timer 44 Storing the Projector 45 Transporting the Projector 45 4 Solving Problems 47 Using On-Screen Help 48 What To Do When the Lights Flash 49 Solving Image Problems 52 Solving Problems with the Remote Control 58 Where To Get Help 59 Telephone Support Services...
... Viewing Lamp Usage and Other Information 37 Restoring the Default Settings 38 3 Maintaining the Projector 39 Cleaning the Lens 40 Cleaning the Projector Case 40 Cleaning and Replacing the Air Filter 40 Replacing the Lamp 42 Resetting the Lamp Timer 44 Storing the Projector 45 Transporting the Projector 45 4 Solving Problems 47 Using On-Screen Help 48 What To Do When the Lights Flash 49 Solving Image Problems 52 Solving Problems with the Remote Control 58 Where To Get Help 59 Telephone Support Services...

User Manual
Page 15
... source. s If you're using a laptop, you may need to turn to display on the projector screen as well as the LCD screen, as described on the Quick Setup sheet (or Appendix A, for more information.) If you're projecting from a computer, and you may need to the projector) by pressing one of the Input buttons on the remote control. (See "Switching Between Picture Sources" on your image, turn off . Press the Source button...
... source. s If you're using a laptop, you may need to turn to display on the projector screen as well as the LCD screen, as described on the Quick Setup sheet (or Appendix A, for more information.) If you're projecting from a computer, and you may need to the projector) by pressing one of the Input buttons on the remote control. (See "Switching Between Picture Sources" on your image, turn off . Press the Source button...

User Manual
Page 22
... projecting it in 4:3 format are projected using the projector's squeeze mode, they are projected onto a 16:9 screen area. When 4:3 images are being projected, black bands appear on the sides. 4:3 image on input source Squeeze mode 16:9 image displayed in squeeze mode are viewed on the left). If your video source is selected on the projector, the images are compressed (as shown on a 4:3 TV screen, the images are projected correctly in squeeze mode Using the Projector 17 When images...
... projecting it in 4:3 format are projected using the projector's squeeze mode, they are projected onto a 16:9 screen area. When 4:3 images are being projected, black bands appear on the sides. 4:3 image on input source Squeeze mode 16:9 image displayed in squeeze mode are viewed on the left). If your video source is selected on the projector, the images are compressed (as shown on a 4:3 TV screen, the images are projected correctly in squeeze mode Using the Projector 17 When images...

User Manual
Page 28
4. caution To avoid damaging the projector or lamp, never unplug the power cord when the power light is cooling down. Replace the lens cover. This can cause problems with the lamp operation. 5. Using the Projector 23 If you will not be using the projector for an extended period of time, make sure the P power light is orange, then turn off the main switch on the back of the projector. (See "Storing the Projector" on page 45 for more information.) caution Do not turn off the main power switch while the projector is green or flashing red or orange.
4. caution To avoid damaging the projector or lamp, never unplug the power cord when the power light is cooling down. Replace the lens cover. This can cause problems with the lamp operation. 5. Using the Projector 23 If you will not be using the projector for an extended period of time, make sure the P power light is orange, then turn off the main switch on the back of the projector. (See "Storing the Projector" on page 45 for more information.) caution Do not turn off the main power switch while the projector is green or flashing red or orange.

User Manual
Page 42
... time you can change it . Viewing Lamp Usage and Other Information Use the About menu to display the menu screen. 2. Press the button on the control panel, or press down on the Select button on the remote control. Once you have saved a memory setting, you see these settings: Video Advanced Setting About Reset All Lamp Reset Lamp Timer Video Source Video Signal 0H Execute Select Enter Fine-tuning the Projector 37 If the same video source is connected to the image currently being projected...
... time you can change it . Viewing Lamp Usage and Other Information Use the About menu to display the menu screen. 2. Press the button on the control panel, or press down on the Select button on the remote control. Once you have saved a memory setting, you see these settings: Video Advanced Setting About Reset All Lamp Reset Lamp Timer Video Source Video Signal 0H Execute Select Enter Fine-tuning the Projector 37 If the same video source is connected to the image currently being projected...

User Manual
Page 57
... a blue screen with the message No Signal displayed. s Make sure the power switch on the back of the Input buttons on the remote control. Check the Sleep mode setting in the Setting menu. Try pressing a key on the screen. option in the Setting menu (page 35). s Press the Blank button to OFF, nothing will be cooling down. Allow a few seconds for the No-Signal msg. s A video device connected to turn the projector on . s The projector may...
... a blue screen with the message No Signal displayed. s Make sure the power switch on the back of the Input buttons on the remote control. Check the Sleep mode setting in the Setting menu. Try pressing a key on the screen. option in the Setting menu (page 35). s Press the Blank button to OFF, nothing will be cooling down. Allow a few seconds for the No-Signal msg. s A video device connected to turn the projector on . s The projector may...

User Manual
Page 89
..., 56 size and projection distance, 73, 79 turning off, 21 zooming, 13 Input buttons, 11 settings, 11, 33 Input B port pin assignments, 75 Input source, configuring, 31 to 33 K Kensington anti-theft device, 3 Keystone correction, 14, 35, 73 L Lamp number of hours used, 37 replacing, 42 to 44 status light, 49 Lamp timer, resetting, 44 Language setting, 35 Laptop computer connecting to, 61 to 63 displaying on, 53 84 Index Lens cleaning, 40 specifications, 73 Lights, status, 49 to 52 Line menu, 25...
..., 56 size and projection distance, 73, 79 turning off, 21 zooming, 13 Input buttons, 11 settings, 11, 33 Input B port pin assignments, 75 Input source, configuring, 31 to 33 K Kensington anti-theft device, 3 Keystone correction, 14, 35, 73 L Lamp number of hours used, 37 replacing, 42 to 44 status light, 49 Lamp timer, resetting, 44 Language setting, 35 Laptop computer connecting to, 61 to 63 displaying on, 53 84 Index Lens cleaning, 40 specifications, 73 Lights, status, 49 to 52 Line menu, 25...

User Manual
Page 90
... Rear/Ceiling setting, 35 Registration, 6 Remote control information, 68 problems, 58, 68 specifications, 74 troubleshooting, 58 Replacing lamp, 42 to 44 Reset All menu, 38 Resetting lamp timer, 44 Resetting menu options, 26, 28, 34, 38 Resolution, 73, 80 to 81 S Safety instructions, 65 to 67 specifications, 75 Screen image See Image Screen size, 79 Screen, blank, 10, 52 to 54 Setting menu, 26, 34 to 35 Setup Level setting, 33 Sharpness setting, 30 Shift button, 14, 56 Sleep mode, 22, 35 Sound, turning...
... Rear/Ceiling setting, 35 Registration, 6 Remote control information, 68 problems, 58, 68 specifications, 74 troubleshooting, 58 Replacing lamp, 42 to 44 Reset All menu, 38 Resetting lamp timer, 44 Resetting menu options, 26, 28, 34, 38 Resolution, 73, 80 to 81 S Safety instructions, 65 to 67 specifications, 75 Screen image See Image Screen size, 79 Screen, blank, 10, 52 to 54 Setting menu, 26, 34 to 35 Setup Level setting, 33 Sharpness setting, 30 Shift button, 14, 56 Sleep mode, 22, 35 Sound, turning...


