
Network Guide
Page 4
... 8 Network Interface Operation 8 Status light 8 Network connector 9 About the Software 9 How To Overview 11 Selecting a Printing Method 12 Printing from Windows 12 Features of the Printing Methods 12 Installing Components on Your Computer 13 About Installing Components on Your Computer 13 Windows 8/7/Vista 13 Windows XP 15 Setting Up the Network Interface 16 Connecting the Network Interface to the Network 16 Configuring the Network Interface 17 Installing the Printer Driver 17 About Installing the Printer Driver...
... 8 Network Interface Operation 8 Status light 8 Network connector 9 About the Software 9 How To Overview 11 Selecting a Printing Method 12 Printing from Windows 12 Features of the Printing Methods 12 Installing Components on Your Computer 13 About Installing Components on Your Computer 13 Windows 8/7/Vista 13 Windows XP 15 Setting Up the Network Interface 16 Connecting the Network Interface to the Network 16 Configuring the Network Interface 17 Installing the Printer Driver 17 About Installing the Printer Driver...

Network Guide
Page 7
... Ethernet interface, which is written for use the printer on your printer and computers. About This Guide This Network Guide contains information about your printer, see your computer. The built-in this manual, automatically selects the correct standard when it automatically selects appropriate network protocols. Use the Software Disc to set up the network interface, install the configuration software, and modify network settings of your network or operating system. It includes how...
... Ethernet interface, which is written for use the printer on your printer and computers. About This Guide This Network Guide contains information about your printer, see your computer. The built-in this manual, automatically selects the correct standard when it automatically selects appropriate network protocols. Use the Software Disc to set up the network interface, install the configuration software, and modify network settings of your network or operating system. It includes how...

Network Guide
Page 11
..., and network settings (such as status lights and RJ-45 connector. Connect the network interface to the network. If necessary, configure the network settings of the network interface, such as IP address, subnet mask, etc.) of the computer is set up the network interface for details. 3. How To 11 Configure the network interface and install the printer driver. Check the network interface operation. See "About Installing Components on Your Computer" on page 13...
..., and network settings (such as status lights and RJ-45 connector. Connect the network interface to the network. If necessary, configure the network settings of the network interface, such as IP address, subnet mask, etc.) of the computer is set up the network interface for details. 3. How To 11 Configure the network interface and install the printer driver. Check the network interface operation. See "About Installing Components on Your Computer" on page 13...
Network Guide
Page 13
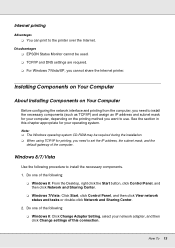
.... O Windows 7/Vista: Click Start, click Control Panel, and then click View network status and tasks or double-click Network and Sharing Center. 2. Installing Components on Your Computer About Installing Components on the printing method you want to install the necessary components. 1. See the section in this connection. Note: O The Windows operating system CD-ROM may be used. Do one of the following: O Windows 8: Click Change Adapter Setting, select your network adapter...
.... O Windows 7/Vista: Click Start, click Control Panel, and then click View network status and tasks or double-click Network and Sharing Center. 2. Installing Components on Your Computer About Installing Components on the printing method you want to install the necessary components. 1. See the section in this connection. Note: O The Windows operating system CD-ROM may be used. Do one of the following: O Windows 8: Click Change Adapter Setting, select your network adapter...

Network Guide
Page 16
Make sure that your printer. Note: You can configure the network interface to use on the TCP/IP network and also install the printer driver using Windows, see "Configuring the Network Interface" on page 17. Important: After turning off the printer, wait until the status lights go off, print a network status sheet. Double-click Internet Protocol (TCP/IP) on page 16. Restart the computer. The necessary components are using the Software Disc shipped with your printer is turned off...
Make sure that your printer. Note: You can configure the network interface to use on the TCP/IP network and also install the printer driver using Windows, see "Configuring the Network Interface" on page 17. Important: After turning off the printer, wait until the status lights go off, print a network status sheet. Double-click Internet Protocol (TCP/IP) on page 16. Restart the computer. The necessary components are using the Software Disc shipped with your printer is turned off...

Network Guide
Page 17
... Network Interface Configure the network interface for your operating system. Installing the Printer Driver About Installing the Printer Driver To print to install the printer driver on your computer. 1. The software installer screen opens automatically. If the software installer screen does not appear, double-click setup.exe on -screen instructions to accept the license terms. 7. Click the Next button at the Welcome screen 6. Follow the on the Software Disc. 4. Software installation starts. Note: If you need to the network printer, you see the User Account Control...
... Network Interface Configure the network interface for your operating system. Installing the Printer Driver About Installing the Printer Driver To print to install the printer driver on your computer. 1. The software installer screen opens automatically. If the software installer screen does not appear, double-click setup.exe on -screen instructions to accept the license terms. 7. Click the Next button at the Welcome screen 6. Follow the on the Software Disc. 4. Software installation starts. Note: If you need to the network printer, you see the User Account Control...

Network Guide
Page 20
... IP address box using a TCP/IP address or hostname radio button and then click Next. 6. Follow the on-screen instructions to set on page 21 to start the Add Printer wizard. 3. How To 20 The URL should be the same as the URL you set up the device. See "Installing a printer driver" on EpsonNet Config's IPP/IPPS Information page. Click Add a network, wireless or Bluetooth printer. 4. Internet printing (IPP...
... IP address box using a TCP/IP address or hostname radio button and then click Next. 6. Follow the on-screen instructions to set on page 21 to start the Add Printer wizard. 3. How To 20 The URL should be the same as the URL you set up the device. See "Installing a printer driver" on EpsonNet Config's IPP/IPPS Information page. Click Add a network, wireless or Bluetooth printer. 4. Internet printing (IPP...

Network Guide
Page 21
... Next. Note: If the Add Printer wizard prompts you to complete the setup. Clicking No will abort the driver installation. 8. Click Open. 6. Windows XP The printer driver installation procedure differs depending on -screen instructions to install the software, click Yes. TCP/IP printing 1. How To 21 Click Browse. 5. On the Add Printer screen, click the Have Disk button. Installing a printer driver 1. Note: If the User Account Control screen appears, click the Yes or...
... Next. Note: If the Add Printer wizard prompts you to complete the setup. Clicking No will abort the driver installation. 8. Click Open. 6. Windows XP The printer driver installation procedure differs depending on -screen instructions to install the software, click Yes. TCP/IP printing 1. How To 21 Click Browse. 5. On the Add Printer screen, click the Have Disk button. Installing a printer driver 1. Note: If the User Account Control screen appears, click the Yes or...

Network Guide
Page 24
... Add Printer screen, click the Have Disk button. Follow the on a home or office network radio button. 5. Select the CD/DVD drive for details. 6. See "Installing a printer driver" on EpsonNet Config's IPP/IPPS Information page. Enter the URL of the network interface, use EpsonNet Config. Click Browse. 5. http://IP address of printer:631/Printer name Example: http://192.168.100.201:631/EPSON_IPP_Printer Note: To check...
... Add Printer screen, click the Have Disk button. Follow the on a home or office network radio button. 5. Select the CD/DVD drive for details. 6. See "Installing a printer driver" on EpsonNet Config's IPP/IPPS Information page. Enter the URL of the network interface, use EpsonNet Config. Click Browse. 5. http://IP address of printer:631/Printer name Example: http://192.168.100.201:631/EPSON_IPP_Printer Note: To check...

Network Guide
Page 34
... button until Network Setup appears. Tips for more information about settings on the printer's control panel. Tips for Administrator Setting an IP Address on the Printer's Control Panel After connecting the printer to the network, you need to confirm the new IP address. To set the IP address, subnet mask, and default gateway from the DHCP server whenever the printer is reset or turned on your printer. 2. Print a network status sheet to set the IP address before using the printer's control panel. O Choose Panel when manually setting the IP address...
... button until Network Setup appears. Tips for more information about settings on the printer's control panel. Tips for Administrator Setting an IP Address on the Printer's Control Panel After connecting the printer to the network, you need to confirm the new IP address. To set the IP address, subnet mask, and default gateway from the DHCP server whenever the printer is reset or turned on your printer. 2. Print a network status sheet to set the IP address before using the printer's control panel. O Choose Panel when manually setting the IP address...

User Manual
Page 3
... Replacement Parts 17 Printer Usage Guidelines ...18 Using Your Printer ...18 Handling Ink Packs and Ink Tanks 19 Handling Media...20 Storing Your Printer ...20 Media Handling...22 Media Handling Precautions ...22 Loading Media...23 Viewing and Changing Media Settings 41 Saving Sets of Media Settings...42 Printable Area and Media Size Checking 43 Printing the Amount of Media Remaining 45 Aligning the Print Head...46 Adjusting the Media Feed...47 Adjusting the Media Feed During Printing 49 Adjusting Heating and Drying During Printing 50 Cutting Media ...50 Using the Auto...
... Replacement Parts 17 Printer Usage Guidelines ...18 Using Your Printer ...18 Handling Ink Packs and Ink Tanks 19 Handling Media...20 Storing Your Printer ...20 Media Handling...22 Media Handling Precautions ...22 Loading Media...23 Viewing and Changing Media Settings 41 Saving Sets of Media Settings...42 Printable Area and Media Size Checking 43 Printing the Amount of Media Remaining 45 Aligning the Print Head...46 Adjusting the Media Feed...47 Adjusting the Media Feed During Printing 49 Adjusting Heating and Drying During Printing 50 Cutting Media ...50 Using the Auto...

User Manual
Page 20
... the media packaging materials so you can use the printer for an extended period of time with each type of direct sunlight. • Display and store printed media as you do not turn on at least once every two weeks to automatically clean the print head and prevent the nozzles from causing creases in the media, which may cause jams or damage to the print head. • Make sure...
... the media packaging materials so you can use the printer for an extended period of time with each type of direct sunlight. • Display and store printed media as you do not turn on at least once every two weeks to automatically clean the print head and prevent the nozzles from causing creases in the media, which may cause jams or damage to the print head. • Make sure...

User Manual
Page 47
... a test pattern, and then selecting the feed adjustments you need to use for printing. You may need . Parent topic: Media Handling Related references Media Setup Menu Settings Adjusting the Media Feed If your printouts contain horizontal banding, uneven tint, or stripes, you need to adjust the feed again if you plan to select the pattern number with the fewest gaps, as in C1 and press the OK button. Before adjusting the feed, make sure you have correctly loaded...
... a test pattern, and then selecting the feed adjustments you need to use for printing. You may need . Parent topic: Media Handling Related references Media Setup Menu Settings Adjusting the Media Feed If your printouts contain horizontal banding, uneven tint, or stripes, you need to adjust the feed again if you plan to select the pattern number with the fewest gaps, as in C1 and press the OK button. Before adjusting the feed, make sure you have correctly loaded...

User Manual
Page 83
...) Side Margin(Left) Print Start Position Margin Between Pages Media Size Check Media End Check Options 0.12 to 1.00 inch (3 to 25 mm) 0.12 to 1.00 inch (3 to 25 mm) 0.00 to 32.00 inches (0 to 800 mm) Normal No Margin/-10 mm to use these menu settings correctly. Parent topic: Using the Control Panel Menus Related tasks Loading Media Saving Sets of Media Settings Adjusting the Media Feed Aligning the Print Head Adjusting Heating and Drying During Printing Printer Setup Menu Settings The Printer Setup menu lets you control margin settings, automatic cleaning...
...) Side Margin(Left) Print Start Position Margin Between Pages Media Size Check Media End Check Options 0.12 to 1.00 inch (3 to 25 mm) 0.12 to 1.00 inch (3 to 25 mm) 0.00 to 32.00 inches (0 to 800 mm) Normal No Margin/-10 mm to use these menu settings correctly. Parent topic: Using the Control Panel Menus Related tasks Loading Media Saving Sets of Media Settings Adjusting the Media Feed Aligning the Print Head Adjusting Heating and Drying During Printing Printer Setup Menu Settings The Printer Setup menu lets you control margin settings, automatic cleaning...

User Manual
Page 118
... print head only if print quality declines or image colors are gaps or the pattern is clean and you resume printing. You can clean the print head when printing is paused, if necessary, but the colors in the Printer Setup menu. Parent topic: Print Head Maintenance Related references Printer Setup Menu Settings Maintenance Menu Settings Related tasks Loading Media Cleaning the Print Head Cleaning the Print Head If printouts are no gaps, the print head is faint, clean the print head. You can select from three levels of head cleaning: • Execute (Light): Use this cleaning level...
... print head only if print quality declines or image colors are gaps or the pattern is clean and you resume printing. You can clean the print head when printing is paused, if necessary, but the colors in the Printer Setup menu. Parent topic: Print Head Maintenance Related references Printer Setup Menu Settings Maintenance Menu Settings Related tasks Loading Media Cleaning the Print Head Cleaning the Print Head If printouts are no gaps, the print head is faint, clean the print head. You can select from three levels of head cleaning: • Execute (Light): Use this cleaning level...
User Manual
Page 179
... pause/cancel button and select Job Cancel. F/W Install Error Firmware update failed. If this doesn't work, note the code and call for service has occurred, the printer automatically stops printing. sure the media is nearing or at least 11.8 inches (300 mm) wide. Call For Service A call for service is displayed on the LCD screen, contact Epson for service occurs when: XXX Error XXX • The power cable is compatible with the service code shown...
... pause/cancel button and select Job Cancel. F/W Install Error Firmware update failed. If this doesn't work, note the code and call for service has occurred, the printer automatically stops printing. sure the media is nearing or at least 11.8 inches (300 mm) wide. Call For Service A call for service is displayed on the LCD screen, contact Epson for service occurs when: XXX Error XXX • The power cable is compatible with the service code shown...

User Manual
Page 183
... cable. • Check the model and specifications of the interface cable to see if the cable is appropriate for your printer directly to a USB hub, make sure the printer's IP address is turned on the network. Disconnect all USB hubs from the computer and connect the printer directly to your printer from another computer on . • Make sure any interface cables are using DHCP, set correctly for your network does not assign IP addresses using...
... cable. • Check the model and specifications of the interface cable to see if the cable is appropriate for your printer directly to a USB hub, make sure the printer's IP address is turned on the network. Disconnect all USB hubs from the computer and connect the printer directly to your printer from another computer on . • Make sure any interface cables are using DHCP, set correctly for your network does not assign IP addresses using...
User Manual
Page 232
... product or use the product with a cable, ensure the correct orientation of the connectors. Click here for sufficient ventilation. Do not block or cover openings in your documentation, do not tilt it, stand it on its side, or turn off the product using the product for a long period, unplug the power cord from potential sources of electromagnetic interference, such as specifically explained in...
... product or use the product with a cable, ensure the correct orientation of the connectors. Click here for sufficient ventilation. Do not block or cover openings in your documentation, do not tilt it, stand it on its side, or turn off the product using the product for a long period, unplug the power cord from potential sources of electromagnetic interference, such as specifically explained in...
Warranty Statement
Page 4
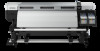
... Epson SureColor F9200 64-inch wide printer prove defective during Epson's regular support hours (currently 6:00 AM to receive, unpack, and install the replacement printer, and prepare the defective printer for return shipment by the serial number. Epson also warrants that for highlights of the programs. When service involves the exchange of a unit or its sole discretion Epson may be free from defects in the user manual or documentation...
... Epson SureColor F9200 64-inch wide printer prove defective during Epson's regular support hours (currently 6:00 AM to receive, unpack, and install the replacement printer, and prepare the defective printer for return shipment by the serial number. Epson also warrants that for highlights of the programs. When service involves the exchange of a unit or its sole discretion Epson may be free from defects in the user manual or documentation...

Warranty Statement
Page 5
... software, applications, parts, components or peripheral devices added to use , coverage of your user's guide for in the Epson SureColor F9200 User's Guide. Check and clean the print head, wiper, wiper cleaner, caps, heat shield, and wiper rail. e. If the printer will be invoiced at least every two weeks. The userlevel maintenance includes the following items: a. b. Check and replace the wiper, and wiper cleaner parts - d. Apply carriage rod grease when a message...
... software, applications, parts, components or peripheral devices added to use , coverage of your user's guide for in the Epson SureColor F9200 User's Guide. Check and clean the print head, wiper, wiper cleaner, caps, heat shield, and wiper rail. e. If the printer will be invoiced at least every two weeks. The userlevel maintenance includes the following items: a. b. Check and replace the wiper, and wiper cleaner parts - d. Apply carriage rod grease when a message...

