
Quick Reference Guide
Page 2
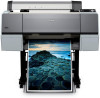
Printer Parts Front Roll paper holder Front cover Ink bay Paper basket Back Interface connector for optional equipment USB interface Roll paper cover Control panel Ink bay Casters Network interface AC inlet Maintenance tank (Pro 9890 includes two tanks, one on each side of printer) 1
Printer Parts Front Roll paper holder Front cover Ink bay Paper basket Back Interface connector for optional equipment USB interface Roll paper cover Control panel Ink bay Casters Network interface AC inlet Maintenance tank (Pro 9890 includes two tanks, one on each side of printer) 1
Quick Reference Guide
Page 3
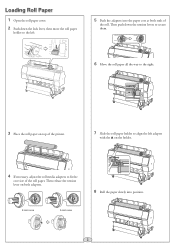
... to fit the core size of the roll paper. Loading Roll Paper 1 Open the roll paper cover. 2 Push down the tension levers to secure them. 6 Move the roll paper all the way to the right. 3 Place the roll paper on top of the printer. 7 Slide the roll paper holder to align the left . 5 Push the adapters... into position. 2 Then push down the lock lever, then move the roll paper holder to the left adapter with the...
... to fit the core size of the roll paper. Loading Roll Paper 1 Open the roll paper cover. 2 Push down the tension levers to secure them. 6 Move the roll paper all the way to the right. 3 Place the roll paper on top of the printer. 7 Slide the roll paper holder to align the left . 5 Push the adapters... into position. 2 Then push down the lock lever, then move the roll paper holder to the left adapter with the...
Quick Reference Guide
Page 4
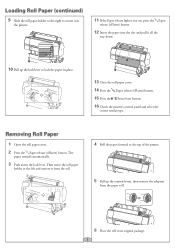
... move the roll paper holder to lock the paper in its original package. 3 Removing Roll Paper 1 Open the roll paper cover. 2 Press the Paper release (ePlaten) button. The paper rewinds automatically. 3 Push down . 10 Pull up the tension levers, then remove the adapters from the roll. 4 Roll the paper forward to the ...the printer. 11 If the Paper release light is not on, press the Paper release (ePlaten) button. 12 Insert the paper into the slot and pull it from the paper roll. 6 Place the roll in place. 13 Close the roll paper cover. 14 Press the Paper release (ePlaten) button. 15...
... move the roll paper holder to lock the paper in its original package. 3 Removing Roll Paper 1 Open the roll paper cover. 2 Press the Paper release (ePlaten) button. The paper rewinds automatically. 3 Push down . 10 Pull up the tension levers, then remove the adapters from the roll. 4 Roll the paper forward to the ...the printer. 11 If the Paper release light is not on, press the Paper release (ePlaten) button. 12 Insert the paper into the slot and pull it from the paper roll. 6 Place the roll in place. 13 Close the roll paper cover. 14 Press the Paper release (ePlaten) button. 15...
Quick Reference Guide
Page 5
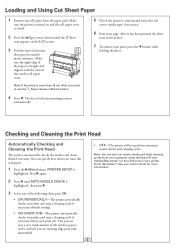
...Menu button. This process uses a very small amount of the paper is useful if you want this to use the Paper release (ePlaten) button. 4 Press . Loading and Using Cut Sheet Paper 1 Remove any roll paper from your computer using the Epson Printer Utility4 (Macintosh®) or the Utility tab in the printer.... 7 To remove your print, press the button while holding the sheet. Make sure the right edge of ink (and no paper) and is straight...
...Menu button. This process uses a very small amount of the paper is useful if you want this to use the Paper release (ePlaten) button. 4 Press . Loading and Using Cut Sheet Paper 1 Remove any roll paper from your computer using the Epson Printer Utility4 (Macintosh®) or the Utility tab in the printer.... 7 To remove your print, press the button while holding the sheet. Make sure the right edge of ink (and no paper) and is straight...

Quick Reference Guide
Page 6
...button. 3 Press until HEAD ALIGNMENT is highlighted. POWER CLEANING-Press OK to start the cleaning cycle. Load Epson Enhanced Matte paper. (You can also use Epson Doubleweight Matte or Ultra Premium Photo Paper Luster.) 2 Press the Menu button. 3 Press the or button until TEST PRINT is selected, then press... as described below. 1 Press the Menu button. 2 Press until MAINTENANCE is selected, then press . 3 Press until CLEANING is the type of paper you need to start the bi-directional alignment. 11 When done, press the Pause/reset button. 5 CLEAN EACH COLOR-Press , select the color ...
...button. 3 Press until HEAD ALIGNMENT is highlighted. POWER CLEANING-Press OK to start the cleaning cycle. Load Epson Enhanced Matte paper. (You can also use Epson Doubleweight Matte or Ultra Premium Photo Paper Luster.) 2 Press the Menu button. 3 Press the or button until TEST PRINT is selected, then press... as described below. 1 Press the Menu button. 2 Press until MAINTENANCE is selected, then press . 3 Press until CLEANING is the type of paper you need to start the bi-directional alignment. 11 When done, press the Pause/reset button. 5 CLEAN EACH COLOR-Press , select the color ...
Quick Reference Guide
Page 8
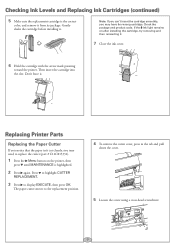
Note: If you can't insert the cartridge smoothly, you may have the wrong cartridge. Replacing Printer Parts Replacing the Paper Cutter If you notice that the paper isn't cut cleanly, you may need to display EXECUTE, then press OK. Press to highlight CUTTER REPLACEMENT. 3 Press to replace the cutter (part... then reinserting it from its package. Check the package and product code. Then insert the cartridge into the slot. Don't force it . The paper cutter moves to the replacement position. 4 To remove the cutter cover, press in the tab and pull down the cover. 5 Loosen the screw...
Note: If you can't insert the cartridge smoothly, you may have the wrong cartridge. Replacing Printer Parts Replacing the Paper Cutter If you notice that the paper isn't cut cleanly, you may need to display EXECUTE, then press OK. Press to highlight CUTTER REPLACEMENT. 3 Press to replace the cutter (part... then reinserting it from its package. Check the package and product code. Then insert the cartridge into the slot. Don't force it . The paper cutter moves to the replacement position. 4 To remove the cutter cover, press in the tab and pull down the cover. 5 Loosen the screw...

Quick Reference Guide
Page 10
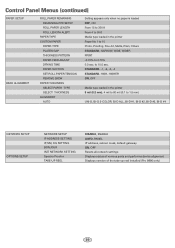
... 0 Number of capacity remaining in each maintance tank Ink in milliliters and paper in each saved job; Menu PRINTER SETUP Item PLATEN GAP PAGE LINE ROLL PAPER MARGIN PAPER SIZE CHECK PAPER SKEW CHECK REFRESH MARGIN AUTO NOZZLE CHECK PRINT NOZZLE PATTERN INITIALIZE SETTINGS Settings ... jobs; Control Panel Menus Boldface type indicates the default setting. most recent job is number 0 Information about registered paper configurations MAINTENANCE PRINTER STATUS CUTTER ADJUSTMENT CUTTER REPLACEMENT CLEANING CLOCK SETTING VERSION INK LEVEL MAINTENANCE TANK JOB HISTORY TOTAL PRINTS ...
... 0 Number of capacity remaining in each maintance tank Ink in milliliters and paper in each saved job; Menu PRINTER SETUP Item PLATEN GAP PAGE LINE ROLL PAPER MARGIN PAPER SIZE CHECK PAPER SKEW CHECK REFRESH MARGIN AUTO NOZZLE CHECK PRINT NOZZLE PATTERN INITIALIZE SETTINGS Settings ... jobs; Control Panel Menus Boldface type indicates the default setting. most recent job is number 0 Information about registered paper configurations MAINTENANCE PRINTER STATUS CUTTER ADJUSTMENT CUTTER REPLACEMENT CLEANING CLOCK SETTING VERSION INK LEVEL MAINTENANCE TANK JOB HISTORY TOTAL PRINTS ...
Quick Reference Guide
Page 11
... settings Displays status of various parts and performs device alignment Displays version of the take-up reel installed (Pro 9890 only) 10 STANDARD, -1, -2, -3, -4 STANDARD, HIGH, HIGHER ON, OFF Media type loaded in the printer Paper No 1 to 10 Photo, Proofing, Fine Art, Matte, Plain, Others STANDARD, NARROW, WIDE, WIDER PRINT -0.70% to...
... settings Displays status of various parts and performs device alignment Displays version of the take-up reel installed (Pro 9890 only) 10 STANDARD, -1, -2, -3, -4 STANDARD, HIGH, HIGHER ON, OFF Media type loaded in the printer Paper No 1 to 10 Photo, Proofing, Fine Art, Matte, Plain, Others STANDARD, NARROW, WIDE, WIDER PRINT -0.70% to...

Quick Reference Guide
Page 13
Control Panel Lights and Buttons Paper light Power light and button Pause/reset light and button Ink light Black ink change button Paper feed up button Paper release (ePlaten™) light and button Menu button Paper cut button Ink cover open button OK button Paper feed down button Left arrow or paper source button Printed in USA CPD-28260
Control Panel Lights and Buttons Paper light Power light and button Pause/reset light and button Ink light Black ink change button Paper feed up button Paper release (ePlaten™) light and button Menu button Paper cut button Ink cover open button OK button Paper feed down button Left arrow or paper source button Printed in USA CPD-28260
User's Guide
Page 5
...the Printer 21 Unpacking and Assembling the Stand 22 Unpacking the Printer and Mounting It on the Stand 25 Attaching the Paper Basket (Epson Stylus Pro 7890 27 Attaching the Paper Basket (Epson Stylus Pro 9890 34 Completing Setup and Connecting the Power Cord 42 Installing Ink 46 Connecting to Your System 48 Installing the ...Firmware 52 Checking the Current Firmware Version 52 Downloading and Updating the Firmware 53 Configuring the Printer's Network Adapter 54 2 Handling Paper and Other Media Selecting Media for Your Printer 55 Available Epson Special Media 56 Guidelines for Using...
...the Printer 21 Unpacking and Assembling the Stand 22 Unpacking the Printer and Mounting It on the Stand 25 Attaching the Paper Basket (Epson Stylus Pro 7890 27 Attaching the Paper Basket (Epson Stylus Pro 9890 34 Completing Setup and Connecting the Power Cord 42 Installing Ink 46 Connecting to Your System 48 Installing the ...Firmware 52 Checking the Current Firmware Version 52 Downloading and Updating the Firmware 53 Configuring the Printer's Network Adapter 54 2 Handling Paper and Other Media Selecting Media for Your Printer 55 Available Epson Special Media 56 Guidelines for Using...
User's Guide
Page 6
... Printer 76 Catching Printouts Under the Printer 78 Storing the Paper Basket 80 Optimizing the Settings for Your Paper 81 Creating Paper Configurations 81 Printing Your Paper Configurations 83 Selecting Paper Configurations 83 3 Printing With Epson Drivers for Mac OS X Sizing Images for Borderless Printing on Roll Paper 86 Choosing Page Setup and Basic Print Options 87...
... Printer 76 Catching Printouts Under the Printer 78 Storing the Paper Basket 80 Optimizing the Settings for Your Paper 81 Creating Paper Configurations 81 Printing Your Paper Configurations 83 Selecting Paper Configurations 83 3 Printing With Epson Drivers for Mac OS X Sizing Images for Borderless Printing on Roll Paper 86 Choosing Page Setup and Basic Print Options 87...
User's Guide
Page 7
...4 Printing With Epson Drivers for Windows Sizing Images for Borderless Printing on Roll Paper 108 Choosing Basic Print Options 109 Selecting the Correct Media Type Setting 111 Choosing Color Management Options 114 Choosing Roll Paper Options 116 Choosing Cut Sheet Paper Options 119 Choosing ...Page Layout Options 122 Choosing Advanced Black and White Photo Settings 123 Choosing Paper Configuration Options 125 Saving, Exporting, and Importing Custom ...
...4 Printing With Epson Drivers for Windows Sizing Images for Borderless Printing on Roll Paper 108 Choosing Basic Print Options 109 Selecting the Correct Media Type Setting 111 Choosing Color Management Options 114 Choosing Roll Paper Options 116 Choosing Cut Sheet Paper Options 119 Choosing ...Page Layout Options 122 Choosing Advanced Black and White Photo Settings 123 Choosing Paper Configuration Options 125 Saving, Exporting, and Importing Custom ...
User's Guide
Page 8
... Head 152 Replacing Ink Cartridges 153 Switching Black Ink Mode 157 Changing the Date and Time 157 Using Maintenance Mode 158 Replacing the Paper Cutter 159 Removing the Old Cutter 159 Installing the New Cutter 161 Replacing the Maintenance Tank 163 Cleaning the Printer 165 Transporting or ...172 Auto Take-Up Reel Error Messages 176 Improving Print Quality 177 Solving Operational Problems 180 Solving Miscellaneous Printing Problems 181 Solving Paper Problems 183 Fixing Paper Eject Problems 184 Clearing Paper Jams 185 Solving Problems With the Optional Auto Take-Up Reel 187 8
... Head 152 Replacing Ink Cartridges 153 Switching Black Ink Mode 157 Changing the Date and Time 157 Using Maintenance Mode 158 Replacing the Paper Cutter 159 Removing the Old Cutter 159 Installing the New Cutter 161 Replacing the Maintenance Tank 163 Cleaning the Printer 165 Transporting or ...172 Auto Take-Up Reel Error Messages 176 Improving Print Quality 177 Solving Operational Problems 180 Solving Miscellaneous Printing Problems 181 Solving Paper Problems 183 Fixing Paper Eject Problems 184 Clearing Paper Jams 185 Solving Problems With the Optional Auto Take-Up Reel 187 8
User's Guide
Page 9
... A Specifications Clearing Stored Print Information 189 Environmental 189 Electrical 190 Dimensions and Weight 190 Printer Interfaces 190 Safety Approvals 191 Media 191 Roll Paper 191 Cut Sheets 194 Printable Area 198 Ink Cartridges 198 B Using the Optional Auto Take-Up Reel Loading Roll... the Take-Up Reel 200 Winding Prints Forward 201 Winding Prints Backward 202 Printing Using the Auto Take-Up Reel 203 Reversing the Paper Stops for a 2-inch Paper Reel Core 204 Installing a Take-Up Reel Core 206 C Control Panel Control Panel Buttons and Lights 209 Buttons 209 Lights 211 LCD ...
... A Specifications Clearing Stored Print Information 189 Environmental 189 Electrical 190 Dimensions and Weight 190 Printer Interfaces 190 Safety Approvals 191 Media 191 Roll Paper 191 Cut Sheets 194 Printable Area 198 Ink Cartridges 198 B Using the Optional Auto Take-Up Reel Loading Roll... the Take-Up Reel 200 Winding Prints Forward 201 Winding Prints Backward 202 Printing Using the Auto Take-Up Reel 203 Reversing the Paper Stops for a 2-inch Paper Reel Core 204 Installing a Take-Up Reel Core 206 C Control Panel Control Panel Buttons and Lights 209 Buttons 209 Lights 211 LCD ...
User's Guide
Page 11
Warnings, Cautions, Notes, and Tips Please follow these guidelines as you use and printer maintenance-loading paper, replacing ink cartridges and other components, cleaning and aligning the print head, and using the printer's menu system. Notes contain important information about your... daily use this book: WARNINGS must be followed carefully to get the most out of procedures for setting up and using your printer, loading paper, using the Epson® printer drivers, and replacing ink cartridges. Cautions must be observed to avoid damage to your printer. It also tells you have a ...
Warnings, Cautions, Notes, and Tips Please follow these guidelines as you use and printer maintenance-loading paper, replacing ink cartridges and other components, cleaning and aligning the print head, and using the printer's menu system. Notes contain important information about your... daily use this book: WARNINGS must be followed carefully to get the most out of procedures for setting up and using your printer, loading paper, using the Epson® printer drivers, and replacing ink cartridges. Cautions must be observed to avoid damage to your printer. It also tells you have a ...
User's Guide
Page 12
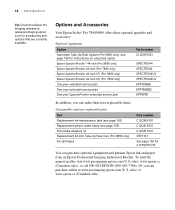
...Epson Stylus® Pro 7890/9890 offers these user-replaceable items: Consumables and user-replaceable parts Part Replacement ink maintenance tank (see page 163) Replacement printer cutter blade (see page 199 for instructions on using this option Epson SpectroProofer™ 44-inch (Pro 9890 only) Epson SpectroProofer 24-inch (Pro 7890 only) Epson...In addition, you can purchase optional equipment and genuine Epson ink and paper from an Epson Professional Imaging Authorized Reseller. You can purchase online at www.proimaging.epson. Or you can order these optional upgrades and accessories:...
...Epson Stylus® Pro 7890/9890 offers these user-replaceable items: Consumables and user-replaceable parts Part Replacement ink maintenance tank (see page 163) Replacement printer cutter blade (see page 199 for instructions on using this option Epson SpectroProofer™ 44-inch (Pro 9890 only) Epson SpectroProofer 24-inch (Pro 7890 only) Epson...In addition, you can purchase optional equipment and genuine Epson ink and paper from an Epson Professional Imaging Authorized Reseller. You can purchase online at www.proimaging.epson. Or you can order these optional upgrades and accessories:...
User's Guide
Page 15
... operate properly if it is designed for use a damaged or frayed power cord. 15 Make sure you use the equipment safely and effectively. • The Epson Stylus Pro 7890 weighs about 186 lb (84.5 kg) and the Epson Stylus Pro 9890 weighs about 256 lb (116 kg) without the stand, paper basket, ink, or...
... operate properly if it is designed for use a damaged or frayed power cord. 15 Make sure you use the equipment safely and effectively. • The Epson Stylus Pro 7890 weighs about 186 lb (84.5 kg) and the Epson Stylus Pro 9890 weighs about 256 lb (116 kg) without the stand, paper basket, ink, or...

User's Guide
Page 18
Front Roll paper holder Roll paper cover Front cover Control panel Ink bay Paper basket Back Interface connector for optional equipment USB interface for the Pro 7890 unless otherwise noted. 18 | Introduction Printer Parts These illustrations show the Epson Stylus Pro 9890, but the parts are the same for computer Ink bay Casters Network interface Maintenance tank (Pro 9890 includes two tanks, one on each side of printer) 18 AC inlet
Front Roll paper holder Roll paper cover Front cover Control panel Ink bay Paper basket Back Interface connector for optional equipment USB interface for the Pro 7890 unless otherwise noted. 18 | Introduction Printer Parts These illustrations show the Epson Stylus Pro 9890, but the parts are the same for computer Ink bay Casters Network interface Maintenance tank (Pro 9890 includes two tanks, one on each side of printer) 18 AC inlet
User's Guide
Page 19
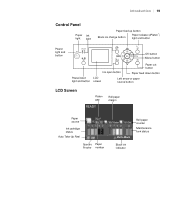
Introduction | 19 Control Panel Paper Ink light light Paper feed up button Black ink change button Paper release (ePlaten™) light and button Power light and button OK button Menu button Pause/reset light and button Ink open button Paper cut button Paper feed down button LCD screen Left arrow or paper source button LCD Screen Platen gap Roll paper margin Paper source Ink cartridge status Auto Take-Up Reel Spectro Paper Proofer number Roll paper counter Maintenance tank status Black ink indicator 19
Introduction | 19 Control Panel Paper Ink light light Paper feed up button Black ink change button Paper release (ePlaten™) light and button Power light and button OK button Menu button Pause/reset light and button Ink open button Paper cut button Paper feed down button LCD screen Left arrow or paper source button LCD Screen Platen gap Roll paper margin Paper source Ink cartridge status Auto Take-Up Reel Spectro Paper Proofer number Roll paper counter Maintenance tank status Black ink indicator 19
User's Guide
Page 22
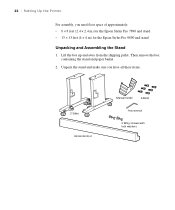
22 | Setting Up the Printer For assembly, you have all these items. 2 Sides Horizontal strut Manual holder 6 Bolts Hex wrench 2 Wing screws with lock washers 22 Lift the box up and away from the shipping pallet. Unpack the stand and make sure you need floor space of approximately: • 8 × 8 feet (2.4 × 2.4 m) for the Epson Stylus Pro 7890 and stand • 13 × 13 feet (4 × 4 m) for the Epson Stylus Pro 9890 and stand Unpacking and Assembling the Stand 1. Then remove the box containing the stand and paper basket. 2.
22 | Setting Up the Printer For assembly, you have all these items. 2 Sides Horizontal strut Manual holder 6 Bolts Hex wrench 2 Wing screws with lock washers 22 Lift the box up and away from the shipping pallet. Unpack the stand and make sure you need floor space of approximately: • 8 × 8 feet (2.4 × 2.4 m) for the Epson Stylus Pro 7890 and stand • 13 × 13 feet (4 × 4 m) for the Epson Stylus Pro 9890 and stand Unpacking and Assembling the Stand 1. Then remove the box containing the stand and paper basket. 2.

