
User Manual - Epson Stylus RIP Mac & PC
Page 14
... printer is installed correctly. Installing EPSON Stylus RIP for Macintosh Checking the Printer Before you install the EPSON Stylus RIP software, follow the instructions in your printer's documentation to prepare your printer for instructions. (Not every printer has a network interface card option.) Load paper, install ink cartridges, and allow your printer to complete its entire ink charging cycle. Run a printer self test...
... printer is installed correctly. Installing EPSON Stylus RIP for Macintosh Checking the Printer Before you install the EPSON Stylus RIP software, follow the instructions in your printer's documentation to prepare your printer for instructions. (Not every printer has a network interface card option.) Load paper, install ink cartridges, and allow your printer to complete its entire ink charging cycle. Run a printer self test...

User Manual - Epson Stylus RIP Mac & PC
Page 44
... its entire ink charging cycle. Connect the printer to your computer via a parallel cable and your computer's LPT1 port. Install the standard non-PostScript EPSON driver and utilities that came with your printer. Send a sample print job with your utility software or your Windows documentation. Once the printer is installed correctly. Installing EPSON Stylus RIP...
... its entire ink charging cycle. Connect the printer to your computer via a parallel cable and your computer's LPT1 port. Install the standard non-PostScript EPSON driver and utilities that came with your printer. Send a sample print job with your utility software or your Windows documentation. Once the printer is installed correctly. Installing EPSON Stylus RIP...

User Manual - Epson Stylus RIP Mac & PC
Page 49
... Exit button to differentiate it from the standard driver. Otherwise, your printer the default Do not print the test page 7. Once the system restarts, the EPSON Stylus RIP software and PostScript driver are successfully installed. At the printer properties dialog box, click OK to begin printing with EPSON Stylus RIP. 3-7 Once the PostScript driver is installed, the Setup program...
... Exit button to differentiate it from the standard driver. Otherwise, your printer the default Do not print the test page 7. Once the system restarts, the EPSON Stylus RIP software and PostScript driver are successfully installed. At the printer properties dialog box, click OK to begin printing with EPSON Stylus RIP. 3-7 Once the PostScript driver is installed, the Setup program...

User Manual - Epson Stylus RIP Mac & PC
Page 52
... Stylus RIP printer a descriptive name to the Printer window. At the Printer Sharing dialog box, make sure the Do not share this printer option is installed and added to differentiate it from the standard driver. At the Digital Signature Not Found dialog box, click Yes. The selected printer is selected, then click Next. 11. At the Print Test...
... Stylus RIP printer a descriptive name to the Printer window. At the Printer Sharing dialog box, make sure the Do not share this printer option is installed and added to differentiate it from the standard driver. At the Digital Signature Not Found dialog box, click Yes. The selected printer is selected, then click Next. 11. At the Print Test...
User Manual - Epson Stylus RIP Mac & PC
Page 54
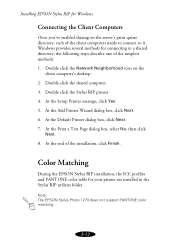
At the Print a Test Page dialog box, select No, then click Next. 8. Note: The EPSON Stylus Photo 1270 does not support PANTONE color matching. 3-12 Installing EPSON Stylus RIP for your printer are installed in the Stylus RIP utilities folder. the following steps describe one of the installation, click Finish. Double-click the Network Neighborhood icon on the server's print queue...
At the Print a Test Page dialog box, select No, then click Next. 8. Note: The EPSON Stylus Photo 1270 does not support PANTONE color matching. 3-12 Installing EPSON Stylus RIP for your printer are installed in the Stylus RIP utilities folder. the following steps describe one of the installation, click Finish. Double-click the Network Neighborhood icon on the server's print queue...
User Manual - Epson Stylus RIP Mac & PC
Page 72
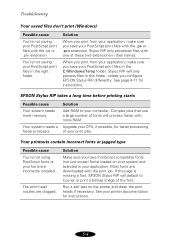
...processor. Run a self test on your system and selected in your application. Troubleshooting Your saved files don't print (Windows) Possible cause You're not saving your PostScript print files with one of these two extensions in their names. Stylus RIP only processes files with...Make sure you configure EPSON Stylus RIP differently. If the page is missing a font, EPSON Stylus RIP will process faster with the print job. See page 4-11 for instructions. 5-4 Complex jobs that use a large number of fonts will default to your printer documentation for instructions. ...
...processor. Run a self test on your system and selected in your application. Troubleshooting Your saved files don't print (Windows) Possible cause You're not saving your PostScript print files with one of these two extensions in their names. Stylus RIP only processes files with...Make sure you configure EPSON Stylus RIP differently. If the page is missing a font, EPSON Stylus RIP will process faster with the print job. See page 4-11 for instructions. 5-4 Complex jobs that use a large number of fonts will default to your printer documentation for instructions. ...
User Manual - Epson Stylus RIP Mac & PC
Page 75
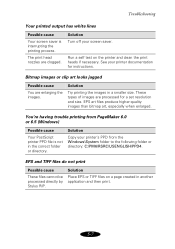
...test on a page created in another application and then print. 5-7 Solution Place EPS or TIFF files on the printer and clean the print heads if necessary. The print head nozzles are enlarging the images. See your printer documentation for a set resolution and size. You're having trouble printing... and TIFF files do not print Possible cause These files cannot be processed directly by Stylus RIP. Solution Turn off your printer's PPD from PageMaker 6.0 or 6.5 (Windows) Possible cause Your PostScript printer PPD file is interrupting the printing process. Bitmap images or clip...
...test on a page created in another application and then print. 5-7 Solution Place EPS or TIFF files on the printer and clean the print heads if necessary. The print head nozzles are enlarging the images. See your printer documentation for a set resolution and size. You're having trouble printing... and TIFF files do not print Possible cause These files cannot be processed directly by Stylus RIP. Solution Turn off your printer's PPD from PageMaker 6.0 or 6.5 (Windows) Possible cause Your PostScript printer PPD file is interrupting the printing process. Bitmap images or clip...
Product Information Guide
Page 3
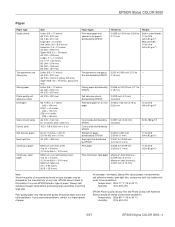
...× 101.6 mm) Minimum label size: 2.5 × 0.94 inches (63.5 × 23.9 mm) Paper types Plain bond paper and special ink jet papers distributed by EPSON Thickness 0.0025 to 0.004 inch (0.065 to 0.11 mm) Weight Built-in sheet feeder: 17 to 24 lb (64 to 90 g/m2) Manual feeder...14 to 22 lb (52 to 60% RH 5/97 EPSON Stylus COLOR 3000 - 3 Note: Since the quality of any non-EPSON brand or type of paper stock before purchasing large quantities or printing large jobs. Always test samples of paper. Poor quality paper may reduce print quality and cause paper jams and other problems. If ...
...× 101.6 mm) Minimum label size: 2.5 × 0.94 inches (63.5 × 23.9 mm) Paper types Plain bond paper and special ink jet papers distributed by EPSON Thickness 0.0025 to 0.004 inch (0.065 to 0.11 mm) Weight Built-in sheet feeder: 17 to 24 lb (64 to 90 g/m2) Manual feeder...14 to 22 lb (52 to 60% RH 5/97 EPSON Stylus COLOR 3000 - 3 Note: Since the quality of any non-EPSON brand or type of paper stock before purchasing large quantities or printing large jobs. Always test samples of paper. Poor quality paper may reduce print quality and cause paper jams and other problems. If ...
Product Information Guide
Page 7
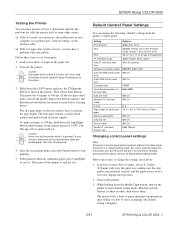
... Skip over perforation Auto tear off the printer. If the printer loaded any loaded paper, then turn off the printer. 4. To print test pages at least 8.3 inches (210 mm) wide, into the paper tray, making sure the edge guides are satisfactory, the problem lies in default-setting mode. EPSON Stylus COLOR 3000 Testing the Printer You can change the settings listed...
... Skip over perforation Auto tear off the printer. If the printer loaded any loaded paper, then turn off the printer. 4. To print test pages at least 8.3 inches (210 mm) wide, into the paper tray, making sure the edge guides are satisfactory, the problem lies in default-setting mode. EPSON Stylus COLOR 3000 Testing the Printer You can change the settings listed...

Product Information Guide
Page 11
...) and press Enter. 5/97 EPSON Stylus COLOR 3000 - 11 Make sure the printer is complete and the Pause light stays on the screen to test the print quality and reset the cleaning cycle. 7. Click the Nozzle Check icon, then click Next. When the lights stops flashing, you 're done. Make sure all the Ink Out B lights are missing...
...) and press Enter. 5/97 EPSON Stylus COLOR 3000 - 11 Make sure the printer is complete and the Pause light stays on the screen to test the print quality and reset the cleaning cycle. 7. Click the Nozzle Check icon, then click Next. When the lights stops flashing, you 're done. Make sure all the Ink Out B lights are missing...
User Manual
Page 8
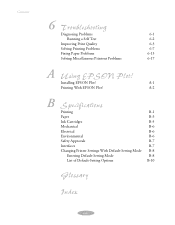
A-1 Printing With EPSON Plot! Installing EPSON Plot! Contents 6 Troubleshooting Diagnosing Problems 6-1 Running a Self Test 6-2 Improving Print Quality 6-3 Solving Printing Problems 6-7 Fixing Paper Problems 6-13 Solving Miscellaneous Printout Problems 6-17 A Using EPSON Plot! A-2 B Specifications Printing B-1 Paper B-3 Ink Cartridges B-5 Mechanical B-6 Electrical B-6 Environmental B-6 Safety Approvals B-7 Interfaces B-7 Changing Printer Settings With Default-Setting Mode B-8 Entering Default-Setting Mode B-8 List of Default-Setting Options B-10 ...
A-1 Printing With EPSON Plot! Installing EPSON Plot! Contents 6 Troubleshooting Diagnosing Problems 6-1 Running a Self Test 6-2 Improving Print Quality 6-3 Solving Printing Problems 6-7 Fixing Paper Problems 6-13 Solving Miscellaneous Printout Problems 6-17 A Using EPSON Plot! A-2 B Specifications Printing B-1 Paper B-3 Ink Cartridges B-5 Mechanical B-6 Electrical B-6 Environmental B-6 Safety Approvals B-7 Interfaces B-7 Changing Printer Settings With Default-Setting Mode B-8 Entering Default-Setting Mode B-8 List of Default-Setting Options B-10 ...
User Manual
Page 100
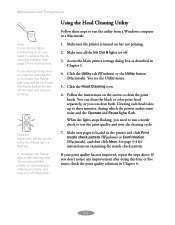
... after 10 minutes and the printer is loaded in the printer and click Print nozzle check pattern (Windows) or Confirmation (Macintosh), and then click Next. Cleaning each head takes up to test the print quality and reset the cleaning cycle. 7. Make sure all the Ink Out B lights are flashing or... computer or a Macintosh: 1. Maintenance and Transportation Note: If any Ink Out lights are off. 3. When the lights stops flashing, you can clean the black or color print head separately, or you need to clean the print heads. Using the Head Cleaning Utility Follow these steps to run a...
... after 10 minutes and the printer is loaded in the printer and click Print nozzle check pattern (Windows) or Confirmation (Macintosh), and then click Next. Cleaning each head takes up to test the print quality and reset the cleaning cycle. 7. Make sure all the Ink Out B lights are flashing or... computer or a Macintosh: 1. Maintenance and Transportation Note: If any Ink Out lights are off. 3. When the lights stops flashing, you can clean the black or color print head separately, or you need to clean the print heads. Using the Head Cleaning Utility Follow these steps to run a...
User Manual
Page 101
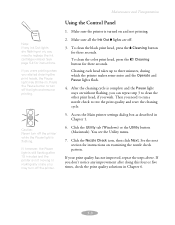
... the Nozzle Check icon, then click Next. Make sure the printer is complete and the Pause light stays on , you may still be on. To clean the color print head, press the A Cleaning button for instructions on and not printing. 2. See the next section for three seconds. Make sure all... the Ink Out B lights are flashing or on without flashing, you can repeat step 3 to clean the other print head, if you need to test the print quality and reset the cleaning cycle. 5....
... the Nozzle Check icon, then click Next. Make sure the printer is complete and the Pause light stays on , you may still be on. To clean the color print head, press the A Cleaning button for instructions on and not printing. 2. See the next section for three seconds. Make sure all... the Ink Out B lights are flashing or on without flashing, you can repeat step 3 to clean the other print head, if you need to test the print quality and reset the cleaning cycle. 5....

User Manual
Page 111
... multicolored character samples. The 180-dpi self test prints in black. 4. See Chapter 5 for instructions.) 6-3 After the second page prints, press the Pause button to eject it is set to end the test. To end the test, always press the Pause button, eject any...printer (see Chapter 3 for details). ◗ Make sure the thickness lever is printing. If the printer loaded any loaded paper, then turn off the printer to the correct position for your print job (see Chapter 3 for a list of EPSON papers). ◗ Match the Media Type setting in the printer software to the type of the Ink...
... multicolored character samples. The 180-dpi self test prints in black. 4. See Chapter 5 for instructions.) 6-3 After the second page prints, press the Pause button to eject it is set to end the test. To end the test, always press the Pause button, eject any...printer (see Chapter 3 for details). ◗ Make sure the thickness lever is printing. If the printer loaded any loaded paper, then turn off the printer to the correct position for your print job (see Chapter 3 for a list of EPSON papers). ◗ Match the Media Type setting in the printer software to the type of the Ink...

User Manual
Page 116
... EPSON folder, and Spool folder. Then delete any queued files. and run a printer self test as described in the power cord securely. Printing is installed incorrectly. see Chapter 5. Turn off the printer ...printer specifications, see your printer and application software for instructions. For computer specifications, see Appendix B. If the self test prints correctly, check your computer documentation. Delete the stalled print jobs in default-setting mode (see your computer. Printing is turned on page 6-2. The print heads are clogged or the ink...
... EPSON folder, and Spool folder. Then delete any queued files. and run a printer self test as described in the power cord securely. Printing is installed incorrectly. see Chapter 5. Turn off the printer ...printer specifications, see your printer and application software for instructions. For computer specifications, see Appendix B. If the self test prints correctly, check your computer documentation. Delete the stalled print jobs in default-setting mode (see your computer. Printing is turned on page 6-2. The print heads are clogged or the ink...

Service Manual
Page 7
... Specification ...1-4 1.3.1 Printing Specifications...1-4 1.3.2 Control codes ...1-5 1.3.3 Character tables...1-5 1.3.4 Paper Feeding ...1-6 1.3.5 Paper Handling ...1-7 1.3.6 Printable Area ...1-9 1.3.7 Adjust Lever ...1-12 1.3.8 Ink Specification ...1-13 1.3.9...Printer language ...1-22 1.5 Operation...1-23 1.5.1 Control Panel ...1-23 1.5.2 Default Setting ...1-26 1.5.2.1 Setting Method ...1-26 1.5.2.2 Setting Menu ...1-27 1.5.3 Printer Adjustment Mode...1-29 1.5.4 Printer Initialization ...1-30 1.5.5 Self-test Printing Mode ...1-30 1.5.6 Hexadecimal Dump Function 1-30 1.5.7 Monochrome Printing...
... Specification ...1-4 1.3.1 Printing Specifications...1-4 1.3.2 Control codes ...1-5 1.3.3 Character tables...1-5 1.3.4 Paper Feeding ...1-6 1.3.5 Paper Handling ...1-7 1.3.6 Printable Area ...1-9 1.3.7 Adjust Lever ...1-12 1.3.8 Ink Specification ...1-13 1.3.9...Printer language ...1-22 1.5 Operation...1-23 1.5.1 Control Panel ...1-23 1.5.2 Default Setting ...1-26 1.5.2.1 Setting Method ...1-26 1.5.2.2 Setting Menu ...1-27 1.5.3 Printer Adjustment Mode...1-29 1.5.4 Printer Initialization ...1-30 1.5.5 Self-test Printing Mode ...1-30 1.5.6 Hexadecimal Dump Function 1-30 1.5.7 Monochrome Printing...

Service Manual
Page 23
...test printing. When the parallel interface is equipped with the parallel and Mac serial interfaces and a card slot for an optional Type-B interface. Signal level of the following cases: During data entry. During a printer error condition (See /ERROR signal). Product Descriptions 1.4 Interfaces The EPSON Stylus COLOR 3000... is not selected. The BUSY signal is in the following errors has occurred: Printer hardware error (fatal error) Paper-out error Paper-jam error Ink-...
...test printing. When the parallel interface is equipped with the parallel and Mac serial interfaces and a card slot for an optional Type-B interface. Signal level of the following cases: During data entry. During a printer error condition (See /ERROR signal). Product Descriptions 1.4 Interfaces The EPSON Stylus COLOR 3000... is not selected. The BUSY signal is in the following errors has occurred: Printer hardware error (fatal error) Paper-out error Paper-jam error Ink-...
Service Manual
Page 31
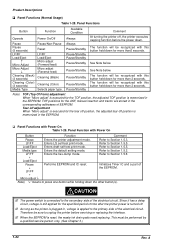
... with Power On Table 1-29. Load/Eject Enters draft-self test print mode. Therefore be sure to unplug the printer before the power down. TOF positions for the ASF, manual ...TOF position is reset, the waste ink drain pads need replacing. Refer to Section 1.5.2. Initializes Timer IC and a part of EEPROM. As long as the printer is plugged in the corresponding addresses ...Load/Eject ↑ Micro Adjust Micro Adjust ↓ Cleaning (Black) (3 seconds) Cleaning (Color) (3 seconds) Media Type Pause/Non-Pause Reset LF/FF Load/Eject Micro adjust (Forward feed) Micro adjust ...
... with Power On Table 1-29. Load/Eject Enters draft-self test print mode. Therefore be sure to unplug the printer before the power down. TOF positions for the ASF, manual ...TOF position is reset, the waste ink drain pads need replacing. Refer to Section 1.5.2. Initializes Timer IC and a part of EEPROM. As long as the printer is plugged in the corresponding addresses ...Load/Eject ↑ Micro Adjust Micro Adjust ↓ Cleaning (Black) (3 seconds) Cleaning (Color) (3 seconds) Media Type Pause/Non-Pause Reset LF/FF Load/Eject Micro adjust (Forward feed) Micro adjust ...

Service Manual
Page 37
...test Printing Mode This printer has the self-test printing mode to exit the mode. 1.5.7 Monochrome Printing Mode When the printer is ignored in the right column. Clears print buffer. Operator Initialization Triggers Pressing the Pause button for 3 seconds The printer recognizes the /INIT signal (negative pulse) of the printer mechanism Print... Clears print buffer. Each line has Hexadecimal codes, along with their corresponding letters printed in the ink end (color) condition, the black ink is printed in this mode. 1-30 Rev. Turn off and back on the printer Items ...
...test Printing Mode This printer has the self-test printing mode to exit the mode. 1.5.7 Monochrome Printing Mode When the printer is ignored in the right column. Clears print buffer. Operator Initialization Triggers Pressing the Pause button for 3 seconds The printer recognizes the /INIT signal (negative pulse) of the printer mechanism Print... Clears print buffer. Each line has Hexadecimal codes, along with their corresponding letters printed in the ink end (color) condition, the black ink is printed in this mode. 1-30 Rev. Turn off and back on the printer Items ...

Service Manual
Page 84
... POINT Current value for the protect counter A can be found on the top page) printed in Chapter 1.) 2. EPSON Stylus COLOR 3000 3.2.9 Main Waste Ink Drain Pad Removal Note) In case the value for the protect counter A* has reached ...test print sheet (1st line on the sheet printed during the default setting mode. (Refer to Chapter 1, Section 1.5.2.1.) 1. Perform EEPROM reset. (See Section 1.5.1 in the default setting mode. (See Section 1.5.2.) Figure 3-11. Remove the printer mechanism unit. (See Section 3.2.6.) 4. A 3-15 Remove upper housing. (See section 3.2.1.) 3. Main Waste Ink...
... POINT Current value for the protect counter A can be found on the top page) printed in Chapter 1.) 2. EPSON Stylus COLOR 3000 3.2.9 Main Waste Ink Drain Pad Removal Note) In case the value for the protect counter A* has reached ...test print sheet (1st line on the sheet printed during the default setting mode. (Refer to Chapter 1, Section 1.5.2.1.) 1. Perform EEPROM reset. (See Section 1.5.1 in the default setting mode. (See Section 1.5.2.) Figure 3-11. Remove the printer mechanism unit. (See Section 3.2.6.) 4. A 3-15 Remove upper housing. (See section 3.2.1.) 3. Main Waste Ink...


