
User Manual
Page 3
... may be liable to the purchaser of this product, or (excluding the US) failure to the use of Seiko Epson Corporation. Seiko Epson Corporation shall not be liable against any damages or problems arising from the use of any options or any means, ...Epson Corporation. No patent liability is a trademark of the information contained herein. Epson and Epson ESC/P are trademarks of Linotype AG and/or its affiliates shall be reproduced, stored in a retrieval system, or transmitted in any form or by Seiko Epson Corporation Nagano, Japan User's Guide EPSON® 48-NOZZLE INK JET PRINTER...
... may be liable to the purchaser of this product, or (excluding the US) failure to the use of Seiko Epson Corporation. Seiko Epson Corporation shall not be liable against any damages or problems arising from the use of any options or any means, ...Epson Corporation. No patent liability is a trademark of the information contained herein. Epson and Epson ESC/P are trademarks of Linotype AG and/or its affiliates shall be reproduced, stored in a retrieval system, or transmitted in any form or by Seiko Epson Corporation Nagano, Japan User's Guide EPSON® 48-NOZZLE INK JET PRINTER...
User Manual
Page 5
... and instructions marked on the label. Do not use your obsolete outlet. If you are not sure of the type of power available, consult your printer. If you are provided for cleaning, not liquid or aerosol cleaners. Never push objects of any slots or openings in those compartments to insert the... plug into the wall outlet does not exceed 15 amperes. Never place the printer near water or spill any liquid on it , and use an extension cord, make sure that could expose you to dangerous voltage points or ...
... and instructions marked on the label. Do not use your obsolete outlet. If you are not sure of the type of power available, consult your printer. If you are provided for cleaning, not liquid or aerosol cleaners. Never push objects of any slots or openings in those compartments to insert the... plug into the wall outlet does not exceed 15 amperes. Never place the printer near water or spill any liquid on it , and use an extension cord, make sure that could expose you to dangerous voltage points or ...

User Manual
Page 6
... the following support services through the Epson Connection at (800) 922-8911 Assistance in performance, indicating a need for your Epson product Customer Relations Information about user groups iv Epson also provides the following conditions: When... the power cord or plug is damaged or frayed If liquid has been spilled into it If it has been exposed to normal operation. LI Unplug the printer...
... the following support services through the Epson Connection at (800) 922-8911 Assistance in performance, indicating a need for your Epson product Customer Relations Information about user groups iv Epson also provides the following conditions: When... the power cord or plug is damaged or frayed If liquid has been spilled into it If it has been exposed to normal operation. LI Unplug the printer...
User Manual
Page 7
These differences in your application program. Note: Tofind fhe right lines-per -page setting, try 65. Make sure you choose the correct printer. Tips for Printing on Single Sheets There are a few lines from one page onto the next. you can also try setting the form length ...lines per -page setting. 3. When you print on single sheets, you may notice that it normally asks you what printer you want. 4. Many programs include an option to 61; for the right printer to choose. 2. When you should know about printing on single sheets as described below to 66. See Chapter 1...
These differences in your application program. Note: Tofind fhe right lines-per -page setting, try 65. Make sure you choose the correct printer. Tips for Printing on Single Sheets There are a few lines from one page onto the next. you can also try setting the form length ...lines per -page setting. 3. When you print on single sheets, you may notice that it normally asks you what printer you want. 4. Many programs include an option to 61; for the right printer to choose. 2. When you should know about printing on single sheets as described below to 66. See Chapter 1...
User Manual
Page 8
... to Use This Manual 2 Warnings, Cautions, and Notes 2 Chapter 1 Setting Up Your Printer About Your Ink Jet Printer l-2 A few precautions l-2 Choosing the right paper l-3 Unpacking the Printer l-4 Attaching the paper support l-5 Choosing a Place for the Printer l-6 Plugging in the Printer l-7 Installing the Ink Cartridge l-8 Testing the Printer l-13 Loading paper in the paper feeder l-13 Running the self test...
... to Use This Manual 2 Warnings, Cautions, and Notes 2 Chapter 1 Setting Up Your Printer About Your Ink Jet Printer l-2 A few precautions l-2 Choosing the right paper l-3 Unpacking the Printer l-4 Attaching the paper support l-5 Choosing a Place for the Printer l-6 Plugging in the Printer l-7 Installing the Ink Cartridge l-8 Testing the Printer l-13 Loading paper in the paper feeder l-13 Running the self test...
User Manual
Page 9
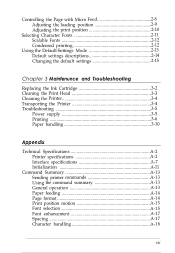
... Changing the default settings 2-15 Chapter 3 Mainfenunce and Troubleshooting Replacing the Ink Cartridge 3-2 Cleaning the Print Head 3-3 Cleaning the Printer 3-4 Transporting the Printer 3-4 Troubleshooting 3-5 Power supply 3-5 Printing 3-6 Paper handling 3-10 Appendix Technical Specifications A-2 Printer specifications A-2 Interface specifications A-7 Initialization A-11 Command Summary A-13 Sending printer commands A-13 Using the command summary A-13 General operation A-13 Paper...
... Changing the default settings 2-15 Chapter 3 Mainfenunce and Troubleshooting Replacing the Ink Cartridge 3-2 Cleaning the Print Head 3-3 Cleaning the Printer 3-4 Transporting the Printer 3-4 Troubleshooting 3-5 Power supply 3-5 Printing 3-6 Paper handling 3-10 Appendix Technical Specifications A-2 Printer specifications A-2 Interface specifications A-7 Initialization A-11 Command Summary A-13 Sending printer commands A-13 Using the command summary A-13 General operation A-13 Paper...
User Manual
Page 11
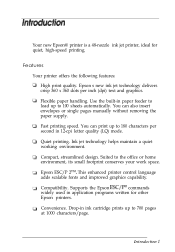
...-cpi letter quality (LQ) mode. You can print up to the office or home environment, its small footprint conserves your work space. Compatibility. Your new Epson@ printer is a 48-nozzle ink jet printer, ideal for other Epson printers. Epson's new ink jet technology delivers crisp 360 x 360 dots per second in application programs written for quiet, high-speed printing.
...-cpi letter quality (LQ) mode. You can print up to the office or home environment, its small footprint conserves your work space. Compatibility. Your new Epson@ printer is a 48-nozzle ink jet printer, ideal for other Epson printers. Epson's new ink jet technology delivers crisp 360 x 360 dots per second in application programs written for quiet, high-speed printing.
User Manual
Page 12
...you'll find in this chapter. It explains how to unpack and set up the printer. Warnings, Cautions, and Notes Warnings nzusf be observed to avoid damage to your printer. 2 Introduction If the printer does not operate properly or you will need to read and follow these instructions. CI ...A glossary of your equipment. It also describes how to avoid bodily injury. Notes contain important information and useful tips on the operation of printer terms and an index are at the end. Cl Chapter 2 contains information that you have difficulties, see this book: CI Chapter 1 describes...
...you'll find in this chapter. It explains how to unpack and set up the printer. Warnings, Cautions, and Notes Warnings nzusf be observed to avoid damage to your printer. 2 Introduction If the printer does not operate properly or you will need to read and follow these instructions. CI ...A glossary of your equipment. It also describes how to avoid bodily injury. Notes contain important information and useful tips on the operation of printer terms and an index are at the end. Cl Chapter 2 contains information that you have difficulties, see this book: CI Chapter 1 describes...
User Manual
Page 13
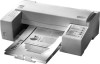
Chapter 1 Setting Up Your Printer About Your Ink Jet Printer 1-2 A few precautions 1-2 Choosing the right paper 1-3 Unpacking the Printer 1-4 Attaching the paper support l-5 Choosing a Place for the Printer l-6 Plugging in the Printer l-7 Installing the Ink Cartridge l-8 Testing the Printer l-13 Loading paper in the paper feeder l-13 Running the self test l-14 Connecting the Printer to Your Computer l-15 Setting Up Your Software Programs l-17 Tips for Using the Paper Feeder l-18 Setting Up Your Printer 1-1
Chapter 1 Setting Up Your Printer About Your Ink Jet Printer 1-2 A few precautions 1-2 Choosing the right paper 1-3 Unpacking the Printer 1-4 Attaching the paper support l-5 Choosing a Place for the Printer l-6 Plugging in the Printer l-7 Installing the Ink Cartridge l-8 Testing the Printer l-13 Loading paper in the paper feeder l-13 Running the self test l-14 Connecting the Printer to Your Computer l-15 Setting Up Your Software Programs l-17 Tips for Using the Paper Feeder l-18 Setting Up Your Printer 1-1
User Manual
Page 14
...with soap and water. Ll Once you install the ink cartridge, do not open the clamp or remove the ink cartridge except to ink jet printers, you may wonder how they differ from dot matrix or laser printers. CI Install the ink cartridge immediately after you remove it from the cartridge... the page as a dot-matrix. If it gets in poor print quality. 1-2 Setting Up Your Printer About Your Ink Jet Printer If you're new to replace it with a new one. An ink jet printer produces cost-effective, quality print results. Leaving the cartridge unpacked for a long time before use the ...
...with soap and water. Ll Once you install the ink cartridge, do not open the clamp or remove the ink cartridge except to ink jet printers, you may wonder how they differ from dot matrix or laser printers. CI Install the ink cartridge immediately after you remove it from the cartridge... the page as a dot-matrix. If it gets in poor print quality. 1-2 Setting Up Your Printer About Your Ink Jet Printer If you're new to replace it with a new one. An ink jet printer produces cost-effective, quality print results. Leaving the cartridge unpacked for a long time before use the ...

User Manual
Page 15
... paper. Also, avoid paper that is too absorbent, the ink can also cap the print head by pressing the PAUSE button. 0 Do not put your ink jet printer is too thick or too thin. Ink cartridges are also important. 0 Install the ink cartridge immediately after you remove it from a cold place to... a warm one hour until the ink warms to the new temperature. 0 Do not turn off...
... paper. Also, avoid paper that is too absorbent, the ink can also cap the print head by pressing the PAUSE button. 0 Do not put your ink jet printer is too thick or too thin. Ink cartridges are also important. 0 Install the ink cartridge immediately after you remove it from a cold place to... a warm one hour until the ink warms to the new temperature. 0 Do not turn off...
User Manual
Page 16
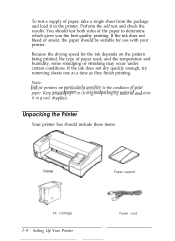
Note: Ink jet printers me plrrticulmdy sensitizle to determine which gives you the best quality printing. If the ink does not dry quickly enough, try removing sheets one at a time as they finish printing. Unpacking the Printer Your printer box should test both sides of the paper to the condition ofyour ...Keep unused paper in its origind pnckqing rrznterial and store it in 0 cool, dry plnce. You should include these items: Ink cartridge 1-4 Setting Up Your Printer Paper support Power cord Perform the self test and check the results. Because the drying speed for use with your...
Note: Ink jet printers me plrrticulmdy sensitizle to determine which gives you the best quality printing. If the ink does not dry quickly enough, try removing sheets one at a time as they finish printing. Unpacking the Printer Your printer box should test both sides of the paper to the condition ofyour ...Keep unused paper in its origind pnckqing rrznterial and store it in 0 cool, dry plnce. You should include these items: Ink cartridge 1-4 Setting Up Your Printer Paper support Power cord Perform the self test and check the results. Because the drying speed for use with your...
User Manual
Page 17
You must remove all of the AC plug varies by country; Setting Up Your Printer 1-5 Save all packing and protective materials packed with your printer before you begin using the printer. In some locations, the power cord comes attached to remove these materials. The shape of the packaging and the ...protective materials in your location. be sure the plug included is the right shape for your printer) to the printer. To install it up and turn on the printer case. Follow the directions on the Notice Sheet (inserted in case you can set it , push the paper...
You must remove all of the AC plug varies by country; Setting Up Your Printer 1-5 Save all packing and protective materials packed with your printer before you begin using the printer. In some locations, the power cord comes attached to remove these materials. The shape of the packaging and the ...protective materials in your location. be sure the plug included is the right shape for your printer) to the printer. To install it up and turn on the printer case. Follow the directions on the Notice Sheet (inserted in case you can set it , push the paper...

User Manual
Page 18
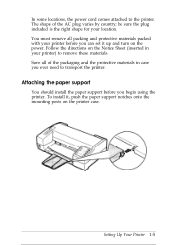
...a flat, horizontal, stable surface. do not interfere with paper feeding; Choosing a Place for the Printer When selecting a location for your printer, follow these guidelines: Place the printer on the same circuit as loudspeakers or the base units of cordless telephones. Also keep it cannot operate... plug. Avoid electrical outlets controlled by wall switches or automatic timers. Avoid using or storing the printer in line voltage. Place the printer where you plan to use a printer stand, follow these guidelines: Cl Use a stand that supports at an angle, it away from...
...a flat, horizontal, stable surface. do not interfere with paper feeding; Choosing a Place for the Printer When selecting a location for your printer, follow these guidelines: Place the printer on the same circuit as loudspeakers or the base units of cordless telephones. Also keep it cannot operate... plug. Avoid electrical outlets controlled by wall switches or automatic timers. Avoid using or storing the printer in line voltage. Place the printer where you plan to use a printer stand, follow these guidelines: Cl Use a stand that supports at an angle, it away from...
User Manual
Page 19
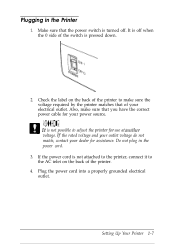
Plugging in the power cord. 3. It is off . If the power cord is pressed down. 2. Also, make sure the voltage required by the printer matches that the power switch is not possible to adjust the printerfor use at another voltage. Caution: It is turned off when the 0 side of ... cable for assistance. Plug the power cord into a properly grounded electrical outlet. Check the label on the back of your power source. Setting Up Your Printer 1-7 lf the rated voltage and your outlet voltage do not match, contact your dealer for your electrical outlet. Do not plug in the...
Plugging in the power cord. 3. It is off . If the power cord is pressed down. 2. Also, make sure the voltage required by the printer matches that the power switch is not possible to adjust the printerfor use at another voltage. Caution: It is turned off when the 0 side of ... cable for assistance. Plug the power cord into a properly grounded electrical outlet. Check the label on the back of your power source. Setting Up Your Printer 1-7 lf the rated voltage and your outlet voltage do not match, contact your dealer for your electrical outlet. Do not plug in the...
User Manual
Page 20
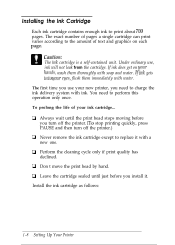
... new one. The exact number of pages a single cartridge can print varies according to the amount of your new printer, you need to replace it . The first time you use , ink will not leak from the cartridge. Ll Always wait until just before you install it with soap and water. To... cartridge sealed until the print head stops moving before you turn off the printer. (To stop printing quickly, press PAUSE and then turn off the printer.) Cl Never remove the ink cartridge except to perform this operation only once. If ink does get on each page. You need to print about 700 pages....
... new one. The exact number of pages a single cartridge can print varies according to the amount of your new printer, you need to replace it . The first time you use , ink will not leak from the cartridge. Ll Always wait until just before you install it with soap and water. To... cartridge sealed until the print head stops moving before you turn off the printer. (To stop printing quickly, press PAUSE and then turn off the printer.) Cl Never remove the ink cartridge except to perform this operation only once. If ink does get on each page. You need to print about 700 pages....
User Manual
Page 21
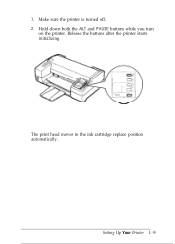
Hold down both the ALT and PAUSE buttons while you turn on the printer. Release the buttons after the printer starts initializing. Setting Up Your Printer 1 - 9 1. The print head moves to the ink cartridge replace position automatically. Make sure the printer is turned off. 2.
Hold down both the ALT and PAUSE buttons while you turn on the printer. Release the buttons after the printer starts initializing. Setting Up Your Printer 1 - 9 1. The print head moves to the ink cartridge replace position automatically. Make sure the printer is turned off. 2.
User Manual
Page 22
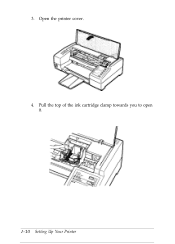
3. Open the printer cover. 4. Pull the top of the ink cartridge clamp towards you to open it. 1-10 Setting Up Your Printer
3. Open the printer cover. 4. Pull the top of the ink cartridge clamp towards you to open it. 1-10 Setting Up Your Printer
User Manual
Page 23
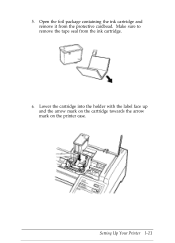
Setting Up Your Printer l-11 Lower the cartridge into the holder with the label face up and the arrow mark on the cartridge towards the arrow mark on the printer case. Make sure to remove the tape seal from the protective cardboad. 5. Open the foil package containing the ink cartridge and remove it from the ink cartridge. 6.
Setting Up Your Printer l-11 Lower the cartridge into the holder with the label face up and the arrow mark on the cartridge towards the arrow mark on the printer case. Make sure to remove the tape seal from the protective cardboad. 5. Open the foil package containing the ink cartridge and remove it from the ink cartridge. 6.
User Manual
Page 24
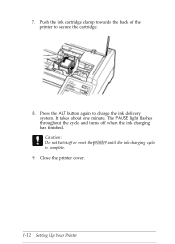
The PAUSE light flashes throughout the cycle and turns off or reset the printer until the ink-charging cycle is complete. 9. It takes about one minute. Close the printer cover. Press the ALT button again to secure the cartridge. 8. I-12 Setting Up Your Printer Caution: Do not tur~z off when the ink charging has finished. 7. Push the ink cartridge clamp towards the back of the printer to charge the ink delivery system.
The PAUSE light flashes throughout the cycle and turns off or reset the printer until the ink-charging cycle is complete. 9. It takes about one minute. Close the printer cover. Press the ALT button again to secure the cartridge. 8. I-12 Setting Up Your Printer Caution: Do not tur~z off when the ink charging has finished. 7. Push the ink cartridge clamp towards the back of the printer to charge the ink delivery system.

