
User Manual
Page 3
...or alterations to the use of the information contained herein. Copyright 0 1992 by Seiko Epson Corporation. Neither Seiko Epson Corporation nor its subsidiaries. Epson and Epson ESC/P are trademarks of the information contained herein. Neither is any means, mechanical, ...otherwise, without the prior written permission of Seiko Epson Corporation. Helvetica and Times are registered trademarks and Epson ESC/P 2 is assumed with Seiko Epson Corporation's operating and maintenance instructions. EPSON® 48-NOZZLE INK JET PRINTER All rights reserved. No patent liability is ...
...or alterations to the use of the information contained herein. Copyright 0 1992 by Seiko Epson Corporation. Neither Seiko Epson Corporation nor its subsidiaries. Epson and Epson ESC/P are trademarks of the information contained herein. Neither is any means, mechanical, ...otherwise, without the prior written permission of Seiko Epson Corporation. Helvetica and Times are registered trademarks and Epson ESC/P 2 is assumed with Seiko Epson Corporation's operating and maintenance instructions. EPSON® 48-NOZZLE INK JET PRINTER All rights reserved. No patent liability is ...
User Manual
Page 5
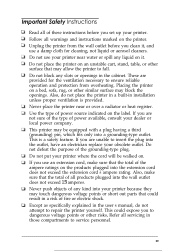
... are not sure of the type of the grounding-type plug. This could result in a risk of all warnings and instructions marked on the printer. Follow all products plugged into the extension cord does not exceed the extension cord's ampere rating. Do not block any slots or openings in ...installation unless proper ventilation is a safety feature. Do not defeat the purpose of power available, consult your printer near or over a radiator or heat register. Also, make sure that the total of the ampere ratings on a bed, sofa, rug, or other ...
... are not sure of the type of the grounding-type plug. This could result in a risk of all warnings and instructions marked on the printer. Follow all products plugged into the extension cord does not exceed the extension cord's ampere rating. Do not block any slots or openings in ...installation unless proper ventilation is a safety feature. Do not defeat the purpose of power available, consult your printer near or over a radiator or heat register. Also, make sure that the total of the ampere ratings on a bed, sofa, rug, or other ...

User Manual
Page 6
...800) 922-8911 Assistance in performance, indicating a need for your software Sales of the ESC/P reference manual, which contains comprehensive information on ESC/P 2 commands Epson technical information library fax service Product literature with technical specifications on our current and new products Sales of authorized Epson dealers and Service Centers. LI Unplug the printer... from the wall outlet and have it repaired by a qualified technician to restore the printer to rain or water If it ...
...800) 922-8911 Assistance in performance, indicating a need for your software Sales of the ESC/P reference manual, which contains comprehensive information on ESC/P 2 commands Epson technical information library fax service Product literature with technical specifications on our current and new products Sales of authorized Epson dealers and Service Centers. LI Unplug the printer... from the wall outlet and have it repaired by a qualified technician to restore the printer to rain or water If it ...
User Manual
Page 7
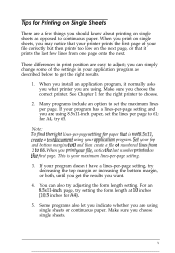
... an application program, it prints the last few things you choose the correct printer. Some programs also let you indicate whether you are using single sheets or continuous...onto the next. Make sure you should know about printing on fhe first page. See Chapter 1 for the right printer to set the lines per -page setting and you want. 4. Many programs include an option to choose. 2. ...the right results. 1. When you print on the next page, or that your printer prints the first page of numbered linesfrom 2 to adjust; for A4). 5. you may notice that it normally ...
... an application program, it prints the last few things you choose the correct printer. Some programs also let you indicate whether you are using single sheets or continuous...onto the next. Make sure you should know about printing on fhe first page. See Chapter 1 for the right printer to set the lines per -page setting and you want. 4. Many programs include an option to choose. 2. ...the right results. 1. When you print on the next page, or that your printer prints the first page of numbered linesfrom 2 to adjust; for A4). 5. you may notice that it normally ...
User Manual
Page 8
... to Use This Manual 2 Warnings, Cautions, and Notes 2 Chapter 1 Setting Up Your Printer About Your Ink Jet Printer l-2 A few precautions l-2 Choosing the right paper l-3 Unpacking the Printer l-4 Attaching the paper support l-5 Choosing a Place for the Printer l-6 Plugging in the Printer l-7 Installing the Ink Cartridge l-8 Testing the Printer l-13 Loading paper in the paper feeder l-13 Running the self test...
... to Use This Manual 2 Warnings, Cautions, and Notes 2 Chapter 1 Setting Up Your Printer About Your Ink Jet Printer l-2 A few precautions l-2 Choosing the right paper l-3 Unpacking the Printer l-4 Attaching the paper support l-5 Choosing a Place for the Printer l-6 Plugging in the Printer l-7 Installing the Ink Cartridge l-8 Testing the Printer l-13 Loading paper in the paper feeder l-13 Running the self test...
User Manual
Page 9
... Changing the default settings 2-15 Chapter 3 Mainfenunce and Troubleshooting Replacing the Ink Cartridge 3-2 Cleaning the Print Head 3-3 Cleaning the Printer 3-4 Transporting the Printer 3-4 Troubleshooting 3-5 Power supply 3-5 Printing 3-6 Paper handling 3-10 Appendix Technical Specifications A-2 Printer specifications A-2 Interface specifications A-7 Initialization A-11 Command Summary A-13 Sending printer commands A-13 Using the command summary A-13 General operation A-13 Paper...
... Changing the default settings 2-15 Chapter 3 Mainfenunce and Troubleshooting Replacing the Ink Cartridge 3-2 Cleaning the Print Head 3-3 Cleaning the Printer 3-4 Transporting the Printer 3-4 Troubleshooting 3-5 Power supply 3-5 Printing 3-6 Paper handling 3-10 Appendix Technical Specifications A-2 Printer specifications A-2 Interface specifications A-7 Initialization A-11 Command Summary A-13 Sending printer commands A-13 Using the command summary A-13 General operation A-13 Paper...
User Manual
Page 11
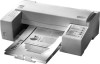
... prints up to the office or home environment, its small footprint conserves your work space. Your new Epson@ printer is a 48-nozzle ink jet printer, ideal for other Epson printers. Flexible paper handling. You can also insert envelopes or single pages manually without removing the paper supply...in 12-cpi letter quality (LQ) mode. Epson's new ink jet technology delivers crisp 360 x 360 dots per second in paper feeder to load up to 700 pages at 1000 characters/page. Fast printing speed. Convenience. Features Your printer offers the following features: High print quality. ...
... prints up to the office or home environment, its small footprint conserves your work space. Your new Epson@ printer is a 48-nozzle ink jet printer, ideal for other Epson printers. Flexible paper handling. You can also insert envelopes or single pages manually without removing the paper supply...in 12-cpi letter quality (LQ) mode. Epson's new ink jet technology delivers crisp 360 x 360 dots per second in paper feeder to load up to 700 pages at 1000 characters/page. Fast printing speed. Convenience. Features Your printer offers the following features: High print quality. ...
User Manual
Page 12
.... CI A glossary of your equipment. It also describes how to load paper manually and change printer settings from the control panel. LI Chapter 3 contains maintenance and troubleshooting information. If the printer does not operate properly or you have difficulties, see this book: CI Chapter 1 describes how to unpack and set... up the printer. It explains how to load the paper feeder and print a self test. Be sure to avoid bodily injury. Warnings, Cautions, and Notes Warnings nzusf...
.... CI A glossary of your equipment. It also describes how to load paper manually and change printer settings from the control panel. LI Chapter 3 contains maintenance and troubleshooting information. If the printer does not operate properly or you have difficulties, see this book: CI Chapter 1 describes how to unpack and set... up the printer. It explains how to load the paper feeder and print a self test. Be sure to avoid bodily injury. Warnings, Cautions, and Notes Warnings nzusf...
User Manual
Page 13
Chapter 1 Setting Up Your Printer About Your Ink Jet Printer 1-2 A few precautions 1-2 Choosing the right paper 1-3 Unpacking the Printer 1-4 Attaching the paper support l-5 Choosing a Place for the Printer l-6 Plugging in the Printer l-7 Installing the Ink Cartridge l-8 Testing the Printer l-13 Loading paper in the paper feeder l-13 Running the self test l-14 Connecting the Printer to Your Computer l-15 Setting Up Your Software Programs l-17 Tips for Using the Paper Feeder l-18 Setting Up Your Printer 1-1
Chapter 1 Setting Up Your Printer About Your Ink Jet Printer 1-2 A few precautions 1-2 Choosing the right paper 1-3 Unpacking the Printer 1-4 Attaching the paper support l-5 Choosing a Place for the Printer l-6 Plugging in the Printer l-7 Installing the Ink Cartridge l-8 Testing the Printer l-13 Loading paper in the paper feeder l-13 Running the self test l-14 Connecting the Printer to Your Computer l-15 Setting Up Your Software Programs l-17 Tips for Using the Paper Feeder l-18 Setting Up Your Printer 1-1
User Manual
Page 14
...sure to read through the following list of precautions to operate your skin, wash it from dot matrix or laser printers. About Your Ink Jet Printer If you're new to ink jet printers, you may wonder how they differ from its package. Ll Once you are high print quality and quiet printing....of this technology are familiar with soap and water. Cl Do not dismantle the ink cartridges or try to replace and more affordable than an impact printer such as it prints, it with laser printers. An ink jet printer produces cost-effective, quality print results. If it does get crisp, laser-sharp...
...sure to read through the following list of precautions to operate your skin, wash it from dot matrix or laser printers. About Your Ink Jet Printer If you're new to ink jet printers, you may wonder how they differ from its package. Ll Once you are high print quality and quiet printing....of this technology are familiar with soap and water. Cl Do not dismantle the ink cartridges or try to replace and more affordable than an impact printer such as it prints, it with laser printers. An ink jet printer produces cost-effective, quality print results. If it does get crisp, laser-sharp...

User Manual
Page 15
... good up to the date printed on the cartridge carton. 0 When moving the ink cartridge from its rated life expectancy. However, with your ink jet printer is selecting the right paper. 0 Install the ink cartridge immediately after you remove it is a good practice to test any paper or... envelopes in your printer before buying large quantities. Leaving the cartridge unpacked for a long ...
... good up to the date printed on the cartridge carton. 0 When moving the ink cartridge from its rated life expectancy. However, with your ink jet printer is selecting the right paper. 0 Install the ink cartridge immediately after you remove it is a good practice to test any paper or... envelopes in your printer before buying large quantities. Leaving the cartridge unpacked for a long ...
User Manual
Page 16
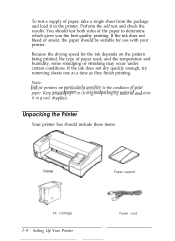
...should test both sides of the paper to the condition ofyour paper. Note: Ink jet printers me plrrticulmdy sensitizle to determine which gives you the best quality printing. Unpacking the Printer Your printer box should be suitable for the ink depends on the pattern being printed, the type of paper, take a ...single sheet from the package and load it in the printer. If the ink does not bleed or smear, the paper should include these items: Ink cartridge 1-4 Setting Up Your Printer Paper support Power cord If the ink does not dry quickly enough, try removing sheets one at a time...
...should test both sides of the paper to the condition ofyour paper. Note: Ink jet printers me plrrticulmdy sensitizle to determine which gives you the best quality printing. Unpacking the Printer Your printer box should be suitable for the ink depends on the pattern being printed, the type of paper, take a ...single sheet from the package and load it in the printer. If the ink does not bleed or smear, the paper should include these items: Ink cartridge 1-4 Setting Up Your Printer Paper support Power cord If the ink does not dry quickly enough, try removing sheets one at a time...
User Manual
Page 17
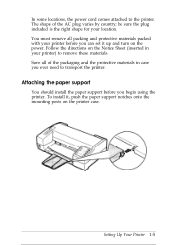
..., the power cord comes attached to transport the printer. be sure the plug included is the right shape for your printer) to remove these materials. Save all packing and protective materials packed with your printer before you ever need to the printer. Attaching the paper support You should install the paper... paper support notches onto the mounting posts on the power. To install it up and turn on the printer case. You must remove all of the AC plug varies by country; Setting Up Your Printer 1-5 Follow the directions on the Notice Sheet (inserted in case you begin using the...
..., the power cord comes attached to transport the printer. be sure the plug included is the right shape for your printer) to remove these materials. Save all packing and protective materials packed with your printer before you ever need to the printer. Attaching the paper support You should install the paper... paper support notches onto the mounting posts on the power. To install it up and turn on the printer case. You must remove all of the AC plug varies by country; Setting Up Your Printer 1-5 Follow the directions on the Notice Sheet (inserted in case you begin using the...

User Manual
Page 18
...supports at an angle, it away from potential sources of electromagnetic interference, such as large motors or other appliances that tilts the printer. It should always be kept level. Also keep it cannot operate properly. Avoid electrical outlets controlled by wall switches or automatic... humidity. Keep the entire computer system away from direct sunlight, strong light sources, or heat generating devices. Avoid using or storing the printer in places subject to a leg of cordless telephones. Also, avoid outlets on a flat, horizontal, stable surface. Q Place cables so...
...supports at an angle, it away from potential sources of electromagnetic interference, such as large motors or other appliances that tilts the printer. It should always be kept level. Also keep it cannot operate properly. Avoid electrical outlets controlled by wall switches or automatic... humidity. Keep the entire computer system away from direct sunlight, strong light sources, or heat generating devices. Avoid using or storing the printer in places subject to a leg of cordless telephones. Also, avoid outlets on a flat, horizontal, stable surface. Q Place cables so...
User Manual
Page 19
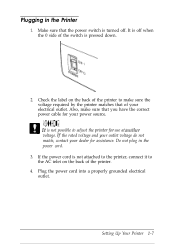
... off. Plug the power cord into a properly grounded electrical outlet. Also, make sure the voltage required by the printer matches that you have the correct power cable for assistance. Do not plug in the Printer 1. It is off when the 0 side of your power source. Check the label on the back of... the printer to adjust the printerfor use at another voltage. Caution: It is not attached to the printer, connect it to the AC inlet on the back of the printer. 4. Plugging in the power cord. 3. lf the rated voltage and your ...
... off. Plug the power cord into a properly grounded electrical outlet. Also, make sure the voltage required by the printer matches that you have the correct power cable for assistance. Do not plug in the Printer 1. It is off when the 0 side of your power source. Check the label on the back of... the printer to adjust the printerfor use at another voltage. Caution: It is not attached to the printer, connect it to the AC inlet on the back of the printer. 4. Plugging in the power cord. 3. lf the rated voltage and your ...
User Manual
Page 20
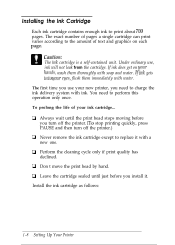
.... Cl Leave the cartridge sealed until the print head stops moving before you turn off the printer. (To stop printing quickly, press PAUSE and then turn off the printer.) Cl Never remove the ink cartridge except to print about 700 pages. You need to perform this operation only once. Install... the ink cartridge as follows: 1-8 Setting Up Your Printer lf mk gets iuto l/our et/es, flush them thoroughly with ink. To prolong the life of text and graphics on Tour hands, wash them immediately with ...
.... Cl Leave the cartridge sealed until the print head stops moving before you turn off the printer. (To stop printing quickly, press PAUSE and then turn off the printer.) Cl Never remove the ink cartridge except to print about 700 pages. You need to perform this operation only once. Install... the ink cartridge as follows: 1-8 Setting Up Your Printer lf mk gets iuto l/our et/es, flush them thoroughly with ink. To prolong the life of text and graphics on Tour hands, wash them immediately with ...
User Manual
Page 21
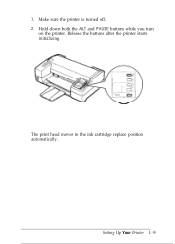
Make sure the printer is turned off. 2. Hold down both the ALT and PAUSE buttons while you turn on the printer. Setting Up Your Printer 1 - 9 The print head moves to the ink cartridge replace position automatically. 1. Release the buttons after the printer starts initializing.
Make sure the printer is turned off. 2. Hold down both the ALT and PAUSE buttons while you turn on the printer. Setting Up Your Printer 1 - 9 The print head moves to the ink cartridge replace position automatically. 1. Release the buttons after the printer starts initializing.
User Manual
Page 22
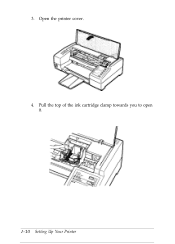
3. Open the printer cover. 4. Pull the top of the ink cartridge clamp towards you to open it. 1-10 Setting Up Your Printer
3. Open the printer cover. 4. Pull the top of the ink cartridge clamp towards you to open it. 1-10 Setting Up Your Printer
User Manual
Page 23
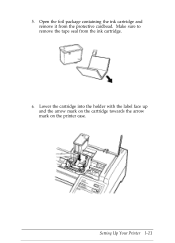
Lower the cartridge into the holder with the label face up and the arrow mark on the cartridge towards the arrow mark on the printer case. Setting Up Your Printer l-11 Make sure to remove the tape seal from the protective cardboad. 5. Open the foil package containing the ink cartridge and remove it from the ink cartridge. 6.
Lower the cartridge into the holder with the label face up and the arrow mark on the cartridge towards the arrow mark on the printer case. Setting Up Your Printer l-11 Make sure to remove the tape seal from the protective cardboad. 5. Open the foil package containing the ink cartridge and remove it from the ink cartridge. 6.
User Manual
Page 24
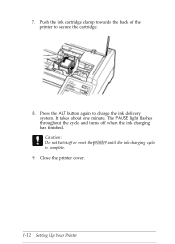
Close the printer cover. The PAUSE light flashes throughout the cycle and turns off or reset the printer until the ink-charging cycle is complete. 9. Press the ALT button again to secure the cartridge. 8. Caution: Do not tur~z off when the ink charging has finished. I-12 Setting Up Your Printer It takes about one minute. 7. Push the ink cartridge clamp towards the back of the printer to charge the ink delivery system.
Close the printer cover. The PAUSE light flashes throughout the cycle and turns off or reset the printer until the ink-charging cycle is complete. 9. Press the ALT button again to secure the cartridge. 8. Caution: Do not tur~z off when the ink charging has finished. I-12 Setting Up Your Printer It takes about one minute. 7. Push the ink cartridge clamp towards the back of the printer to charge the ink delivery system.

