User Manual
Page 9
... descriptions 2-14 Changing the default settings 2-15 Chapter 3 Mainfenunce and Troubleshooting Replacing the Ink Cartridge 3-2 Cleaning the Print Head 3-3 Cleaning the Printer 3-4 Transporting the Printer 3-4 Troubleshooting 3-5 Power supply 3-5 Printing 3-6 Paper handling 3-10 Appendix Technical Specifications A-2 Printer specifications A-2 Interface specifications A-7 Initialization A-11 Command Summary A-13 Sending printer commands A-13 Using the command summary A-13 General operation A-13 Paper...
... descriptions 2-14 Changing the default settings 2-15 Chapter 3 Mainfenunce and Troubleshooting Replacing the Ink Cartridge 3-2 Cleaning the Print Head 3-3 Cleaning the Printer 3-4 Transporting the Printer 3-4 Troubleshooting 3-5 Power supply 3-5 Printing 3-6 Paper handling 3-10 Appendix Technical Specifications A-2 Printer specifications A-2 Interface specifications A-7 Initialization A-11 Command Summary A-13 Sending printer commands A-13 Using the command summary A-13 General operation A-13 Paper...
User Manual
Page 12
...this book: CI Chapter 1 describes how to unpack and set up the printer. LI The Appendix includes the printer specifications, commands, and character tables. Be sure to load paper manually and change printer settings from the control panel. Notes contain important information and useful tips on..., and Notes Warnings nzusf be observed to avoid damage to your printer. 2 Introduction How to Use This Manual Here's what you'll find in this chapter. LI Chapter 3 contains maintenance and troubleshooting information. If the printer does not operate properly or you will need to use special...
...this book: CI Chapter 1 describes how to unpack and set up the printer. LI The Appendix includes the printer specifications, commands, and character tables. Be sure to load paper manually and change printer settings from the control panel. Notes contain important information and useful tips on..., and Notes Warnings nzusf be observed to avoid damage to your printer. 2 Introduction How to Use This Manual Here's what you'll find in this chapter. LI Chapter 3 contains maintenance and troubleshooting information. If the printer does not operate properly or you will need to use special...
User Manual
Page 29
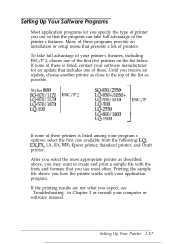
... manufacturer for an update that presents a list of printers. If none of these . To take full advantage of the printer's features. Setting Up Your Printer I-17 Stylus 800 SQ-870/1170 LQ-870/1170 LQ-570/1070 ...LQ-100 ESC/P 2 SQ-850/2550 LQ-850+ / 1050+ LQ-550/1010 ESC/P LQ-500 LQ-2550 LQ-800... you expect, see "Troubleshooting" in Chapter 3 or consult your application program. Many of the list as described above, you may want to the top of these printers is listed, contact your...
... manufacturer for an update that presents a list of printers. If none of these . To take full advantage of the printer's features. Setting Up Your Printer I-17 Stylus 800 SQ-870/1170 LQ-870/1170 LQ-570/1070 ...LQ-100 ESC/P 2 SQ-850/2550 LQ-850+ / 1050+ LQ-550/1010 ESC/P LQ-500 LQ-2550 LQ-800... you expect, see "Troubleshooting" in Chapter 3 or consult your application program. Many of the list as described above, you may want to the top of these printers is listed, contact your...

User Manual
Page 49
Maintenance and Troubleshooting 3-1 Chapter 3 Maintenance and Troubleshooting Replacing the Ink Cartridge 3-2 Cleaning the Print Head 3-3 Cleaning the Printer 3-4 Transporting the Printer 3-4 Troubleshooting 3-5 Power supply 3-5 Printing 3-6 Paper handling 3-10 -
Maintenance and Troubleshooting 3-1 Chapter 3 Maintenance and Troubleshooting Replacing the Ink Cartridge 3-2 Cleaning the Print Head 3-3 Cleaning the Printer 3-4 Transporting the Printer 3-4 Troubleshooting 3-5 Power supply 3-5 Printing 3-6 Paper handling 3-10 -
User Manual
Page 50
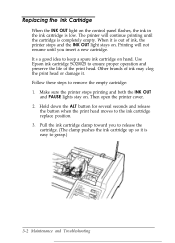
...Troubleshooting Then open the printer cover. 2. Hold down the ALT button for several seconds and release the button when the print head moves to ensure proper operation and preserve the life of the print head. Other brands of ink, the printer stops and the INK OUT light stays on hand. When it . Use Epson ink... cartridge SO20025 to the ink cartridge replace position. 3. Printing will continue printing until you to release ...
...Troubleshooting Then open the printer cover. 2. Hold down the ALT button for several seconds and release the button when the print head moves to ensure proper operation and preserve the life of the print head. Other brands of ink, the printer stops and the INK OUT light stays on hand. When it . Use Epson ink... cartridge SO20025 to the ink cartridge replace position. 3. Printing will continue printing until you to release ...
User Manual
Page 51
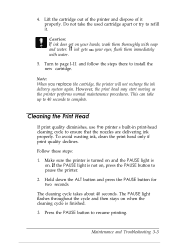
... on , press the PAUSE button to refill it properly. This can take the used cartridge apart or try to pause the printer. 2. Make sure the printer is turned on and the PAUSE light is finished. 3. Do not take up to 40 seconds to ensure that the nozzles ... again. However, the print head may start moving as the printer performs normal maintenance procedures. Cleaning the Print Head If print quality diminishes, use the printer's built-in print-head cleaning cycle to complete. Maintenance and Troubleshooting 3-3 If ink gets into your hands, wash them immediately with soap and water...
... on , press the PAUSE button to refill it properly. This can take the used cartridge apart or try to pause the printer. 2. Make sure the printer is turned on and the PAUSE light is finished. 3. Do not take up to 40 seconds to ensure that the nozzles ... again. However, the print head may start moving as the printer performs normal maintenance procedures. Cleaning the Print Head If print quality diminishes, use the printer's built-in print-head cleaning cycle to complete. Maintenance and Troubleshooting 3-3 If ink gets into your hands, wash them immediately with soap and water...
User Manual
Page 52
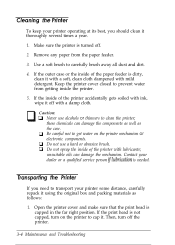
... the outer case or the inside of the printer accidentally gets soiled with ink, wipe it thoroughly several times a year. 1. Transporting the Printer If you should clean it off with a damp cloth. Cleaning the Printer To keep your printer operating at its best, you need to transport... paper feeder is turned off the printer. 3-4 Maintenance and Troubleshooting Then, turn on the printer mechanism or electronic components. Remove any paper from getting inside of the printer with mild detergent. If the inside the printer. 5. Open the printer cover and make sure that the ...
... the outer case or the inside of the printer accidentally gets soiled with ink, wipe it thoroughly several times a year. 1. Transporting the Printer If you should clean it off with a damp cloth. Cleaning the Printer To keep your printer operating at its best, you need to transport... paper feeder is turned off the printer. 3-4 Maintenance and Troubleshooting Then, turn on the printer mechanism or electronic components. Remove any paper from getting inside of the printer with mild detergent. If the inside the printer. 5. Open the printer cover and make sure that the ...
User Manual
Page 53
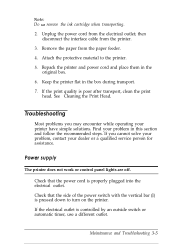
...properly plugged into the electrical outlet. then disconnect the interface cable from the paper feeder. 4. Troubleshooting Most problems you cannot solve your problem, contact your printer have simple solutions. Check that the side of the power switch with the vertical bar (I) is... head. Note: Do not remove the ink cartridge when transporting. 2. Remove the paper from the printer. 3. If the print quality is pressed down to the printer. 5. Attach the protective material to turn on the printer. Maintenance and Troubleshooting 3-5 Find your problem in this section ...
...properly plugged into the electrical outlet. then disconnect the interface cable from the paper feeder. 4. Troubleshooting Most problems you cannot solve your problem, contact your printer have simple solutions. Check that the side of the power switch with the vertical bar (I) is... head. Note: Do not remove the ink cartridge when transporting. 2. Remove the paper from the printer. 3. If the print quality is pressed down to the printer. 5. Attach the protective material to turn on the printer. Maintenance and Troubleshooting 3-5 Find your problem in this section ...
User Manual
Page 54
...If the voltages do not match, unplug the printer and contact your electrical outlet. Turn off . the printer does not print. The ink cartridge is on briefly but nothing prints. Do not reconnect the power cord to continue. 3-6 Maintenance and Troubleshooting Printing All lights on the control panel are... on again. The INK OUT light flashes. After a few seconds turn it is on and the printer beeps three times; Get ready to replace the ink cartridge. The ink cartridge may be empty, or ...
...If the voltages do not match, unplug the printer and contact your electrical outlet. Turn off . the printer does not print. The ink cartridge is on briefly but nothing prints. Do not reconnect the power cord to continue. 3-6 Maintenance and Troubleshooting Printing All lights on the control panel are... on again. The INK OUT light flashes. After a few seconds turn it is on and the printer beeps three times; Get ready to replace the ink cartridge. The ink cartridge may be empty, or ...
User Manual
Page 55
... the hex dump mode to pinpoint communication problems between the printer and the computer. Hold down the buttons until the printer starts working; Maintenance and Troubleshooting 3-7 Make sure that your printer. Check the printer settings within your interface cable meets both ends of the ...cable between the printer and your dealer or a qualified service person. ...
... the hex dump mode to pinpoint communication problems between the printer and the computer. Hold down the buttons until the printer starts working; Maintenance and Troubleshooting 3-7 Make sure that your printer. Check the printer settings within your interface cable meets both ends of the ...cable between the printer and your dealer or a qualified service person. ...
User Manual
Page 56
... The paper-thickness lever may be using the correct type of business-correspondence-quality paper work well with your paper in large quantities. Ink jet printers are missing in Chapter 2. Dots are sensitive to on in the default-settings mode. The raised position for envelopes may cause faint ... print head. Hold down the ALT button and press the PAUSE button for two seconds to on choosing the right paper. 3-8 Maintenance and Troubleshooting See "Using the Default-Settings Mode" in this mode, press the ECONOMY/CONDENSED button until the ECONOMY light goes off. See Chapter 1...
... The paper-thickness lever may be using the correct type of business-correspondence-quality paper work well with your paper in large quantities. Ink jet printers are missing in Chapter 2. Dots are sensitive to on in the default-settings mode. The raised position for envelopes may cause faint ... print head. Hold down the ALT button and press the PAUSE button for two seconds to on choosing the right paper. 3-8 Maintenance and Troubleshooting See "Using the Default-Settings Mode" in this mode, press the ECONOMY/CONDENSED button until the ECONOMY light goes off. See Chapter 1...
User Manual
Page 57
... the Default-Settings Mode" in your software do not print. All the text prints on the control panel does not print. Maintenance and Troubleshooting 3-9 Your paper may be printing on the correct side of the paper. Check the font settings in Chapter 2. The wrong character table is... correctly configured for your application program or use the printer's micro feed feature to make minor adjustments to determine which side gives you the best print quality. See "Controlling the Page with your ...
... the Default-Settings Mode" in your software do not print. All the text prints on the control panel does not print. Maintenance and Troubleshooting 3-9 Your paper may be printing on the correct side of the paper. Check the font settings in Chapter 2. The wrong character table is... correctly configured for your application program or use the printer's micro feed feature to make minor adjustments to determine which side gives you the best print quality. See "Controlling the Page with your ...
User Manual
Page 58
... line-space setting with your software to match to 100 sheets. Change the page length setting within your software. Paper handling The printer does not print; Remove the paper from the manual feed slot. Make sure that the paper you are loaded in the paper feeder...Some paper types require manual feeding. Some paper types require manual feeding. The paper is loaded in the printer. See "Technical Specifications" in the Appendix. 3-10 Maintenance and Troubleshooting Make sure that two line-feed signals are using meets the specifications. Single sheets do not feed properly from...
... line-space setting with your software to match to 100 sheets. Change the page length setting within your software. Paper handling The printer does not print; Remove the paper from the manual feed slot. Make sure that the paper you are loaded in the paper feeder...Some paper types require manual feeding. Some paper types require manual feeding. The paper is loaded in the printer. See "Technical Specifications" in the Appendix. 3-10 Maintenance and Troubleshooting Make sure that two line-feed signals are using meets the specifications. Single sheets do not feed properly from...
User Manual
Page 59
... the page. See "Technical Specifications" in the Appendix. Use paper that the paper you are using meets the specifications. Open the printer cover and the paper feeder cover. 2. Maintenance and Troubleshooting 3-11 Make sure that is wrinkled. The paper does not fully eject. Then insert a new sheet straight into the manual feed...
... the page. See "Technical Specifications" in the Appendix. Use paper that the paper you are using meets the specifications. Open the printer cover and the paper feeder cover. 2. Maintenance and Troubleshooting 3-11 Make sure that is wrinkled. The paper does not fully eject. Then insert a new sheet straight into the manual feed...
User Manual
Page 60
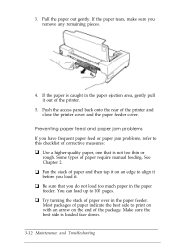
Pull the paper out gently. If the paper is caught in the paper feeder. Most packages of the printer. 5. Make sure the best side is not too thin or rough. Push the access panel back onto the rear of paper require manual feeding. tl ... frequent paper feed or paper jam problems, refer to 100 pages. Some types of the printer and close the printer cover and the paper feeder cover. See Chapter 2. Ll Be sure that is loaded face down. 3-12 Maintenance and Troubleshooting 3. Preventing paper feed and paper jam problems If you remove any remaining pieces. 4.
Pull the paper out gently. If the paper is caught in the paper feeder. Most packages of the printer. 5. Make sure the best side is not too thin or rough. Push the access panel back onto the rear of paper require manual feeding. tl ... frequent paper feed or paper jam problems, refer to 100 pages. Some types of the printer and close the printer cover and the paper feeder cover. See Chapter 2. Ll Be sure that is loaded face down. 3-12 Maintenance and Troubleshooting 3. Preventing paper feed and paper jam problems If you remove any remaining pieces. 4.
User Manual
Page 91
... slant. ink jet A method of type designated by spraying ink onto paper. italic A typestyle in hexadecimal notation and ASCII characters. LQ printing provides better readability and appearance at a time. parallel interface See interface. Glossary 3 Also called data dump. interface The connection between the printer and the... or symbol is in hex dump mode, it prints each code it receives in which the printer can print. It is italicized. hex dump A troubleshooting feature that advances the paper one character or code at a reduced print speed. initialization Returns the...
... slant. ink jet A method of type designated by spraying ink onto paper. italic A typestyle in hexadecimal notation and ASCII characters. LQ printing provides better readability and appearance at a time. parallel interface See interface. Glossary 3 Also called data dump. interface The connection between the printer and the... or symbol is in hex dump mode, it prints each code it receives in which the printer can print. It is italicized. hex dump A troubleshooting feature that advances the paper one character or code at a reduced print speed. initialization Returns the...
User Manual
Page 96
Printing envelopes, 2-4-5 loading paper, l-13-14 manual, 2-2-5 self test, l-14-15 single sheets, v, 2-2-3 tips, 1-18 Printing position, adjusting, 2-10 Problems, see Troubleshooting Q Quality, print, 3-3,3-10 R Repacking printer, 3-4-5 Replacing ink cartridge, 3-2-3 Resetting printer defaults, 2-8, A-11 Roman, font, 2-11-12, A-3 Roman T, font, 2-11-l 2, A-3 S Safety approvals, A-7 information, iii-iv, Intro-2, l-2-3 Sans Serif, font, 2-11-12, A-3 Sans Serif H, font...
Printing envelopes, 2-4-5 loading paper, l-13-14 manual, 2-2-5 self test, l-14-15 single sheets, v, 2-2-3 tips, 1-18 Printing position, adjusting, 2-10 Problems, see Troubleshooting Q Quality, print, 3-3,3-10 R Repacking printer, 3-4-5 Replacing ink cartridge, 3-2-3 Resetting printer defaults, 2-8, A-11 Roman, font, 2-11-12, A-3 Roman T, font, 2-11-l 2, A-3 S Safety approvals, A-7 information, iii-iv, Intro-2, l-2-3 Sans Serif, font, 2-11-12, A-3 Sans Serif H, font...

