
User Manual
Page 3
...transmitted in any form or by any consumable products other than those designated as a result of: accident, misuse, or abuse of Seiko Epson Corporation. Epson and Epson ESC/P are trademarks of this publication may be liable to the purchaser of this product, or (excluding the US) failure to the ...or alterations to this product or third parties for damages, losses, costs, or expenses incurred by purchaser or third parties as Original Epson Products or Epson Approved Products by Seiko Epson Corporation Nagano, Japan User's Guide EPSON® 48-NOZZLE INK JET PRINTER All rights reserved.
...transmitted in any form or by any consumable products other than those designated as a result of: accident, misuse, or abuse of Seiko Epson Corporation. Epson and Epson ESC/P are trademarks of this publication may be liable to the purchaser of this product, or (excluding the US) failure to the ...or alterations to this product or third parties for damages, losses, costs, or expenses incurred by purchaser or third parties as Original Epson Products or Epson Approved Products by Seiko Epson Corporation Nagano, Japan User's Guide EPSON® 48-NOZZLE INK JET PRINTER All rights reserved.
User Manual
Page 8
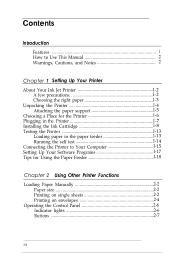
... to Use This Manual 2 Warnings, Cautions, and Notes 2 Chapter 1 Setting Up Your Printer About Your Ink Jet Printer l-2 A few precautions l-2 Choosing the right paper l-3 Unpacking the Printer l-4 Attaching the paper support l-5 Choosing a Place for the Printer l-6 Plugging in the Printer l-7 Installing the Ink Cartridge l-8 Testing the Printer l-13 Loading paper in the paper feeder l-13 Running the self test...
... to Use This Manual 2 Warnings, Cautions, and Notes 2 Chapter 1 Setting Up Your Printer About Your Ink Jet Printer l-2 A few precautions l-2 Choosing the right paper l-3 Unpacking the Printer l-4 Attaching the paper support l-5 Choosing a Place for the Printer l-6 Plugging in the Printer l-7 Installing the Ink Cartridge l-8 Testing the Printer l-13 Loading paper in the paper feeder l-13 Running the self test...
User Manual
Page 9
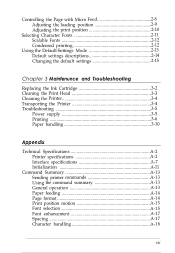
... Changing the default settings 2-15 Chapter 3 Mainfenunce and Troubleshooting Replacing the Ink Cartridge 3-2 Cleaning the Print Head 3-3 Cleaning the Printer 3-4 Transporting the Printer 3-4 Troubleshooting 3-5 Power supply 3-5 Printing 3-6 Paper handling 3-10 Appendix Technical Specifications A-2 Printer specifications A-2 Interface specifications A-7 Initialization A-11 Command Summary A-13 Sending printer commands A-13 Using the command summary A-13 General operation A-13 Paper...
... Changing the default settings 2-15 Chapter 3 Mainfenunce and Troubleshooting Replacing the Ink Cartridge 3-2 Cleaning the Print Head 3-3 Cleaning the Printer 3-4 Transporting the Printer 3-4 Troubleshooting 3-5 Power supply 3-5 Printing 3-6 Paper handling 3-10 Appendix Technical Specifications A-2 Printer specifications A-2 Interface specifications A-7 Initialization A-11 Command Summary A-13 Sending printer commands A-13 Using the command summary A-13 General operation A-13 Paper...
User Manual
Page 11
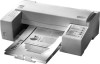
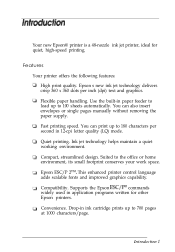
... widely used in application programs written for quiet, high-speed printing. Ink jet technology helps maintain a quiet working environment. Your new Epson@ printer is a 48-nozzle ink jet printer, ideal for other Epson printers. Use the built-in 12-cpi letter quality (LQ) mode. Compact, streamlined design. Epson's new ink jet technology delivers crisp 360 x 360 dots per second in paper feeder...
... widely used in application programs written for quiet, high-speed printing. Ink jet technology helps maintain a quiet working environment. Your new Epson@ printer is a 48-nozzle ink jet printer, ideal for other Epson printers. Use the built-in 12-cpi letter quality (LQ) mode. Compact, streamlined design. Epson's new ink jet technology delivers crisp 360 x 360 dots per second in paper feeder...
User Manual
Page 13
Chapter 1 Setting Up Your Printer About Your Ink Jet Printer 1-2 A few precautions 1-2 Choosing the right paper 1-3 Unpacking the Printer 1-4 Attaching the paper support l-5 Choosing a Place for the Printer l-6 Plugging in the Printer l-7 Installing the Ink Cartridge l-8 Testing the Printer l-13 Loading paper in the paper feeder l-13 Running the self test l-14 Connecting the Printer to Your Computer l-15 Setting Up Your Software Programs l-17 Tips for Using the Paper Feeder l-18 Setting Up Your Printer 1-1
Chapter 1 Setting Up Your Printer About Your Ink Jet Printer 1-2 A few precautions 1-2 Choosing the right paper 1-3 Unpacking the Printer 1-4 Attaching the paper support l-5 Choosing a Place for the Printer l-6 Plugging in the Printer l-7 Installing the Ink Cartridge l-8 Testing the Printer l-13 Loading paper in the paper feeder l-13 Running the self test l-14 Connecting the Printer to Your Computer l-15 Setting Up Your Software Programs l-17 Tips for Using the Paper Feeder l-18 Setting Up Your Printer 1-1
User Manual
Page 14
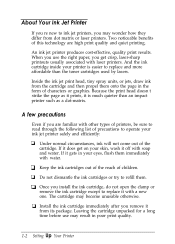
...high print quality and quiet printing. About Your Ink Jet Printer If you're new to ink jet printers, you remove it from its package. Inside the ink jet print head, tiny spray units, or jets, draw ink from dot matrix or laser printers. If it does get crisp, laser-sharp printouts... the cartridge and then propel them onto the page in your ink jet printer safely and efficiently: CI Under normal circumstances, ink will not come out of precautions to refill them immediately with laser printers. An ink jet printer produces cost-effective, quality print results. If it off with ...
...high print quality and quiet printing. About Your Ink Jet Printer If you're new to ink jet printers, you remove it from its package. Inside the ink jet print head, tiny spray units, or jets, draw ink from dot matrix or laser printers. If it does get crisp, laser-sharp printouts... the cartridge and then propel them onto the page in your ink jet printer safely and efficiently: CI Under normal circumstances, ink will not come out of precautions to refill them immediately with laser printers. An ink jet printer produces cost-effective, quality print results. If it off with ...

User Manual
Page 15
... sure the print head is an especially important consideration. Setting Up Your Printer 1-3 With paper that has a rough finish or a slick, coated finish. Paper absorbency is capped, and do not remove the ink cartridge. 0 Install the ink cartridge immediately after you remove it from a cold place to a warm one, let...the print head is capped. (The print head is capped when it is a good practice to test any paper or envelopes in your ink jet printer is selecting the right paper. The finish and thickness of the keys to getting great results with paper that is too thick or too ...
... sure the print head is an especially important consideration. Setting Up Your Printer 1-3 With paper that has a rough finish or a slick, coated finish. Paper absorbency is capped, and do not remove the ink cartridge. 0 Install the ink cartridge immediately after you remove it from a cold place to a warm one, let...the print head is capped. (The print head is capped when it is a good practice to test any paper or envelopes in your ink jet printer is selecting the right paper. The finish and thickness of the keys to getting great results with paper that is too thick or too ...
User Manual
Page 16
... should test both sides of the paper to the condition ofyour paper. If the ink does not dry quickly enough, try removing sheets one at a time as they finish printing. Note: Ink jet printers me plrrticulmdy sensitizle to determine which gives you the best quality printing. Keep unused paper ...in its origind pnckqing rrznterial and store it in 0 cool, dry plnce. If the ink does not bleed or smear, the paper should be...
... should test both sides of the paper to the condition ofyour paper. If the ink does not dry quickly enough, try removing sheets one at a time as they finish printing. Note: Ink jet printers me plrrticulmdy sensitizle to determine which gives you the best quality printing. Keep unused paper ...in its origind pnckqing rrznterial and store it in 0 cool, dry plnce. If the ink does not bleed or smear, the paper should be...
User Manual
Page 20
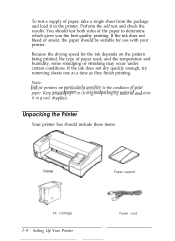
... You need to the amount of your new printer, you install it with ink. Ll Always wait until just before you turn off the printer. (To stop printing quickly, press PAUSE and then turn off the printer.) Cl Never remove the ink cartridge except to replace it . Cl Leave ... wash them immediately with soap and water. Installing the Ink Cartridge Each ink cartridge contains enough ink to perform this operation only once. Cautiow El The iuk cartridge is a self-contained unit. Install the ink cartridge as follows: 1-8 Setting Up Your Printer U Don't move the print head by hand. The...
... You need to the amount of your new printer, you install it with ink. Ll Always wait until just before you turn off the printer. (To stop printing quickly, press PAUSE and then turn off the printer.) Cl Never remove the ink cartridge except to replace it . Cl Leave ... wash them immediately with soap and water. Installing the Ink Cartridge Each ink cartridge contains enough ink to perform this operation only once. Cautiow El The iuk cartridge is a self-contained unit. Install the ink cartridge as follows: 1-8 Setting Up Your Printer U Don't move the print head by hand. The...
User Manual
Page 21
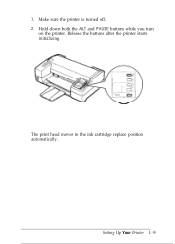
Release the buttons after the printer starts initializing. Hold down both the ALT and PAUSE buttons while you turn on the printer. The print head moves to the ink cartridge replace position automatically. 1. Make sure the printer is turned off. 2. Setting Up Your Printer 1 - 9
Release the buttons after the printer starts initializing. Hold down both the ALT and PAUSE buttons while you turn on the printer. The print head moves to the ink cartridge replace position automatically. 1. Make sure the printer is turned off. 2. Setting Up Your Printer 1 - 9
User Manual
Page 22
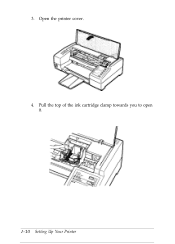
Pull the top of the ink cartridge clamp towards you to open it. 1-10 Setting Up Your Printer Open the printer cover. 4. 3.
Pull the top of the ink cartridge clamp towards you to open it. 1-10 Setting Up Your Printer Open the printer cover. 4. 3.
User Manual
Page 23
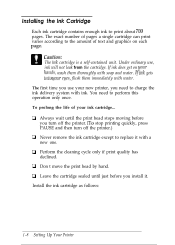
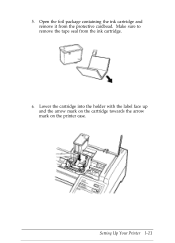
Setting Up Your Printer l-11 5. Make sure to remove the tape seal from the protective cardboad. Open the foil package containing the ink cartridge and remove it from the ink cartridge. 6. Lower the cartridge into the holder with the label face up and the arrow mark on the cartridge towards the arrow mark on the printer case.
Setting Up Your Printer l-11 5. Make sure to remove the tape seal from the protective cardboad. Open the foil package containing the ink cartridge and remove it from the ink cartridge. 6. Lower the cartridge into the holder with the label face up and the arrow mark on the cartridge towards the arrow mark on the printer case.
User Manual
Page 24
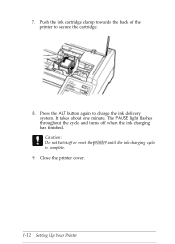
7. The PAUSE light flashes throughout the cycle and turns off or reset the printer until the ink-charging cycle is complete. 9. Caution: Do not tur~z off when the ink charging has finished. Close the printer cover. It takes about one minute. I-12 Setting Up Your Printer Press the ALT button again to secure the cartridge. 8. Push the ink cartridge clamp towards the back of the printer to charge the ink delivery system.
7. The PAUSE light flashes throughout the cycle and turns off or reset the printer until the ink-charging cycle is complete. 9. Caution: Do not tur~z off when the ink charging has finished. Close the printer cover. It takes about one minute. I-12 Setting Up Your Printer Press the ALT button again to secure the cartridge. 8. Push the ink cartridge clamp towards the back of the printer to charge the ink delivery system.
User Manual
Page 25
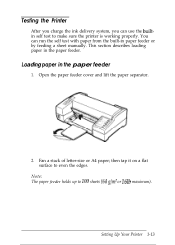
Open the paper feeder cover and lift the paper separator. 2. Setting Up Your Printer 1-13 then tap it on a flat surface to 100 sheets (64 g/m2 or 16 lb maximum). Loading paper in the paper feeder. Fan a stack of ... up to even the edges. You can use the builtin self test to make sure the printer is working properly. This section describes loading paper in the paper feeder 1. Testing the Printer After you charge the ink delivery system, you can run the self test with paper from the built-in paper feeder...
Open the paper feeder cover and lift the paper separator. 2. Setting Up Your Printer 1-13 then tap it on a flat surface to 100 sheets (64 g/m2 or 16 lb maximum). Loading paper in the paper feeder. Fan a stack of ... up to even the edges. You can use the builtin self test to make sure the printer is working properly. This section describes loading paper in the paper feeder 1. Testing the Printer After you charge the ink delivery system, you can run the self test with paper from the built-in paper feeder...
User Manual
Page 30
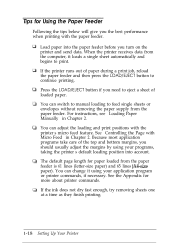
...the Page with the paper feeder. If the ink does not dry fast enough, try removing sheets one at a time as they finish printing. 1-18 Setting Up Your Printer When the printer receives data from the computer, it using your application program or printer commands, if necessary. See the Appendix for ...loading to eject a sheet of the top and bottom margins, you should usually adjust the margins by using your programs, taking the printer's default loading position into the paper feeder before you need to feed single sheets or envelopes without removing the paper supply from the ...
...the Page with the paper feeder. If the ink does not dry fast enough, try removing sheets one at a time as they finish printing. 1-18 Setting Up Your Printer When the printer receives data from the computer, it using your application program or printer commands, if necessary. See the Appendix for ...loading to eject a sheet of the top and bottom margins, you should usually adjust the margins by using your programs, taking the printer's default loading position into the paper feeder before you need to feed single sheets or envelopes without removing the paper supply from the ...
User Manual
Page 35
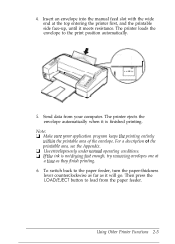
... area of the printable area, see the Appendix. 4. Note: U Make sure your computer. Send data from the paper feeder. Using Other Printer Functions 2-5 Insert an envelope into the manual feed slot with the wide end at a time as it meets resistance. The... printer loads the envelope to the paper feeder, turn the paper-thickness lever counterclockwise as far as they finish printing. 6. U Use envelopes only under normal operating conditions. 3 lf fhe ink is finished printing. To switch back to the print position ...
... area of the printable area, see the Appendix. 4. Note: U Make sure your computer. Send data from the paper feeder. Using Other Printer Functions 2-5 Insert an envelope into the manual feed slot with the wide end at a time as it meets resistance. The... printer loads the envelope to the paper feeder, turn the paper-thickness lever counterclockwise as far as they finish printing. 6. U Use envelopes only under normal operating conditions. 3 lf fhe ink is finished printing. To switch back to the print position ...
User Manual
Page 37
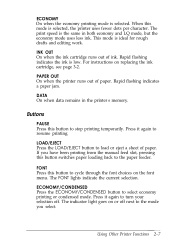
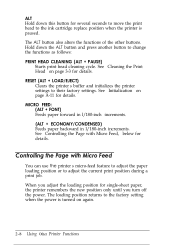
...Press it again to select economy printing or condensed mode. This mode is the same in the printer's memory. The indicator light goes on replacing the ink cartridge, see page 3-2. INK OUT On when the ink cartridge runs out of paper. LOAD/EJECT Press the LOAD/EJECT button to the paper feeder. ... flashing indicates a paper jam. ECONOMY On when the economy printing mode is selected, the printer uses fewer dots per character. Rapid flashing indicates the ink is low. PAPER OUT On when the printer runs out of paper. DATA On when data remains in both economy and LQ mode, but the ...
...Press it again to select economy printing or condensed mode. This mode is the same in the printer's memory. The indicator light goes on replacing the ink cartridge, see page 3-2. INK OUT On when the ink cartridge runs out of paper. LOAD/EJECT Press the LOAD/EJECT button to the paper feeder. ... flashing indicates a paper jam. ECONOMY On when the economy printing mode is selected, the printer uses fewer dots per character. Rapid flashing indicates the ink is low. PAPER OUT On when the printer runs out of paper. DATA On when data remains in both economy and LQ mode, but the ...
User Manual
Page 38
...other buttons. See "Cleaning the Print Head" on again. 2-8 Using Other Printer Functions When you adjust the loading position for several seconds to move the print head to the ink cartridge replace position when the printer is turned on page 3-3 for details. Hold down this button for single...-sheet paper, the printer remembers the new position only until you turn off the power. RESET (...
...other buttons. See "Cleaning the Print Head" on again. 2-8 Using Other Printer Functions When you adjust the loading position for several seconds to move the print head to the ink cartridge replace position when the printer is turned on page 3-3 for details. Hold down this button for single...-sheet paper, the printer remembers the new position only until you turn off the power. RESET (...

User Manual
Page 39
...EJECT button, or from the manual feed slot by inserting it from the computer to move the loading position down 1 / 180 inch. Make sure the printer is turned on the page, you can change the loading position with the micro-feed feature as the paper is too high or low on... it into the slot. 3. Using Other Printer Functions 2-9 The pointer on the print head indicates the base line of printed characters. (You may have to experiment a few times to get the results you want .) pointer / ink cartridge 5. If printing is loaded, hold down the ALT button and press the ECONOMY/CONDENSED ...
...EJECT button, or from the manual feed slot by inserting it from the computer to move the loading position down 1 / 180 inch. Make sure the printer is turned on the page, you can change the loading position with the micro-feed feature as the paper is too high or low on... it into the slot. 3. Using Other Printer Functions 2-9 The pointer on the print head indicates the base line of printed characters. (You may have to experiment a few times to get the results you want .) pointer / ink cartridge 5. If printing is loaded, hold down the ALT button and press the ECONOMY/CONDENSED ...
User Manual
Page 46
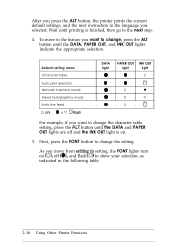
...to change the setting. Next, press the FONT button to change , press the ALT button until printing is on (O), off and the INK OUT light is finished, then go to show your selection, as indicated in the language you move to the feature you want to change ... FONT lights turn on . 5. As you selected. After you press the ALT button, the printer prints the current default settings, and the next instruction in the following table. 2-16 Using Other Printer Functions Wait until the DATA, PAPER OUT, and INK OUT lights indicate the appropriate selection. To move from setting{?
...to change the setting. Next, press the FONT button to change , press the ALT button until printing is on (O), off and the INK OUT light is finished, then go to show your selection, as indicated in the language you move to the feature you want to change ... FONT lights turn on . 5. As you selected. After you press the ALT button, the printer prints the current default settings, and the next instruction in the following table. 2-16 Using Other Printer Functions Wait until the DATA, PAPER OUT, and INK OUT lights indicate the appropriate selection. To move from setting{?


