
Network Guide
Page 8
Features of the Network Interface ❏ Connects your Epson printer using a built-in Ethernet interface, which is called the network interface in this manual, to the network. ❏ Supports multiple protocols, such as TCP/IP and Bonjour. ❏ Supports both 10Base-T and 100Base-TX. ❏ Supports DHCP. ❏ Supports ...
Features of the Network Interface ❏ Connects your Epson printer using a built-in Ethernet interface, which is called the network interface in this manual, to the network. ❏ Supports multiple protocols, such as TCP/IP and Bonjour. ❏ Supports both 10Base-T and 100Base-TX. ❏ Supports DHCP. ❏ Supports ...
Network Guide
Page 17
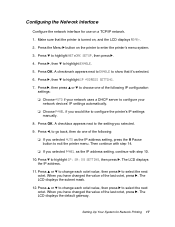
...and the LCD displays READY. 2. The LCD displays the default gateway. Press r, then d to enter the printer's menu system. 3. A checkmark appears next to ENABLE to configure the printer's IP settings manually. 8. Press r, then press u or d to choose one of the following IP configuration settings: ❏... press r. Press OK. When you selected. 9. The LCD displays the subnet mask. 12. Setting Up Your System for use on the printer to highlight ENABLE. 5. Configuring the Network Interface Configure the network interface for Network Printing 17 Press the Menu r button on a TCP/IP ...
...and the LCD displays READY. 2. The LCD displays the default gateway. Press r, then d to enter the printer's menu system. 3. A checkmark appears next to ENABLE to configure the printer's IP settings manually. 8. Press r, then press u or d to choose one of the following IP configuration settings: ❏... press r. Press OK. When you selected. 9. The LCD displays the subnet mask. 12. Setting Up Your System for use on the printer to highlight ENABLE. 5. Configuring the Network Interface Configure the network interface for Network Printing 17 Press the Menu r button on a TCP/IP ...

Network Guide
Page 21
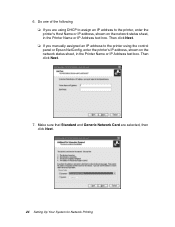
Select the Standard radio button and then select EPSON Network Printer. Click Next. 8. Installing the Printer Driver 1. When you created for Network Printing 21 Select the port you see a screen like this one, click the Manual button. 4. Click Finish. 9. Follow the on-screen instructions to finish installing the printer driver. Follow the instructions to install the...
Select the Standard radio button and then select EPSON Network Printer. Click Next. 8. Installing the Printer Driver 1. When you created for Network Printing 21 Select the port you see a screen like this one, click the Manual button. 4. Click Finish. 9. Follow the on-screen instructions to finish installing the printer driver. Follow the instructions to install the...
Network Guide
Page 24
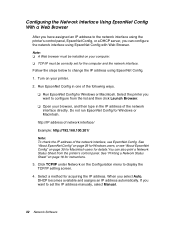
Then click Next. 7. Do one of the following ❏ If you manually assigned an IP address to the printer using DHCP to assign an IP address to the printer, enter the printer's Host Name or IP address, shown on the network status sheet, in the Printer Name or IP Address text box. Then click Next. ❏..., then click Next. 24 Setting Up Your System for Network Printing 6. Make sure that Standard and Generic Network Card are using the control panel or Epson NetConfig, enter the printer's IP address, shown on the network status sheet, in the...
Then click Next. 7. Do one of the following ❏ If you manually assigned an IP address to the printer using DHCP to assign an IP address to the printer, enter the printer's Host Name or IP address, shown on the network status sheet, in the Printer Name or IP Address text box. Then click Next. ❏..., then click Next. 24 Setting Up Your System for Network Printing 6. Make sure that Standard and Generic Network Card are using the control panel or Epson NetConfig, enter the printer's IP address, shown on the network status sheet, in the...

Network Guide
Page 26
Follow the on -screen instructions to install the printer driver. 3. Select the port you see a screen like this one, click the Manual button. 4. Insert the printer software CD in the Install From Disk dialog box. 26 Setting Up Your System for the printer, then click OK. 5. Click OK in your CD or DVD drive. 2. Installing the Printer Driver 1. When you created for Network Printing Follow the on -screen instructions to finish installing the printer driver. 6.
Follow the on -screen instructions to install the printer driver. 3. Select the port you see a screen like this one, click the Manual button. 4. Insert the printer software CD in the Install From Disk dialog box. 26 Setting Up Your System for the printer, then click OK. 5. Click OK in your CD or DVD drive. 2. Installing the Printer Driver 1. When you created for Network Printing Follow the on -screen instructions to finish installing the printer driver. 6.
Network Guide
Page 32
... configure the network interface using EpsonNet Config with Web Browser. Note: ❏ A Web browser must be correctly set the IP address manually, select Manual. 32 Network Software See "Printing a Network Status Sheet" on page 18 for Windows or Macintosh. When you select Auto, DHCP becomes.... Configuring the Network Interface Using EpsonNet Config With a Web Browser After you have assigned an IP address to the network interface using the printer's control panel, EpsonNet Config, or a DHCP server, you can also print a Network Status Sheet from the list and then click Launch...
... configure the network interface using EpsonNet Config with Web Browser. Note: ❏ A Web browser must be correctly set the IP address manually, select Manual. 32 Network Software See "Printing a Network Status Sheet" on page 18 for Windows or Macintosh. When you select Auto, DHCP becomes.... Configuring the Network Interface Using EpsonNet Config With a Web Browser After you have assigned an IP address to the network interface using the printer's control panel, EpsonNet Config, or a DHCP server, you can also print a Network Status Sheet from the list and then click Launch...
Network Guide
Page 33
.... If there is not supported, we recommend that you want to change of the network interface changes every time you turn on the printer so that you want to the network interface even when there are no gateway, leave the default values. 6. If you need to ... not conflict with EpsonNet Config; Select Enable for Acquire DNS Server Address Automatically if you select Manual and then enter an IP address. A DHCP server/router must check any unexpected change the printer port setting accordingly. 5. Network Software 33 this prevents any changes made to Enable; When setting...
.... If there is not supported, we recommend that you want to change of the network interface changes every time you turn on the printer so that you want to the network interface even when there are no gateway, leave the default values. 6. If you need to ... not conflict with EpsonNet Config; Select Enable for Acquire DNS Server Address Automatically if you select Manual and then enter an IP address. A DHCP server/router must check any unexpected change the printer port setting accordingly. 5. Network Software 33 this prevents any changes made to Enable; When setting...
Network Guide
Page 37
... segment as described in "Printing a Network Status Sheet" on page 41. Use EpsonNet Config or the printer's control panel to assign the printer an IP address that belongs to the computer manually, but its IP address is installed on the computer. Cause What to see if you can print a..." on page 18. Install the TCP/IP protocol. Set a correct IP address for the computer. Troubleshooting 37 First, check to do The printer settings or network settings may be used because no network is not installed on the computer, but you have added or deleted protocols after installing...
... segment as described in "Printing a Network Status Sheet" on page 41. Use EpsonNet Config or the printer's control panel to assign the printer an IP address that belongs to the computer manually, but its IP address is installed on the computer. Cause What to see if you can print a..." on page 18. Install the TCP/IP protocol. Set a correct IP address for the computer. Troubleshooting 37 First, check to do The printer settings or network settings may be used because no network is not installed on the computer, but you have added or deleted protocols after installing...

Network Guide
Page 40
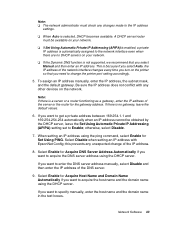
.... 14. Press r, then press u or d to choose one of the last octet, press the Pause button to configure the printer's IP settings manually. 8. Press u or d to change each octet value, then press r to select the next octet. Press u or d to change each octet value, then press r ...as the IP address setting, continue with Web Browser. ❏ See the User's Guide for more information about settings on again. Turn the printer off then back on the printer's control panel. 40 Tips for Administrators Print a network status sheet to highlight IP, SM, DG SETTING, then press r. Press l, to...
.... 14. Press r, then press u or d to choose one of the last octet, press the Pause button to configure the printer's IP settings manually. 8. Press u or d to change each octet value, then press r to select the next octet. Press u or d to change each octet value, then press r ...as the IP address setting, continue with Web Browser. ❏ See the User's Guide for more information about settings on again. Turn the printer off then back on the printer's control panel. 40 Tips for Administrators Print a network status sheet to highlight IP, SM, DG SETTING, then press r. Press l, to...
Printer Guide
Page 6
...Printer 57 Available Epson Special Media 58 Guidelines for Using Epson Media 58 Using Roll Paper 59 Roll Paper Guidelines 59 Selecting the Paper Type 59 Setting Up Automatic Media Tracking and Identification 61 Placing the Paper in the Printer 62 Loading the Paper for Printing 68 Cutting Paper Manually...Selecting Paper Configurations 85 3 Printing With Epson Drivers for Macintosh. . 87 Sizing Images for Borderless Printing on Roll Paper 88 Printing With Mac OS X 10.5 89 Choosing Page Setup and Basic Print Options 89 Choosing Color Management Options 96 Choosing Advanced Media ...
...Printer 57 Available Epson Special Media 58 Guidelines for Using Epson Media 58 Using Roll Paper 59 Roll Paper Guidelines 59 Selecting the Paper Type 59 Setting Up Automatic Media Tracking and Identification 61 Placing the Paper in the Printer 62 Loading the Paper for Printing 68 Cutting Paper Manually...Selecting Paper Configurations 85 3 Printing With Epson Drivers for Macintosh. . 87 Sizing Images for Borderless Printing on Roll Paper 88 Printing With Mac OS X 10.5 89 Choosing Page Setup and Basic Print Options 89 Choosing Color Management Options 96 Choosing Advanced Media ...

Printer Guide
Page 22
Unpack the stand and make sure you need floor space of approximately: • 8 × 8 feet (2.4 × 2.4 m) for the Epson Stylus Pro 7900 and stand • 13 × 13 feet (4 × 4 m) for the Epson Stylus Pro 9900 and stand Unpacking and Assembling the Stand 1. Then remove the box containing the stand and paper basket. 2. Lift the box up and away from the shipping pallet. 22 | Setting Up the Printer For assembly, you have all these items. 2 Sides Horizontal strut Manual holder 6 Bolts Hex wrench 2 Wing screws with lock washers 22
Unpack the stand and make sure you need floor space of approximately: • 8 × 8 feet (2.4 × 2.4 m) for the Epson Stylus Pro 7900 and stand • 13 × 13 feet (4 × 4 m) for the Epson Stylus Pro 9900 and stand Unpacking and Assembling the Stand 1. Then remove the box containing the stand and paper basket. 2. Lift the box up and away from the shipping pallet. 22 | Setting Up the Printer For assembly, you have all these items. 2 Sides Horizontal strut Manual holder 6 Bolts Hex wrench 2 Wing screws with lock washers 22

Printer Guide
Page 42
Completing Setup and Connecting the Power Cord 1. Attach the manual holder to the bottom of the stand. Attach the paper guides to the left or right side of the printer as shown: 18. Continue with the next section to the place of use. (The casters are meant for moving the printer for only a short distance.) Lock the casters after moving. 42 42 | Setting Up the Printer 17. Store the Printer Guide in the holder. 2. Unlock the casters. Then move the printer to complete the setup process and connect the power cord.
Completing Setup and Connecting the Power Cord 1. Attach the manual holder to the bottom of the stand. Attach the paper guides to the left or right side of the printer as shown: 18. Continue with the next section to the place of use. (The casters are meant for moving the printer for only a short distance.) Lock the casters after moving. 42 42 | Setting Up the Printer 17. Store the Printer Guide in the holder. 2. Unlock the casters. Then move the printer to complete the setup process and connect the power cord.

Printer Guide
Page 50
...the EpsonNet folder into the trash. Click your printer software. 6. Read the license agreement and click Agree. Follow the on-screen instructions to install the software and manuals, register your printer, and place links to Epson Professional Imaging and myEpsonPrinter.com websites on your ...desktop. 50 You see this : Note: If you can install the new one. Then reinstall your printer model. Click the Install button. ...
...the EpsonNet folder into the trash. Click your printer software. 6. Read the license agreement and click Agree. Follow the on-screen instructions to install the software and manuals, register your printer, and place links to Epson Professional Imaging and myEpsonPrinter.com websites on your ...desktop. 50 You see this : Note: If you can install the new one. Then reinstall your printer model. Click the Install button. ...

Printer Guide
Page 53
..., see the on the printer, press the printer's PPower button. (Make sure the printer is connected; Setting Up the Printer | 53 5. When you see page 48.) For network connection, click the Manual button, select the port you to update the printer firmware, if necessary. 53 Click your printer with Epson, then remove the printer software CD-ROM. 10. see...
..., see the on the printer, press the printer's PPower button. (Make sure the printer is connected; Setting Up the Printer | 53 5. When you see page 48.) For network connection, click the Manual button, select the port you to update the printer firmware, if necessary. 53 Click your printer with Epson, then remove the printer software CD-ROM. 10. see...

Printer Guide
Page 54
..., and it is the same, you don't need to download the firmware manually, visit Epson's support website at epson.com/support, select your printer. 4. Press the r Menu button. 2. When done, press the l button. Select your desktop. Make sure your printer is turned on your printer, then click the Firmware Updater button. Note: For more information on...
..., and it is the same, you don't need to download the firmware manually, visit Epson's support website at epson.com/support, select your printer. 4. Press the r Menu button. 2. When done, press the l button. Select your desktop. Make sure your printer is turned on your printer, then click the Firmware Updater button. Note: For more information on...
Printer Guide
Page 59
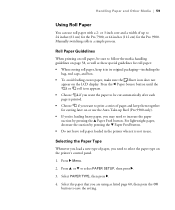
... OK button to select PAPER SETUP, then press r. 3. Press r Menu. 2. For lightweight paper, decrease the suction by pressing the u Paper Feed button. Manually switching rolls is printed. • Choose if you may need to increase the paper suction by pressing the d Paper Feed button. • Do not leave... roll paper loaded in the printer when it in use roll paper with a 2- Selecting the Paper Type Whenever you need to select the paper type on the LCD display. or 3-inch core and a width of paper, you load a new type of up Reel (Pro 9900 only). • If you'...
... OK button to select PAPER SETUP, then press r. 3. Press r Menu. 2. For lightweight paper, decrease the suction by pressing the u Paper Feed button. Manually switching rolls is printed. • Choose if you may need to increase the paper suction by pressing the d Paper Feed button. • Do not leave... roll paper loaded in the printer when it in use roll paper with a 2- Selecting the Paper Type Whenever you need to select the paper type on the LCD display. or 3-inch core and a width of paper, you load a new type of up Reel (Pro 9900 only). • If you'...

Printer Guide
Page 70
... l Paper Source button until you can print trim lines on the right edge of your printer driver software. Press and release the button. Press OK to exit the menu. Run your print job is cut it manually. The paper is finished. Press r Menu. 2. You can use the button to cut most types... of non-Epson media. If the paper cannot be cut by the built-in cutter might not be able to...
... l Paper Source button until you can print trim lines on the right edge of your printer driver software. Press and release the button. Press OK to exit the menu. Run your print job is cut it manually. The paper is finished. Press r Menu. 2. You can use the button to cut most types... of non-Epson media. If the paper cannot be cut by the built-in cutter might not be able to...

Printer Guide
Page 72
Push down the lock lever firmly to release it from the roll. 72 72 | Handling Paper and Other Media • If you are using the Auto Take-Up Reel, you need to the left and remove it . Then move the roll paper holder all the way to rewind the paper manually. 3.
Push down the lock lever firmly to release it from the roll. 72 72 | Handling Paper and Other Media • If you are using the Auto Take-Up Reel, you need to the left and remove it . Then move the roll paper holder all the way to rewind the paper manually. 3.

Printer Guide
Page 99
... 3. Select the following Auto Cut Settings: • Normal Cut allows margin space at the top and bottom of the roll. Banner option). 99 Printing With Epson Drivers for borderless printing. • Single Cut allows images to be sure to select the width of the previous or next image if you want... to operate the cutter manually, use the optional Auto Take-Up Reel, or print multiple print jobs without cutting. button to -end and saves paper. You will see a sliver of...
... 3. Select the following Auto Cut Settings: • Normal Cut allows margin space at the top and bottom of the roll. Banner option). 99 Printing With Epson Drivers for borderless printing. • Single Cut allows images to be sure to select the width of the previous or next image if you want... to operate the cutter manually, use the optional Auto Take-Up Reel, or print multiple print jobs without cutting. button to -end and saves paper. You will see a sliver of...

Printer Guide
Page 115
Printing With Epson Drivers for Macintosh | 115 Normal cut Double cut Single cut Note: These settings override settings made through the control panel. • Normal Cut allows margin ... images and trims each print individually. See page 70 for borderless printing. • Single Cut allows images to be printed end-to operate the cutter manually, use the optional Auto Take-Up Reel, or print multiple print jobs without cutting. Banner option): • Print Page Line prints trim lines on using...
Printing With Epson Drivers for Macintosh | 115 Normal cut Double cut Single cut Note: These settings override settings made through the control panel. • Normal Cut allows margin ... images and trims each print individually. See page 70 for borderless printing. • Single Cut allows images to be printed end-to operate the cutter manually, use the optional Auto Take-Up Reel, or print multiple print jobs without cutting. Banner option): • Print Page Line prints trim lines on using...


