
Printer Guide
Page 5
... Ink Cartridge Safety Instructions 17 Printer Parts 18 Front 18 Back 18 Control Panel 19 LCD Display 19 1 Setting Up the Printer 21 Unpacking and Assembling the Printer 21 Unpacking and Assembling the Stand 22 Unpacking the Printer and Mounting It on the Stand 25 Attaching the Paper Basket (Epson Stylus Pro 7900 27 Attaching the Paper Basket (Epson Stylus Pro 9900...
... Ink Cartridge Safety Instructions 17 Printer Parts 18 Front 18 Back 18 Control Panel 19 LCD Display 19 1 Setting Up the Printer 21 Unpacking and Assembling the Printer 21 Unpacking and Assembling the Stand 22 Unpacking the Printer and Mounting It on the Stand 25 Attaching the Paper Basket (Epson Stylus Pro 7900 27 Attaching the Paper Basket (Epson Stylus Pro 9900...

Printer Guide
Page 8
... Replacing Ink Cartridges 159 Switching Black Ink Mode 163 Changing the Date and Time 163 Using Maintenance Mode 164 Replacing the Paper Cutter 165 Removing the Old Cutter 165 Installing the New Cutter 167 Replacing the Maintenance Tank 169 Cleaning the Printer 171 Transporting or Storing the Printer 173 Preparing the Printer for Shipment...
... Replacing Ink Cartridges 159 Switching Black Ink Mode 163 Changing the Date and Time 163 Using Maintenance Mode 164 Replacing the Paper Cutter 165 Removing the Old Cutter 165 Installing the New Cutter 167 Replacing the Maintenance Tank 169 Cleaning the Printer 171 Transporting or Storing the Printer 173 Preparing the Printer for Shipment...
Printer Guide
Page 9
Contents | 9 Uninstalling and Reinstalling the Printer Driver 193 Macintosh OS X 10.5 193 Macintosh OS X 10.4 193 Windows 193 A Specifications 195 Environmental 195 Electrical 195 Dimensions and Weight 196 Printer Interfaces 196 Safety Approvals 196 Media 196 Roll Paper 196 Cut Sheets 197 Printable Area 199 Ink Cartridges 199 Index 201 9
Contents | 9 Uninstalling and Reinstalling the Printer Driver 193 Macintosh OS X 10.5 193 Macintosh OS X 10.4 193 Windows 193 A Specifications 195 Environmental 195 Electrical 195 Dimensions and Weight 196 Printer Interfaces 196 Safety Approvals 196 Media 196 Roll Paper 196 Cut Sheets 197 Printable Area 199 Ink Cartridges 199 Index 201 9

Printer Guide
Page 11
... use this book: WARNINGS must be followed carefully to get the most out of procedures for setting up and using your printer, loading paper, using the Epson® printer drivers, and replacing ink cartridges. Warnings, Cautions, Notes, and Tips Please follow these guidelines as you how to your equipment. For additional information, see the...
... use this book: WARNINGS must be followed carefully to get the most out of procedures for setting up and using your printer, loading paper, using the Epson® printer drivers, and replacing ink cartridges. Warnings, Cautions, Notes, and Tips Please follow these guidelines as you how to your equipment. For additional information, see the...
Printer Guide
Page 12
... 44-inch Take-Up Reel Core (Pro 9900 only) Ink Cartridges Part number C12C890191 C12C815331 C12C811241 C815121 See page 160 for accessories and options that are currently available. sales), www.epson.ca (Canadian sales), or call 800-GO-EPSON (800-463-7766). Options and Accessories Your Epson Stylus® Pro 7900/9900 offers these optional upgrades and accessories: Optional...
... 44-inch Take-Up Reel Core (Pro 9900 only) Ink Cartridges Part number C12C890191 C12C815331 C12C811241 C815121 See page 160 for accessories and options that are currently available. sales), www.epson.ca (Canadian sales), or call 800-GO-EPSON (800-463-7766). Options and Accessories Your Epson Stylus® Pro 7900/9900 offers these optional upgrades and accessories: Optional...
Printer Guide
Page 17
... the same environment as this product. Ink Cartridge Safety Instructions • Keep ink cartridges out of the reach of the ink cartridge. If ink gets in the ink supply port, making covers or plugs unnecessary, but care is consumed because the printer automatically performs a reliability check. • If you to prevent ink from dirt...
... the same environment as this product. Ink Cartridge Safety Instructions • Keep ink cartridges out of the reach of the ink cartridge. If ink gets in the ink supply port, making covers or plugs unnecessary, but care is consumed because the printer automatically performs a reliability check. • If you to prevent ink from dirt...
Printer Guide
Page 19
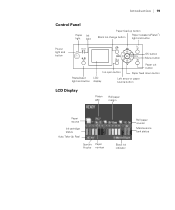
Introduction | 19 Control Panel Paper Ink light light Paper feed up button Black ink change button Paper release (ePlaten™) light and button Power light and button OK button Menu button Pause/reset light and button Ink open button Paper cut button Paper feed down button LCD display Left arrow or paper source button LCD Display Platen gap Roll paper margin Paper source Ink cartridge status Auto Take-Up Reel Spectro Paper Proofer number Roll paper counter Maintenance tank status Black ink indicator 19
Introduction | 19 Control Panel Paper Ink light light Paper feed up button Black ink change button Paper release (ePlaten™) light and button Power light and button OK button Menu button Pause/reset light and button Ink open button Paper cut button Paper feed down button LCD display Left arrow or paper source button LCD Display Platen gap Roll paper margin Paper source Ink cartridge status Auto Take-Up Reel Spectro Paper Proofer number Roll paper counter Maintenance tank status Black ink indicator 19
Printer Guide
Page 25
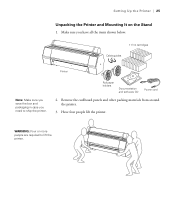
Make sure you have all the items shown below: 11 Ink cartridges Cable guides Printer Note: Make sure you save the box and packaging in case you need to lift the printer. 25 Setting Up the Printer | 25 Unpacking the Printer and Mounting It on the Stand 1. Have four people lift the printer. Roll paper holders Documentation and software CD Power cord 2. WARNING: Four or more people are required to ship the printer. Remove the cardboard panels and other packing materials from around the printer. 3.
Make sure you have all the items shown below: 11 Ink cartridges Cable guides Printer Note: Make sure you save the box and packaging in case you need to lift the printer. 25 Setting Up the Printer | 25 Unpacking the Printer and Mounting It on the Stand 1. Have four people lift the printer. Roll paper holders Documentation and software CD Power cord 2. WARNING: Four or more people are required to ship the printer. Remove the cardboard panels and other packing materials from around the printer. 3.

Printer Guide
Page 46
Make sure you order a new set of the ink in each cartridge to be used. Press the P Power button to charge the ink system. In a moment, INSTALL INK CARTRIDGE appears on the printer. 46 | Setting Up the Printer Installing Ink Use the ink cartridges that came with your printer for most of cartridges as soon as possible. 1. Open both ink covers. 46 The cartridges shipped with your printer are provided mainly to turn on the LCD display and the ink covers pop open slightly. 2. During the initial installation process, it is normal for initial ink charging.
Make sure you order a new set of the ink in each cartridge to be used. Press the P Power button to charge the ink system. In a moment, INSTALL INK CARTRIDGE appears on the printer. 46 | Setting Up the Printer Installing Ink Use the ink cartridges that came with your printer for most of cartridges as soon as possible. 1. Open both ink covers. 46 The cartridges shipped with your printer are provided mainly to turn on the LCD display and the ink covers pop open slightly. 2. During the initial installation process, it is normal for initial ink charging.

Printer Guide
Page 47
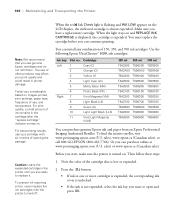
...) 9 Green (G) 10 Light Light Black (LLK) 11 Vivid Light Magenta (VLM) 5. Cartridge 1 Cyan (C) 2 Orange (O) 3 Yellow (Y) 4 Light Cyan (LC) 5 Matte Black (MK) 6 Photo Black (PK) Right ink bay Slot no . Make sure you insert each cartridge with the arrow pointing toward the printer, then insert it into its slot until it clicks into the...
...) 9 Green (G) 10 Light Light Black (LLK) 11 Vivid Light Magenta (VLM) 5. Cartridge 1 Cyan (C) 2 Orange (O) 3 Yellow (Y) 4 Light Cyan (LC) 5 Matte Black (MK) 6 Photo Black (PK) Right ink bay Slot no . Make sure you insert each cartridge with the arrow pointing toward the printer, then insert it into its slot until it clicks into the...
Printer Guide
Page 48
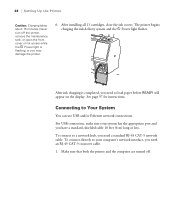
After installing all 11 cartridges, close the ink covers. The printer begins charging the ink delivery system and the P Power light flashes. See page 57 for instructions. Never turn off . 48 To connect directly to load ... open the front cover or ink covers while the P Power light is completed, you need an RJ-45 CAT-5 crossover cable. 1. 48 | Setting Up the Printer Caution: Charging takes about 15 minutes. Connecting to a network hub, you have a standard, shielded cable 10 feet (6 m) long or less. For USB connection, make sure...
After installing all 11 cartridges, close the ink covers. The printer begins charging the ink delivery system and the P Power light flashes. See page 57 for instructions. Never turn off . 48 To connect directly to load ... open the front cover or ink covers while the P Power light is completed, you need an RJ-45 CAT-5 crossover cable. 1. 48 | Setting Up the Printer Caution: Charging takes about 15 minutes. Connecting to a network hub, you have a standard, shielded cable 10 feet (6 m) long or less. For USB connection, make sure...
Printer Guide
Page 117
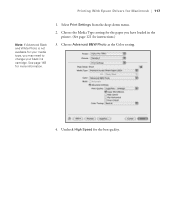
Choose Advanced B&W Photo as the Color setting. 4. Uncheck High Speed for more information. 1. Choose the Media Type setting for the paper you may need to change your media type, you have loaded in the printer. (See page 121 for instructions.) 3. Printing With Epson Drivers for Macintosh | 117 Note: If Advanced Black and White Photo is not available for your black ink cartridge. See page 163 for the best quality. 117 Select Print Settings from the drop-down menu. 2.
Choose Advanced B&W Photo as the Color setting. 4. Uncheck High Speed for more information. 1. Choose the Media Type setting for the paper you may need to change your media type, you have loaded in the printer. (See page 121 for instructions.) 3. Printing With Epson Drivers for Macintosh | 117 Note: If Advanced Black and White Photo is not available for your black ink cartridge. See page 163 for the best quality. 117 Select Print Settings from the drop-down menu. 2.
Printer Guide
Page 138
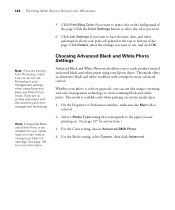
... information. See page 163 for your media type, you want to change your Epson driver. Choosing Advanced Black and White Photo Settings Advanced Black and White Photo mode allows you to select the color you may need to use, and click OK. This mode offers an alternative ... neutral and toned black-and-white prints using Advanced Black and White Photo mode. This mode is color or grayscale, you can use Photoshop's color management settings when using your black ink cartridge. For the Mode setting, select Custom, then click Advanced. 138 Click Details, select the settings ...
... information. See page 163 for your media type, you want to change your Epson driver. Choosing Advanced Black and White Photo Settings Advanced Black and White Photo mode allows you to select the color you may need to use, and click OK. This mode offers an alternative ... neutral and toned black-and-white prints using Advanced Black and White Photo mode. This mode is color or grayscale, you can use Photoshop's color management settings when using your black ink cartridge. For the Mode setting, select Custom, then click Advanced. 138 Click Details, select the settings ...
Printer Guide
Page 151
... head • Replacing ink cartridges • Changing the date and time • Performing additional maintenance tasks • Replacing the paper cutter blade • Replacing the maintenance tank • Cleaning the printer • Transporting or storing the printer In addition to the features ... of printer settings. For more information, see page 153). 151 You can also use the menu system on the CD-ROM that came with your maintenance tank(s), and other information. 151 Chapter 5: Maintaining and Transporting the Printer The Epson Stylus Pro 7900 and Pro 9900 require little...
... head • Replacing ink cartridges • Changing the date and time • Performing additional maintenance tasks • Replacing the paper cutter blade • Replacing the maintenance tank • Cleaning the printer • Transporting or storing the printer In addition to the features ... of printer settings. For more information, see page 153). 151 You can also use the menu system on the CD-ROM that came with your maintenance tank(s), and other information. 151 Chapter 5: Maintaining and Transporting the Printer The Epson Stylus Pro 7900 and Pro 9900 require little...
Printer Guide
Page 152
...from centimeters to inches and feet using maintenance mode on the printer's control panel. When done, press l. • To check how much capacity the maintenance tank(s) have, press d to be replaced by an authorized Epson service technician. Printing Status Information The status check sheet shows ...r again. The percentage remaining for each tank is filled, the percentage drops. The most recent job is loaded in the printer, you see the status of the remaining cartridges. Make sure paper is saved as No. 0. Press d to select TEST PRINT, then press r. 4. For the last ...
...from centimeters to inches and feet using maintenance mode on the printer's control panel. When done, press l. • To check how much capacity the maintenance tank(s) have, press d to be replaced by an authorized Epson service technician. Printing Status Information The status check sheet shows ...r again. The percentage remaining for each tank is filled, the percentage drops. The most recent job is loaded in the printer, you see the status of the remaining cartridges. Make sure paper is saved as No. 0. Press d to select TEST PRINT, then press r. 4. For the last ...
Printer Guide
Page 157
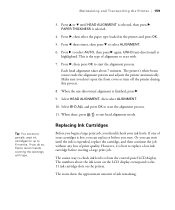
... ink (and no paper) and is loaded in the printer. 3. Print a nozzle check to run a cleaning cycle...-The printer will not perform automatic nozzle checks and cleaning cycles. 4. The cartridges need to replace a low cartridge to ...Epson LFP Remote Panel2): normal cleaning, power cleaning, and cleaning each pair of the following, then press OK: • ON: PERIODICALLY-The printer... periodically checks its nozzles and runs a cleaning cycle if necessary (default). • ON: EVERY JOB-The printer...cartridge. 1. Make sure the printer is ready and the red B ink Check light on the printer's...
... ink (and no paper) and is loaded in the printer. 3. Print a nozzle check to run a cleaning cycle...-The printer will not perform automatic nozzle checks and cleaning cycles. 4. The cartridges need to replace a low cartridge to ...Epson LFP Remote Panel2): normal cleaning, power cleaning, and cleaning each pair of the following, then press OK: • ON: PERIODICALLY-The printer... periodically checks its nozzles and runs a cleaning cycle if necessary (default). • ON: EVERY JOB-The printer...cartridge. 1. Make sure the printer is ready and the red B ink Check light on the printer's...
Printer Guide
Page 159
... one of alignment to exit head alignment mode. If you do so, Epson recommends covering the openings with . 7. When done, press to start the alignment process. Maintaining and Transporting the Printer | 159 Tip: You can store partially used ink cartridges for up to replace a low ink cartridge before you start the alignment process. 11.
... one of alignment to exit head alignment mode. If you do so, Epson recommends covering the openings with . 7. When done, press to start the alignment process. Maintaining and Transporting the Printer | 159 Tip: You can store partially used ink cartridges for up to replace a low ink cartridge before you start the alignment process. 11.
Printer Guide
Page 160
... your print quality and could result in the cartridge after the "replace cartridge" indicator comes on . Note the color of the cartridge that you use of use up a cartridge with the printer turned off. Then follow these steps: 1. The use genuine Epson cartridges and do not refill them. sales) or www.epson.ca (Canadian sales). You can purchase genuine...
... your print quality and could result in the cartridge after the "replace cartridge" indicator comes on . Note the color of the cartridge that you use of use up a cartridge with the printer turned off. Then follow these steps: 1. The use genuine Epson cartridges and do not refill them. sales) or www.epson.ca (Canadian sales). You can purchase genuine...
Printer Guide
Page 161
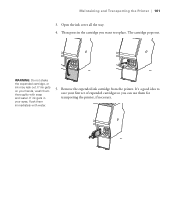
If ink gets in the cartridge you want to save your first set of expended cartridges so you can use them for transporting the printer, if necessary. 161 It's a good idea to replace. Open the ink cover all the way. 4. Then press in your hands, wash them immediately with soap and water. WARNING: Do not shake the expended cartridge, or ink may leak out. The cartridge pops out. Remove the expended ink cartridge from the printer. If ink gets on your eyes, flush them thoroughly with water. 5. Maintaining and Transporting the Printer | 161 3.
If ink gets in the cartridge you want to save your first set of expended cartridges so you can use them for transporting the printer, if necessary. 161 It's a good idea to replace. Open the ink cover all the way. 4. Then press in your hands, wash them immediately with soap and water. WARNING: Do not shake the expended cartridge, or ink may leak out. The cartridge pops out. Remove the expended ink cartridge from the printer. If ink gets on your eyes, flush them thoroughly with water. 5. Maintaining and Transporting the Printer | 161 3.
Printer Guide
Page 162
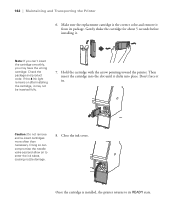
... air to its package. 162 | Maintaining and Transporting the Printer 6. If the B Ink light remains on after installing the cartridge, it may have the wrong cartridge. Gently shake the cartridge for about 5 seconds before installing it from its READY state. 162 Once the cartridge is the correct color and remove it . Note: If you may not...
... air to its package. 162 | Maintaining and Transporting the Printer 6. If the B Ink light remains on after installing the cartridge, it may have the wrong cartridge. Gently shake the cartridge for about 5 seconds before installing it from its READY state. 162 Once the cartridge is the correct color and remove it . Note: If you may not...


