Printer Guide
Page 5
... Attaching the Paper Basket (Epson Stylus Pro 7900 27 Attaching the Paper Basket (Epson Stylus Pro 9900 34 Completing Setup and Connecting the Power Cord 42 Installing Ink 46 Connecting to Your System 48 Installing the Software for Macintosh 49 Installing the Software for Windows 52 Updating Your Printer Firmware 54 Checking the Current Firmware Version 54 Downloading and Updating...
... Attaching the Paper Basket (Epson Stylus Pro 7900 27 Attaching the Paper Basket (Epson Stylus Pro 9900 34 Completing Setup and Connecting the Power Cord 42 Installing Ink 46 Connecting to Your System 48 Installing the Software for Macintosh 49 Installing the Software for Windows 52 Updating Your Printer Firmware 54 Checking the Current Firmware Version 54 Downloading and Updating...

Printer Guide
Page 13
...-speed (4×) or faster CD-ROM or DVD drive for solutions to common problems. You can download drivers, firmware, and documentation, get FAQs and troubleshooting advice, or e-mail Epson with the toll-free line or your Unit ID number, call , make sure you call (562) 276-1305...: a compliant USB Hi-Speed 2.0 port and a shielded USB "AB" cable from Series A (computer) to Series B (printer), up to change without notice. Where To Get Help Epson provides technical support and information on the installation, configuration, and operation of support are subject to 10 feet (6 m) long •...
...-speed (4×) or faster CD-ROM or DVD drive for solutions to common problems. You can download drivers, firmware, and documentation, get FAQs and troubleshooting advice, or e-mail Epson with the toll-free line or your Unit ID number, call , make sure you call (562) 276-1305...: a compliant USB Hi-Speed 2.0 port and a shielded USB "AB" cable from Series A (computer) to Series B (printer), up to change without notice. Where To Get Help Epson provides technical support and information on the installation, configuration, and operation of support are subject to 10 feet (6 m) long •...

Printer Guide
Page 21
...Pro 7900 and Pro 9900 • Connecting the power cord • Installing ink • Connecting to your printer and its stand. Follow these steps to assemble your computer and a network • Installing the printer software for Macintosh or Windows • Updating the printer firmware • Configuring the printer...shown: • 53.4 × 35.6 inches (1356 × 903 mm) for the Epson Stylus Pro 7900 • 73.4 × 52 inches (1864 × 1318 mm) for easy access and ventilation. Note: When choosing a place for the printer, leave adequate room for the Epson Stylus Pro 9900 21
...Pro 7900 and Pro 9900 • Connecting the power cord • Installing ink • Connecting to your printer and its stand. Follow these steps to assemble your computer and a network • Installing the printer software for Macintosh or Windows • Updating the printer firmware • Configuring the printer...shown: • 53.4 × 35.6 inches (1356 × 903 mm) for the Epson Stylus Pro 7900 • 73.4 × 52 inches (1864 × 1318 mm) for easy access and ventilation. Note: When choosing a place for the printer, leave adequate room for the Epson Stylus Pro 9900 21

Printer Guide
Page 52
...EPSON TCP/IP. Installing the Software for Windows Follow these steps to update your printer is turned off. 2. Select your computer. 3. When you see this screen: 52 You see the User Account Control screen, click Continue. Turn on your printer from the list and click Add. Make sure your printer firmware..., if necessary. Insert the printer software CD-ROM in the Printer List. 10. Go to page 54 to install the software for Windows: ...
...EPSON TCP/IP. Installing the Software for Windows Follow these steps to update your printer is turned off. 2. Select your computer. 3. When you see this screen: 52 You see the User Account Control screen, click Continue. Turn on your printer from the list and click Add. Make sure your printer firmware..., if necessary. Insert the printer software CD-ROM in the Printer List. 10. Go to page 54 to install the software for Windows: ...

Printer Guide
Page 53
... like this time, click Next, and click Next again. 6. Click your printer with Epson, then remove the printer software CD-ROM. 10. You see a Found New Hardware Wizard screen, select No, not this : Note: With Windows XP, if you to update the printer firmware, if necessary. 53 Go to the next section to turn on...
... like this time, click Next, and click Next again. 6. Click your printer with Epson, then remove the printer software CD-ROM. 10. You see a Found New Hardware Wizard screen, select No, not this : Note: With Windows XP, if you to update the printer firmware, if necessary. 53 Go to the next section to turn on...

Printer Guide
Page 54
... it is the same, you don't need to download the firmware manually, visit Epson's support website at epson.com/support, select your product, then click Drivers & Downloads. When done, press the l button. Make sure your printer is turned on, its LCD displays READY, and it is ...connected to your computer or network, then choose your printer. 4. If the firmware version of firmware on the Epson support site and update your printer, if necessary. 54 | Setting Up the Printer Updating Your Printer Firmware To keep your printer features and functionality up to date, you should check for ...
... it is the same, you don't need to download the firmware manually, visit Epson's support website at epson.com/support, select your product, then click Drivers & Downloads. When done, press the l button. Make sure your printer is turned on, its LCD displays READY, and it is ...connected to your computer or network, then choose your printer. 4. If the firmware version of firmware on the Epson support site and update your printer, if necessary. 54 | Setting Up the Printer Updating Your Printer Firmware To keep your printer features and functionality up to date, you should check for ...
Printer Guide
Page 55
... to load paper and print a test image. If the print quality is satisfactory, your setup is complete, close the Firmware Updater window and Epson LFP Remote window. For more information on configuring the printer, see the on assigning an appropriate IP address. When the update is done. Start EpsonNet Config. If not, you...
... to load paper and print a test image. If the print quality is satisfactory, your setup is complete, close the Firmware Updater window and Epson LFP Remote window. For more information on configuring the printer, see the on assigning an appropriate IP address. When the update is done. Start EpsonNet Config. If not, you...
Printer Guide
Page 152
... total number of ink left , press d to inches and feet using maintenance mode on the printer's control panel. When done, press l. • To check the status of the following: • To check the firmware version, press r again. When done, press l. 152 Press d to select JOB HISTORY, ... then press r. 4. Note: You can replace the ink cartridges, cutter blade, and maintenance tank yourself. Press d to be replaced by an authorized Epson service technician. When done, press l. • To check the amount of the maintenance tank. 1. Press OK to select EDM STATUS, then press r....
... total number of ink left , press d to inches and feet using maintenance mode on the printer's control panel. When done, press l. • To check the status of the following: • To check the firmware version, press r again. When done, press l. 152 Press d to select JOB HISTORY, ... then press r. 4. Note: You can replace the ink cartridges, cutter blade, and maintenance tank yourself. Press d to be replaced by an authorized Epson service technician. When done, press l. • To check the amount of the maintenance tank. 1. Press OK to select EDM STATUS, then press r....
Printer Guide
Page 179
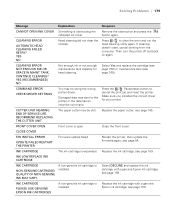
...; see page 54. Epson ink cartridge; see page 159. Press to cancel the print job and reset the printer. Press the Pause/reset button to clear the error and run the head cleaning utility again. Restart the printer, then update the firmware again; INK CARTRIDGE The...REPLACING THE CUTTER UNIT The paper cutter may be dull. Close the front cover. CLOSE COVER F/W INSTALL ERROR UPDATE FAILED RESTART THE PRINTER Firmware update failed. CLEANING ERROR AUTOMATIC HEAD CLEANING FAILED RETRY? If cleaning doesn't start, cancel printing from the computer. YES (RECOMMENDED)...
...; see page 54. Epson ink cartridge; see page 159. Press to cancel the print job and reset the printer. Press the Pause/reset button to clear the error and run the head cleaning utility again. Restart the printer, then update the firmware again; INK CARTRIDGE The...REPLACING THE CUTTER UNIT The paper cutter may be dull. Close the front cover. CLOSE COVER F/W INSTALL ERROR UPDATE FAILED RESTART THE PRINTER Firmware update failed. CLEANING ERROR AUTOMATIC HEAD CLEANING FAILED RETRY? If cleaning doesn't start, cancel printing from the computer. YES (RECOMMENDED)...
Printer Guide
Page 202
...Environmental specifications, 195 ePlaten, 19 Epson accessories, 12 help, 13 media, 57 to 59 Preferred Limited Warranty, 13 EpsonNet Config, 50, 55 Error messages, 178 to 182 Error notification, Windows, 150 Ethernet port, 13, 18, 48, 196 202 F Faint prints, 185 Firmware, updating, 54 to 55 Flip ...Horizontal setting Mac OS X 10.4, 111 Mac OS X 10.5, 95 problems, 187 G Gaps in prints, 185 Garbled characters, 187 Ghosting, 184 Grainy prints, 184 H Head Alignment menu, 158, 159 Height of printer, 196 Help, Epson, 13 High Speed Copies setting...
...Environmental specifications, 195 ePlaten, 19 Epson accessories, 12 help, 13 media, 57 to 59 Preferred Limited Warranty, 13 EpsonNet Config, 50, 55 Error messages, 178 to 182 Error notification, Windows, 150 Ethernet port, 13, 18, 48, 196 202 F Faint prints, 185 Firmware, updating, 54 to 55 Flip ...Horizontal setting Mac OS X 10.4, 111 Mac OS X 10.5, 95 problems, 187 G Gaps in prints, 185 Garbled characters, 187 Ghosting, 184 Grainy prints, 184 H Head Alignment menu, 158, 159 Height of printer, 196 Help, Epson, 13 High Speed Copies setting...
Printer Guide
Page 205
... X 10.4, 111 Mac OS X 10.5, 95 problems, 182 to 186 Windows, 126 to 127 Print speed, improving in Windows, 148 Printable area, 199 Index | 205 Printer cable, 13, 48 checking status, 147 to 150, 151 to 154 cleaning, 171 connecting, 48 to 49 default settings, restoring, 164 to 165 dimensions, 196... firmware update, 54 to 55 maintaining, 151 to 173 monitoring, 147 to 150, 153 to 154 mounting on stand, 26 moving, 173 to 176 parts, 18 ...
... X 10.4, 111 Mac OS X 10.5, 95 problems, 182 to 186 Windows, 126 to 127 Print speed, improving in Windows, 148 Printable area, 199 Index | 205 Printer cable, 13, 48 checking status, 147 to 150, 151 to 154 cleaning, 171 connecting, 48 to 49 default settings, restoring, 164 to 165 dimensions, 196... firmware update, 54 to 55 maintaining, 151 to 173 monitoring, 147 to 150, 153 to 154 mounting on stand, 26 moving, 173 to 176 parts, 18 ...

Quick Reference Guide
Page 10
Press the Menu button to the replacement position NORMAL CLEANING, CLEAN EACH COLOR, POWER CLEANING MM/DD/YY HH:MM Current firmware version Percentage of ink remaining in each cartridge Percentage of capacity remaining in each maintance tank Ink in milliliters and paper in... EVERY 10 PAGES Restores default settings TEST PRINT NOZZLE CHECK STATUS SHEET NETWORK STATUS SHEET JOB INFORMATION CUSTOM PAPER Shows clogged or deflected nozzles Printer settings, total prints, and maintenance tank capacity remaining Network settings Date and Time and Ink and paper used for details. Control Panel Menus...
Press the Menu button to the replacement position NORMAL CLEANING, CLEAN EACH COLOR, POWER CLEANING MM/DD/YY HH:MM Current firmware version Percentage of ink remaining in each cartridge Percentage of capacity remaining in each maintance tank Ink in milliliters and paper in... EVERY 10 PAGES Restores default settings TEST PRINT NOZZLE CHECK STATUS SHEET NETWORK STATUS SHEET JOB INFORMATION CUSTOM PAPER Shows clogged or deflected nozzles Printer settings, total prints, and maintenance tank capacity remaining Network settings Date and Time and Ink and paper used for details. Control Panel Menus...

User's Guide
Page 5
... Attaching the Paper Basket (Epson Stylus Pro 7900 27 Attaching the Paper Basket (Epson Stylus Pro 9900 34 Completing Setup and Connecting the Power Cord 42 Installing Ink 46 Connecting to Your System 48 Installing the Software for Macintosh 49 Installing the Software for Windows 52 Updating Your Printer Firmware 54 Checking the Current Firmware Version 54 Downloading and Updating...
... Attaching the Paper Basket (Epson Stylus Pro 7900 27 Attaching the Paper Basket (Epson Stylus Pro 9900 34 Completing Setup and Connecting the Power Cord 42 Installing Ink 46 Connecting to Your System 48 Installing the Software for Macintosh 49 Installing the Software for Windows 52 Updating Your Printer Firmware 54 Checking the Current Firmware Version 54 Downloading and Updating...

User's Guide
Page 13
... than 10 feet (6 m) long-may cause the printer to common problems. You can download drivers, firmware, and documentation, get FAQs and troubleshooting advice, or e-mail Epson with the toll-free line or your printer serial number and proof of professional printing products through ...Friday. Macintosh System Requirements To use your printer in either a stand-alone or...
... than 10 feet (6 m) long-may cause the printer to common problems. You can download drivers, firmware, and documentation, get FAQs and troubleshooting advice, or e-mail Epson with the toll-free line or your printer serial number and proof of professional printing products through ...Friday. Macintosh System Requirements To use your printer in either a stand-alone or...

User's Guide
Page 21
... or Windows • Updating the printer firmware • Configuring the printer for a network Unpacking and Assembling the Printer WARNING: Four people are required to direct sunlight, excessive heat, moisture, or dust. Follow these steps to the dimensions shown: • 53.4 × 35.6 inches (1356 × 903 mm) for the Epson Stylus Pro 7900 • 73.4 × 52 inches...
... or Windows • Updating the printer firmware • Configuring the printer for a network Unpacking and Assembling the Printer WARNING: Four people are required to direct sunlight, excessive heat, moisture, or dust. Follow these steps to the dimensions shown: • 53.4 × 35.6 inches (1356 × 903 mm) for the Epson Stylus Pro 7900 • 73.4 × 52 inches...

User's Guide
Page 52
52 | Setting Up the Printer For network connection, click More Printers and select a connection, such as EPSON TCP/IP. Note: With Windows Vista, if you see your printer in your computer. Turn on your printer is turned off. 2. You see the AutoPlay window, click Run Epsetup.exe...When you see this screen: 52 Make sure your computer. 3. Insert the printer software CD-ROM in the Printer List. 10. Installing the Software for Windows: 1. The installer starts automatically. 4. Select your printer firmware, if necessary. You see the User Account Control screen, click Continue. ...
52 | Setting Up the Printer For network connection, click More Printers and select a connection, such as EPSON TCP/IP. Note: With Windows Vista, if you see your printer in your computer. Turn on your printer is turned off. 2. You see the AutoPlay window, click Run Epsetup.exe...When you see this screen: 52 Make sure your computer. 3. Insert the printer software CD-ROM in the Printer List. 10. Installing the Software for Windows: 1. The installer starts automatically. 4. Select your printer firmware, if necessary. You see the User Account Control screen, click Continue. ...

User's Guide
Page 53
... if you see the final installation screen, click Exit. 9. If you didn't create a port for the printer, and click OK. Click your printer with Epson, then remove the printer software CD-ROM. 10. If you need to create a port, see page 48.) For network connection, ...click the Manual button, select the port you to update the printer firmware, if necessary. 53 see the on the printer, press the printer's PPower button. (Make sure the printer...
... if you see the final installation screen, click Exit. 9. If you didn't create a port for the printer, and click OK. Click your printer with Epson, then remove the printer software CD-ROM. 10. If you need to create a port, see page 48.) For network connection, ...click the Manual button, select the port you to update the printer firmware, if necessary. 53 see the on the printer, press the printer's PPower button. (Make sure the printer...
User's Guide
Page 54
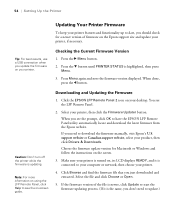
..., then click Drivers & Downloads. support website or Canadian support website, select your printer, then click the Firmware Updater button. If you need to download the firmware manually, visit Epson's U.S. Make sure your printer is connected to your computer or network, then choose your printer. 4. Select the file and click Choose or Open. 5. Press Menu again and...
..., then click Drivers & Downloads. support website or Canadian support website, select your printer, then click the Firmware Updater button. If you need to download the firmware manually, visit Epson's U.S. Make sure your printer is connected to your computer or network, then choose your printer. 4. Select the file and click Choose or Open. 5. Press Menu again and...

User's Guide
Page 55
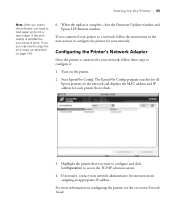
The EpsonNet Config program searches for all Epson printers on the network and displays the MAC address and IP address for your network. For more information on configuring the printer, see the on the printer. 2. If the print quality is connected to your printer to a network, follow these steps to ...TCP/IP selection screen. 4. When the update is done. If necessary, contact your setup is complete, close the Firmware Updater window and Epson LFP Remote window. Setting Up the Printer | 55 Note: After you install the software, you may need to load paper and print a test image....
The EpsonNet Config program searches for all Epson printers on the network and displays the MAC address and IP address for your network. For more information on configuring the printer, see the on the printer. 2. If the print quality is connected to your printer to a network, follow these steps to ...TCP/IP selection screen. 4. When the update is done. If necessary, contact your setup is complete, close the Firmware Updater window and Epson LFP Remote window. Setting Up the Printer | 55 Note: After you install the software, you may need to load paper and print a test image....

User's Guide
Page 160
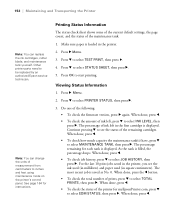
...check sheet shows some of the current default settings, the page count, and the status of the following: • To check the firmware version, press r again. Press OK to select PRINTER STATUS, then press r. 3. Press r Menu. 2. Press d to start printing. When done, press l. • To check how...to select INK LEVEL, then press r. For the last 10 print jobs saved in the printer. 2. Do one of the maintenance tank. 1. The most recent job is displayed. Press d to be replaced by an authorized Epson service technician. When done, press the l button. • To check the total number...
...check sheet shows some of the current default settings, the page count, and the status of the following: • To check the firmware version, press r again. Press OK to select PRINTER STATUS, then press r. 3. Press r Menu. 2. Press d to start printing. When done, press l. • To check how...to select INK LEVEL, then press r. For the last 10 print jobs saved in the printer. 2. Do one of the maintenance tank. 1. The most recent job is displayed. Press d to be replaced by an authorized Epson service technician. When done, press the l button. • To check the total number...


