Printer Guide
Page 5
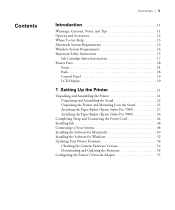
... 18 Control Panel 19 LCD Display 19 1 Setting Up the Printer 21 Unpacking and Assembling the Printer 21 Unpacking and Assembling the Stand 22 Unpacking the Printer and Mounting It on the Stand 25 Attaching the Paper Basket (Epson Stylus Pro 7900 27 Attaching the Paper Basket (Epson Stylus Pro 9900 34 Completing Setup and Connecting the Power Cord 42 Installing...
... 18 Control Panel 19 LCD Display 19 1 Setting Up the Printer 21 Unpacking and Assembling the Printer 21 Unpacking and Assembling the Stand 22 Unpacking the Printer and Mounting It on the Stand 25 Attaching the Paper Basket (Epson Stylus Pro 7900 27 Attaching the Paper Basket (Epson Stylus Pro 9900 34 Completing Setup and Connecting the Power Cord 42 Installing...

Printer Guide
Page 15
... is designed for use the equipment safely and effectively. • The Epson Stylus Pro 7900 weighs about 186 lb (84.5 kg) and the Epson Stylus Pro 9900 weighs about 256 lb (116 kg) without the stand, paper basket, ink, or paper. You may need more space behind the printer if you print on and off. • Avoid using your...
... is designed for use the equipment safely and effectively. • The Epson Stylus Pro 7900 weighs about 186 lb (84.5 kg) and the Epson Stylus Pro 9900 weighs about 256 lb (116 kg) without the stand, paper basket, ink, or paper. You may need more space behind the printer if you print on and off. • Avoid using your...

Printer Guide
Page 18
Front Roll paper holder Roll paper cover Front cover Control panel Ink bay Paper basket Back Interface connector for optional equipment USB interface for the Pro 7900 unless otherwise noted. 18 | Introduction Printer Parts These illustrations show the Epson Stylus Pro 9900, but the parts are the same for computer Ink bay Casters Network interface Maintenance tank (Pro 9900 includes two tanks, one on each side of printer) 18 AC inlet
Front Roll paper holder Roll paper cover Front cover Control panel Ink bay Paper basket Back Interface connector for optional equipment USB interface for the Pro 7900 unless otherwise noted. 18 | Introduction Printer Parts These illustrations show the Epson Stylus Pro 9900, but the parts are the same for computer Ink bay Casters Network interface Maintenance tank (Pro 9900 includes two tanks, one on each side of printer) 18 AC inlet

Printer Guide
Page 21
...; 35.6 inches (1356 × 903 mm) for the Epson Stylus Pro 7900 • 73.4 × 52 inches (1864 × 1318 mm) for the Epson Stylus Pro 9900 21 Before you begin, make sure you have sufficient space to set up and use the printer-at least 12 inches on all sides in addition to assemble ...your computer and a network • Installing the printer software for Macintosh or Windows •...
...; 35.6 inches (1356 × 903 mm) for the Epson Stylus Pro 7900 • 73.4 × 52 inches (1864 × 1318 mm) for the Epson Stylus Pro 9900 21 Before you begin, make sure you have sufficient space to set up and use the printer-at least 12 inches on all sides in addition to assemble ...your computer and a network • Installing the printer software for Macintosh or Windows •...

Printer Guide
Page 22
Unpack the stand and make sure you need floor space of approximately: • 8 × 8 feet (2.4 × 2.4 m) for the Epson Stylus Pro 7900 and stand • 13 × 13 feet (4 × 4 m) for the Epson Stylus Pro 9900 and stand Unpacking and Assembling the Stand 1. Then remove the box containing the stand and paper basket. 2. 22 | Setting Up the Printer For assembly, you have all these items. 2 Sides Horizontal strut Manual holder 6 Bolts Hex wrench 2 Wing screws with lock washers 22 Lift the box up and away from the shipping pallet.
Unpack the stand and make sure you need floor space of approximately: • 8 × 8 feet (2.4 × 2.4 m) for the Epson Stylus Pro 7900 and stand • 13 × 13 feet (4 × 4 m) for the Epson Stylus Pro 9900 and stand Unpacking and Assembling the Stand 1. Then remove the box containing the stand and paper basket. 2. 22 | Setting Up the Printer For assembly, you have all these items. 2 Sides Horizontal strut Manual holder 6 Bolts Hex wrench 2 Wing screws with lock washers 22 Lift the box up and away from the shipping pallet.
Printer Guide
Page 27
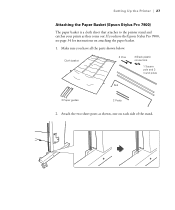
Make sure you have all the parts shown below: Cloth basket 2 Pins 2 Black plastic connectors 1 Square pole and 2 round poles Rod 2 Paper guides 2 Posts 2. Attach the two short posts as they come out. If you have the Epson Stylus Pro 9900, see page 34 for instructions on each side of the stand. 27 Setting Up the Printer | 27 Attaching the Paper Basket (Epson Stylus Pro 7900) The paper basket is a cloth sheet that attaches to the printer stand and catches your prints as shown, one on attaching the paper basket. 1.
Make sure you have all the parts shown below: Cloth basket 2 Pins 2 Black plastic connectors 1 Square pole and 2 round poles Rod 2 Paper guides 2 Posts 2. Attach the two short posts as they come out. If you have the Epson Stylus Pro 9900, see page 34 for instructions on each side of the stand. 27 Setting Up the Printer | 27 Attaching the Paper Basket (Epson Stylus Pro 7900) The paper basket is a cloth sheet that attaches to the printer stand and catches your prints as shown, one on attaching the paper basket. 1.

Printer Guide
Page 34
Attach two of the stand as they come out. Make sure you have all the parts shown below. 34 | Setting Up the Printer Attaching the Paper Basket (Epson Stylus Pro 9900) The paper basket is a cloth sheet that attaches to the front of the posts to the printer stand and catches your prints as shown, one on attaching the paper basket. 1. If you have the Epson Stylus Pro 7900, see page 27 for instructions on each side. 34 Cloth basket 2 Black plastic connectors 4 Pins 2 Plastic end pieces 3 Square poles 5 Paper guides 4 Posts 2 Round poles Rod 2.
Attach two of the stand as they come out. Make sure you have all the parts shown below. 34 | Setting Up the Printer Attaching the Paper Basket (Epson Stylus Pro 9900) The paper basket is a cloth sheet that attaches to the front of the posts to the printer stand and catches your prints as shown, one on attaching the paper basket. 1. If you have the Epson Stylus Pro 7900, see page 27 for instructions on each side. 34 Cloth basket 2 Black plastic connectors 4 Pins 2 Plastic end pieces 3 Square poles 5 Paper guides 4 Posts 2 Round poles Rod 2.

Printer Guide
Page 44
Save the packing material in the following sections show the Epson Stylus Pro 9900, but the instructions are the same for the Pro 7900. Close the front cover. 7. Note: The illustrations in case you need to the AC inlet on the back of the printer. 44 Connect the power cord to ship the printer. 6. Open the front cover and remove the tape and packing material. 44 | Setting Up the Printer 5.
Save the packing material in the following sections show the Epson Stylus Pro 9900, but the instructions are the same for the Pro 7900. Close the front cover. 7. Note: The illustrations in case you need to the AC inlet on the back of the printer. 44 Connect the power cord to ship the printer. 6. Open the front cover and remove the tape and packing material. 44 | Setting Up the Printer 5.

Printer Guide
Page 45
Attach the cable guides to the left side Power cord on right side 9. Caution: Do not use an outlet that is controlled by an automatic timer or wall switch. Plug the power cord into a properly grounded electrical outlet. 45 Otherwise, you may accidentally shut off the printer and cause damage. 10. Setting Up the Printer | 45 8. For the Pro 9900, attach the loops on left or right side of the printer back and route the power cord to the cable guides. Power cord on the paper basket cords to the side of the printer as shown.
Attach the cable guides to the left side Power cord on right side 9. Caution: Do not use an outlet that is controlled by an automatic timer or wall switch. Plug the power cord into a properly grounded electrical outlet. 45 Otherwise, you may accidentally shut off the printer and cause damage. 10. Setting Up the Printer | 45 8. For the Pro 9900, attach the loops on left or right side of the printer back and route the power cord to the cable guides. Power cord on the paper basket cords to the side of the printer as shown.
Printer Guide
Page 57
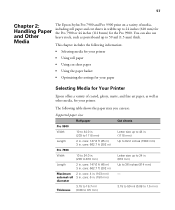
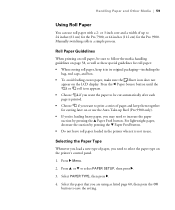
... Pro 9900. 57 Chapter 2: Handling Paper and Other Media The Epson Stylus Pro 7900 and Pro 9900 print on a variety of coated, glossy, matte, and fine art paper, as well as posterboard up to 59 mil (1.5 mm) thick. core: 147.6 ft (45 m) 3 in . The following information: • Selecting media for your printer ...• Optimizing the settings for your paper Selecting Media for Your Printer Epson offers a variety of media, including roll paper and cut sheets in widths up to 1118 mm) Length 2 in . core: 662.7 ft (202 m) Pro 7900 Width 10 to 24.0 in . (203 to 24 inches (610...
... Pro 9900. 57 Chapter 2: Handling Paper and Other Media The Epson Stylus Pro 7900 and Pro 9900 print on a variety of coated, glossy, matte, and fine art paper, as well as posterboard up to 59 mil (1.5 mm) thick. core: 147.6 ft (45 m) 3 in . The following information: • Selecting media for your printer ...• Optimizing the settings for your paper Selecting Media for Your Printer Epson offers a variety of media, including roll paper and cut sheets in widths up to 1118 mm) Length 2 in . core: 662.7 ft (202 m) Pro 7900 Width 10 to 24.0 in . (203 to 24 inches (610...
Printer Guide
Page 59
...each page is a simple process. Select the paper that you need to print a series of paper, you are using as these special guidelines for the Pro 9900. Press the l Paper Source button until the or roll icon appears. • Choose if you want to increase the paper suction by pressing the d...8226; Do not leave roll paper loaded in the printer when it in use. Press r Menu. 2. or 3-inch core and a width of up to select PAPER SETUP, then press r. 3. Select PAPER TYPE, then press r. 4. Press u or d to 24 inches (61 cm) for the Pro 7900, or 44 inches (112 cm) for roll paper...
...each page is a simple process. Select the paper that you need to print a series of paper, you are using as these special guidelines for the Pro 9900. Press the l Paper Source button until the or roll icon appears. • Choose if you want to increase the paper suction by pressing the d...8226; Do not leave roll paper loaded in the printer when it in use. Press r Menu. 2. or 3-inch core and a width of up to select PAPER SETUP, then press r. 3. Select PAPER TYPE, then press r. 4. Press u or d to 24 inches (61 cm) for the Pro 7900, or 44 inches (112 cm) for roll paper...
Printer Guide
Page 74
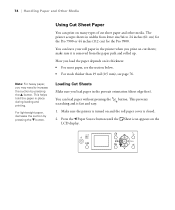
... section below. • For stock thicker than 19 mil (0.5 mm), see page 76. The printer accepts sheets in the printer when you may need to 24 inches (61 cm) for the Pro 7900 or 44 inches (112 cm) for the Pro 9900. Note: For heavy paper, you print on cut sheet paper and other media. Make... sure the printer is turned on and the roll paper cover is fast and easy. make sure it is removed...
... section below. • For stock thicker than 19 mil (0.5 mm), see page 76. The printer accepts sheets in the printer when you may need to 24 inches (61 cm) for the Pro 7900 or 44 inches (112 cm) for the Pro 9900. Note: For heavy paper, you print on cut sheet paper and other media. Make... sure the printer is turned on and the roll paper cover is fast and easy. make sure it is removed...
Printer Guide
Page 76
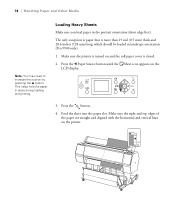
... with the horizontal and vertical lines on the LCD display. 3. This helps hold the paper in the portrait orientation (short edge first). Make sure the printer is turned on and the roll paper cover is more than 19 mil (0.5 mm) thick and 28.6 inches (728 mm) long, which should be loaded... in landscape orientation (Pro 9900 only). 1. Loading Heavy Sheets Make sure you load paper in place during loading and printing. The only exception is paper that is closed. 2. Press the...
... with the horizontal and vertical lines on the LCD display. 3. This helps hold the paper in the portrait orientation (short edge first). Make sure the printer is turned on and the roll paper cover is more than 19 mil (0.5 mm) thick and 28.6 inches (728 mm) long, which should be loaded... in landscape orientation (Pro 9900 only). 1. Loading Heavy Sheets Make sure you load paper in place during loading and printing. The only exception is paper that is closed. 2. Press the...

Printer Guide
Page 78
See page 83 for the Pro 7900). 1. You can set up either to catch the paper under the printer or in front of the printer. If you are using the Epson driver, you switch media, don't forget to change the setting back to STANDARD. The basket keeps your printouts from getting dirty or scratched....62 inches (157 cm) or longer (for the Pro 9900) or 36 inches (91 cm) or longer (for more information. Catching Printouts in Front of the Printer Follow the steps below . 78 Using the Paper Basket The paper basket attaches to your printer and catches your printouts as shown below to set...
See page 83 for the Pro 7900). 1. You can set up either to catch the paper under the printer or in front of the printer. If you are using the Epson driver, you switch media, don't forget to change the setting back to STANDARD. The basket keeps your printouts from getting dirty or scratched....62 inches (157 cm) or longer (for the Pro 9900) or 36 inches (91 cm) or longer (for more information. Catching Printouts in Front of the Printer Follow the steps below . 78 Using the Paper Basket The paper basket attaches to your printer and catches your printouts as shown below to set...
Printer Guide
Page 87
...for updated drivers and utilities that let you also need to use color management features in Adobe® Photoshop® or other applications, or in the standard folder for Macintosh Your Epson Stylus Pro 7900 or Pro 9900 comes with drivers and utilities that may become available. When you plan... on printing borderless images on roll paper, check the guidelines on page 88 to the right folder. If you install the Epson printer driver, the ready-made...
...for updated drivers and utilities that let you also need to use color management features in Adobe® Photoshop® or other applications, or in the standard folder for Macintosh Your Epson Stylus Pro 7900 or Pro 9900 comes with drivers and utilities that may become available. When you plan... on printing borderless images on roll paper, check the guidelines on page 88 to the right folder. If you install the Epson printer driver, the ready-made...

Printer Guide
Page 123
... and software, or you install the Epson printer driver, the ready-made profiles are located in the driver itself. Make sure you want to the right folder. Make sure any profiles you have them created by a color specialist. 123 Chapter 4: Printing With Epson Drivers for Windows Your Epson Stylus Pro 7900 or Pro 9900 comes with drivers and utilities that...
... and software, or you install the Epson printer driver, the ready-made profiles are located in the driver itself. Make sure you want to the right folder. Make sure any profiles you have them created by a color specialist. 123 Chapter 4: Printing With Epson Drivers for Windows Your Epson Stylus Pro 7900 or Pro 9900 comes with drivers and utilities that...
Printer Guide
Page 151
..., and the status of printer settings. 151 Chapter 5: Maintaining and Transporting the Printer The Epson Stylus Pro 7900 and Pro 9900 require little maintenance to the features described in the next section), or view the printer's status on the LCD display (see page 152) or a printer driver screen (see the... (described in this chapter, you can also use the menu system on the printer to fine-tune a variety of your printer. This chapter describes the following routine procedures: • Checking printer status • Checking and cleaning the print head • Aligning the print ...
..., and the status of printer settings. 151 Chapter 5: Maintaining and Transporting the Printer The Epson Stylus Pro 7900 and Pro 9900 require little maintenance to the features described in the next section), or view the printer's status on the LCD display (see page 152) or a printer driver screen (see the... (described in this chapter, you can also use the menu system on the printer to fine-tune a variety of your printer. This chapter describes the following routine procedures: • Checking printer status • Checking and cleaning the print head • Aligning the print ...

Printer Guide
Page 169
...see page 152), using your printer software (see page 153), or by viewing its icon on the control panel, shown below. You can check how much space remains in the tank(s). The Epson Stylus Pro 7900 has one maintenance tank (on the right side), and the Pro 9900 has two (one of space... remaining in the maintenance tank by printing a nozzle check sheet (see page 156). Follow these steps to be replaced (left . The printer will not print if one...
...see page 152), using your printer software (see page 153), or by viewing its icon on the control panel, shown below. You can check how much space remains in the tank(s). The Epson Stylus Pro 7900 has one maintenance tank (on the right side), and the Pro 9900 has two (one of space... remaining in the maintenance tank by printing a nozzle check sheet (see page 156). Follow these steps to be replaced (left . The printer will not print if one...

Printer Guide
Page 180
...cartridge. INK TOO LOW TO CLEAN REPLACE INK CARTRIDGE Not enough ink for printing. Replace the cartridge(s) before cleaning; MAINTENANCE REQUEST A printer part may decline when ink is full; described on page 13. see page 159. MAINTENANCE TANK FULL REPLACE THE MAINTENANCE TANK The ...that cannot be Note the code number and contact Epson as replaced soon. see page 159. see page 159. For the Pro 9900, note which tank needs replacement; See page 159. Replace the cartridge(s) before cleaning; For the Pro 9900, note which tank is nearly full; Replace the ...
...cartridge. INK TOO LOW TO CLEAN REPLACE INK CARTRIDGE Not enough ink for printing. Replace the cartridge(s) before cleaning; MAINTENANCE REQUEST A printer part may decline when ink is full; described on page 13. see page 159. MAINTENANCE TANK FULL REPLACE THE MAINTENANCE TANK The ...that cannot be Note the code number and contact Epson as replaced soon. see page 159. see page 159. For the Pro 9900, note which tank needs replacement; See page 159. Replace the cartridge(s) before cleaning; For the Pro 9900, note which tank is nearly full; Replace the ...
Product Brochure
Page 2
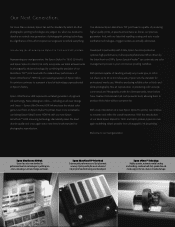
... color management process in -line spectrophotometer. Epson UltraChrome HDR represents our latest generation of this effort inspired our engineers to innovate and refine the overall experience. With the introduction of technology unprecedented in photographic ink jet technology. including an all -new Epson Stylus Pro 7900 and 9900 printers. Representing our next generation, the Epson Stylus Pro 7900 (24-inch) and Epson Stylus Pro 9900...
... color management process in -line spectrophotometer. Epson UltraChrome HDR represents our latest generation of this effort inspired our engineers to innovate and refine the overall experience. With the introduction of technology unprecedented in photographic ink jet technology. including an all -new Epson Stylus Pro 7900 and 9900 printers. Representing our next generation, the Epson Stylus Pro 7900 (24-inch) and Epson Stylus Pro 9900...


