User Manual
Page 4
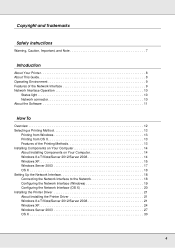
... 9 Network Interface Operation 10 Status light 10 Network connector 10 About the Software 11 How To Overview 12 Selecting a Printing Method 13 Printing from Windows 13 Printing from OS X 13 Features of the Printing Methods 13 Installing Components on Your Computer 14 About Installing Components on Your Computer 14 Windows 8.x/7/Vista/Server 2012/Server 2008 14 Windows XP 15 Windows Server 2003 17 OS X 18 Setting Up the Network Interface 18 Connecting...
... 9 Network Interface Operation 10 Status light 10 Network connector 10 About the Software 11 How To Overview 12 Selecting a Printing Method 13 Printing from Windows 13 Printing from OS X 13 Features of the Printing Methods 13 Installing Components on Your Computer 14 About Installing Components on Your Computer 14 Windows 8.x/7/Vista/Server 2012/Server 2008 14 Windows XP 15 Windows Server 2003 17 OS X 18 Setting Up the Network Interface 18 Connecting...
User Manual
Page 8
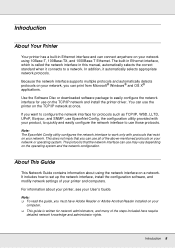
.... If you can use on your User's Guide. This does not imply that you must have Adobe Reader or Adobe Acrobat Reader installed on the TCP/IP network and install the printer driver. Note: The EpsonNet Config utility configures the network interface to work only with your product, to quickly and easily configure the network interface to easily configure the network interface for network administrators, and many of the...
.... If you can use on your User's Guide. This does not imply that you must have Adobe Reader or Adobe Acrobat Reader installed on the TCP/IP network and install the printer driver. Note: The EpsonNet Config utility configures the network interface to work only with your product, to quickly and easily configure the network interface to easily configure the network interface for network administrators, and many of the...
User Manual
Page 12
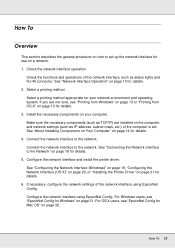
... "Connecting the Network Interface to the Network" on page 10 for details. 4. How To Overview This section describes the general procedure on how to set . Select a printing method. How To 12 Configure the network interface using EpsonNet Config. Check the network interface operation. Check the functions and operations of the network interface using EpsonNet Config. See "Network Interface Operation" on page 18 for details. 3. Make sure the necessary components (such as status lights and...
... "Connecting the Network Interface to the Network" on page 10 for details. 4. How To Overview This section describes the general procedure on how to set . Select a printing method. How To 12 Configure the network interface using EpsonNet Config. Check the network interface operation. Check the functions and operations of the network interface using EpsonNet Config. See "Network Interface Operation" on page 18 for details. 3. Make sure the necessary components (such as status lights and...
User Manual
Page 19
... Control screen, click Yes or Continue. 3. If you are using Windows, see "Configuring the Network Interface (OS X)" on the Software Disc. 4. Note:' Because Bonjour is connected to accept the license terms. How To 19 See "EpsonNet Print (for details. The software installer screen opens automatically. otherwise the network interface may not work correctly. See your printer User's Guide for Windows users)" on page 36 and "Installing the Printer Driver" on a network just by default...
... Control screen, click Yes or Continue. 3. If you are using Windows, see "Configuring the Network Interface (OS X)" on the Software Disc. 4. Note:' Because Bonjour is connected to accept the license terms. How To 19 See "EpsonNet Print (for details. The software installer screen opens automatically. otherwise the network interface may not work correctly. See your printer User's Guide for Windows users)" on page 36 and "Installing the Printer Driver" on a network just by default...
User Manual
Page 21
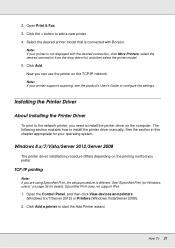
..., select the desired connection from the drop-down list, and then select the printer model. 5. Installing the Printer Driver About Installing the Printer Driver To print to install the printer driver on page 36 for Windows users)" on the computer. Open the Control Panel, and then click View devices and printers (Windows 8.x/7/Server 2012) or Printers (Windows Vista/Server 2008). 2. Note: If your printer supports scanning, see the product's User's Guide to add a new printer. 4. Windows 8.x/7/Vista/Server 2012/Server 2008 The printer driver installation procedure differs depending...
..., select the desired connection from the drop-down list, and then select the printer model. 5. Installing the Printer Driver About Installing the Printer Driver To print to install the printer driver on page 36 for Windows users)" on the computer. Open the Control Panel, and then click View devices and printers (Windows 8.x/7/Server 2012) or Printers (Windows Vista/Server 2008). 2. Note: If your printer supports scanning, see the product's User's Guide to add a new printer. 4. Windows 8.x/7/Vista/Server 2012/Server 2008 The printer driver installation procedure differs depending...
User Manual
Page 23
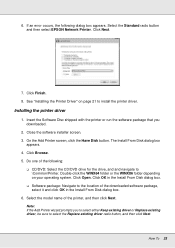
... to select either Keep existing driver or Replace existing driver, be sure to \Common\Printer. The Install From Disk dialog box appears. 4. Click Open. Note: If the Add Printer wizard prompts you downloaded. 2. Select the Standard radio button and then select EPSON Network Printer. Click Browse. 5. Double-click the WINX64 folder or the WINX86 folder depending on page 21 to the location of the downloaded software package, select it...
... to select either Keep existing driver or Replace existing driver, be sure to \Common\Printer. The Install From Disk dialog box appears. 4. Click Open. Note: If the Add Printer wizard prompts you downloaded. 2. Select the Standard radio button and then select EPSON Network Printer. Click Browse. 5. Double-click the WINX64 folder or the WINX86 folder depending on page 21 to the location of the downloaded software package, select it...

User Manual
Page 26
... Standard radio button and then select EPSON Network Printer. How To 26 O Software package: Navigate to install the printer driver. Insert the Software Disc shipped with the printer or run the software package that you to select either Keep existing driver or Replace existing driver, be sure to \Common\Printer. Double-click the WINX64 folder or the WINX86 folder depending on page 26 to the location of the downloaded software package...
... Standard radio button and then select EPSON Network Printer. How To 26 O Software package: Navigate to install the printer driver. Insert the Software Disc shipped with the printer or run the software package that you to select either Keep existing driver or Replace existing driver, be sure to \Common\Printer. Double-click the WINX64 folder or the WINX86 folder depending on page 26 to the location of the downloaded software package...
User Manual
Page 29
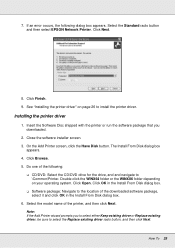
..., select it and click OK in the Install From Disk dialog box. Click OK in the Install From Disk dialog box. 6. Click Browse. 5. Click Finish. 9. 7. Click Open. See "Installing the printer driver" on your operating system. Installing the printer driver 1. Close the software installer screen. 3. O Software package: Navigate to install the printer driver. Note: If the Add Printer wizard prompts you downloaded. 2. Select the Standard radio button and then select EPSON Network Printer.
..., select it and click OK in the Install From Disk dialog box. Click OK in the Install From Disk dialog box. 6. Click Browse. 5. Click Finish. 9. 7. Click Open. See "Installing the printer driver" on your operating system. Installing the printer driver 1. Close the software installer screen. 3. O Software package: Navigate to install the printer driver. Note: If the Add Printer wizard prompts you downloaded. 2. Select the Standard radio button and then select EPSON Network Printer.
User Manual
Page 30
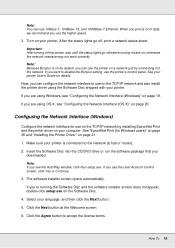
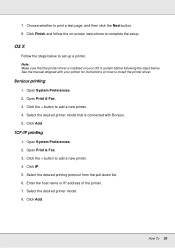
... steps below to install the printer driver. TCP/IP printing 1. Bonjour printing 1. Open Print & Fax. 3. Select the desired printing protocol from the pull-down list. 6. Note: Make sure that is installed on your printer for instructions on -screen instructions to add a new printer. 4. Open Print & Fax. 3. See the manual shipped with Bonjour. 5. Open System Preferences. 2. How To 30 Choose whether to add a new printer. 4. Open System Preferences. 2. Select the desired printer model. 8. Click the + button to complete the setup. Click Finish...
... steps below to install the printer driver. TCP/IP printing 1. Bonjour printing 1. Open Print & Fax. 3. Select the desired printing protocol from the pull-down list. 6. Note: Make sure that is installed on your printer for instructions on -screen instructions to add a new printer. 4. Open Print & Fax. 3. See the manual shipped with Bonjour. 5. Open System Preferences. 2. How To 30 Choose whether to add a new printer. 4. Open System Preferences. 2. Select the desired printer model. 8. Click the + button to complete the setup. Click Finish...
User Manual
Page 40
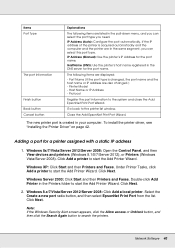
... printer list window. To install the printer driver, see "Installing the Printer Driver" on page 42. Windows 8x/7/Vista/Server 2012/Server 2008: Open the Control Panel, and then View devices and printers (Windows 8.1/8/7/Server 2012), or Printers (Windows Vista/Server 2008). Windows XP: Click Start and then Printers and Faxes. Windows 8.x/7/Vista/Server 2012/Server 2008: Click Add a local printer. Go back to the system and close the Add EpsonNet Print Port Wizard. Click Next. Windows Server 2003: Click Start and then Printers and Faxes. IP Address (Manual): Use...
... printer list window. To install the printer driver, see "Installing the Printer Driver" on page 42. Windows 8x/7/Vista/Server 2012/Server 2008: Open the Control Panel, and then View devices and printers (Windows 8.1/8/7/Server 2012), or Printers (Windows Vista/Server 2008). Windows XP: Click Start and then Printers and Faxes. Windows 8.x/7/Vista/Server 2012/Server 2008: Click Add a local printer. Go back to the system and close the Add EpsonNet Print Port Wizard. Click Next. Windows Server 2003: Click Start and then Printers and Faxes. IP Address (Manual): Use...

User Manual
Page 43
.... Network Software 43 Note: If the Add Printer Wizard asks you to select either Keep existing driver or Replace existing driver, be sure to configure the printer port. Click Finish and follow the on page 43. Click OK in the Install From Disk dialog box. 7. The printing speed differs depending on your operating system. Windows XP/Server 2003: Click Start and then Printers and Faxes. 2. Windows 8.x/7/Vista/Server 2012/Server 2008: Open the Control Panel...
.... Network Software 43 Note: If the Add Printer Wizard asks you to select either Keep existing driver or Replace existing driver, be sure to configure the printer port. Click Finish and follow the on page 43. Click OK in the Install From Disk dialog box. 7. The printing speed differs depending on your operating system. Windows XP/Server 2003: Click Start and then Printers and Faxes. 2. Windows 8.x/7/Vista/Server 2012/Server 2008: Open the Control Panel...

User Manual
Page 5
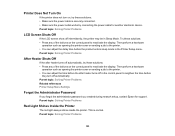
... Solving Problems ...119 Product Status Messages ...119 Solving Printer Problems...122 Printer Does Not Turn On ...123 LCD Screen Shuts Off ...123 After Heater Shuts Off ...123 Forgot the Administrator Password 123 Red Light Shines Inside the Printer 123 Solving Printing Problems ...124 Nothing Prints ...124 Cannot Print Over a Network...124 Print Head Moves But Nothing Prints 125 Printing Continues After Media Roll Empties 125 Removing Jammed Media...125 Solving Print Quality Problems ...128 Nozzle Check Pattern Prints...
... Solving Problems ...119 Product Status Messages ...119 Solving Printer Problems...122 Printer Does Not Turn On ...123 LCD Screen Shuts Off ...123 After Heater Shuts Off ...123 Forgot the Administrator Password 123 Red Light Shines Inside the Printer 123 Solving Printing Problems ...124 Nothing Prints ...124 Cannot Print Over a Network...124 Print Head Moves But Nothing Prints 125 Printing Continues After Media Roll Empties 125 Removing Jammed Media...125 Solving Print Quality Problems ...128 Nozzle Check Pattern Prints...
User Manual
Page 63
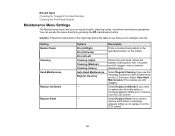
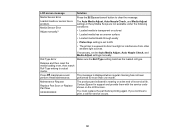
... the media. Cleans the print head. Caution: Follow the instructions in the specified location on the LCD screen. Select the lightest cleaning level first. Select Regular Cleaning if you to replace it on the LCD screen. Setting Nozzle Check Cleaning Head Maintenance Replace Ink Bottle Replace Parts Options Print At Right Print At Center Print At Left Cleaning (Light) Cleaning (Medium) Cleaning (Heavy) Auto Head Maintenance Regular Cleaning - - If nozzles are still clogged. Select Replace Ink Bottle if you need to replace parts before a message appears...
... the media. Cleans the print head. Caution: Follow the instructions in the specified location on the LCD screen. Select the lightest cleaning level first. Select Regular Cleaning if you to replace it on the LCD screen. Setting Nozzle Check Cleaning Head Maintenance Replace Ink Bottle Replace Parts Options Print At Right Print At Center Print At Left Cleaning (Light) Cleaning (Medium) Cleaning (Heavy) Auto Head Maintenance Regular Cleaning - - If nozzles are still clogged. Select Replace Ink Bottle if you need to replace parts before a message appears...
User Manual
Page 119
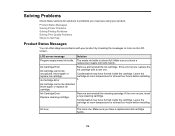
... four hours before installing it . Ink Cartridge Error Replace cleaning cartridge. Remove and reinstall the cleaning cartridge. The waste ink bottle is low. Insert again or replace ink cartridge. If the error recurs, replace the ink cartridge with your product. Make sure you have using your product by checking the messages or icons on its LCD screen. Solving Problems Check these sections for solutions to Get Help Product Status Messages You can often diagnose problems with a new one. Condensation may...
... four hours before installing it . Ink Cartridge Error Replace cleaning cartridge. Remove and reinstall the cleaning cartridge. The waste ink bottle is low. Insert again or replace ink cartridge. If the error recurs, replace the ink cartridge with your product. Make sure you have using your product by checking the messages or icons on its LCD screen. Solving Problems Check these sections for solutions to Get Help Product Status Messages You can often diagnose problems with a new one. Condensation may...

User Manual
Page 120
... Warming Up... Command Error Check print settings on again. Perform head cleaning if necessary. The print head is the correct width, turn it back to the original position, and reattach the media to the auto take -up reel to the off the Media Size Check setting and try printing again. 120 Then set the Auto switch on the auto take -up , press the OK button. Make sure the installed RIP software is at least...
... Warming Up... Command Error Check print settings on again. Perform head cleaning if necessary. The print head is the correct width, turn it back to the original position, and reattach the media to the auto take -up reel to the off the Media Size Check setting and try printing again. 120 Then set the Auto switch on the auto take -up , press the OK button. Make sure the installed RIP software is at least...
User Manual
Page 121
... perform Head Maintenance. If you continue to clear the message. Maintenance Request Replace Part Soon or Replace Part Now XXXXXXXXXX Solution Press the pause/cancel button to print, a call for service occurs. 121 Contact Epson for more than one month. Make sure the Roll Type setting matches the loaded roll type. The Auto Media Adjust, Auto Nozzle Check, and Media Adjust settings in Easy Media Setup are not available under the following conditions: • Loaded media is transparent or colored • Loaded media...
... perform Head Maintenance. If you continue to clear the message. Maintenance Request Replace Part Soon or Replace Part Now XXXXXXXXXX Solution Press the pause/cancel button to print, a call for service occurs. 121 Contact Epson for more than one month. Make sure the Roll Type setting matches the loaded roll type. The Auto Media Adjust, Auto Nozzle Check, and Media Adjust settings in Easy Media Setup are not available under the following conditions: • Loaded media is transparent or colored • Loaded media...

User Manual
Page 122
... concepts Print Head Maintenance Related references Where to Get Help Printer Setup Menu Settings Consumables and Replacement Parts Related tasks Replacing the Waste Ink Bottle Replacing the Ink Cartridges Solving Printer Problems Check these sections if you have problems operating your product. If the same call for service is not connected securely • An error occurs that cannot be cleared When a call for service occurs when: • The power cable is displayed on the LCD screen, contact Epson for support...
... concepts Print Head Maintenance Related references Where to Get Help Printer Setup Menu Settings Consumables and Replacement Parts Related tasks Replacing the Waste Ink Bottle Replacing the Ink Cartridges Solving Printer Problems Check these sections if you have problems operating your product. If the same call for service is not connected securely • An error occurs that cannot be cleared When a call for service occurs when: • The power cable is displayed on the LCD screen, contact Epson for support...
User Manual
Page 123
...: • Make sure the power cable is normal. Then perform a hardware operation such as opening the printer cover or sending a job to reactivate the display. This is securely connected. • Make sure the power outlet works by connecting the power cable for support. Printer Does Not Turn On If the printer does not turn off automatically. Parent topic: Solving Printer Problems Related references Printer Setup Menu Settings Forgot the Administrator Password If you forgot the administrator password you created during network setup, contact Epson for...
...: • Make sure the power cable is normal. Then perform a hardware operation such as opening the printer cover or sending a job to reactivate the display. This is securely connected. • Make sure the power outlet works by connecting the power cable for support. Printer Does Not Turn On If the printer does not turn off automatically. Parent topic: Solving Printer Problems Related references Printer Setup Menu Settings Forgot the Administrator Password If you forgot the administrator password you created during network setup, contact Epson for...

User Manual
Page 129
... control panel. • Turn on the Media Skew Check and Media Size Check settings on your computer screen, the colors may require different adjustment values. • Use genuine Epson ink cartridges and make sure the cartridges have not expired. • Raise the temperature of the after heater, and give the heater and your media time to warm up before printing again. • Make sure the media settings in uneven color. Parent topic: Solving Print Quality Problems...
... control panel. • Turn on the Media Skew Check and Media Size Check settings on your computer screen, the colors may require different adjustment values. • Use genuine Epson ink cartridges and make sure the cartridges have not expired. • Raise the temperature of the after heater, and give the heater and your media time to warm up before printing again. • Make sure the media settings in uneven color. Parent topic: Solving Print Quality Problems...
User Manual
Page 132
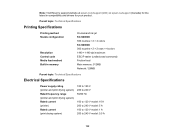
... Specifications Printing Specifications Printing method Nozzle configuration Resolution Control code Media feed method Built-in compatibility and drivers for your product. Note: Visit Epson's support website at epson.com/support (U.S.) or epson.ca/support (Canada) for the latest in memory On-demand ink jet SC-S40600: 360 nozzles × 2 × 4 colors SC-S60600: 360 nozzles × 2 × 2 rows × 4 colors 1440 × 1440 dpi maximum ESC/P raster (undisclosed command) Friction feed Main memory: 512MB Network...
... Specifications Printing Specifications Printing method Nozzle configuration Resolution Control code Media feed method Built-in compatibility and drivers for your product. Note: Visit Epson's support website at epson.com/support (U.S.) or epson.ca/support (Canada) for the latest in memory On-demand ink jet SC-S40600: 360 nozzles × 2 × 4 colors SC-S60600: 360 nozzles × 2 × 2 rows × 4 colors 1440 × 1440 dpi maximum ESC/P raster (undisclosed command) Friction feed Main memory: 512MB Network...


