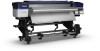
User Manual
Page 1
Contents Unpacking and assembling the printer 2 Assembling the stand ...5 Installing the printer ...8 Installing the auto take-up reel unit 14 Installing the media feeding unit 18 Connecting the cables ...21 Installing the print drying system (included with SC-S60600 25 Installing ink cartridges ...26 Installing the software ...28 Setting an administrative password 29
Contents Unpacking and assembling the printer 2 Assembling the stand ...5 Installing the printer ...8 Installing the auto take-up reel unit 14 Installing the media feeding unit 18 Connecting the cables ...21 Installing the print drying system (included with SC-S60600 25 Installing ink cartridges ...26 Installing the software ...28 Setting an administrative password 29
User Manual
Page 2
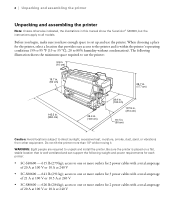
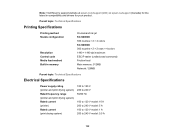
...vibrations from other equipment. access to one or more outlets for 3 power cables with a total amperage of 21 A at 100 V or 10.5 A at 240 V • SC-S60600 - 641 lb (291 kg); The following weight and power requirements for 2 power cables with a total amperage of 20 A at 100 V or 10 A at 240 V access... to one or more outlets for each printer: • SC-S40600 - 615 lb (279 kg); When choosing a place for 2 power cables with a total amperage of 20 A at 100 V or 10 A at 240 V •...
...vibrations from other equipment. access to one or more outlets for 3 power cables with a total amperage of 21 A at 100 V or 10.5 A at 240 V • SC-S60600 - 641 lb (291 kg); The following weight and power requirements for 2 power cables with a total amperage of 20 A at 100 V or 10 A at 240 V access... to one or more outlets for each printer: • SC-S40600 - 615 lb (279 kg); When choosing a place for 2 power cables with a total amperage of 20 A at 100 V or 10 A at 240 V •...

User Manual
Page 4
4 | Unpacking and assembling the printer Auto take-up reel and media feeding unit : Print drying system (included with SC-S60600) Maintenance supplies Note: The maintenance supplies are not required for setup. For more information on their use, see the Quick Reference or online User's Guide. After unpacking the printer and stand, save the box and packaging in case you need to ship the printer later.
4 | Unpacking and assembling the printer Auto take-up reel and media feeding unit : Print drying system (included with SC-S60600) Maintenance supplies Note: The maintenance supplies are not required for setup. For more information on their use, see the Quick Reference or online User's Guide. After unpacking the printer and stand, save the box and packaging in case you need to ship the printer later.
User Manual
Page 25
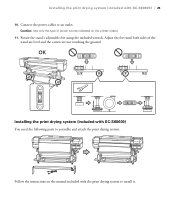
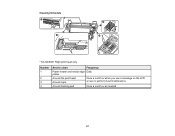
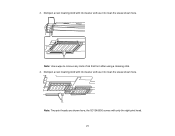
Installing the print drying system (included with the print drying system to install it. Caution: Use only the type of the stand are level and the casters are not touching the ground. Installing the print drying system (included with SC-S60600) You need the following parts to an outlet. Adjust the feet until both sides of power source indicated on the printer's label. 11. Rotate the stand's adjustable feet using the included wrench. Connect the power cables to assemble and attach the print drying system: Follow the instructions in the manual included with SC-S60600) | 25 10.
Installing the print drying system (included with the print drying system to install it. Caution: Use only the type of the stand are level and the casters are not touching the ground. Installing the print drying system (included with SC-S60600) You need the following parts to an outlet. Adjust the feet until both sides of power source indicated on the printer's label. 11. Rotate the stand's adjustable feet using the included wrench. Connect the power cables to assemble and attach the print drying system: Follow the instructions in the manual included with SC-S60600) | 25 10.
User Manual
Page 26
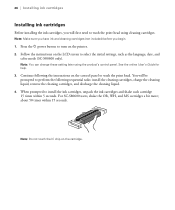
Follow the instructions on the cartridge. For SC-S80600 users, shake the OR, WH, and MS cartridges a bit more; Note: You can change these setting later using cleaning cartridges. 26 | Installing ink cartridges ... cartridges and shake each cartridge 15 times within 15 seconds. When prompted to select the initial settings, such as the language, date, and color mode (SC-S80600 only). Press the P power button to wash the print head using the product's control panel. You will first need to turn on the printer...
Follow the instructions on the cartridge. For SC-S80600 users, shake the OR, WH, and MS cartridges a bit more; Note: You can change these setting later using cleaning cartridges. 26 | Installing ink cartridges ... cartridges and shake each cartridge 15 times within 15 seconds. When prompted to select the initial settings, such as the language, date, and color mode (SC-S80600 only). Press the P power button to wash the print head using the product's control panel. You will first need to turn on the printer...
User Manual
Page 27
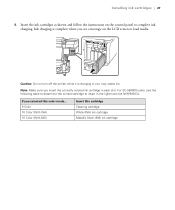
... not turn off the printer while it is complete when you insert the correctly colored ink cartridge in the rightmost slot (WH/MS/CL). For SC-S80600 users, see a message on the control panel to insert in each slot. If you may waste ink. Ink charging is charging or you selected...
... not turn off the printer while it is complete when you insert the correctly colored ink cartridge in the rightmost slot (WH/MS/CL). For SC-S80600 users, see a message on the control panel to insert in each slot. If you may waste ink. Ink charging is charging or you selected...
User Manual
Page 28
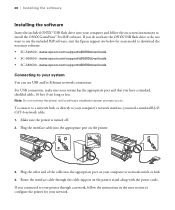
...software Installing the software Insert the included ONYX® USB flash drive into your computer or network switch or hub. 4. www.epson.com/support/s60600downloads • SC-S80600 - For USB connection, make sure your system has the appropriate port and that you do not want to install the...Route the interface cable through a network, follow the on-screen instructions to use USB and/or Ethernet network connections. www.epson.com/support/s40600downloads • SC-S60600 - To connect to a network hub, or directly to your model to . Make sure the printer is turned off. 2.
...software Installing the software Insert the included ONYX® USB flash drive into your computer or network switch or hub. 4. www.epson.com/support/s60600downloads • SC-S80600 - For USB connection, make sure your system has the appropriate port and that you do not want to install the...Route the interface cable through a network, follow the on-screen instructions to use USB and/or Ethernet network connections. www.epson.com/support/s40600downloads • SC-S60600 - To connect to a network hub, or directly to your model to . Make sure the printer is turned off. 2.

User Manual
Page 9
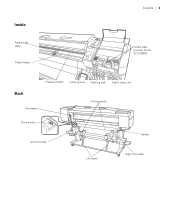
Front 1 Left maintenance cover 2 Print drying system (included with SC-S60600 and optional for SC-S40600) 3 After heater 4 Tension bar 5 Takeup reel roll core holder 6 Takeup roll support 7 Auto switch 8 Manual switch 9 Ink cartridges (one set for SC-S40600) 10 ink cartridge lock levers 11 Cartridge check light 12 Right maintenance cover 13 Media loading lever 14 Alert light 9 Product Parts -
Front 1 Left maintenance cover 2 Print drying system (included with SC-S60600 and optional for SC-S40600) 3 After heater 4 Tension bar 5 Takeup reel roll core holder 6 Takeup roll support 7 Auto switch 8 Manual switch 9 Ink cartridges (one set for SC-S40600) 10 ink cartridge lock levers 11 Cartridge check light 12 Right maintenance cover 13 Media loading lever 14 Alert light 9 Product Parts -

User Manual
Page 16
... cartridge Cyan ink cartridge Magenta ink cartridge Part number T890100 T890200 T890300 16 7 Wiper unit status Displays the remaining amount for SC-S40600) No icon: Print drying system not installed or installed incorrectly : Drying fan is on : Drying fan is off Parent ...topic: Printer Part Locations Consumables and Replacement Parts You can purchase genuine Epson ink, paper, and accessories from an Epson authorized reseller. To find the nearest reseller, visit proimaging.epson.com (U.S.) or epson.ca (Canada), or call 800-GOEPSON (800-463-7766). replace the wiper ...
... cartridge Cyan ink cartridge Magenta ink cartridge Part number T890100 T890200 T890300 16 7 Wiper unit status Displays the remaining amount for SC-S40600) No icon: Print drying system not installed or installed incorrectly : Drying fan is on : Drying fan is off Parent ...topic: Printer Part Locations Consumables and Replacement Parts You can purchase genuine Epson ink, paper, and accessories from an Epson authorized reseller. To find the nearest reseller, visit proimaging.epson.com (U.S.) or epson.ca (Canada), or call 800-GOEPSON (800-463-7766). replace the wiper ...
User Manual
Page 17
... Your Printer Follow these sections as you use your printer: • Operate the printer only within the specified operating temperature and humidity range for the SC-S40600) Media edge guide Part number T890400 T696000 C13S210044 T699300 C13T724000 C13S090013 C13S090016 C12C932381 C12C932411 Parent topic: Introduction to make sure you maintain the specified...
... Your Printer Follow these sections as you use your printer: • Operate the printer only within the specified operating temperature and humidity range for the SC-S40600) Media edge guide Part number T890400 T696000 C13S210044 T699300 C13T724000 C13S090013 C13S090016 C12C932381 C12C932411 Parent topic: Introduction to make sure you maintain the specified...
User Manual
Page 62
... printer enters sleep mode. Setting Media Check Options Media Size Check Media End Check Media Skew Check Btw Pages Nozzle Check Lamp Setting Head Mode (SC-S60600 only) Sleep Mode Off Print Pattern Auto Nozzle Check Auto Manual 2 Heads Mode Head1 Head2 15 to 240 minutes Restore Settings Yes No Parent topic...
... printer enters sleep mode. Setting Media Check Options Media Size Check Media End Check Media Skew Check Btw Pages Nozzle Check Lamp Setting Head Mode (SC-S60600 only) Sleep Mode Off Print Pattern Auto Nozzle Check Auto Manual 2 Heads Mode Head1 Head2 15 to 240 minutes Restore Settings Yes No Parent topic...
User Manual
Page 67
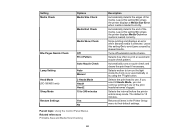
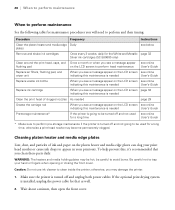
Cleaning Schedule * SC-S40600: Right print head only Number 1 2 3 4 Area to clean Frequency Platen heater and media edge Daily plates Around the print head Around caps Once a month or when you see a message on the LCD screen to perform head maintenance Around flushing pad Once a month or as needed 67
Cleaning Schedule * SC-S40600: Right print head only Number 1 2 3 4 Area to clean Frequency Platen heater and media edge Daily plates Around the print head Around caps Once a month or when you see a message on the LCD screen to perform head maintenance Around flushing pad Once a month or as needed 67
User Manual
Page 77
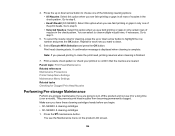
Note: Use a wipe to clean the areas shown here. Dampen a new cleaning stick with ink cleaner and use it to clean the areas shown here. the SC-S40600 comes with ink cleaner and use it to remove any clots of ink that form after using a cleaning stick. 4. Note: Two print heads are shown here; Dampen a new cleaning stick with only the right print head. 77 3.
Note: Use a wipe to clean the areas shown here. Dampen a new cleaning stick with ink cleaner and use it to clean the areas shown here. the SC-S40600 comes with ink cleaner and use it to remove any clots of ink that form after using a cleaning stick. 4. Note: Two print heads are shown here; Dampen a new cleaning stick with only the right print head. 77 3.
User Manual
Page 106
... or gaps in all rows of the following cleaning options: • All Nozzles: Select this option when you begin: • SC-S40600: 4 cleaning cartridges • SC-S60600: 8 cleaning cartridges 1. Select Execute With Selection and press the OK button. A confirmation message is displayed when cleaning is finished. ...7. Go to step 6. • Head1/Head2 (SC-S60600): Select this option when you paused printing to highlight the row number and press the OK button. Make sure you have these cleaning...
... or gaps in all rows of the following cleaning options: • All Nozzles: Select this option when you begin: • SC-S40600: 4 cleaning cartridges • SC-S60600: 8 cleaning cartridges 1. Select Execute With Selection and press the OK button. A confirmation message is displayed when cleaning is finished. ...7. Go to step 6. • Head1/Head2 (SC-S60600): Select this option when you paused printing to highlight the row number and press the OK button. Make sure you have these cleaning...
User Manual
Page 132
Note: Visit Epson's support website at epson.com/support (U.S.) or epson.ca/support (Canada) for the latest in memory On-demand ink jet SC-S40600: 360 nozzles × 2 × 4 colors SC-S60600: 360 nozzles × 2 × 2 rows × 4 colors 1440 × 1440 dpi maximum ESC/P raster (undisclosed command) Friction feed Main memory: 512MB Network: 128MB Parent topic...
Note: Visit Epson's support website at epson.com/support (U.S.) or epson.ca/support (Canada) for the latest in memory On-demand ink jet SC-S40600: 360 nozzles × 2 × 4 colors SC-S60600: 360 nozzles × 2 × 2 rows × 4 colors 1440 × 1440 dpi maximum ESC/P raster (undisclosed command) Friction feed Main memory: 512MB Network: 128MB Parent topic...
User Manual
Page 133
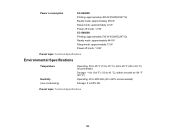
...: Printing: approximately 480 W (ISO/IEC24712) Ready mode: approximately 330 W Sleep mode: approximately 12 W Power off mode: 1.5 W SC-S60600: Printing: approximately 745 W (ISO/IEC24712) Ready mode: approximately 445 W Sleep mode: approximately 13 W Power off mode: 1.8 W Parent topic: Technical Specifications Environmental Specifications Temperature Humidity (non-...
...: Printing: approximately 480 W (ISO/IEC24712) Ready mode: approximately 330 W Sleep mode: approximately 12 W Power off mode: 1.5 W SC-S60600: Printing: approximately 745 W (ISO/IEC24712) Ready mode: approximately 445 W Sleep mode: approximately 13 W Power off mode: 1.8 W Parent topic: Technical Specifications Environmental Specifications Temperature Humidity (non-...
User Manual
Page 134
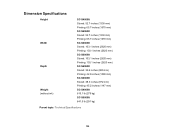
... mm) Printing: 65.7 inches (1670 mm) SC-S60600: Stored: 52.7 inches (1338 mm) Printing: 65.7 inches (1670 mm) SC-S40600: Stored: 103.1 inches (2620 mm) Printing: 103.1 inches (2620 mm) SC-S60600: Stored: 103.1 inches (2620 mm) Printing: 103.1 inches (2620 mm) SC-S40600: Stored: 34.6 inches (880 mm) ...Printing: 42.9 inches (1090 mm) SC-S60600: Stored: 38.3 inches (972 mm) Printing: 45.2 inches (1147 mm) SC-S40600: 615.1 lb (279 kg) SC-S60600: 641.5 lb (291 kg...
... mm) Printing: 65.7 inches (1670 mm) SC-S60600: Stored: 52.7 inches (1338 mm) Printing: 65.7 inches (1670 mm) SC-S40600: Stored: 103.1 inches (2620 mm) Printing: 103.1 inches (2620 mm) SC-S60600: Stored: 103.1 inches (2620 mm) Printing: 103.1 inches (2620 mm) SC-S40600: Stored: 34.6 inches (880 mm) ...Printing: 42.9 inches (1090 mm) SC-S60600: Stored: 38.3 inches (972 mm) Printing: 45.2 inches (1147 mm) SC-S40600: 615.1 lb (279 kg) SC-S60600: 641.5 lb (291 kg...

Quick Reference Guide
Page 2
Ink cartridges (one set for the SC-S40600/SC-S80600. 2 | Printer parts Printer parts Note: Unless otherwise indicated, the illustrations in this manual show the SureColor® S40600, but the instructions apply to all models. Front Left maintenance cover Print drying system* After heater Tension bar Left roll core holder Front cover Air filters Control panel Media loading lever Right maintenance cover USB port LAN port AC inlets Cartridge check lights Lock levers Roll supports Waste ink tank Right roll core holder * Included with the SC-S60600 and optional for the SC-S40600)
Ink cartridges (one set for the SC-S40600/SC-S80600. 2 | Printer parts Printer parts Note: Unless otherwise indicated, the illustrations in this manual show the SureColor® S40600, but the instructions apply to all models. Front Left maintenance cover Print drying system* After heater Tension bar Left roll core holder Front cover Air filters Control panel Media loading lever Right maintenance cover USB port LAN port AC inlets Cartridge check lights Lock levers Roll supports Waste ink tank Right roll core holder * Included with the SC-S60600 and optional for the SC-S40600)
Quick Reference Guide
Page 3
Inside Media edge plate Platen heater Inside | 3 Nozzle caps (one set for the SC-S40600) Pressure rollers Cutter groove Flushing pad Fabric wiper unit Back Pre-heater Roll supports Drive switch Left roll holder Lift levers Handle Right roll holder
Inside Media edge plate Platen heater Inside | 3 Nozzle caps (one set for the SC-S40600) Pressure rollers Cutter groove Flushing pad Fabric wiper unit Back Pre-heater Roll supports Drive switch Left roll holder Lift levers Handle Right roll holder
Quick Reference Guide
Page 28
... you see online for a long time, otherwise a print head nozzle may damage the printer. 1. daily for the White and Metallic page 32 Silver ink cartridges (SC-S80600 only) Clean around the print head, caps, and Once a month or when you see a message appear see online flushing pad on the LCD screen...
... you see online for a long time, otherwise a print head nozzle may damage the printer. 1. daily for the White and Metallic page 32 Silver ink cartridges (SC-S80600 only) Clean around the print head, caps, and Once a month or when you see a message appear see online flushing pad on the LCD screen...