Product Information Guide
Page 1
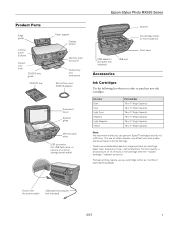
...damage. For best printing results, use , and temperature. Epson Stylus Photo RX595 Series Product Parts Edge guide Control panel buttons Output tray lever CD/DVD tray guide CD/DVD tray Paper support Display screen Memory card slot cover Output tray and extensions Mini or 8-cm mini CD/DVD adapter Document cover... 1 The use genuine Epson® cartridges and do not refill them. Power inlet (for power cable) USB cable for computer (not included) USB port Accessories Ink Cartridges Use the following list when you order or purchase new ink cartridges: Ink color Black Cyan Light Cyan ...
...damage. For best printing results, use , and temperature. Epson Stylus Photo RX595 Series Product Parts Edge guide Control panel buttons Output tray lever CD/DVD tray guide CD/DVD tray Paper support Display screen Memory card slot cover Output tray and extensions Mini or 8-cm mini CD/DVD adapter Document cover... 1 The use genuine Epson® cartridges and do not refill them. Power inlet (for power cable) USB cable for computer (not included) USB port Accessories Ink Cartridges Use the following list when you order or purchase new ink cartridges: Ink color Black Cyan Light Cyan ...
Product Information Guide
Page 3
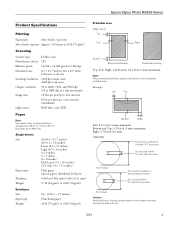
... mm) minimum Right: 0.78 inch (20 mm) CD/DVDs Do not print outside of 4.6 inch (117 mm) area Do not print within 0.7 inch (18 mm) area 8 cm discs Caution: Avoid printing in the expanded printable area. Epson Stylus Photo RX595 Series Product Specifications Printing Paper path Sheet feeder, top entry Sheet feeder capacity ...to 4800, 7200, and 9600 dpi (50 to 4800 dpi in 1 dpi increments) 16 bits per pixel per color internal 8 bits per pixel per color external (maximum) RGB three color LED Paper Note: Use paper under normal conditions: Temperature: 59 to 77 °F (15 to 25 °...
... mm) minimum Right: 0.78 inch (20 mm) CD/DVDs Do not print outside of 4.6 inch (117 mm) area Do not print within 0.7 inch (18 mm) area 8 cm discs Caution: Avoid printing in the expanded printable area. Epson Stylus Photo RX595 Series Product Specifications Printing Paper path Sheet feeder, top entry Sheet feeder capacity ...to 4800, 7200, and 9600 dpi (50 to 4800 dpi in 1 dpi increments) 16 bits per pixel per color internal 8 bits per pixel per color external (maximum) RGB three color LED Paper Note: Use paper under normal conditions: Temperature: 59 to 77 °F (15 to 25 °...
Product Information Guide
Page 4
... Ink freezes at 77 °F (25 °C) Size and Weight Size Stored: Printing: Weight Width: 17.7 inches (450 mm) Depth: 16.3 inches (413 mm)...(8.3 kg) (without the ink cartridges, power cable, or CD/DVD tray) Electrical Power supply rating Input voltage range Rated frequency...Color Cyan, Magenta, Yellow, Light Cyan, Light Magenta, Black Part number 78 or 77 (High Capacity) Cartridge life Opened package: Within 6 months Unopened package: Do not use up a cartridge within six months of files: Up to 60.5 Hz 0.6 A (1.2 A maximum) 15 W 4W 1.3 W 0.2 W 4 5/07 Epson Stylus Photo RX595...
... Ink freezes at 77 °F (25 °C) Size and Weight Size Stored: Printing: Weight Width: 17.7 inches (450 mm) Depth: 16.3 inches (413 mm)...(8.3 kg) (without the ink cartridges, power cable, or CD/DVD tray) Electrical Power supply rating Input voltage range Rated frequency...Color Cyan, Magenta, Yellow, Light Cyan, Light Magenta, Black Part number 78 or 77 (High Capacity) Cartridge life Opened package: Within 6 months Unopened package: Do not use up a cartridge within six months of files: Up to 60.5 Hz 0.6 A (1.2 A maximum) 15 W 4W 1.3 W 0.2 W 4 5/07 Epson Stylus Photo RX595...
Product Information Guide
Page 7
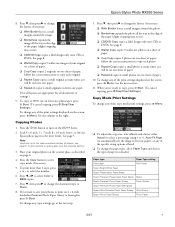
...paper; Press the Copy button to select Color or B&W copies. 7. Press d, then press r to the edge of paper; See page 8. ❏ Wallet Copy copies 9 wallet-size photos on a sheet of paper. 10. ...print more than 1 copy, press + or - Press d, then press r to change any of the print settings displayed on one sheet of paper. ❏ 2-up Copy copies 2 photos on plain paper, see page 5. See the next section. 11. Epson Stylus Photo RX595 Series 8. Glossy Epson Premium Photo Paper Semi-gloss Epson Ultra Premium Photo Paper Glossy Ultra Glossy Epson Photo Paper Glossy Photo...
...paper; Press the Copy button to select Color or B&W copies. 7. Press d, then press r to the edge of paper; See page 8. ❏ Wallet Copy copies 9 wallet-size photos on a sheet of paper. 10. ...print more than 1 copy, press + or - Press d, then press r to change any of the print settings displayed on one sheet of paper. ❏ 2-up Copy copies 2 photos on plain paper, see page 5. See the next section. 11. Epson Stylus Photo RX595 Series 8. Glossy Epson Premium Photo Paper Semi-gloss Epson Ultra Premium Photo Paper Glossy Ultra Glossy Epson Photo Paper Glossy Photo...
Product Information Guide
Page 8
Epson Stylus Photo RX595 Series ❏ To change the paper size, select Paper Size and choose the size of paper you loaded. ❏ To change the copy quality, select .... Always remove the disc first. 4. Use only the Epson Print CD software to adjust the CD-Inner setting on the RX595 Series control panel. Push in the output tray. Push down the tray lever to within 0.16 inch (4 mm) of the edge of image expansion when printing borderless photos, select Expansion and choose Standard, Min, or Mid...
Epson Stylus Photo RX595 Series ❏ To change the paper size, select Paper Size and choose the size of paper you loaded. ❏ To change the copy quality, select .... Always remove the disc first. 4. Use only the Epson Print CD software to adjust the CD-Inner setting on the RX595 Series control panel. Push in the output tray. Push down the tray lever to within 0.16 inch (4 mm) of the edge of image expansion when printing borderless photos, select Expansion and choose Standard, Min, or Mid...

Product Information Guide
Page 9
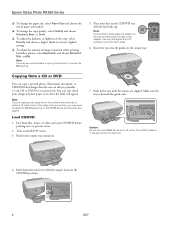
...on CD/DVDs using the Epson Print CD computer software that came with your RX595 Series, or using the RX595 Series control panel. Copy Your Label Design Onto a CD/DVD 1. To copy your design; You can print on the scanner glass and copy the label onto an ink jet-printable CD/DVD. 1. Epson Stylus Photo RX595 Series... label. To copy a test label onto plain paper, or to select Color or B&W copies. 6. Press l or r to adjust the position or ink density of the label, press x Menu and see the next section. ❏ To print a test label, select Paper Type and choose Plain Paper. ❏ ...
...on CD/DVDs using the Epson Print CD computer software that came with your RX595 Series, or using the RX595 Series control panel. Copy Your Label Design Onto a CD/DVD 1. To copy your design; You can print on the scanner glass and copy the label onto an ink jet-printable CD/DVD. 1. Epson Stylus Photo RX595 Series... label. To copy a test label onto plain paper, or to select Color or B&W copies. 6. Press l or r to adjust the position or ink density of the label, press x Menu and see the next section. ❏ To print a test label, select Paper Type and choose Plain Paper. ❏ ...
Product Information Guide
Page 13
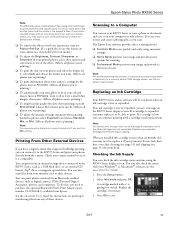
Epson Stylus Photo RX595 Series Note: PhotoEnhance uses a sophisticated face recognition technology to optimize photos that supports PictBridge printing, you can print photos wirelessly from Bluetooth-enabled devices, such as you scan. Printing From Other External Devices If you 're printing.) ❏ To improve print quality but slow down printing, turn off PhotoEnhance to retain the special color...print head. see a message on scanning a photo or document to be visible in your photo includes a face with an intentional color cast, such as a USB flash drive, or an external CD...
Epson Stylus Photo RX595 Series Note: PhotoEnhance uses a sophisticated face recognition technology to optimize photos that supports PictBridge printing, you can print photos wirelessly from Bluetooth-enabled devices, such as you scan. Printing From Other External Devices If you 're printing.) ❏ To improve print quality but slow down printing, turn off PhotoEnhance to retain the special color...print head. see a message on scanning a photo or document to be visible in your photo includes a face with an intentional color cast, such as a USB flash drive, or an external CD...
Product Information Guide
Page 14
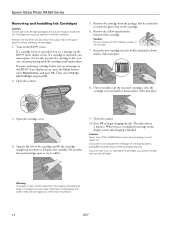
Epson Stylus Photo RX595 Series Removing and Installing Ink Cartridges Caution: Do not open ink cartridge packages until...Press OK to the paper position before you see a message on the cartridge and lift the cartridge straight up to print. Warning: If ink gets on the display screen, press OK and press down all the necessary cartridges, close the... cartridge from the bottom of it clicks into your hands, wash them immediately with soap and water. Remove the CD/DVD tray and return the output tray to begin charging the ink. When you cannot reinstall and use the cartridge...
Epson Stylus Photo RX595 Series Removing and Installing Ink Cartridges Caution: Do not open ink cartridge packages until...Press OK to the paper position before you see a message on the cartridge and lift the cartridge straight up to print. Warning: If ink gets on the display screen, press OK and press down all the necessary cartridges, close the... cartridge from the bottom of it clicks into your hands, wash them immediately with soap and water. Remove the CD/DVD tray and return the output tray to begin charging the ink. When you cannot reinstall and use the cartridge...
Product Information Guide
Page 16
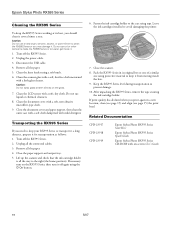
... print head. Fasten the ink cartridge holder to the right (the home position). After unpacking the RX595 Series, remove the tape securing the ink cartridge holder. Remove all the way to the case using a soft brush. 6. Epson Stylus Photo RX595 Series Cleaning the RX595 ... cleaner directly on the RX595 Series, then turn on the glass. 7. Clean the document cover with a soft, dry cloth. Related Documentation CPD-23917 CPD-23918 CPD-23919 Epson Stylus Photo RX595 Series Start Here Epson Stylus Photo RX595 Series Quick Guide Epson Stylus Photo RX595 Series CD-ROM with on-screen User...
... print head. Fasten the ink cartridge holder to the right (the home position). After unpacking the RX595 Series, remove the tape securing the ink cartridge holder. Remove all the way to the case using a soft brush. 6. Epson Stylus Photo RX595 Series Cleaning the RX595 ... cleaner directly on the RX595 Series, then turn on the glass. 7. Clean the document cover with a soft, dry cloth. Related Documentation CPD-23917 CPD-23918 CPD-23919 Epson Stylus Photo RX595 Series Start Here Epson Stylus Photo RX595 Series Quick Guide Epson Stylus Photo RX595 Series CD-ROM with on-screen User...
Quick Reference Guide
Page 4
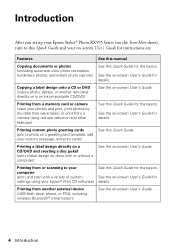
... camera (view your photos and print, print photos by the date they were taken, or print from another disc label directly onto an ink jet-printable CD/DVD) See the on-screen User's Guide. Printing from a camera using your Epson® Print CD software) See this Quick Guide for the basics. Introduction After you set up your Epson Stylus® Photo RX595 Series (see...
... camera (view your photos and print, print photos by the date they were taken, or print from another disc label directly onto an ink jet-printable CD/DVD) See the on-screen User's Guide. Printing from a camera using your Epson® Print CD software) See this Quick Guide for the basics. Introduction After you set up your Epson Stylus® Photo RX595 Series (see...
Quick Reference Guide
Page 5
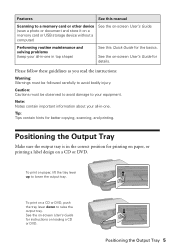
...printing a label design on -screen User's Guide for details. Positioning the Output Tray Make sure the output tray is in top shape) See this manual Scanning to a memory card or other device (scan a photo or document and store it on a memory card or USB storage device without a computer) See the on a CD... Tips contain hints for instructions on -screen User's Guide for better copying, scanning, and printing. Note: Notes contain important information about your equipment. See the on a CD or DVD. To print on paper, lift the tray lever up to your all -in-one . Features See this...
...printing a label design on -screen User's Guide for details. Positioning the Output Tray Make sure the output tray is in top shape) See this manual Scanning to a memory card or other device (scan a photo or document and store it on a memory card or USB storage device without a computer) See the on a CD... Tips contain hints for instructions on -screen User's Guide for better copying, scanning, and printing. Note: Notes contain important information about your equipment. See the on a CD or DVD. To print on paper, lift the tray lever up to your all -in-one . Features See this...
Quick Reference Guide
Page 12
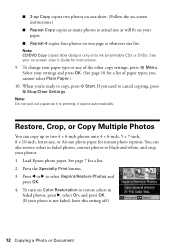
... Color Restoration to restore colors in faded photos, convert photos to copy, press x Start. Restore, Crop, or Copy Multiple Photos You can also restore colors in faded photos, press r, select On, and press OK. (If your on one page at actual size as it ejects automatically. To change your photos. 1. If you cannot select Plain Paper.) 10. Load Epson photo...
... Color Restoration to restore colors in faded photos, convert photos to copy, press x Start. Restore, Crop, or Copy Multiple Photos You can also restore colors in faded photos, press r, select On, and press OK. (If your on one page at actual size as it ejects automatically. To change your photos. 1. If you cannot select Plain Paper.) 10. Load Epson photo...
Quick Reference Guide
Page 21
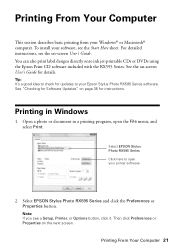
... Note: If you see the Start Here sheet. Select EPSON Stylus Photo RX595 Series Click here to open the File menu, and select Print. Select EPSON Stylus Photo RX595 Series and click the Preferences or Properties button. See "...Checking for Software Updates" on -screen User's Guide. Tip: It's a good idea to your Windows® or Macintosh® computer. To install your printer software 2. See the on the next screen. You can also print label designs directly onto ink jet-printable CDs...
... Note: If you see the Start Here sheet. Select EPSON Stylus Photo RX595 Series Click here to open the File menu, and select Print. Select EPSON Stylus Photo RX595 Series and click the Preferences or Properties button. See "...Checking for Software Updates" on -screen User's Guide. Tip: It's a good idea to your Windows® or Macintosh® computer. To install your printer software 2. See the on the next screen. You can also print label designs directly onto ink jet-printable CDs...
Quick Reference Guide
Page 25
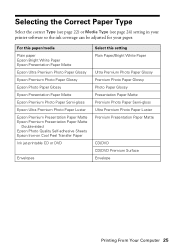
... Sheets Epson Iron-on Cool Peel Transfer Paper Ink jet-printable CD or DVD Envelopes Select this setting Plain Paper/Bright White Paper Ultra Premium Photo Paper Glossy Premium Photo Paper Glossy Photo Paper Glossy Presentation Paper Matte Premium Photo Paper Semi-gloss Ultra Premium Photo Paper Luster Premium Presentation Paper Matte CD/DVD CD/DVD Premium Surface Envelope Printing...
... Sheets Epson Iron-on Cool Peel Transfer Paper Ink jet-printable CD or DVD Envelopes Select this setting Plain Paper/Bright White Paper Ultra Premium Photo Paper Glossy Premium Photo Paper Glossy Photo Paper Glossy Presentation Paper Matte Premium Photo Paper Semi-gloss Ultra Premium Photo Paper Luster Premium Presentation Paper Matte CD/DVD CD/DVD Premium Surface Envelope Printing...
Quick Reference Guide
Page 32
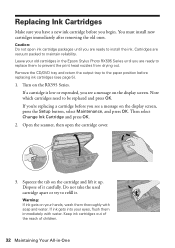
Note which cartridges need to prevent the print head nozzles from drying out. Dispose of children. 32 Maintaining Your All-in the Epson Stylus Photo RX595 Series until you are ready to maintain reliability. Replacing Ink Cartridges Make sure you have a new ink cartridge before you see a message... packages until you see page 5). 1. Do not take the used cartridge apart or try to the paper position before you begin. Remove the CD/DVD tray and return the output tray to refill it up. If you're replacing a cartridge before replacing ink cartridges (see a message on...
Note which cartridges need to prevent the print head nozzles from drying out. Dispose of children. 32 Maintaining Your All-in the Epson Stylus Photo RX595 Series until you are ready to maintain reliability. Replacing Ink Cartridges Make sure you have a new ink cartridge before you see a message... packages until you see page 5). 1. Do not take the used cartridge apart or try to the paper position before you begin. Remove the CD/DVD tray and return the output tray to refill it up. If you're replacing a cartridge before replacing ink cartridges (see a message on...
Start Here
Page 6
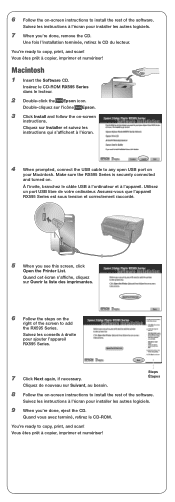
...to copy, print, and scan! Vous êtes prêt à copier, imprimer et numériser! Double-cliquez sur l'icône Epson. 3 Click Install and follow the on your Macintosh. Une fois l'installation terminée, retirez le CD du lecteur. Insérez le CD-ROM RX595 Series dans ...Double-click the Epson icon. Quand cet écran s'affiche, cliquez sur Ouvrir la liste des imprimantes. 6 Follow the steps on -screen instructions to install the rest of the screen to add the RX595 Series. Quand vous avez terminé, retirez le CD-ROM. You're ready to copy, print, and scan...
...to copy, print, and scan! Vous êtes prêt à copier, imprimer et numériser! Double-cliquez sur l'icône Epson. 3 Click Install and follow the on your Macintosh. Une fois l'installation terminée, retirez le CD du lecteur. Insérez le CD-ROM RX595 Series dans ...Double-click the Epson icon. Quand cet écran s'affiche, cliquez sur Ouvrir la liste des imprimantes. 6 Follow the steps on -screen instructions to install the rest of the screen to add the RX595 Series. Quand vous avez terminé, retirez le CD-ROM. You're ready to copy, print, and scan...


