Product Information Guide
Page 13
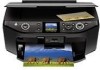
... color cast, such as digital cameras, PDAs (Personal Digital Assistants), phones, and computers. Check your photos directly from Epson....installed ink cartridge is low or expended, you may see page 15) the print head. Replace any of the effect. (Affects all photos you're printing.) ❏ To print the date on your photos and select the format for it to the RX595...Epson Stylus Photo RX595 Series Note: PhotoEnhance uses a sophisticated face recognition technology to optimize photos that supports PictBridge printing, you 're printing.) ❏ To automatically crop your photo...
... color cast, such as digital cameras, PDAs (Personal Digital Assistants), phones, and computers. Check your photos directly from Epson....installed ink cartridge is low or expended, you may see page 15) the print head. Replace any of the effect. (Affects all photos you're printing.) ❏ To print the date on your photos and select the format for it to the RX595...Epson Stylus Photo RX595 Series Note: PhotoEnhance uses a sophisticated face recognition technology to optimize photos that supports PictBridge printing, you 're printing.) ❏ To automatically crop your photo...
Product Information Guide
Page 14
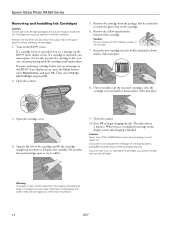
..., close the cartridge cover and push it down until it . 9. If a cartridge is low or expended, you see a message on the RX595 Series display screen. If you're replacing a cartridge before replacing ink cartridges. 1. Insert the new cartridge into place. 8. This takes about 2... can continue printing until the cartridge needs replacement. Cartridges are ready to install the ink. Caution: Do not remove any other labels or seals, or ink will leak. 7. Epson Stylus Photo RX595 Series Removing and Installing Ink Cartridges Caution: Do not open ink cartridge packages until you are ...
..., close the cartridge cover and push it down until it . 9. If a cartridge is low or expended, you see a message on the RX595 Series display screen. If you're replacing a cartridge before replacing ink cartridges. 1. Insert the new cartridge into place. 8. This takes about 2... can continue printing until the cartridge needs replacement. Cartridges are ready to install the ink. Caution: Do not remove any other labels or seals, or ink will leak. 7. Epson Stylus Photo RX595 Series Removing and Installing Ink Cartridges Caution: Do not open ink cartridge packages until you are ...
Product Information Guide
Page 16
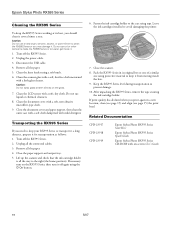
...cartridges installed to the case using tape. Pack the RX595 Series in a new location, clean (see page 15) and align (see page 15) the print head. Related Documentation CPD-23917 CPD-23918 CPD-23919 Epson Stylus Photo RX595 Series Start Here Epson Stylus Photo RX595 Series Quick Guide Epson Stylus Photo RX595 ...cloth. Caution: Do not use liquid or chemical cleansers. 8. Remove all the connected cables. 3. Epson Stylus Photo RX595 Series Cleaning the RX595 Series To keep the RX595 Series working at its original box or one of a similar size using protective material to keep it...
...cartridges installed to the case using tape. Pack the RX595 Series in a new location, clean (see page 15) and align (see page 15) the print head. Related Documentation CPD-23917 CPD-23918 CPD-23919 Epson Stylus Photo RX595 Series Start Here Epson Stylus Photo RX595 Series Quick Guide Epson Stylus Photo RX595 ...cloth. Caution: Do not use liquid or chemical cleansers. 8. Remove all the connected cables. 3. Epson Stylus Photo RX595 Series Cleaning the RX595 Series To keep the RX595 Series working at its original box or one of a similar size using protective material to keep it...
Quick Reference Guide
Page 21
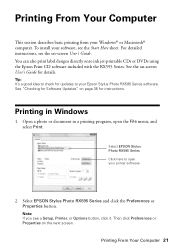
...for Software Updates" on -screen User's Guide for instructions. Printing From Your Computer 21 See the on page 35 for details. Select EPSON Stylus Photo RX595 Series and click the Preferences or Properties button. Tip: It's a good idea to check for updates to open the File menu, ... sheet. You can also print label designs directly onto ink jet-printable CDs or DVDs using the Epson Print CD software included with the RX595 Series. Printing From Your Computer This section describes basic printing from your Epson Stylus Photo RX595 Series software. To install your printer software 2.
...for Software Updates" on -screen User's Guide for instructions. Printing From Your Computer 21 See the on page 35 for details. Select EPSON Stylus Photo RX595 Series and click the Preferences or Properties button. Tip: It's a good idea to check for updates to open the File menu, ... sheet. You can also print label designs directly onto ink jet-printable CDs or DVDs using the Epson Print CD software included with the RX595 Series. Printing From Your Computer This section describes basic printing from your Epson Stylus Photo RX595 Series software. To install your printer software 2.
Quick Reference Guide
Page 32
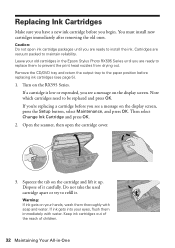
...press OK. If a cartridge is low or expended, you see a message on your hands, wash them thoroughly with water. You must install new cartridges immediately after removing the old ones. Leave your eyes, flush them to prevent the print head nozzles from drying out. Remove... you see a message on the RX595 Series. Caution: Do not open the cartridge cover. 3. Cartridges are ready to install the ink. If you're replacing a cartridge before you begin. Dispose of children. 32 Maintaining Your All-in the Epson Stylus Photo RX595 Series until you are vacuum packed ...
...press OK. If a cartridge is low or expended, you see a message on your hands, wash them thoroughly with water. You must install new cartridges immediately after removing the old ones. Leave your eyes, flush them to prevent the print head nozzles from drying out. Remove... you see a message on the RX595 Series. Caution: Do not open the cartridge cover. 3. Cartridges are ready to install the ink. If you're replacing a cartridge before you begin. Dispose of children. 32 Maintaining Your All-in the Epson Stylus Photo RX595 Series until you are vacuum packed ...


