
Product Brochure
Page 1
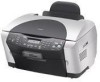
...* - The feature-rich Epson Stylus Photo RX500 all-in card slots - Award winning 48-bit (2400 x 4800 dpi) scanning Convenient built-in -one delivers superior Photo Quality prints, copies and scans, even without turning on your PC Epson Easy Photo Fix™ scanning technology - Quickly restores faded color photos to 16 ppm color) - Brilliance that lasts. Prints a 4" x 6" color photo in transparency adapter...
...* - The feature-rich Epson Stylus Photo RX500 all-in card slots - Award winning 48-bit (2400 x 4800 dpi) scanning Convenient built-in -one delivers superior Photo Quality prints, copies and scans, even without turning on your PC Epson Easy Photo Fix™ scanning technology - Quickly restores faded color photos to 16 ppm color) - Brilliance that lasts. Prints a 4" x 6" color photo in transparency adapter...
Product Brochure
Page 2
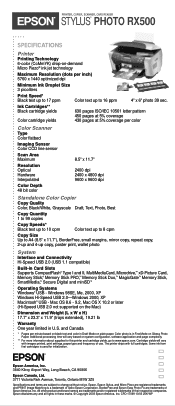
..., Ltd. 3771 Victoria Park Avenue, Toronto, Ontario M1W 3Z5 Specifications and terms are trademarks of use. Epson disclaims any and all rights in U.S. PRINTER, COPIER, SCANNER, CARD READER STYLUS® PHOTO RX500 SPECIFICATIONS Printer Printing Technology 6-color (CcMmYK) drop-on-demand Micro Piezo® ink jet technology Maximum Resolution (dots per inch) 5760 x 1440 optimized dpi...
..., Ltd. 3771 Victoria Park Avenue, Toronto, Ontario M1W 3Z5 Specifications and terms are trademarks of use. Epson disclaims any and all rights in U.S. PRINTER, COPIER, SCANNER, CARD READER STYLUS® PHOTO RX500 SPECIFICATIONS Printer Printing Technology 6-color (CcMmYK) drop-on-demand Micro Piezo® ink jet technology Maximum Resolution (dots per inch) 5760 x 1440 optimized dpi...
Product Information Guide
Page 3
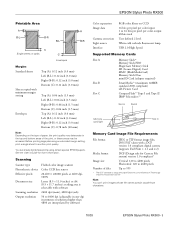
...FAT taken with software 2400 dpi (main), 4800 dpi (sub) 50 to confirm print quality. EPSON Stylus Photo RX500 Printable Area A B-L B-R C Single sheets or cards Envelopes Margins Standard sheets Sheets copied with minimum...Scanner type Photoelectric device Effective pixels Document size Scanning resolution Output resolution Flatbed color image scanner Color CCD line sensor 20,400 × 28,080 pixels at 2400 dpi, 100% Letter (8.5 × 11.0 inches) or A4 (8.5 × 11.7 inches); You can 't print images whose file names contain double-byte characters. 10/03 EPSON Stylus Photo RX500...
...FAT taken with software 2400 dpi (main), 4800 dpi (sub) 50 to confirm print quality. EPSON Stylus Photo RX500 Printable Area A B-L B-R C Single sheets or cards Envelopes Margins Standard sheets Sheets copied with minimum...Scanner type Photoelectric device Effective pixels Document size Scanning resolution Output resolution Flatbed color image scanner Color CCD line sensor 20,400 × 28,080 pixels at 2400 dpi, 100% Letter (8.5 × 11.0 inches) or A4 (8.5 × 11.7 inches); You can 't print images whose file names contain double-byte characters. 10/03 EPSON Stylus Photo RX500...
Product Information Guide
Page 5
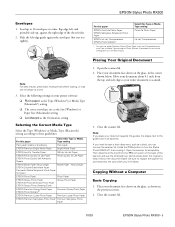
... Type setting for Epson EPSON Photo Paper Photo Paper EPSON Glossy Photo Paper EPSON All-Purpose Glossy Photo Paper EPSON Glossy Photo Greeting Cards Glossy Photo Paper EPSON Premium Glossy Photo Paper EPSON Photo Stickers®* Premium Glossy Photo Paper EPSON Premium Luster Photo Paper Premium Luster Photo Paper EPSON Premium Semigloss Photo Paper Premium Semigloss Photo Paper Placing Your Original Document 1. Close the scanner lid. 10/03 EPSON Stylus Photo RX500 - 5 Open the scanner lid. 2. Close the...
... Type setting for Epson EPSON Photo Paper Photo Paper EPSON Glossy Photo Paper EPSON All-Purpose Glossy Photo Paper EPSON Glossy Photo Greeting Cards Glossy Photo Paper EPSON Premium Glossy Photo Paper EPSON Photo Stickers®* Premium Glossy Photo Paper EPSON Premium Luster Photo Paper Premium Luster Photo Paper EPSON Premium Semigloss Photo Paper Premium Semigloss Photo Paper Placing Your Original Document 1. Close the scanner lid. 10/03 EPSON Stylus Photo RX500 - 5 Open the scanner lid. 2. Close the...
Product Information Guide
Page 8
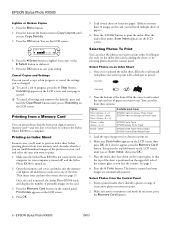
... Load several sheets of the pictures on . 4. Glossy - Load the type of paper you will need multiple sheets of the scanner glass, as you face the scanner. Make sure you 'll want to print. 1. oooo nnnn + r 4. Printing an Index Sheet In most cases, you ... Card button). 8 - Near the bottom of consecutive photos you don't even have to connect the Stylus Photo RX500 to print. 2. EPSON Stylus Photo RX500 10/03 Printing from a Memory Card You can select from the Control Panel 1. Press OK. 5. Press the x Color button to darken it doesn't appear, press the Memory...
... Load several sheets of the pictures on . 4. Glossy - Load the type of paper you will need multiple sheets of the scanner glass, as you face the scanner. Make sure you 'll want to print. 1. oooo nnnn + r 4. Printing an Index Sheet In most cases, you ... Card button). 8 - Near the bottom of consecutive photos you don't even have to connect the Stylus Photo RX500 to print. 2. EPSON Stylus Photo RX500 10/03 Printing from a Memory Card You can select from the Control Panel 1. Press OK. 5. Press the x Color button to darken it doesn't appear, press the Memory...

Product Information Guide
Page 10
... 11. Press ink cartridge. Replace the cartridge the Color button to begin replacing the ink ink. If it to EPSON's photosharing web site. Scanner error - - - > See your computer (not supported for Mac OS 8.6). Press the P On button to turn off the Stylus Photo RX500, then turn off the Stylus Photo RX500. Multi-page feed error - > Multiple pages have been...
... 11. Press ink cartridge. Replace the cartridge the Color button to begin replacing the ink ink. If it to EPSON's photosharing web site. Scanner error - - - > See your computer (not supported for Mac OS 8.6). Press the P On button to turn off the Stylus Photo RX500, then turn off the Stylus Photo RX500. Multi-page feed error - > Multiple pages have been...
Product Information Guide
Page 12
... press the x Color button. When you may dry out. Make sure the Stylus Photo RX500 is turned on the LCD screen, use the side grips to open the scanner unit, as shown. Press the Setup button to keep the scanner lid closed. 4. When done, press the OK button. Wait until you need to replace. 6. EPSON Stylus Photo RX500 10/03...
... press the x Color button. When you may dry out. Make sure the Stylus Photo RX500 is turned on the LCD screen, use the side grips to open the scanner unit, as shown. Press the Setup button to keep the scanner lid closed. 4. When done, press the OK button. Wait until you need to replace. 6. EPSON Stylus Photo RX500 10/03...
Product Information Guide
Page 13
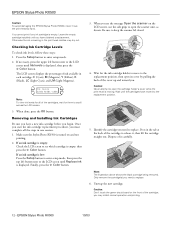
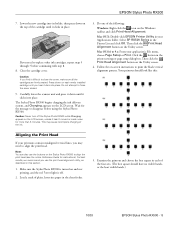
...scanner unit and press it click into place. This may need to close the cover, make sure all the cartridges are firmly seated. Click the button in each newly installed cartridge until it difficult to replace other ink cartridges, repeat steps 5 through 7 before using the Stylus Photo RX500...turn off . 2. Then click the Print Head Alignment button on the Utility screen. 4. EPSON Stylus Photo RX500 7. Press down until you find it clicks into place. The Stylus Photo RX500 begins charging the ink delivery system, and Charging appears on the Windows taskbar and click Print...
...scanner unit and press it click into place. This may need to close the cover, make sure all the cartridges are firmly seated. Click the button in each newly installed cartridge until it difficult to replace other ink cartridges, repeat steps 5 through 7 before using the Stylus Photo RX500...turn off . 2. Then click the Print Head Alignment button on the Utility screen. 4. EPSON Stylus Photo RX500 7. Press down until you find it clicks into place. The Stylus Photo RX500 begins charging the ink delivery system, and Charging appears on the Windows taskbar and click Print...
Product Support Bulletin
Page 2
...8226; Scan to open a scanned image in -One products)--Error during launch: Epson Scan cannot be started. A Total Pages: Perfection 1670/2400/3170/3200 Series Scanners & Stylus CX3200/5200/5400/6400/Stylus Photo RX500 All-in-One Products Smart Panel Compatibility on Mac OS 10.3 JD /DS ... quit. • Edit Text-Epson Scan may not work properly. Program may experience unexpected behavior and/or generate an error message and fail. These two products come with all scanner products listed above except the Stylus CX6400 and Stylus Photo RX500. The following functions and applets ...
...8226; Scan to open a scanned image in -One products)--Error during launch: Epson Scan cannot be started. A Total Pages: Perfection 1670/2400/3170/3200 Series Scanners & Stylus CX3200/5200/5400/6400/Stylus Photo RX500 All-in-One Products Smart Panel Compatibility on Mac OS 10.3 JD /DS ... quit. • Edit Text-Epson Scan may not work properly. Program may experience unexpected behavior and/or generate an error message and fail. These two products come with all scanner products listed above except the Stylus CX6400 and Stylus Photo RX500. The following functions and applets ...

Product Support Bulletin
Page 4
... 11006 depending on your model selection. 2.) Double-click on the scanner's flatbed. Test the scanner: Once the update is displayed and cannot be functional without further modifications. Page 1 of the above-named multi-function devices on the MAC desktop. A Total Pages: Epson Stylus Photo RX500, Stylus CX6400 Epson Scan Driver Release v.1.33 for Mac systems running OS 10...
... 11006 depending on your model selection. 2.) Double-click on the scanner's flatbed. Test the scanner: Once the update is displayed and cannot be functional without further modifications. Page 1 of the above-named multi-function devices on the MAC desktop. A Total Pages: Epson Stylus Photo RX500, Stylus CX6400 Epson Scan Driver Release v.1.33 for Mac systems running OS 10...
Product Support Bulletin
Page 5
... to complete the installation. Follow the prompts to extract the installation files. 2. Stylus CX6400/Stylus Photo RX500 All-in Scan and Save. o Restores functionality to www.epson.com and click on Mac OS 10.3 and 10.3.1. Epson Smart Panel Patch v3.10P01A for your scanner or multi-function device. Download the epson10973.sea.hqx file. Note: The...
... to complete the installation. Follow the prompts to extract the installation files. 2. Stylus CX6400/Stylus Photo RX500 All-in Scan and Save. o Restores functionality to www.epson.com and click on Mac OS 10.3 and 10.3.1. Epson Smart Panel Patch v3.10P01A for your scanner or multi-function device. Download the epson10973.sea.hqx file. Note: The...
Product Support Bulletin
Page 7
.... 2.) Double-click on the epsonx109xx.sea.hqx file. C Total Pages: 1 Epson Stylus Photo RX500/Stylus CX6400 Problems connecting Epson SPC units to MAC computers using OS X 10.2.7 This bulletin was created to inform you of 1 PSB.2003.12.001 Page 1 of a scanner driver update required for scanner communications. EPSON PRODUCT SUPPORT BULLETIN Date: PSB #: Reference: Product(s): Subject: 12/04...
.... 2.) Double-click on the epsonx109xx.sea.hqx file. C Total Pages: 1 Epson Stylus Photo RX500/Stylus CX6400 Problems connecting Epson SPC units to MAC computers using OS X 10.2.7 This bulletin was created to inform you of 1 PSB.2003.12.001 Page 1 of a scanner driver update required for scanner communications. EPSON PRODUCT SUPPORT BULLETIN Date: PSB #: Reference: Product(s): Subject: 12/04...

Start Here Card
Page 7
... Questions?" to the right to unlock the scanner. They give you print or scan. A... to add a printer, click Add. 2 On the next screen, select EPSON USB from the Apple menu. 2 Select the SP RX500 Series icon, then select your USB port and turn on -screen Reference Guide...RX500 LCD screen. Selecting the RX500 in Mac OS X 1 Open the OS X Applications folder, then open the Utilities folder and start up your Macintosh in OS 9.x. Any Problems? section 8. The RX500 doesn't work , try these suggestions. Make sure the ink cartridges are pushed all the way down menu. 3 Click Stylus Photo RX500...
... Questions?" to the right to unlock the scanner. They give you print or scan. A... to add a printer, click Add. 2 On the next screen, select EPSON USB from the Apple menu. 2 Select the SP RX500 Series icon, then select your USB port and turn on -screen Reference Guide...RX500 LCD screen. Selecting the RX500 in Mac OS X 1 Open the OS X Applications folder, then open the Utilities folder and start up your Macintosh in OS 9.x. Any Problems? section 8. The RX500 doesn't work , try these suggestions. Make sure the ink cartridges are pushed all the way down menu. 3 Click Stylus Photo RX500...
User's Guide
Page 2
... Epson Corporation. Trademarks Epson, Epson Stylus, and Epson Photo Stickers are registered trademarks and Epson Smart Panel, PRINT Image Matching, and the PRINT Image Matching logo are trademarks of Epson America, Inc. and Epson Connection, Epson Store, and SoundAdvice are for damages, losses, costs, or expenses incurred by improper copying or printing of the copyright laws when using digital cameras, scanners...
... Epson Corporation. Trademarks Epson, Epson Stylus, and Epson Photo Stickers are registered trademarks and Epson Smart Panel, PRINT Image Matching, and the PRINT Image Matching logo are trademarks of Epson America, Inc. and Epson Connection, Epson Store, and SoundAdvice are for damages, losses, costs, or expenses incurred by improper copying or printing of the copyright laws when using digital cameras, scanners...

User's Guide
Page 64
Close the scanner lid. 4. To switch modes, click the Pause button at the top of the screen. Select Home Mode (for basic scan settings) or Professional Mode (for advanced scan settings) from the Mode menu at the bottom of the screen. 64 Scanning to a Computer 3. Start your image in Full Auto Mode. Select Home Mode or Professional Mode here Click Pause 7. Epson Scan starts previewing your application. 5. Open the File menu and choose Import or Acquire, then select EPSON Stylus Photo RX500. 6.
Close the scanner lid. 4. To switch modes, click the Pause button at the top of the screen. Select Home Mode (for basic scan settings) or Professional Mode (for advanced scan settings) from the Mode menu at the bottom of the screen. 64 Scanning to a Computer 3. Start your image in Full Auto Mode. Select Home Mode or Professional Mode here Click Pause 7. Epson Scan starts previewing your application. 5. Open the File menu and choose Import or Acquire, then select EPSON Stylus Photo RX500. 6.
User's Guide
Page 73
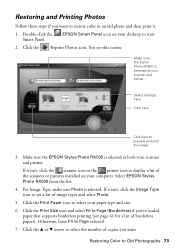
... printing (see a list of image types and select Photo. 5. EPSON Smart Panel icon on your paper type and size. 6. If it isn't, click the scanner icon or the printer icon to start 2. Select EPSON Stylus Photo RX500 from the list. 4. Click the Print Size icon and...scanner and printer. Restoring Color to Page selected. 7. Otherwise, leave Fit to Old Photographs 73 Click the u or d arrow to preview and print the image 3. Double-click the Smart Panel. You see this screen: Make sure the Stylus Photo RX500 is selected as both your computer. Make sure the EPSON Stylus Photo RX500...
... printing (see a list of image types and select Photo. 5. EPSON Smart Panel icon on your paper type and size. 6. If it isn't, click the scanner icon or the printer icon to start 2. Select EPSON Stylus Photo RX500 from the list. 4. Click the Print Size icon and...scanner and printer. Restoring Color to Page selected. 7. Otherwise, leave Fit to Old Photographs 73 Click the u or d arrow to preview and print the image 3. Double-click the Smart Panel. You see this screen: Make sure the Stylus Photo RX500 is selected as both your computer. Make sure the EPSON Stylus Photo RX500...

User's Guide
Page 77
..., choose Import or Acquire, and select EPSON Stylus Photo RX500. In Windows, select Start > All Programs or Programs > EPSON Scan > EPSON Scan. Note: If you can't tell which side is less shiny, look for a faint stamp on the slide mount that side face down 7. Close the scanner lid. 8. Do one of the following...: ■ Start EPSON Scan from your TWAIN-compliant application. Scanning Slides and Film 77 Position the slides in the film holder as ...
..., choose Import or Acquire, and select EPSON Stylus Photo RX500. In Windows, select Start > All Programs or Programs > EPSON Scan > EPSON Scan. Note: If you can't tell which side is less shiny, look for a faint stamp on the slide mount that side face down 7. Close the scanner lid. 8. Do one of the following...: ■ Start EPSON Scan from your TWAIN-compliant application. Scanning Slides and Film 77 Position the slides in the film holder as ...

User's Guide
Page 137
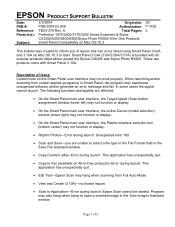
Epson Stylus Photo RX500 Parts Left edge guide Paper support Feeder guard Document mat Scanner lid On button Transportation lock USB cable (not included) LCD screen Scanner glass Control panel Output tray Scanner section Memory card slot cover Ink cartridges
Epson Stylus Photo RX500 Parts Left edge guide Paper support Feeder guard Document mat Scanner lid On button Transportation lock USB cable (not included) LCD screen Scanner glass Control panel Output tray Scanner section Memory card slot cover Ink cartridges


