
How To Copy and Print Booklet
Page 7
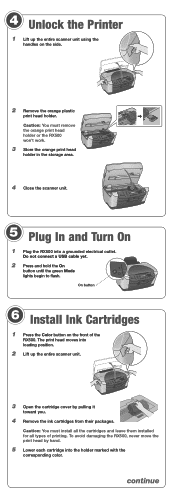
Wait a minute while it warms up. Copy button LCD screen and navigation buttons On button Menu button OK button 11 Press the Copy button. 12 Press the Menu button. You see BorderFree 15 Press the OK button. Copy Layout Color button 13 Press the OK button. 14 Press the green button next to the screen to turn on the RX500. Copy Layout 2.BorderFree 7 Press until you see this screen: Copy Menu 1. 9 Close the scanner lid. 10 Press the P On button to display BorderFree.
Wait a minute while it warms up. Copy button LCD screen and navigation buttons On button Menu button OK button 11 Press the Copy button. 12 Press the Menu button. You see BorderFree 15 Press the OK button. Copy Layout Color button 13 Press the OK button. 14 Press the green button next to the screen to turn on the RX500. Copy Layout 2.BorderFree 7 Press until you see this screen: Copy Menu 1. 9 Close the scanner lid. 10 Press the P On button to display BorderFree.

How To Copy and Print Booklet
Page 11
Wait a minute while it warms up. 8 Open the memory card slot cover. On button Memory card slot cover 11 6 Flip the feeder guard back over the paper. 7 Press the P On button to turn on the RX500.
Wait a minute while it warms up. 8 Open the memory card slot cover. On button Memory card slot cover 11 6 Flip the feeder guard back over the paper. 7 Press the P On button to turn on the RX500.

How To Copy and Print Booklet
Page 12
Be careful not to force it (it won't go in all the way). Found Images... Do not insert more than one card at a time. CompactFlash™ or Microdrive™ (bottom) Memory Stick® (middle) SmartMedia™ (top) SD or MMC (middle) xD (top) The memory card light turns green. 10 Close the memory card slot cover. The message Found Images appears on the LCD screen. Total 5 OK 12 9 Insert your memory card into the correct slot.
Be careful not to force it (it won't go in all the way). Found Images... Do not insert more than one card at a time. CompactFlash™ or Microdrive™ (bottom) Memory Stick® (middle) SmartMedia™ (top) SD or MMC (middle) xD (top) The memory card light turns green. 10 Close the memory card slot cover. The message Found Images appears on the LCD screen. Total 5 OK 12 9 Insert your memory card into the correct slot.

How To Copy and Print Booklet
Page 18
... in your User's Guide for more information about Color Restoration. 18 You can bring them back to see this setting in Smart Panel or EPSON Scan. ❍ In Smart Panel, click the Reprint Photos icon, then click the Color Restoration icon on the screen that appears. Then select... the Color Restoration check box. (You may have faded photos or negatives, you have to scroll to life using the Color Restoration setting in your scanner software. The icon turns blue. ❍ In EPSON Scan,...
... in your User's Guide for more information about Color Restoration. 18 You can bring them back to see this setting in Smart Panel or EPSON Scan. ❍ In Smart Panel, click the Reprint Photos icon, then click the Color Restoration icon on the screen that appears. Then select... the Color Restoration check box. (You may have faded photos or negatives, you have to scroll to life using the Color Restoration setting in your scanner software. The icon turns blue. ❍ In EPSON Scan,...

Product Brochure
Page 1
... ppm color) - Handy photo proof sheet lets you choose the images you want to -card technology - The feature-rich Epson Stylus Photo RX500 all-in transparency adapter - Offers innovative scan-to print from your PC Epson Easy Photo Fix™ scanning technology - Creates brilliant results with built-in -one delivers superior Photo Quality prints, copies and scans, even without turning...
... ppm color) - Handy photo proof sheet lets you choose the images you want to -card technology - The feature-rich Epson Stylus Photo RX500 all-in transparency adapter - Offers innovative scan-to print from your PC Epson Easy Photo Fix™ scanning technology - Creates brilliant results with built-in -one delivers superior Photo Quality prints, copies and scans, even without turning...
Product Information Guide
Page 5
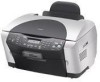
... Glossy Photo Paper EPSON Glossy Photo Greeting Cards Glossy Photo Paper EPSON Premium Glossy Photo Paper EPSON Photo Stickers®* Premium Glossy Photo Paper EPSON Premium Luster Photo Paper Premium Luster Photo Paper EPSON Premium Semigloss Photo Paper Premium Semigloss Photo Paper Placing Your Original Document 1. Close the scanner lid. Open the scanner lid. 2. EPSON Stylus Photo RX500 Envelopes 1. Close the scanner lid. 10/03 EPSON Stylus Photo RX500 - 5 Be sure to turn the Stylus Photo RX500...
... Glossy Photo Paper EPSON Glossy Photo Greeting Cards Glossy Photo Paper EPSON Premium Glossy Photo Paper EPSON Photo Stickers®* Premium Glossy Photo Paper EPSON Premium Luster Photo Paper Premium Luster Photo Paper EPSON Premium Semigloss Photo Paper Premium Semigloss Photo Paper Placing Your Original Document 1. Close the scanner lid. Open the scanner lid. 2. EPSON Stylus Photo RX500 Envelopes 1. Close the scanner lid. 10/03 EPSON Stylus Photo RX500 - 5 Be sure to turn the Stylus Photo RX500...
Product Information Guide
Page 8
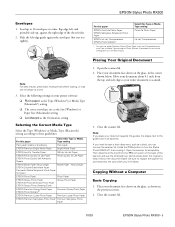
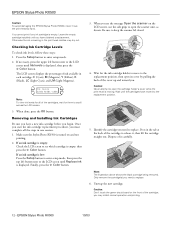
...appears on the LCD screen, then press OK. (If it . 5. EPSON Stylus Photo RX500 10/03 Then insert your images are automatically printed. Print Index appears on the control panel. Press the x Color button. Make sure you see page 3). Press the OK button. After the...the x Stop button. Selecting Photos To Print You can select from the Control Panel 1. Correct Incorrect 2. Glossy - You can select the photos you see this LCD screen: Copy Menu o l - Make sure the Stylus Photo RX500 is turned on the LCD screen. EPSON Stylus Photo RX500 Lighten or Darken Copies 1. ...
...appears on the LCD screen, then press OK. (If it . 5. EPSON Stylus Photo RX500 10/03 Then insert your images are automatically printed. Print Index appears on the control panel. Press the x Color button. Make sure you see page 3). Press the OK button. After the...the x Stop button. Selecting Photos To Print You can select from the Control Panel 1. Correct Incorrect 2. Glossy - You can select the photos you see this LCD screen: Copy Menu o l - Make sure the Stylus Photo RX500 is turned on the LCD screen. EPSON Stylus Photo RX500 Lighten or Darken Copies 1. ...

Product Information Guide
Page 10
...turn off the Stylus Photo RX500, then turn off the Stylus Photo RX500. Service required. Scan to E-mail Scans an image and uploads it with the replacement is not right. Check to make sure the transportation lock is not positioned correctly on the scanner glass. Press the P On button to turn it to install new ink installed. The Stylus Photo RX500...necessary. described on it until it opens in correctly. Press the x Color button to EPSON's photosharing web site. EPSON Stylus Photo RX500 Smart Panel Features Edit Text View and Create Description Scans text documents ...
...turn off the Stylus Photo RX500, then turn off the Stylus Photo RX500. Service required. Scan to E-mail Scans an image and uploads it with the replacement is not right. Check to make sure the transportation lock is not positioned correctly on the scanner glass. Press the P On button to turn it to install new ink installed. The Stylus Photo RX500...necessary. described on it until it opens in correctly. Press the x Color button to EPSON's photosharing web site. EPSON Stylus Photo RX500 Smart Panel Features Edit Text View and Create Description Scans text documents ...
Product Information Guide
Page 11
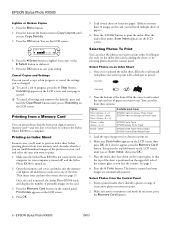
...you may cause damage to your EPSON Stylus Photo RX500 not covered by EPSON's warranty. Print head cleaning uses ink, so clean it hasn't moved or made noise for instructions. error light is loaded. You see the next section.) 2. Press the x Color button. If you don't see ...Head Cleaning Press the Color Make sure letter-size plain paper is off the Stylus Photo RX500 while the message Head Cleaning appears on , you may need to turn off . (If the ! error light on the EPSON Stylus Photo RX500 is turned on the LCD screen, then press the x Color button. You can deliver...
...you may cause damage to your EPSON Stylus Photo RX500 not covered by EPSON's warranty. Print head cleaning uses ink, so clean it hasn't moved or made noise for instructions. error light is loaded. You see the next section.) 2. Press the x Color button. If you don't see ...Head Cleaning Press the Color Make sure letter-size plain paper is off the Stylus Photo RX500 while the message Head Cleaning appears on , you may need to turn off . (If the ! error light on the EPSON Stylus Photo RX500 is turned on the LCD screen, then press the x Color button. You can deliver...
Product Information Guide
Page 12
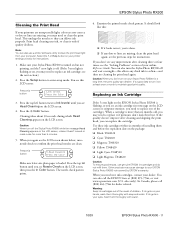
... the print head is empty, then press the x Color button. Press in one session. 1. Note: The illustration above shows the black cartridge being removed. EPSON Stylus Photo RX500 10/03 EPSON Stylus Photo RX500 Caution: To avoid damaging the EPSON Stylus Photo RX500, never move to the LCD screen until Ink levels ...press the x Color button. 3. Press the Setup button to replace. 6. You cannot print if any ink cartridge is turned on the front of ink available in the print head nozzles may inhibit normal operation and printing. 12 - Make sure the Stylus Photo RX500 is empty. ...
... the print head is empty, then press the x Color button. Press in one session. 1. Note: The illustration above shows the black cartridge being removed. EPSON Stylus Photo RX500 10/03 EPSON Stylus Photo RX500 Caution: To avoid damaging the EPSON Stylus Photo RX500, never move to the LCD screen until Ink levels ...press the x Color button. 3. Press the Setup button to replace. 6. You cannot print if any ink cartridge is turned on the front of ink available in the print head nozzles may inhibit normal operation and printing. 12 - Make sure the Stylus Photo RX500 is empty. ...
Product Information Guide
Page 13
... to close the cover, make sure all the cartridges are firmly seated. Mac OS X: Double-click EPSON Printer Utility in place. Make sure the Stylus Photo RX500 is off the Stylus Photo RX500 while Charging appears on and not printing, and the red ! Load a stack of the following: ... should have no visible bands, or the least visible bands.) 10/03 EPSON Stylus Photo RX500 - 13 error light is turned on the LCD screen, unless it down on -screen instructions to force the cover closed. 9. EPSON Stylus Photo RX500 7. Wait for more than 5 minutes. Click the button in the Printer...
... to close the cover, make sure all the cartridges are firmly seated. Mac OS X: Double-click EPSON Printer Utility in place. Make sure the Stylus Photo RX500 is off the Stylus Photo RX500 while Charging appears on and not printing, and the red ! Load a stack of the following: ... should have no visible bands, or the least visible bands.) 10/03 EPSON Stylus Photo RX500 - 13 error light is turned on the LCD screen, unless it down on -screen instructions to force the cover closed. 9. EPSON Stylus Photo RX500 7. Wait for more than 5 minutes. Click the button in the Printer...

Product Support Bulletin
Page 4
With the multi-function device turned on and connected to the Mac computer system, after you of the above-named multi-function devices on the MAC desktop. epson11006.sea.hqx for Stylus Photo RX500) for TWAIN Driver and Epson Scan Utility v.1.33A in progress, please wait..." 2.... error message is completed and the system restarted, place a photo on the correct driver package. A Total Pages: Epson Stylus Photo RX500, Stylus CX6400 Epson Scan Driver Release v.1.33 for Mac systems using any one of an updated Epson Scan Twain Driver (v.1.33A) for CX6400; Installing the updated scanner...
With the multi-function device turned on and connected to the Mac computer system, after you of the above-named multi-function devices on the MAC desktop. epson11006.sea.hqx for Stylus Photo RX500) for TWAIN Driver and Epson Scan Utility v.1.33A in progress, please wait..." 2.... error message is completed and the system restarted, place a photo on the correct driver package. A Total Pages: Epson Stylus Photo RX500, Stylus CX6400 Epson Scan Driver Release v.1.33 for Mac systems using any one of an updated Epson Scan Twain Driver (v.1.33A) for CX6400; Installing the updated scanner...

Product Support Bulletin
Page 6
Action Required: If the computer locks up during bootup, disconnect the multi-function device from the computer and turn it on. EPSON Product Support Bulletin Date: 2/2/2004 Originator: AP PSB #: PSB.2004.02.002 Authorization: Reference: TE03-265 Rev. Page 1 of Dell...ROM chip. Reason: The ROM's for bootup problems that can occur when a Stylus Photo RX500 or Stylus CX6400 multi-function device is ignored by the Epson product which causes the computer to hang during bootup to the Epson multi-function device, the query is connected to inform you of these computers ...
Action Required: If the computer locks up during bootup, disconnect the multi-function device from the computer and turn it on. EPSON Product Support Bulletin Date: 2/2/2004 Originator: AP PSB #: PSB.2004.02.002 Authorization: Reference: TE03-265 Rev. Page 1 of Dell...ROM chip. Reason: The ROM's for bootup problems that can occur when a Stylus Photo RX500 or Stylus CX6400 multi-function device is ignored by the Epson product which causes the computer to hang during bootup to the Epson multi-function device, the query is connected to inform you of these computers ...
Start Here Card
Page 3
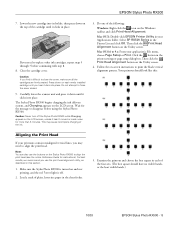
...front of printing. Caution: You must remove the orange print head holder or the RX500 won't work. 3 Store the orange print head holder in the storage area. 4 Close the scanner unit. 5 Plug In and Turn On 1 Plug the RX500 into a grounded electrical outlet. Do not connect a USB cable yet. 2 Press... until the green Mode lights begin to flash. To avoid damaging the RX500, never move the print head by pulling it toward you. 4 Remove the ink cartridges from their packages. On button 6 Install Ink Cartridges 1 Press the Color button on the side. 2 Remove the orange plastic print head holder...
...front of printing. Caution: You must remove the orange print head holder or the RX500 won't work. 3 Store the orange print head holder in the storage area. 4 Close the scanner unit. 5 Plug In and Turn On 1 Plug the RX500 into a grounded electrical outlet. Do not connect a USB cable yet. 2 Press... until the green Mode lights begin to flash. To avoid damaging the RX500, never move the print head by pulling it toward you. 4 Remove the ink cartridges from their packages. On button 6 Install Ink Cartridges 1 Press the Color button on the side. 2 Remove the orange plastic print head holder...

Start Here Card
Page 4
...force the cartridge cover closed. Then close easily, open it and make sure all the ink cartridges are firmly seated. 7 Lower the scanner unit. The RX500 begins charging the ink delivery system. Note: If you 'll waste ink. 7 Load Paper 1 Insert the paper support into place. Position the connector as... shown here before pushing it . 3 Open the output tray. 4 Flip the feeder guard forward. 5 Place a stack of paper in . Note: Don't turn the RX500 off while you see the Initial Charge message or you forget to the round connector on the back of paper. If it clicks into the...
...force the cartridge cover closed. Then close easily, open it and make sure all the ink cartridges are firmly seated. 7 Lower the scanner unit. The RX500 begins charging the ink delivery system. Note: If you 'll waste ink. 7 Load Paper 1 Insert the paper support into place. Position the connector as... shown here before pushing it . 3 Open the output tray. 4 Flip the feeder guard forward. 5 Place a stack of paper in . Note: Don't turn the RX500 off while you see the Initial Charge message or you forget to the round connector on the back of paper. If it clicks into the...

Start Here Card
Page 5
... to continue. Then double-click the EPSON CD-ROM icon. 4 Read the license agreement and click Agree to your computer, then turn on your computer. Caution: Make sure the USB cable fits securely into the slot. Wait for each one and disconnect the RX500. continue You can't install your software... that way. 2 Insert the Epson CD-ROM in the slot as shown. If ...
... to continue. Then double-click the EPSON CD-ROM icon. 4 Read the license agreement and click Agree to your computer, then turn on your computer. Caution: Make sure the USB cable fits securely into the slot. Wait for each one and disconnect the RX500. continue You can't install your software... that way. 2 Insert the Epson CD-ROM in the slot as shown. If ...

Start Here Card
Page 6
... as instructed, then remove the CD-ROM. EPSON OS 8 and 9 Note: Installation may snap if the cable is not routed correctly and the scanner is closed with installation. 7 When you 're ready to continue. 5 Follow the instructions on the RX500. Note: Installation may need to install the software.... The USB connector may take several minutes. continue Caution: Make sure the USB cable fits securely into the USB port on the screen to enter your software is turned on, then lift up the ...
... as instructed, then remove the CD-ROM. EPSON OS 8 and 9 Note: Installation may snap if the cable is not routed correctly and the scanner is closed with installation. 7 When you 're ready to continue. 5 Follow the instructions on the RX500. Note: Installation may need to install the software.... The USB connector may take several minutes. continue Caution: Make sure the USB cable fits securely into the USB port on the screen to enter your software is turned on, then lift up the ...

Start Here Card
Page 7
... information, see a screen asking if you 're ready to add a printer, click Add. 2 On the next screen, select EPSON USB from the Apple menu. 2 Select the SP RX500 Series icon, then select your computer, plugged into a power source, and turned on. See section 2. Try connecting the USB cable to your USB port and.... section 8. Slide the transportation lock under the lid to unlock the scanner. Make sure the ink cartridges are pushed all the way down menu. 3 Click Stylus Photo RX500. If it is listed here, try reinstalling the software.
... information, see a screen asking if you 're ready to add a printer, click Add. 2 On the next screen, select EPSON USB from the Apple menu. 2 Select the SP RX500 Series icon, then select your computer, plugged into a power source, and turned on. See section 2. Try connecting the USB cable to your USB port and.... section 8. Slide the transportation lock under the lid to unlock the scanner. Make sure the ink cartridges are pushed all the way down menu. 3 Click Stylus Photo RX500. If it is listed here, try reinstalling the software.

User's Guide
Page 7
...■ Lets you print without even turning on a variety of scanning and stand-alone copying with each JPEG or TIFF image file. Your RX500 detects that comes with your computer. ...directly from your memory card, without borders on your RX500. 7 The Epson Stylus® Photo RX500 combines the convenience of popular paper sizes. ■ Supports Epson's PRINT Image Matching™ technology and the Exif ... card to your computer, or vice versa. ■ Includes photo restoration features to restore faded color photos to their original brilliance. ■ Includes a built-in transparency...
...■ Lets you print without even turning on a variety of scanning and stand-alone copying with each JPEG or TIFF image file. Your RX500 detects that comes with your computer. ...directly from your memory card, without borders on your RX500. 7 The Epson Stylus® Photo RX500 combines the convenience of popular paper sizes. ■ Supports Epson's PRINT Image Matching™ technology and the Exif ... card to your computer, or vice versa. ■ Includes photo restoration features to restore faded color photos to their original brilliance. ■ Includes a built-in transparency...

User's Guide
Page 20
Note: To copy a thick document such as you can remove the scanner lid. Open the scanner lid completely. Feeder guard Output tray 20 Copying 3. Flip the feeder guard forward. Then disconnect the cord from the TPU connector and pull the lid straight up. When you're finished, be sure to keep it flat on the scanner glass as a book, you scan. Open the output tray. 5. Close the scanner lid. Turn on the RX500 and gently press down the original to turn off the RX500 before replacing the scanner lid and plugging in the connector. 4.
Note: To copy a thick document such as you can remove the scanner lid. Open the scanner lid completely. Feeder guard Output tray 20 Copying 3. Flip the feeder guard forward. Then disconnect the cord from the TPU connector and pull the lid straight up. When you're finished, be sure to keep it flat on the scanner glass as a book, you scan. Open the output tray. 5. Close the scanner lid. Turn on the RX500 and gently press down the original to turn off the RX500 before replacing the scanner lid and plugging in the connector. 4.


