How To Copy and Print Booklet
Page 3
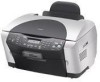
See some examples on setting up your RX500 and connecting it to a computer, see your User's Guide. For instructions on pages 17 and 18. For detailed instructions on using your Epson Stylus® Photo RX500 without your computer? Try the step-by-step instructions in this booklet for these projects: ❍ Copying a 4 × 6-inch photo (page 4) ❍ Printing photos from a memory card (page 9) There's much more you can do with your Stylus Photo RX500! Welcome Did you know you can copy and print using the RX500, see the Start Here sheet. 3
See some examples on setting up your RX500 and connecting it to a computer, see your User's Guide. For instructions on pages 17 and 18. For detailed instructions on using your Epson Stylus® Photo RX500 without your computer? Try the step-by-step instructions in this booklet for these projects: ❍ Copying a 4 × 6-inch photo (page 4) ❍ Printing photos from a memory card (page 9) There's much more you can do with your Stylus Photo RX500! Welcome Did you know you can copy and print using the RX500, see the Start Here sheet. 3
How To Copy and Print Booklet
Page 17
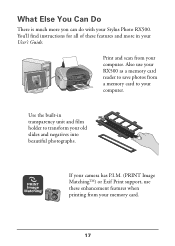
Print and scan from your memory card. 17 If your camera has P.I.M. (PRINT Image MatchingTM) or Exif Print support, use your RX500 as a memory card reader to save photos from a memory card to transform your old slides and negatives into beautiful photographs. Use the built-in your User's Guide. What Else You Can Do There is much more in transparency unit and film holder to your computer. You'll find instructions for all of these enhancement features when printing from your Stylus Photo RX500. Also use these features and more you can do with your computer.
Print and scan from your memory card. 17 If your camera has P.I.M. (PRINT Image MatchingTM) or Exif Print support, use your RX500 as a memory card reader to save photos from a memory card to transform your old slides and negatives into beautiful photographs. Use the built-in your User's Guide. What Else You Can Do There is much more in transparency unit and film holder to your computer. You'll find instructions for all of these enhancement features when printing from your Stylus Photo RX500. Also use these features and more you can do with your computer.

How To Copy and Print Booklet
Page 18
... the Color Restoration setting in your User's Guide for more information about Color Restoration. 18 You can bring them back to see this setting in your scanner software. Then select the Color Restoration check box. (You may have faded photos or negatives, you can select this option.) See the Scanning chapter in Smart Panel or EPSON Scan...
... the Color Restoration setting in your User's Guide for more information about Color Restoration. 18 You can bring them back to see this setting in your scanner software. Then select the Color Restoration check box. (You may have faded photos or negatives, you can select this option.) See the Scanning chapter in Smart Panel or EPSON Scan...
Product Information Guide
Page 3
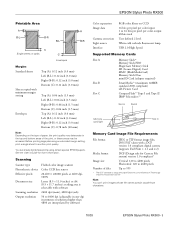
...resolution Output resolution Flatbed color image scanner Color CCD line sensor 20,400 × 28,080 pixels at 2400 dpi, 100% Letter (8.5 × 11.0 inches) or A4 (8.5 × 11.7 inches); EPSON Stylus Photo RX500 Printable Area A B-L...color output 48 bits total User defined 2 level White cold cathode fluorescent lamp USB 2.0 High Speed Supported Memory Cards Slot A Slot B Slot C Memory Stick® Memory Stick PRO MagicGate Memory Stick SD (Secure Digital) Card MMC (MultiMediaCard) Memory Stick Duo miniSD Card (adapter required) SmartMedia™ (maximum 128MB; See the User's Guide...
...resolution Output resolution Flatbed color image scanner Color CCD line sensor 20,400 × 28,080 pixels at 2400 dpi, 100% Letter (8.5 × 11.0 inches) or A4 (8.5 × 11.7 inches); EPSON Stylus Photo RX500 Printable Area A B-L...color output 48 bits total User defined 2 level White cold cathode fluorescent lamp USB 2.0 High Speed Supported Memory Cards Slot A Slot B Slot C Memory Stick® Memory Stick PRO MagicGate Memory Stick SD (Secure Digital) Card MMC (MultiMediaCard) Memory Stick Duo miniSD Card (adapter required) SmartMedia™ (maximum 128MB; See the User's Guide...
Product Information Guide
Page 9
EPSON Stylus Photo RX500 3. Then press OK. 5. Press the Memory Card button to print your Stylus Photo RX500. Using the numeric keypad, enter the number of copies of consecutive images, follow these features: Smart Panel Features Description Scans and prints photos in memory card mode, see the User's Guide or online Reference Guide... 3. RePrint Photos Scan and Save Scans a photo into your computer asking you to select the program to print while the card is still in memory card mode, see the User's Guide or online Reference Guide. Then press the x Color button to ...
EPSON Stylus Photo RX500 3. Then press OK. 5. Press the Memory Card button to print your Stylus Photo RX500. Using the numeric keypad, enter the number of copies of consecutive images, follow these features: Smart Panel Features Description Scans and prints photos in memory card mode, see the User's Guide or online Reference Guide... 3. RePrint Photos Scan and Save Scans a photo into your computer asking you to select the program to print while the card is still in memory card mode, see the User's Guide or online Reference Guide. Then press the x Color button to ...

Product Information Guide
Page 10
... To diagnose some problems, check the LCD screen on the Stylus Photo RX500 for guidelines. Paper jam - - - > Press the Color button. Load paper in the User's Guide or online Reference Guide. Make sure you choose which program it clicks securely into place. Service required. Contact your dealer or EPSON, as described in the sheet feeder, then press the...
... To diagnose some problems, check the LCD screen on the Stylus Photo RX500 for guidelines. Paper jam - - - > Press the Color button. Load paper in the User's Guide or online Reference Guide. Make sure you choose which program it clicks securely into place. Service required. Contact your dealer or EPSON, as described in the sheet feeder, then press the...
Product Information Guide
Page 14
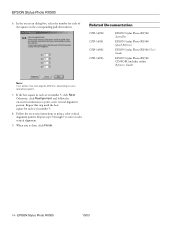
... each set is number 5. 8. Related Documentation CPD-16980 CPD-16981 CPD-16982 CPD-16983 EPSON Stylus Photo RX500 Start Here EPSON Stylus Photo RX500 Quick Reference EPSON Stylus Photo RX500 User's Guide EPSON Stylus Photo RX500 CD-ROM (includes online Reference Guide) Note: Your screen may look slightly different, depending on -screen instructions to correct color vertical alignment. 9. When you're done, click Finish. 14 - Otherwise, click Realignment and follow...
... each set is number 5. 8. Related Documentation CPD-16980 CPD-16981 CPD-16982 CPD-16983 EPSON Stylus Photo RX500 Start Here EPSON Stylus Photo RX500 Quick Reference EPSON Stylus Photo RX500 User's Guide EPSON Stylus Photo RX500 CD-ROM (includes online Reference Guide) Note: Your screen may look slightly different, depending on -screen instructions to correct color vertical alignment. 9. When you're done, click Finish. 14 - Otherwise, click Realignment and follow...

Start Here Card
Page 1
If any parts are missing, contact Epson® as described on the back of this sheet. EPSON Stylus Photo RX500 EPSON Stylus® Photo RX500 Start Here 4043426-00 Printed in XXX CPD-16980R2 4051205-00 XXX 1 Unpack 1 Make sure you have all the tape. Software CD-ROM Ink cartridges (6 total) Document mat continue Stylus Photo RX500 User's Guide How To Copy and Print Film holder Paper support 2 Remove all the parts shown here.
If any parts are missing, contact Epson® as described on the back of this sheet. EPSON Stylus Photo RX500 EPSON Stylus® Photo RX500 Start Here 4043426-00 Printed in XXX CPD-16980R2 4051205-00 XXX 1 Unpack 1 Make sure you have all the tape. Software CD-ROM Ink cartridges (6 total) Document mat continue Stylus Photo RX500 User's Guide How To Copy and Print Film holder Paper support 2 Remove all the parts shown here.

Start Here Card
Page 7
... software Help, User's Guide, or your RX500 is listed here, try reinstalling the software. section 8. Try connecting the USB cable to clear the error. See section 8. Note: If the RX500 doesn't appear, make sure it still doesn't work . See section 2. Make sure the ink cartridges are pushed all the way down menu. 3 Click Stylus Photo RX500. If...
... software Help, User's Guide, or your RX500 is listed here, try reinstalling the software. section 8. Try connecting the USB cable to clear the error. See section 8. Note: If the RX500 doesn't appear, make sure it still doesn't work . See section 2. Make sure the ink cartridges are pushed all the way down menu. 3 Click Stylus Photo RX500. If...

Start Here Card
Page 8
... How To Copy and Print Quick steps for the RX500 or EPSON Scan) • World Wide Web http://support.epson.com • Automated Telephone Services To use genuine Epson ink and paper. On-screen EPSON Stylus Photo RX500 Reference Guide Additional details about your printer software. Glossy on the... be trademarks of their respective owners. In Canada, please call (800) 922-8911. Look for dealer referral. EPSON Stylus Photo RX500 User's Guide Comprehensive instructions for everything you must have a touch tone telephone and call (800) 463-7766 for these services, you can...
... How To Copy and Print Quick steps for the RX500 or EPSON Scan) • World Wide Web http://support.epson.com • Automated Telephone Services To use genuine Epson ink and paper. On-screen EPSON Stylus Photo RX500 Reference Guide Additional details about your printer software. Glossy on the... be trademarks of their respective owners. In Canada, please call (800) 922-8911. Look for dealer referral. EPSON Stylus Photo RX500 User's Guide Comprehensive instructions for everything you must have a touch tone telephone and call (800) 463-7766 for these services, you can...
User's Guide
Page 1
Epson Stylus® Photo RX500 User's Guide
Epson Stylus® Photo RX500 User's Guide

User's Guide
Page 33
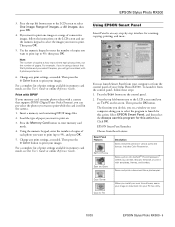
If you need to start copying. on -screen Smart Panel User's Guide or click ? 17. Copying With a Computer 33 Click the Copy button to stop copying in progress, click the Stop button. Note: For more information about ... any of the following settings: ■ Enable or disable Automatic Document Enhancement. (This feature automatically enhances the color and appearance of your copies.) Note: Disabling the Automatic Document Enhancement feature may cause a gray or light colored background to appear on your copies. ■ Add a sepia, blue, or black filter. ■ Adjust brightness...
If you need to start copying. on -screen Smart Panel User's Guide or click ? 17. Copying With a Computer 33 Click the Copy button to stop copying in progress, click the Stop button. Note: For more information about ... any of the following settings: ■ Enable or disable Automatic Document Enhancement. (This feature automatically enhances the color and appearance of your copies.) Note: Disabling the Automatic Document Enhancement feature may cause a gray or light colored background to appear on your copies. ■ Add a sepia, blue, or black filter. ■ Adjust brightness...
User's Guide
Page 59
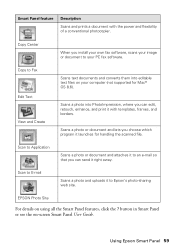
... it right away. button in Smart Panel or see the on using all the Smart Panel features, click the ? EPSON Photo Site For details on -screen Smart Panel User Guide. Scan to E-mail Scans a photo and uploads it to an e-mail so that you can send it with the power and flexibility of a conventional photocopier...
... it right away. button in Smart Panel or see the on using all the Smart Panel features, click the ? EPSON Photo Site For details on -screen Smart Panel User Guide. Scan to E-mail Scans a photo and uploads it to an e-mail so that you can send it with the power and flexibility of a conventional photocopier...


