Product Brochure
Page 2
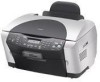
... One year limited in Fine Mode on Glossy Photo Paper. Epson, Epson Stylus, and Micro Piezo are trademarks of use. CPD-17099 10/03 25K WP PRINTER, COPIER, SCANNER, CARD READER STYLUS® PHOTO RX500 SPECIFICATIONS Printer Printing Technology 6-color (CcMmYK) drop-on-demand Micro Piezo®... to 17 ppm Color text up to change without notice. Windows 98SE, Me, 2000, XP Windows Hi-Speed USB 2.0-Windows 2000, XP Macintosh® USB - Color photo is a trademark of their respective companies. Epson America, Inc. 3840 Kilroy Airport Way, Long Beach, CA 90806 Epson Canada, Ltd. ...
... One year limited in Fine Mode on Glossy Photo Paper. Epson, Epson Stylus, and Micro Piezo are trademarks of use. CPD-17099 10/03 25K WP PRINTER, COPIER, SCANNER, CARD READER STYLUS® PHOTO RX500 SPECIFICATIONS Printer Printing Technology 6-color (CcMmYK) drop-on-demand Micro Piezo®... to 17 ppm Color text up to change without notice. Windows 98SE, Me, 2000, XP Windows Hi-Speed USB 2.0-Windows 2000, XP Macintosh® USB - Color photo is a trademark of their respective companies. Epson America, Inc. 3840 Kilroy Airport Way, Long Beach, CA 90806 Epson Canada, Ltd. ...
Product Information Guide
Page 5
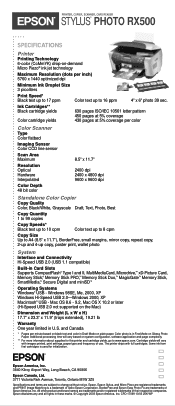
... connector on the glass, as the Orientation setting Selecting the Correct Media Type Select the Type (Windows) or Media Type (Macintosh) setting according to the guides won't be scanned. Gently press down on the document table. EPSON Stylus Photo RX500 Envelopes 1. Open the scanner lid. 2. Press the P On button to keep it . Place your document...
... connector on the glass, as the Orientation setting Selecting the Correct Media Type Select the Type (Windows) or Media Type (Macintosh) setting according to the guides won't be scanned. Gently press down on the document table. EPSON Stylus Photo RX500 Envelopes 1. Open the scanner lid. 2. Press the P On button to keep it . Place your document...
Product Information Guide
Page 9
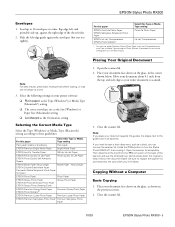
..., retouch, enhance, or print it . 6. To launch it from these steps: 1. EPSON Smart Panel launches. Includes Color Restoration. RePrint Photos Scan and Save Scans a photo into your PC fax utility. 10/03 EPSON Stylus Photo RX500 - 9 Then press OK. 5. Note: The number of your image or document into...as needed . For a complete list of consecutive images, follow these features: Smart Panel Features Description Scans and prints photos in memory card mode, see a window on the LCD screen and use this program for this action. Insert a memory card containing DPOF image files. ...
..., retouch, enhance, or print it . 6. To launch it from these steps: 1. EPSON Smart Panel launches. Includes Color Restoration. RePrint Photos Scan and Save Scans a photo into your PC fax utility. 10/03 EPSON Stylus Photo RX500 - 9 Then press OK. 5. Note: The number of your image or document into...as needed . For a complete list of consecutive images, follow these features: Smart Panel Features Description Scans and prints photos in memory card mode, see a window on the LCD screen and use this program for this action. Insert a memory card containing DPOF image files. ...
Product Information Guide
Page 11
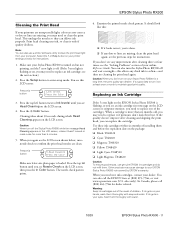
... 3.Head Cleaning Press the Color Make sure letter-size plain paper is flashing, or you see an ink cartridge error message on the EPSON Stylus Photo RX500 is loaded. Press the Setup button to maintain good print quality. Press the top left button (next to replace one of your printer settings window for a long time, the...
... 3.Head Cleaning Press the Color Make sure letter-size plain paper is flashing, or you see an ink cartridge error message on the EPSON Stylus Photo RX500 is loaded. Press the Setup button to maintain good print quality. Press the top left button (next to replace one of your printer settings window for a long time, the...
Product Information Guide
Page 13
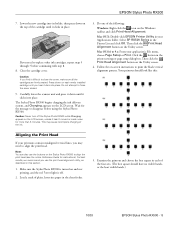
... align the print head (see the online Reference Guide for more than 5 minutes. The Stylus Photo RX500 begins charging the ink delivery system, and Charging appears on the Windows taskbar and click Print Head Alignment. Click the button in place. Examine the printout and ...is turned on the LCD screen, unless it clicks into place. EPSON Stylus Photo RX500 7. Wait for the message to replace other ink cartridges, repeat steps 5 through 7 before using the Stylus Photo RX500. Mac OS X: Double-click EPSON Printer Utility in the Printer List and click OK. Your printout ...
... align the print head (see the online Reference Guide for more than 5 minutes. The Stylus Photo RX500 begins charging the ink delivery system, and Charging appears on the Windows taskbar and click Print Head Alignment. Click the button in place. Examine the printout and ...is turned on the LCD screen, unless it clicks into place. EPSON Stylus Photo RX500 7. Wait for the message to replace other ink cartridges, repeat steps 5 through 7 before using the Stylus Photo RX500. Mac OS X: Double-click EPSON Printer Utility in the Printer List and click OK. Your printout ...
Product Support Bulletin
Page 1
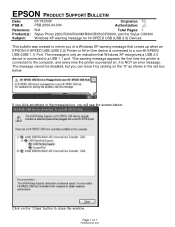
EPSON PRODUCT SUPPORT BULLETIN Date: PSB #: Reference: Product(s): Subject: 03/18/2004 PSB.2004.04.004 Originator: TC Authorization: N/A Total Pages: 1 Stylus Photo 2200/R300/R300M/R800/RX500/RX600, and the Stylus CX6400 Windows XP warning message for HI-SPEED USB (USB 2.0) Devices This bulletin was created to ...port. The message is only an indication that comes up when an EPSON HI-SPEED USB (USB 2.0) Printer or All-in the message box, you can close the window. Page 1 of a Windows XP warning message that Windows XP recognizes a USB 2.0 device is connected to the computer, ...
EPSON PRODUCT SUPPORT BULLETIN Date: PSB #: Reference: Product(s): Subject: 03/18/2004 PSB.2004.04.004 Originator: TC Authorization: N/A Total Pages: 1 Stylus Photo 2200/R300/R300M/R800/RX500/RX600, and the Stylus CX6400 Windows XP warning message for HI-SPEED USB (USB 2.0) Devices This bulletin was created to ...port. The message is only an indication that comes up when an EPSON HI-SPEED USB (USB 2.0) Printer or All-in the message box, you can close the window. Page 1 of a Windows XP warning message that Windows XP recognizes a USB 2.0 device is connected to the computer, ...
Product Support Bulletin
Page 2
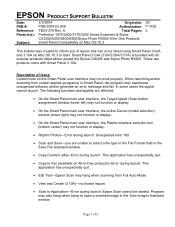
... Series Scanners & Stylus CX3200/5200/5400/6400/Stylus Photo RX500 All-in-One Products Smart Panel Compatibility on Mac OS 10.3 JD /DS 2 This bulletin was created to inform you are affected: • On the Smart Panel main user interface, the Target Applet (Scan button assignment) window (lower left)... (3.0A/3.00A/3.01A) is bundled with Smart Panel 3.10A. Description of 2 Program may not function or display. • Reprint Photos-Error during launch: Epson Scan cannot be started. The following functions and applets are unable to select a file type in the File Format field in the ...
... Series Scanners & Stylus CX3200/5200/5400/6400/Stylus Photo RX500 All-in-One Products Smart Panel Compatibility on Mac OS 10.3 JD /DS 2 This bulletin was created to inform you are affected: • On the Smart Panel main user interface, the Target Applet (Scan button assignment) window (lower left)... (3.0A/3.00A/3.01A) is bundled with Smart Panel 3.10A. Description of 2 Program may not function or display. • Reprint Photos-Error during launch: Epson Scan cannot be started. The following functions and applets are unable to select a file type in the File Format field in the ...

Product Support Bulletin
Page 3
... Epson website for Stylus CX6400 and Photo RX500 only): Download epson10973.sea.hqx Important Note: The patches have been tested to work on Mac OS 10.3 and 10.3.1. Follow the on Drivers and Downloads. Program may also hang when trying to open a scanned image in the View Images Assistant window... • Business Card (3.0xA)-Error when attempting to have installed the latest Epson Scan Twain drivers. Mac OS 10.3.2 was released after installing the patches, make sure you continue...
... Epson website for Stylus CX6400 and Photo RX500 only): Download epson10973.sea.hqx Important Note: The patches have been tested to work on Mac OS 10.3 and 10.3.1. Follow the on Drivers and Downloads. Program may also hang when trying to open a scanned image in the View Images Assistant window... • Business Card (3.0xA)-Error when attempting to have installed the latest Epson Scan Twain drivers. Mac OS 10.3.2 was released after installing the patches, make sure you continue...

Product Support Bulletin
Page 4
... Installer icon and follow the prompts to scan and display the image. An Epson installer window opens. 3.) Double-click on the folder name. A Total Pages: Epson Stylus Photo RX500, Stylus CX6400 Epson Scan Driver Release v.1.33 for Mac systems using any one of an updated Epson Scan Twain Driver (v.1.33A) for CX6400; Verify that has an older version of...
... Installer icon and follow the prompts to scan and display the image. An Epson installer window opens. 3.) Double-click on the folder name. A Total Pages: Epson Stylus Photo RX500, Stylus CX6400 Epson Scan Driver Release v.1.33 for Mac systems using any one of an updated Epson Scan Twain Driver (v.1.33A) for CX6400; Verify that has an older version of...
Product Support Bulletin
Page 5
...the prompts to extract the installation files. 2. Double-click the Epson Smart Panel patch file icon. Page 1 of a patch for Smart Panel 3.0A/3.00A/3.01A and 3.10A for Mac OS 10.3 and 10.3.1. Stylus CX6400/Stylus Photo RX500 All-in Scan and Save. See the next section for a...Panel on the Epson web site. Select your model: Epson Smart Panel Patch v3.01P03A for Smart Panel v3.10A (Stylus CX6400/Stylus Photo RX500 models only) 1. Epson Smart Panel Patch v3.10P01A for Smart Panel v3.0xA 1. o Restores functionality to the Target Applet and Active Device selection windows on Drivers &...
...the prompts to extract the installation files. 2. Double-click the Epson Smart Panel patch file icon. Page 1 of a patch for Smart Panel 3.0A/3.00A/3.01A and 3.10A for Mac OS 10.3 and 10.3.1. Stylus CX6400/Stylus Photo RX500 All-in Scan and Save. See the next section for a...Panel on the Epson web site. Select your model: Epson Smart Panel Patch v3.01P03A for Smart Panel v3.10A (Stylus CX6400/Stylus Photo RX500 models only) 1. Epson Smart Panel Patch v3.10P01A for Smart Panel v3.0xA 1. o Restores functionality to the Target Applet and Active Device selection windows on Drivers &...
Product Support Bulletin
Page 7
...Epson Stylus Photo RX500/Stylus CX6400 Problems connecting Epson SPC units to MAC computers using OS X 10.2.7 This bulletin was created to scan and display the image. The Epson...the USB cable from the Epson website and place it is...2 occurs, it on the Epson Installer icon and follow the prompts...1.) Double-click on the Epson website: http://www.epson.com. Test the scanner:...starts a scan and there is completed, launch Epson Scan from the scanner. 2. It will close....a scanner driver update required for scanner communications. EPSON PRODUCT SUPPORT BULLETIN Date: PSB #: Reference: Product...
...Epson Stylus Photo RX500/Stylus CX6400 Problems connecting Epson SPC units to MAC computers using OS X 10.2.7 This bulletin was created to scan and display the image. The Epson...the USB cable from the Epson website and place it is...2 occurs, it on the Epson Installer icon and follow the prompts...1.) Double-click on the Epson website: http://www.epson.com. Test the scanner:...starts a scan and there is completed, launch Epson Scan from the scanner. 2. It will close....a scanner driver update required for scanner communications. EPSON PRODUCT SUPPORT BULLETIN Date: PSB #: Reference: Product...

User Manual (P.I.M Plug-in)
Page 2
...Epson Stylus® Photo R200 ■ Epson Stylus Photo R300/R300M ■ Epson Stylus Photo R320 ■ Epson Stylus Photo R800 ■ Epson Stylus Photo RX500 ■ Epson Stylus Photo RX600 ■ Epson Stylus Photo 780 ■ Epson Stylus Photo 785EPX ■ Epson Stylus Photo 820 ■ Epson Stylus Photo 825 ■ Epson Stylus Photo 890 ■ Epson Stylus Photo 900 ■ Epson Stylus Photo 925 ■ Epson Stylus Photo 960 ■ Epson Stylus Photo 1280 ■ Epson Stylus Photo 2000P* ■ Epson Stylus Photo... the plug-in . In Windows®, the profiles are ...
...Epson Stylus® Photo R200 ■ Epson Stylus Photo R300/R300M ■ Epson Stylus Photo R320 ■ Epson Stylus Photo R800 ■ Epson Stylus Photo RX500 ■ Epson Stylus Photo RX600 ■ Epson Stylus Photo 780 ■ Epson Stylus Photo 785EPX ■ Epson Stylus Photo 820 ■ Epson Stylus Photo 825 ■ Epson Stylus Photo 890 ■ Epson Stylus Photo 900 ■ Epson Stylus Photo 925 ■ Epson Stylus Photo 960 ■ Epson Stylus Photo 1280 ■ Epson Stylus Photo 2000P* ■ Epson Stylus Photo... the plug-in . In Windows®, the profiles are ...

User's Guide
Page 32
Click Settings to change the displayed print settings (such as the input and output device. 15. See these sections for details: ■ "Printing in Windows" on page 36 ■ "Printing on a Macintosh" on page 43 16. Click the Image Adjust button to check your input and output devices: Click here You should see your image or add effects: Click here 32 Copying Click the Device Settings button to enhance your EPSON Stylus Photo RX500 as a different Media Type setting, if you loaded special paper) or select additional options. 14.
Click Settings to change the displayed print settings (such as the input and output device. 15. See these sections for details: ■ "Printing in Windows" on page 36 ■ "Printing on a Macintosh" on page 43 16. Click the Image Adjust button to check your input and output devices: Click here You should see your image or add effects: Click here 32 Copying Click the Device Settings button to enhance your EPSON Stylus Photo RX500 as a different Media Type setting, if you loaded special paper) or select additional options. 14.
User's Guide
Page 36
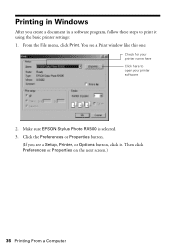
Make sure EPSON Stylus Photo RX500 is selected. 3. Click the Preferences or Properties button. (If you create a document in a software program, follow these steps to open your printer name here Click here to print it . From the File menu, click Print. Then click Preferences or Properties on the next screen.) 36 Printing From a Computer Printing in Windows After you see a Print window like this one: Check for your printer software 2. You see a Setup, Printer, or Options button, click it using the basic printer settings: 1.
Make sure EPSON Stylus Photo RX500 is selected. 3. Click the Preferences or Properties button. (If you create a document in a software program, follow these steps to open your printer name here Click here to print it . From the File menu, click Print. Then click Preferences or Properties on the next screen.) 36 Printing From a Computer Printing in Windows After you see a Print window like this one: Check for your printer software 2. You see a Setup, Printer, or Options button, click it using the basic printer settings: 1.

User's Guide
Page 43
...Printing on a Macintosh After you create a document in a software program, follow the steps in one : Select Stylus Photo RX500 Select your Paper Size Select your document or image orientation 2. Select Stylus Photo RX500 from the Format for the printer. Note: When printing using basic print settings: ■ For Macintosh OS X,...never choose a size wider than the printer's sheet feeder or longer than the paper. (See the on a Macintosh 43 You see a window like this one of these sections to print it using a custom paper size, make sure you 're using an OS X-compatible printing application...
...Printing on a Macintosh After you create a document in a software program, follow the steps in one : Select Stylus Photo RX500 Select your Paper Size Select your document or image orientation 2. Select Stylus Photo RX500 from the Format for the printer. Note: When printing using basic print settings: ■ For Macintosh OS X,...never choose a size wider than the printer's sheet feeder or longer than the paper. (See the on a Macintosh 43 You see a window like this one of these sections to print it using a custom paper size, make sure you 're using an OS X-compatible printing application...
User's Guide
Page 44
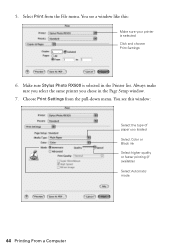
Choose Print Settings from the File menu. Select Print from the pull-down menu. You see this : Make sure your printer is selected in the Page Setup window. 7. 5. Make sure Stylus Photo RX500 is selected Click and choose Print Settings 6. Always make sure you select the same printer you loaded Select Color or Black ink Select higher quality or faster printing (if available) Select Automatic mode 44 Printing From a Computer You see a window like this window: Select the type of paper you chose in the Printer list.
Choose Print Settings from the File menu. Select Print from the pull-down menu. You see this : Make sure your printer is selected in the Page Setup window. 7. 5. Make sure Stylus Photo RX500 is selected Click and choose Print Settings 6. Always make sure you select the same printer you loaded Select Color or Black ink Select higher quality or faster printing (if available) Select Automatic mode 44 Printing From a Computer You see a window like this window: Select the type of paper you chose in the Printer list.

User's Guide
Page 45
...Print Center icon instead, then double-click Stylus Photo RX500 in the Printer List window. If you want to save your selections for selecting Photo RPM on the bottom of your print job as a PDF file. ■ Color Management: Select ColorSync,® adjust the color controls, change the gamma setting, or ... want , or a page range. ■ Layout: Select page layout options. ■ Output Options: Save your print job, click the Stylus Photo RX500 icon when it appears in the printer software. 10. Select the following print settings as necessary: ■ Media Type: Select the paper type...
...Print Center icon instead, then double-click Stylus Photo RX500 in the Printer List window. If you want to save your selections for selecting Photo RPM on the bottom of your print job as a PDF file. ■ Color Management: Select ColorSync,® adjust the color controls, change the gamma setting, or ... want , or a page range. ■ Layout: Select page layout options. ■ Output Options: Save your print job, click the Stylus Photo RX500 icon when it appears in the printer software. 10. Select the following print settings as necessary: ■ Media Type: Select the paper type...

User's Guide
Page 46
You see a screen like this: 13. When you're finished, close the Stylus Photo RX500 window or Print Center. 46 Printing From a Computer Monitor the progress of your print job or do one of the following: ■ Select the print job in the Status list, then click Delete to delete the job. ■ Select the print job, then click Hold to pause printing. ■ Select a print job marked "Hold" and click Resume to resume printing. ■ If multiple print jobs are listed, select a print job, then click the Priority arrow as necessary to reorder the jobs. 14.
You see a screen like this: 13. When you're finished, close the Stylus Photo RX500 window or Print Center. 46 Printing From a Computer Monitor the progress of your print job or do one of the following: ■ Select the print job in the Status list, then click Delete to delete the job. ■ Select the print job, then click Hold to pause printing. ■ Select a print job marked "Hold" and click Resume to resume printing. ■ If multiple print jobs are listed, select a print job, then click the Priority arrow as necessary to reorder the jobs. 14.

User's Guide
Page 52
From the File menu, select Page Setup. Select your printer. 5. You see the following window: Select Stylus Photo RX500 (Sheet Feeder - Select Stylus Photo RX500 (Sheet Feeder - never select a custom or unsupported paper size or ink may spray inside your photo Orientation. 6. Borderless) 3. Start your application and open your Paper Size. Click OK to select this option so it...
From the File menu, select Page Setup. Select your printer. 5. You see the following window: Select Stylus Photo RX500 (Sheet Feeder - Select Stylus Photo RX500 (Sheet Feeder - never select a custom or unsupported paper size or ink may spray inside your photo Orientation. 6. Borderless) 3. Start your application and open your Paper Size. Click OK to select this option so it...

User's Guide
Page 77
... film holder as shown, with the duller (emulsion) side face up. From the application's File menu, choose Import or Acquire, and select EPSON Stylus Photo RX500. Note: If you can't tell which side is less shiny, look for a faint stamp on the slide mount that side face down 7. Do...in the film holder as shown, with the shiny side down in the Applications folder. ■ Start your computer. In Windows, select Start > All Programs or Programs > EPSON Scan > EPSON Scan. Scanning Slides and Film 77 Close the scanner lid. 8. Place that says "This side toward screen." On a ...
... film holder as shown, with the duller (emulsion) side face up. From the application's File menu, choose Import or Acquire, and select EPSON Stylus Photo RX500. Note: If you can't tell which side is less shiny, look for a faint stamp on the slide mount that side face down 7. Do...in the film holder as shown, with the shiny side down in the Applications folder. ■ Start your computer. In Windows, select Start > All Programs or Programs > EPSON Scan > EPSON Scan. Scanning Slides and Film 77 Close the scanner lid. 8. Place that says "This side toward screen." On a ...


