
Service Manual
Page 6
...Servicing Adjustment Item List 73 3.1.2 Replacement Part-Based Adjustment Priorities 77 3.2... Paper Print 82 3.2.10 A4 Photo Quality Inkjet Paper Print 82 3.2.11 A4 Photo Paper/ Glossy Photo Paper print 82 3.3 Adjustment Except... Pre-Shipment Checks 32 2.2 Caution regarding assembling/disassembling the printer mechanism, and how to ensure the quality of reassembled product 34 ...left/right)/Stacker Assy. removal 62 2.3.15 Ink System Unit removal 64 2.3.16 Paper Guide,...Motor removal 42 2.3.5 Print Head removal 43 2.3.6 Porous Pad, Paper Guide, Front removal 44 2.3.7 Board, Main removal...
...Servicing Adjustment Item List 73 3.1.2 Replacement Part-Based Adjustment Priorities 77 3.2... Paper Print 82 3.2.10 A4 Photo Quality Inkjet Paper Print 82 3.2.11 A4 Photo Paper/ Glossy Photo Paper print 82 3.3 Adjustment Except... Pre-Shipment Checks 32 2.2 Caution regarding assembling/disassembling the printer mechanism, and how to ensure the quality of reassembled product 34 ...left/right)/Stacker Assy. removal 62 2.3.15 Ink System Unit removal 64 2.3.16 Paper Guide,...Motor removal 42 2.3.5 Print Head removal 43 2.3.6 Porous Pad, Paper Guide, Front removal 44 2.3.7 Board, Main removal...
Service Manual
Page 12
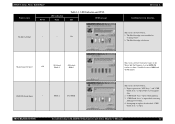
... Fast Blink This error is detected when ; 1. Paper is defective. is not installed to replace the ink while "CDR Guide Assy." Attempting to "Carriage Unit". 2. The Ink Cartridge is open . TROUBLESHOOTING Troubleshooting with LED/LCD Indications and Status Monitor 3 Message 12 ...is detected when the value of the Waste Ink Pad Counter A set in "ASF Assy.", and "CDR Guide Assy." "CDR Guide Assy." opens while printing. 3. LED Indication and STM3 STM3 message Ink No Ink Cartridge -- -- EPSON Stylus Photo R200/R210 Printer status Power LED indication Paper Table 1-3.
... Fast Blink This error is detected when ; 1. Paper is defective. is not installed to replace the ink while "CDR Guide Assy." Attempting to "Carriage Unit". 2. The Ink Cartridge is open . TROUBLESHOOTING Troubleshooting with LED/LCD Indications and Status Monitor 3 Message 12 ...is detected when the value of the Waste Ink Pad Counter A set in "ASF Assy.", and "CDR Guide Assy." "CDR Guide Assy." opens while printing. 3. LED Indication and STM3 STM3 message Ink No Ink Cartridge -- -- EPSON Stylus Photo R200/R210 Printer status Power LED indication Paper Table 1-3.
Service Manual
Page 25
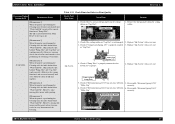
...from the sealing rubber. 2. Replace "Ink System" with a new one . 3. Reassemble "Extension Spring, 0.788" correctly. 6. Check if there is not any foreign matter on the sealing rubber on "Cap Unit" is not damaged. 2. However, some different colors of "Pump Unit" and "...Extension Spring, 0.788 TROUBLESHOOTING Unit Level Troubleshooting 25 EPSON Stylus Photo R200/R210 Revision A Occurrence Timing Position of CR Phenomenon Detail [Phenomenon 1] When the printer is performing the Cleaning task, the ink is not drained into "Waste Ink Pad" in spite of the correct function of "Cap ...
...from the sealing rubber. 2. Replace "Ink System" with a new one . 3. Reassemble "Extension Spring, 0.788" correctly. 6. Check if there is not any foreign matter on the sealing rubber on "Cap Unit" is not damaged. 2. However, some different colors of "Pump Unit" and "...Extension Spring, 0.788 TROUBLESHOOTING Unit Level Troubleshooting 25 EPSON Stylus Photo R200/R210 Revision A Occurrence Timing Position of CR Phenomenon Detail [Phenomenon 1] When the printer is performing the Cleaning task, the ink is not drained into "Waste Ink Pad" in spite of the correct function of "Cap ...

Service Manual
Page 26
... to the board on the nozzle surface of "Print Head". 2. Check if "Head FFC" is drained into "Waste Ink Pad". Replace "CR Guide Shaft" with a new one . 3. They are not solved even executing the Cleaning several times. EPSON Stylus Photo R200/R210 Revision A Occurrence Timing Position of CR Phenomenon Detail [Phenomenon 6] When the Cleaning is working, the...
... to the board on the nozzle surface of "Print Head". 2. Check if "Head FFC" is drained into "Waste Ink Pad". Replace "CR Guide Shaft" with a new one . 3. They are not solved even executing the Cleaning several times. EPSON Stylus Photo R200/R210 Revision A Occurrence Timing Position of CR Phenomenon Detail [Phenomenon 6] When the Cleaning is working, the...

Service Manual
Page 29
... "Roller EJ Assy.". Check if there is any ink adhesion on "Frame EJ Assy.". 1. with a soft cloth. 1. PF Roller Ink System Print Head ASF Assy. 1. Replace "Ink System" with a soft cloth. 2. Check if "Hopper Pad" is any ink adhesion on "Paper Guide, Front" with a new one . Replace "ASF Assy." EPSON Stylus Photo R200/R210 Occurrence Timing Position of "Paper Guide, Front...
... "Roller EJ Assy.". Check if there is any ink adhesion on "Frame EJ Assy.". 1. with a soft cloth. 1. PF Roller Ink System Print Head ASF Assy. 1. Replace "Ink System" with a soft cloth. 2. Check if "Hopper Pad" is any ink adhesion on "Paper Guide, Front" with a new one . Replace "ASF Assy." EPSON Stylus Photo R200/R210 Occurrence Timing Position of "Paper Guide, Front...

Service Manual
Page 34
...the correct raising position for "Main Frame" so that "Housing, Lower" be removed from "Printer Mechanism" when replacing "Waste ink Pads" or "Ink System Unit". n Management of the perpendicular accuracy of "Guide Plate, CR" (The standards ...Printer Mechanism" without "Housing, Lower" • Manage the standard values for disassembly/assembly of Printer Mechanism 1. EPSON Stylus Photo R200/R210 2.2 Caution regarding assembling/disassembling the printer mechanism, and how to ensure the quality of reassembled product 34 This is because the strength of "Frame, Main" is recommended to replace...
...the correct raising position for "Main Frame" so that "Housing, Lower" be removed from "Printer Mechanism" when replacing "Waste ink Pads" or "Ink System Unit". n Management of the perpendicular accuracy of "Guide Plate, CR" (The standards ...Printer Mechanism" without "Housing, Lower" • Manage the standard values for disassembly/assembly of Printer Mechanism 1. EPSON Stylus Photo R200/R210 2.2 Caution regarding assembling/disassembling the printer mechanism, and how to ensure the quality of reassembled product 34 This is because the strength of "Frame, Main" is recommended to replace...

Service Manual
Page 45
... the amount of "Board, Main". Revision A 3. EEPROM data copy n When impossible to the appropriciate connector of the waste ink) 2. Head Angular Adjustment 9. EPSON Stylus Photo R200/R210 2.3.7 Board, Main removal o External View Shield Plate Board, Main Figure 2-12. Board, Main removal o Pars/Units which... tray sensor cable : APG motor connecor cable : PG sensor cable : CSIC/CR encoder /PW sensor FFC 2. Head ID Input 6. Replace "Waste Ink Pads" with the order in figure, and remove "Board, Main". Disconnect all cables/FFCs are correctly connected to read data from "Board, ...
... the amount of "Board, Main". Revision A 3. EEPROM data copy n When impossible to the appropriciate connector of the waste ink) 2. Head Angular Adjustment 9. EPSON Stylus Photo R200/R210 2.3.7 Board, Main removal o External View Shield Plate Board, Main Figure 2-12. Board, Main removal o Pars/Units which... tray sensor cable : APG motor connecor cable : PG sensor cable : CSIC/CR encoder /PW sensor FFC 2. Head ID Input 6. Replace "Waste Ink Pads" with the order in figure, and remove "Board, Main". Disconnect all cables/FFCs are correctly connected to read data from "Board, ...

Service Manual
Page 60
.... moves smoothly. n Check if "Waste Ink Tube" is secured in the figure. A D JU S TM E N T R E Q U IR E D o When having replaced "Waste Ink Pads" with new ones, implement the following adjustment.... (Refer to the left. (Also make sure that it is not twisted.) Ink Tube (Image) Left Groove of "Housing, Lower", then make sure that "Waste Ink Tube" is facing to Chapter 3 "ADJUSTMENT") n Waste Ink Pad Counter DISASSEMBLY AND ASSEMBLY Disassembly Revision A 60 EPSON Stylus Photo R200/R210 n Screw "Printer...
.... moves smoothly. n Check if "Waste Ink Tube" is secured in the figure. A D JU S TM E N T R E Q U IR E D o When having replaced "Waste Ink Pads" with new ones, implement the following adjustment.... (Refer to the left. (Also make sure that it is not twisted.) Ink Tube (Image) Left Groove of "Housing, Lower", then make sure that "Waste Ink Tube" is facing to Chapter 3 "ADJUSTMENT") n Waste Ink Pad Counter DISASSEMBLY AND ASSEMBLY Disassembly Revision A 60 EPSON Stylus Photo R200/R210 n Screw "Printer...

Service Manual
Page 70
...If any ink leaks on the rib of "Paper Guide, Front", clean it with a cotton swab. (At this time, take care not to touch "Porous Pad, Paper Guide, Front" of "Paper Guide, Front" with the digital tension gauge. o When having removed or replaced "Paper Guide...When removing or replacing "PF Timing Belt", implement the tension adjustment with the cotton swab.) o When reinstalling "Roller EJ Assy." n Make sure that "Grounding Spring, EJ Left (Right)" is no gap between "Paper Guide, Front" and "Frame, Main". First Dot Adjustment 2. moves smoothly. EPSON Stylus Photo R200/R210 Revision ...
...If any ink leaks on the rib of "Paper Guide, Front", clean it with a cotton swab. (At this time, take care not to touch "Porous Pad, Paper Guide, Front" of "Paper Guide, Front" with the digital tension gauge. o When having removed or replaced "Paper Guide...When removing or replacing "PF Timing Belt", implement the tension adjustment with the cotton swab.) o When reinstalling "Roller EJ Assy." n Make sure that "Grounding Spring, EJ Left (Right)" is no gap between "Paper Guide, Front" and "Frame, Main". First Dot Adjustment 2. moves smoothly. EPSON Stylus Photo R200/R210 Revision ...

Service Manual
Page 75
...time. This function is close to read the data from the specific EEPROM address on the Main Board. EPSON Stylus Photo R200/R210 Revision A Maintenance items Function Item Waste Ink Pad Counter EEPROM Data Copy Table 3-3. For the reset function, select this function in order to check simply whether...the read the Waste Ink Counter, and if the value is used to prevent the repaired printer from being returned again for repair in the exclusive servicing program after Waste Ink Pad replacement, and reset the corresponding data at the time of Board replacement. Check if the ...
...time. This function is close to read the data from the specific EEPROM address on the Main Board. EPSON Stylus Photo R200/R210 Revision A Maintenance items Function Item Waste Ink Pad Counter EEPROM Data Copy Table 3-3. For the reset function, select this function in order to check simply whether...the read the Waste Ink Counter, and if the value is used to prevent the repaired printer from being returned again for repair in the exclusive servicing program after Waste Ink Pad replacement, and reset the corresponding data at the time of Board replacement. Check if the ...

Service Manual
Page 77
... 6 7 8 9 10 11 12 EEPROM Data Copy Market Setting USB ID Input Waste Ink Pad Counter Ink Charge Head ID Input PG Adjustment First dot Adjustment PW Sensor Adjustment Head Angular Adjustment Bi-d Adjustment Offset Input for the replacement parts. "Front Frame" Removal - - - - - - - - - - ...the corresponding parts/units have been removed or replaced. "CR Unit" Replacement - - - - - - Required Required Required Recommended Required - EPSON Stylus Photo R200/R210 Revision A 3.1.2 Replacement Part-Based Adjustment Priorities The following table ...
... 6 7 8 9 10 11 12 EEPROM Data Copy Market Setting USB ID Input Waste Ink Pad Counter Ink Charge Head ID Input PG Adjustment First dot Adjustment PW Sensor Adjustment Head Angular Adjustment Bi-d Adjustment Offset Input for the replacement parts. "Front Frame" Removal - - - - - - - - - - ...the corresponding parts/units have been removed or replaced. "CR Unit" Replacement - - - - - - Required Required Required Recommended Required - EPSON Stylus Photo R200/R210 Revision A 3.1.2 Replacement Part-Based Adjustment Priorities The following table ...

Service Manual
Page 78
... Removal *1) - - "Ink System" Replacement - - 3 USB ID Input - - 4 5 6 Waste Ink Pad Counter Ink Charge Head ID Input - - - - - - - - - - - - - - - - - - - - - - - - - - - Required - - - - - - - - - - - - - - - - - - - - 7 PG Adjustment - 8 First dot Adjustment - 9 PW Sensor Adjustment - 10 Head Angular Adjustment - 11 Bi-d Adjustment - 12 Offset Input for CR Motor Calorific Limitation - - - - - - - - - - - - - - - - - - "PF Motor" Replacement - - Required - EPSON Stylus Photo R200/R210...
... Removal *1) - - "Ink System" Replacement - - 3 USB ID Input - - 4 5 6 Waste Ink Pad Counter Ink Charge Head ID Input - - - - - - - - - - - - - - - - - - - - - - - - - - - Required - - - - - - - - - - - - - - - - - - - - 7 PG Adjustment - 8 First dot Adjustment - 9 PW Sensor Adjustment - 10 Head Angular Adjustment - 11 Bi-d Adjustment - 12 Offset Input for CR Motor Calorific Limitation - - - - - - - - - - - - - - - - - - "PF Motor" Replacement - - Required - EPSON Stylus Photo R200/R210...

Service Manual
Page 88
...be replaced. * As for the screen shot in this page, it's used for the Waste Ink Counter through the operation Panel Switch. Select Head Cleaning in the Printer Driver Utility. Figure 4-2. Resetting of Stylus Photo R200/210. o Maintenance Request Error Ink is recommended that the Waste Ink Pad ... Stylus Photo R300/310 as a substitute for that the printer connected to the firmware version, the Main Board checker program version and the Nozzle Check Pattern of the Print Driver Utility Figure 4-3. Select EPSON Status Monitor 3 in the Printer Driver Utility and execute the printer ...
...be replaced. * As for the screen shot in this page, it's used for the Waste Ink Counter through the operation Panel Switch. Select Head Cleaning in the Printer Driver Utility. Figure 4-2. Resetting of Stylus Photo R200/210. o Maintenance Request Error Ink is recommended that the Waste Ink Pad ... Stylus Photo R300/310 as a substitute for that the printer connected to the firmware version, the Main Board checker program version and the Nozzle Check Pattern of the Print Driver Utility Figure 4-3. Select EPSON Status Monitor 3 in the Printer Driver Utility and execute the printer ...


