
User Manual (P.I.M Plug-in)
Page 2
... Windows®, the profiles are P.I.M.-, P.I .M.-enabled products, visit www.printimagematching.com. 2 It is not P.I .M. II Plug-in has been updated to include the following printers currently support PRINT Image Matching II, PRINT Image Matching, and Exif Print with Adobe Photoshop 6.0, 7.0, CS, and Photoshop Elements 1.0, 2.0, and 3.0. II Plug-in . What Is New About P.I .M. II Plug-in : ■ Epson Stylus® Photo R200 ■ Epson Stylus Photo R300/R300M ■ Epson Stylus Photo R320 ■ Epson Stylus Photo R800...
... Windows®, the profiles are P.I.M.-, P.I .M.-enabled products, visit www.printimagematching.com. 2 It is not P.I .M. II Plug-in has been updated to include the following printers currently support PRINT Image Matching II, PRINT Image Matching, and Exif Print with Adobe Photoshop 6.0, 7.0, CS, and Photoshop Elements 1.0, 2.0, and 3.0. II Plug-in . What Is New About P.I .M. II Plug-in : ■ Epson Stylus® Photo R200 ■ Epson Stylus Photo R300/R300M ■ Epson Stylus Photo R320 ■ Epson Stylus Photo R800...
Product Information Guide
Page 1
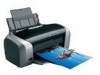
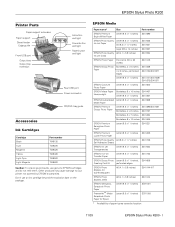
EPSON Stylus Photo R200 Printer Parts Paper support extension Paper support Sheet feeder Edge guide Front USB port Output tray Output tray extension Ink button and light Power button and light Paper button and light Rear USB port Power connector CD/DVD tray guide Accessories Ink Cartridges Cartridge Black Cyan Magenta Yellow Light Cyan Light Magenta Part number T048120 T048220 T048320 T048420 T048520 T048620 Caution: To ensure good results, use an ink cartridge beyond the expiration date on the package. Don't use genuine EPSON cartridges and do not refill them. EPSON Media Paper ...
EPSON Stylus Photo R200 Printer Parts Paper support extension Paper support Sheet feeder Edge guide Front USB port Output tray Output tray extension Ink button and light Power button and light Paper button and light Rear USB port Power connector CD/DVD tray guide Accessories Ink Cartridges Cartridge Black Cyan Magenta Yellow Light Cyan Light Magenta Part number T048120 T048220 T048320 T048420 T048520 T048620 Caution: To ensure good results, use an ink cartridge beyond the expiration date on the package. Don't use genuine EPSON cartridges and do not refill them. EPSON Media Paper ...
Product Information Guide
Page 3
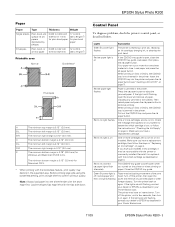
... Normal Borderless* Envelopes A The minimum top margin is receiving a print job, replacing an ink cartridge, charging ink, or cleaning the print head. Note: Always load paper into the printer and press the ) paper button (see "Inserting a CD or DVD" on CDs or DVDs, the CD/DVD tray is jammed in the expanded area. Close the CD/DVD tray guide. Turn off the printer, then open when you have a replacement cartridge. Before printing large jobs using the borderless setting, print a single sheet to confirm printout quality. Red ) paper light flashes Paper is jammed...
... Normal Borderless* Envelopes A The minimum top margin is receiving a print job, replacing an ink cartridge, charging ink, or cleaning the print head. Note: Always load paper into the printer and press the ) paper button (see "Inserting a CD or DVD" on CDs or DVDs, the CD/DVD tray is jammed in the expanded area. Close the CD/DVD tray guide. Turn off the printer, then open when you have a replacement cartridge. Before printing large jobs using the borderless setting, print a single sheet to confirm printout quality. Red ) paper light flashes Paper is jammed...

Product Information Guide
Page 6
...Load all paper with this paper Type or Media Type setting Plain Paper Bright White Paper Photo Quality Ink Jet Paper Matte Paper - Printing CDs and DVDs Your printer includes a special tray that lets you purchase CDs and DVDs that have an ink jet-printable surface. Press the ) button again to feed a sheet of plain paper. For this paper Plain paper sheets or envelopes EPSON Iron-On Transfer Paper EPSON Premium Bright White Paper EPSON Photo Quality Ink Jet Paper EPSON Photo Quality Ink Jet Cards EPSON Photo Quality Self Adhesive Sheets EPSON Matte Paper Heavyweight EPSON Double-Sided...
...Load all paper with this paper Type or Media Type setting Plain Paper Bright White Paper Photo Quality Ink Jet Paper Matte Paper - Printing CDs and DVDs Your printer includes a special tray that lets you purchase CDs and DVDs that have an ink jet-printable surface. Press the ) button again to feed a sheet of plain paper. For this paper Plain paper sheets or envelopes EPSON Iron-On Transfer Paper EPSON Premium Bright White Paper EPSON Photo Quality Ink Jet Paper EPSON Photo Quality Ink Jet Cards EPSON Photo Quality Self Adhesive Sheets EPSON Matte Paper Heavyweight EPSON Double-Sided...
Product Information Guide
Page 7
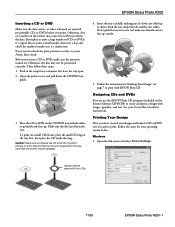
... flat on page 7 to print with images, graphics, and text. Open the File menu and select Printer Settings. Place the CD or DVD on the tray first, then place the CD inside the ring. Windows 1. If you have created your Printer Basics book for your Printer Basics book. Open the printer cover and pull down . Otherwise, the disc may be positioned correctly. Caution: Make sure you print. EPSON Stylus Photo R200 Inserting a CD or DVD Make sure...
... flat on page 7 to print with images, graphics, and text. Open the File menu and select Printer Settings. Place the CD or DVD on the tray first, then place the CD inside the ring. Windows 1. If you have created your Printer Basics book for your Printer Basics book. Open the printer cover and pull down . Otherwise, the disc may be positioned correctly. Caution: Make sure you print. EPSON Stylus Photo R200 Inserting a CD or DVD Make sure...
Product Information Guide
Page 8
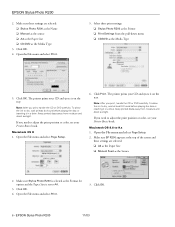
... as the Paper Size ❏ CD/DVD as the Media Type 5. The printer prints your CD and ejects it on the tray. Open the File menu and select Page Setup. 6. If you need to A4. 3. Make sure Stylus Photo R200 is set to adjust the print position or color, see your Printer Basics book. Macintosh OS 8.6 to dry, wait at the top of the screen and these settings are selected: ❏ A4 as the Paper Size ❏ Manual Feed as...
... as the Paper Size ❏ CD/DVD as the Media Type 5. The printer prints your CD and ejects it on the tray. Open the File menu and select Page Setup. 6. If you need to A4. 3. Make sure Stylus Photo R200 is set to adjust the print position or color, see your Printer Basics book. Macintosh OS 8.6 to dry, wait at the top of the screen and these settings are selected: ❏ A4 as the Paper Size ❏ Manual Feed as...
Product Information Guide
Page 9
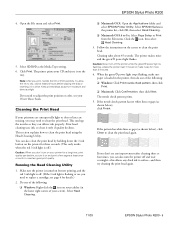
...'t turn the printer off the printer while the green P power light is loaded in a drive. Keep printed discs away from the File menu. This section explains how to replace a cartridge; Follow the instructions on your Printer Basics book. If the nozzle check pattern has no white lines or gaps (as the Media Type setting. 6. Select CD/DVD as shown below ), click Clean to clean the print head. Click Print. Cleaning the Print Head If your CD and ejects it only if quality...
...'t turn the printer off the printer while the green P power light is loaded in a drive. Keep printed discs away from the File menu. This section explains how to replace a cartridge; Follow the instructions on your Printer Basics book. If the nozzle check pattern has no white lines or gaps (as the Media Type setting. 6. Select CD/DVD as shown below ), click Clean to clean the print head. Click Print. Cleaning the Print Head If your CD and ejects it only if quality...
Product Information Guide
Page 11
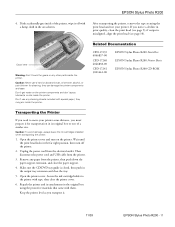
... CPD-17241 3021461-00 EPSON Stylus Photo R200 Start Here EPSON Stylus Photo R200 Printer Basics EPSON Stylus Photo R200 CD-ROM Transporting the Printer If you need to the printer with a damp cloth in print quality, clean the print head (see page 10). After transporting the printer, remove the tape securing the print head and test your printer some distance, you must prepare it for cleaning; Make sure the CD/DVD tray guide is misaligned, align the print head (see page 9); Open the printer cover and turn off with tape, then...
... CPD-17241 3021461-00 EPSON Stylus Photo R200 Start Here EPSON Stylus Photo R200 Printer Basics EPSON Stylus Photo R200 CD-ROM Transporting the Printer If you need to the printer with a damp cloth in print quality, clean the print head (see page 10). After transporting the printer, remove the tape securing the print head and test your printer some distance, you must prepare it for cleaning; Make sure the CD/DVD tray guide is misaligned, align the print head (see page 9); Open the printer cover and turn off with tape, then...
Start Here Card
Page 8
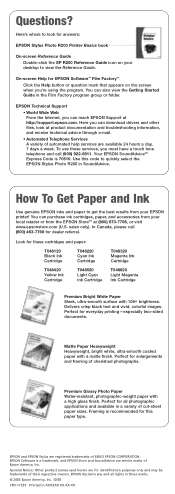
...-weight paper with a matte finish. On-screen Help for answers: EPSON Stylus Photo R200 Printer Basics book On-screen Reference Guide Double-click the SP R200 Reference Guide icon on the screen when you can reach EPSON Support at product documentation and troubleshooting information, and receive technical advice through e-mail. • Automated Telephone Services A variety of automated help services are registered trademarks of SEIKO EPSON CORPORATION. Use this paper type. You can also view the Getting Started Guide in...
...-weight paper with a matte finish. On-screen Help for answers: EPSON Stylus Photo R200 Printer Basics book On-screen Reference Guide Double-click the SP R200 Reference Guide icon on the screen when you can reach EPSON Support at product documentation and troubleshooting information, and receive technical advice through e-mail. • Automated Telephone Services A variety of automated help services are registered trademarks of SEIKO EPSON CORPORATION. Use this paper type. You can also view the Getting Started Guide in...

Printer Basics
Page 4
... Printer 49 Cleaning the Print Head 49 Running the Head Cleaning Utility 50 Replacing an Ink Cartridge 51 Checking the Ink Supply 52 Purchasing Ink Cartridges 53 Ink Cartridge Precautions 53 Removing and Installing Ink Cartridges 54 Aligning the Print Head 57 Cleaning the Printer 59 Transporting the Printer 60 Solving Problems 61 Printer Parts 61 Diagnosing Printer Problems 62 Running a Printer Check 63 Problems and Solutions 64 Setup and Software Installation Problems 64 Printer Problems 65 Print Quality Problems 67 Problems With Paper Feeding 69 CD/DVD Printing Problems...
... Printer 49 Cleaning the Print Head 49 Running the Head Cleaning Utility 50 Replacing an Ink Cartridge 51 Checking the Ink Supply 52 Purchasing Ink Cartridges 53 Ink Cartridge Precautions 53 Removing and Installing Ink Cartridges 54 Aligning the Print Head 57 Cleaning the Printer 59 Transporting the Printer 60 Solving Problems 61 Printer Parts 61 Diagnosing Printer Problems 62 Running a Printer Check 63 Problems and Solutions 64 Setup and Software Installation Problems 64 Printer Problems 65 Print Quality Problems 67 Problems With Paper Feeding 69 CD/DVD Printing Problems...

Printer Basics
Page 18
... highest print quality (Photo RPM) on this screen gives you 're using Select Color or Black ink Select higher quality or faster printing (if available) Click Print Note: For more information about printer settings, click the Help button. The Quality setting on selected papers, click Advanced, then see page 29 for details. ■ Summary: To view a list of all your selections. 18 Printing From Start to adjust the borderless image size; Borderless is selected as necessary: Select the type of paper you the...
... highest print quality (Photo RPM) on this screen gives you 're using Select Color or Black ink Select higher quality or faster printing (if available) Click Print Note: For more information about printer settings, click the Help button. The Quality setting on selected papers, click Advanced, then see page 29 for details. ■ Summary: To view a list of all your selections. 18 Printing From Start to adjust the borderless image size; Borderless is selected as necessary: Select the type of paper you the...
Printer Basics
Page 20
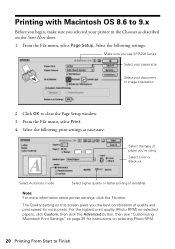
..., make sure you selected your document or image orientation 2. The Quality setting on selecting Photo RPM. 20 Printing From Start to close the Page Setup window. 3. button. Select the following print settings as described on page 25 for most prints. For the highest print quality (Photo RPM) on selected papers, click Custom, then click the Advanced button, then see SP R200 Series Select your paper size Select your printer in the Chooser as necessary: Select the type of quality and print speed for instructions on this screen gives...
..., make sure you selected your document or image orientation 2. The Quality setting on selecting Photo RPM. 20 Printing From Start to close the Page Setup window. 3. button. Select the following print settings as described on page 25 for most prints. For the highest print quality (Photo RPM) on selected papers, click Custom, then click the Advanced button, then see SP R200 Series Select your paper size Select your printer in the Chooser as necessary: Select the type of quality and print speed for instructions on this screen gives...

Printer Basics
Page 22
... EPSON Premium Semigloss Photo Paper EPSON Semigloss Scrapbook Photo Paper EPSON ColorLife Photo Paper EPSON Ink Jet Transparencies Select this paper Type or Media Type setting Plain Paper Bright White Paper Photo Quality Ink Jet Paper Matte Paper - Heavyweight Photo Paper Glossy Photo Paper Premium Glossy Photo Paper Premium Luster Photo Paper Premium Semigloss Photo Paper ColorLife Photo Paper Ink Jet Transparencies 22 Printing From Start to Finish Selecting the Correct Paper Type Select the correct paper Type or Media Type setting so your printer knows what kind of paper you're using...
... EPSON Premium Semigloss Photo Paper EPSON Semigloss Scrapbook Photo Paper EPSON ColorLife Photo Paper EPSON Ink Jet Transparencies Select this paper Type or Media Type setting Plain Paper Bright White Paper Photo Quality Ink Jet Paper Matte Paper - Heavyweight Photo Paper Glossy Photo Paper Premium Glossy Photo Paper Premium Luster Photo Paper Premium Semigloss Photo Paper ColorLife Photo Paper Ink Jet Transparencies 22 Printing From Start to Finish Selecting the Correct Paper Type Select the correct paper Type or Media Type setting so your printer knows what kind of paper you're using...
Printer Basics
Page 46
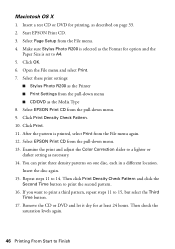
... Time button. 17. Make sure Stylus Photo R200 is printed, select Print from the pull-down menu. 9. Select EPSON Print CD from the File menu again. 12. Repeat steps 11 to A4. 5. Then check the saturation levels again. 46 Printing From Start to print the second pattern. 16. Select EPSON Print CD from the File menu. 4. Remove the CD or DVD and let it dry for option and the Paper Size is set to 14. Open the File menu and select Print. 7. Select Page Setup...
... Time button. 17. Make sure Stylus Photo R200 is printed, select Print from the pull-down menu. 9. Select EPSON Print CD from the File menu again. 12. Repeat steps 11 to A4. 5. Then check the saturation levels again. 46 Printing From Start to print the second pattern. 16. Select EPSON Print CD from the File menu. 4. Remove the CD or DVD and let it dry for option and the Paper Size is set to 14. Open the File menu and select Print. 7. Select Page Setup...
Printer Basics
Page 62
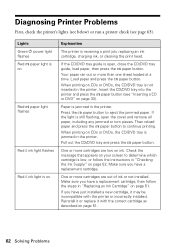
... the correct cartridge as described on page 52. Pull out the CD/DVD tray and press the ) paper button. Paper is low, or follow the steps in the printer. One or more than one sheet loaded at a time. Load paper and press the ) paper button. Lights Green P power light flashes Red ) paper light is on Red ) paper light flashes Red H ink light flashes Red H ink light is on Explanation The printer is still flashing, open , close the CD/DVD tray guide, load paper, then press the ) paper button. Press the ) paper button to continue printing. Diagnosing Printer Problems First, check...
... the correct cartridge as described on page 52. Pull out the CD/DVD tray and press the ) paper button. Paper is low, or follow the steps in the printer. One or more than one sheet loaded at a time. Load paper and press the ) paper button. Lights Green P power light flashes Red ) paper light is on Red ) paper light flashes Red H ink light flashes Red H ink light is on Explanation The printer is still flashing, open , close the CD/DVD tray guide, load paper, then press the ) paper button. Press the ) paper button to continue printing. Diagnosing Printer Problems First, check...
Printer Basics
Page 65
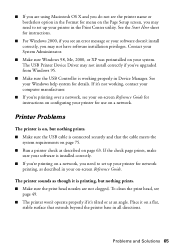
... Windows 98, Me, 2000, or XP was preinstalled on -screen Reference Guide. The printer sounds as described in the Print Center utility. The USB Printer Device Driver may need to set up your printer in your on your printer for details. Printer Problems The printer is on a flat, stable surface that the cable meets the system requirements on page 75. ■ Run a printer check as described on a network. Place it is installed correctly...
... Windows 98, Me, 2000, or XP was preinstalled on -screen Reference Guide. The printer sounds as described in the Print Center utility. The USB Printer Device Driver may need to set up your printer in your on your printer for details. Printer Problems The printer is on a flat, stable surface that the cable meets the system requirements on page 75. ■ Run a printer check as described on a network. Place it is installed correctly...
Service Manual
Page 15
... by installing it with a new one . 2. The printer does not perform any print operation and the error is displayed on LED and STM3. Occurrence Timing Position of EEPROM on LED and STM3. Check if "Hopper" works properly while feeding paper. Compression Spring, 2.51 TROUBLESHOOTING Unit Level Troubleshooting 15 Replace the Ink Cartridge with a new one . 1. Replace the Ink Cartridge with a new one . "Holder, Shaft, LD Roller" rotates to Each Phenomenon Faulty Part/ Part Name Check Point 1. Reassemble "ASF Frame...
... by installing it with a new one . 2. The printer does not perform any print operation and the error is displayed on LED and STM3. Occurrence Timing Position of EEPROM on LED and STM3. Check if "Hopper" works properly while feeding paper. Compression Spring, 2.51 TROUBLESHOOTING Unit Level Troubleshooting 15 Replace the Ink Cartridge with a new one . 1. Replace the Ink Cartridge with a new one . "Holder, Shaft, LD Roller" rotates to Each Phenomenon Faulty Part/ Part Name Check Point 1. Reassemble "ASF Frame...

Service Manual
Page 75
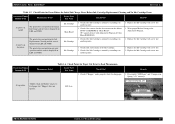
... the exclusive servicing program, print the print normal. Check if the center position of Board replacement. Select this function in each pattern. For the reset function, select this function in each pattern. Exclusive servicing program Exclusive servicing program Exclusive servicing program Used Media Plain paper (A4) Photo Quality Ink Jet Paper (A4) Glossy Photo Paper (A4) Sheet, CD, Dummy Plain paper (A4) Check pattern items ADJUSTMENT Adjustment Items and Overview 75 EPSON Stylus Photo R200/R210...
... the exclusive servicing program, print the print normal. Check if the center position of Board replacement. Select this function in each pattern. For the reset function, select this function in each pattern. Exclusive servicing program Exclusive servicing program Exclusive servicing program Used Media Plain paper (A4) Photo Quality Ink Jet Paper (A4) Glossy Photo Paper (A4) Sheet, CD, Dummy Plain paper (A4) Check pattern items ADJUSTMENT Adjustment Items and Overview 75 EPSON Stylus Photo R200/R210...
Service Manual
Page 82
... the [Print] button to print A4 Photo Quality Inkjet Paper Print Pattern. 3. Check the adjustment result in the Adjustment Program. 2. Check the adjustment result in the Adjustment Program. 2. Select A4 Photo Paper/ Glossy Photo Paper print in each box of the replaced parts/units checklist and then click the [OK] button. 3.2.9 A4 Normal Paper Print [Adjustment Procedure] 1. ADJUSTMENT Adjustment by using adjustment program Revision A 82 Select A4 Photo Quality Inkjet Paper Print in the Adjustment Program. 2. EPSON Stylus Photo R200/R210 3.2.8 Offset...
... the [Print] button to print A4 Photo Quality Inkjet Paper Print Pattern. 3. Check the adjustment result in the Adjustment Program. 2. Check the adjustment result in the Adjustment Program. 2. Select A4 Photo Paper/ Glossy Photo Paper print in each box of the replaced parts/units checklist and then click the [OK] button. 3.2.9 A4 Normal Paper Print [Adjustment Procedure] 1. ADJUSTMENT Adjustment by using adjustment program Revision A 82 Select A4 Photo Quality Inkjet Paper Print in the Adjustment Program. 2. EPSON Stylus Photo R200/R210 3.2.8 Offset...

Service Manual
Page 88
... this page, it is used screen shot of Stylus Photo R300/310 as printing. Display for operations such as Head Cleaning as well as a substitute for the Waste Ink Counter through the operation Panel Switch. After the cleaning, choose "Nozzle Check" and print the Nozzle Check Pattern. Head Cleaning Functions of the Nozzle Check Pattern Print. If it is counted in the Waste Ink Counter set in the EEPROM. MAINTENANCE Overview 88 Select EPSON Status Monitor 3 in the Printer Driver Utility...
... this page, it is used screen shot of Stylus Photo R300/310 as printing. Display for operations such as Head Cleaning as well as a substitute for the Waste Ink Counter through the operation Panel Switch. After the cleaning, choose "Nozzle Check" and print the Nozzle Check Pattern. Head Cleaning Functions of the Nozzle Check Pattern Print. If it is counted in the Waste Ink Counter set in the EEPROM. MAINTENANCE Overview 88 Select EPSON Status Monitor 3 in the Printer Driver Utility...


