Operation Guide - EasyMP Monitor v4.40
Page 2
.... "Timer Settings". Indicates operating methods and the order of operations. Example: Select "Timer" - Example: Esc button Indicates the name of the buttons on the projector's remote control or the control panel. Timer Settings. Select Timer - Indicates the name of the buttons on the EasyMP Monitor or OS screens. 2 Notations Used in...
.... "Timer Settings". Indicates operating methods and the order of operations. Example: Select "Timer" - Example: Esc button Indicates the name of the buttons on the projector's remote control or the control panel. Timer Settings. Select Timer - Indicates the name of the buttons on the EasyMP Monitor or OS screens. 2 Notations Used in...
User Replaceable Parts List
Page 1
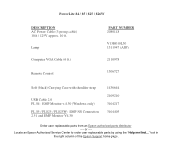
... of the Epson Support home page. Lamp Computer VGA Cable (6 ft.) Remote Control PART NUMBER 2080118 V13H010L50 1511947 (ASP) 2110978 1506727 Soft (black) Carrying Case with shoulder strap USB Cable 2.0 PL 84: EMP Monitor... v.4.30 (Windows only) PL 85 / PL825 / PL825W: EMP NS Connection 2.51 and EMP Monitor V4.30 1436644 2109210 3104217 3104405 Order user replaceable parts from an Epson authorized parts distributor ---- PowerLite 84...
... of the Epson Support home page. Lamp Computer VGA Cable (6 ft.) Remote Control PART NUMBER 2080118 V13H010L50 1511947 (ASP) 2110978 1506727 Soft (black) Carrying Case with shoulder strap USB Cable 2.0 PL 84: EMP Monitor... v.4.30 (Windows only) PL 85 / PL825 / PL825W: EMP NS Connection 2.51 and EMP Monitor V4.30 1436644 2109210 3104217 3104405 Order user replaceable parts from an Epson authorized parts distributor ---- PowerLite 84...
Product Brochure
Page 2
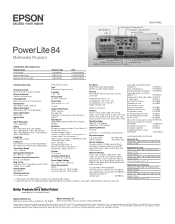
... REMOTE CONTROL Features Search, Comp, Video, USB, LAN, power, aspect, color mode, volume, e-zoom, A/V mute, freeze, menu, page up screen ELPSC08 Duet™ screen ELPSC80 Epson DC-10s document camera ELPDC10S Epson DC-06 document camera (ELPDC06) V12H321001 Kensington security lock ELPSL01 Distribution amplifier ELPDA01 Image presentation camera (ELPDC05) V12H162020 PACKAGING SPECIFICATIONS PowerLite 84 Dimensions...
... REMOTE CONTROL Features Search, Comp, Video, USB, LAN, power, aspect, color mode, volume, e-zoom, A/V mute, freeze, menu, page up screen ELPSC08 Duet™ screen ELPSC80 Epson DC-10s document camera ELPDC10S Epson DC-06 document camera (ELPDC06) V12H321001 Kensington security lock ELPSL01 Distribution amplifier ELPDA01 Image presentation camera (ELPDC05) V12H162020 PACKAGING SPECIFICATIONS PowerLite 84 Dimensions...
Quick Setup
Page 1
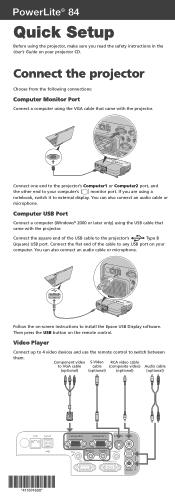
Follow the on your computer. Video Player Connect up to 4 video devices and use the remote control to VGA cable cable (composite video) Audio cable (optional) (optional) (optional) (optional) *411674500* *411674500* You can also connect an audio cable or ...User's Guide on the remote control. Connect the square end of the cable to any USB port on -screen instructions to install the Epson USB Display software. You can also connect an audio cable or microphone. Component video S-Video RCA video cable to switch between them. PowerLite® 84 Quick Setup Before using ...
Follow the on your computer. Video Player Connect up to 4 video devices and use the remote control to VGA cable cable (composite video) Audio cable (optional) (optional) (optional) (optional) *411674500* *411674500* You can also connect an audio cable or ...User's Guide on the remote control. Connect the square end of the cable to any USB port on -screen instructions to install the Epson USB Display software. You can also connect an audio cable or microphone. Component video S-Video RCA video cable to switch between them. PowerLite® 84 Quick Setup Before using ...
Quick Setup
Page 2
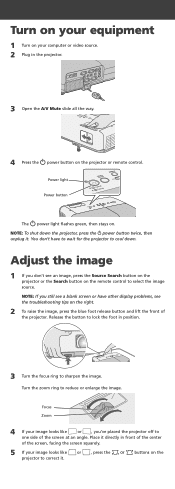
... the image. You don't have other display problems, see an image, press the Source Search button on the projector or the Search button on the remote control to one side of the screen, facing the screen squarely. 5 If your image looks like or , you don't see the troubleshooting tips on the... front of the center of the screen at an angle. Power light Power button The power light flashes green, then stays on the projector or remote control.
... the image. You don't have other display problems, see an image, press the Source Search button on the projector or the Search button on the remote control to one side of the screen, facing the screen squarely. 5 If your image looks like or , you don't see the troubleshooting tips on the... front of the center of the screen at an angle. Power light Power button The power light flashes green, then stays on the projector or remote control.
Quick Setup
Page 3
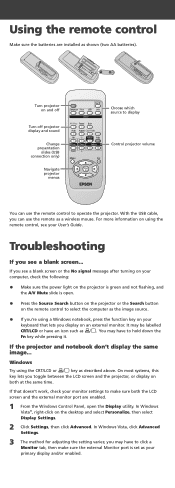
...display and sound Change presentation slides (USB connection only) Navigate projector menus Choose which source to display Control projector volume You can use the remote control to operate the projector. you may have to click a Monitor tab, then make sure both at the same time. With the USB...have an icon such as described above. Windows Try using the CRT/LCD or key as . In Windows Vista®, right-click on using the remote control, see a blank screen... If the projector and notebook don't display the same image... In Windows Vista, click Advanced Settings. 3 The ...
...display and sound Change presentation slides (USB connection only) Navigate projector menus Choose which source to display Control projector volume You can use the remote control to operate the projector. you may have to click a Monitor tab, then make sure both at the same time. With the USB...have an icon such as described above. Windows Try using the CRT/LCD or key as . In Windows Vista®, right-click on using the remote control, see a blank screen... If the projector and notebook don't display the same image... In Windows Vista, click Advanced Settings. 3 The ...

User's Guide
Page 4
... of Your Image 33 Controlling the Volume 33 Adjusting the Aspect Ratio 34 Adjusting the Color Mode 35 Operating Your Computer with the Remote Control 36 Highlighting Your Presentation 37 Using the Pointer Tool 37 Customizing the Pointer Tool 37 3 Connecting to Computers and Other Equipment... 39 Connecting to a Computer 40 Connecting to the VGA Port 40 Connecting to the USB Port 41 Connecting the USB Cable for Remote Mouse Control 42 Connecting an External Monitor 43 Connecting to Video Equipment 44 Connecting a Composite Video Source 45 Connecting an S-Video Source 46...
... of Your Image 33 Controlling the Volume 33 Adjusting the Aspect Ratio 34 Adjusting the Color Mode 35 Operating Your Computer with the Remote Control 36 Highlighting Your Presentation 37 Using the Pointer Tool 37 Customizing the Pointer Tool 37 3 Connecting to Computers and Other Equipment... 39 Connecting to a Computer 40 Connecting to the VGA Port 40 Connecting to the USB Port 41 Connecting the USB Cable for Remote Mouse Control 42 Connecting an External Monitor 43 Connecting to Video Equipment 44 Connecting a Composite Video Source 45 Connecting an S-Video Source 46...

User's Guide
Page 6
Solving Network Problems 100 Solving Problems with the Remote Control 101 Where To Get Help 102 Speak to a Support Representative 102 A Projector Installation 105 B Technical Specifications 107 C Notices 113 Important Safety Instructions 113 FCC Compliance Statement 116 Index 117 6
Solving Network Problems 100 Solving Problems with the Remote Control 101 Where To Get Help 102 Speak to a Support Representative 102 A Projector Installation 105 B Technical Specifications 107 C Notices 113 Important Safety Instructions 113 FCC Compliance Statement 116 Index 117 6
User's Guide
Page 8
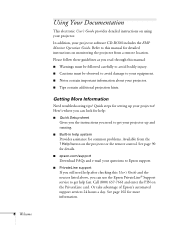
... Help button on the PrivateLine card. Here's where you can use the Epson PrivateLine® Support service to get help fast. Call (800) 637-7661 and enter the PIN on the projector or the remote control. Quick steps for setting up and running. ■ Built-in... to avoid bodily injury. ■ Cautions must be observed to avoid damage to this manual for common problems. Available from a remote location. In addition, your projector. Getting More Information Need troubleshooting tips? Refer to your equipment. ■ Notes contain important information about your...
... Help button on the PrivateLine card. Here's where you can use the Epson PrivateLine® Support service to get help fast. Call (800) 637-7661 and enter the PIN on the projector or the remote control. Quick steps for setting up and running. ■ Built-in... to avoid bodily injury. ■ Cautions must be observed to avoid damage to this manual for common problems. Available from a remote location. In addition, your projector. Getting More Information Need troubleshooting tips? Refer to your equipment. ■ Notes contain important information about your...
User's Guide
Page 10
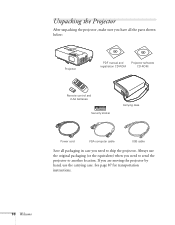
If you are moving the projector by hand, use the original packaging (or the equivalent) when you need to send the projector to ship the projector. Always use the carrying case. See page 87 for transportation instructions. 10 Welcome Unpacking the Projector After unpacking the projector, make sure you have all the parts shown below: Projector PDF manual and Projector software registration CD-ROM CD-ROM Remote control and 2 AA batteries Security sticker Carrying case Power cord VGA computer cable USB cable Save all packaging in case you need to another location.
If you are moving the projector by hand, use the original packaging (or the equivalent) when you need to send the projector to ship the projector. Always use the carrying case. See page 87 for transportation instructions. 10 Welcome Unpacking the Projector After unpacking the projector, make sure you have all the parts shown below: Projector PDF manual and Projector software registration CD-ROM CD-ROM Remote control and 2 AA batteries Security sticker Carrying case Power cord VGA computer cable USB cable Save all packaging in case you need to another location.
User's Guide
Page 11
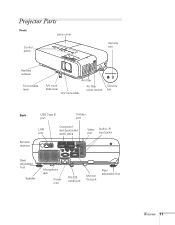
Projector Parts Front Lamp cover Control panel Security slot Remote receiver Foot release lever Air filter A/V mute slide lever A/V mute slide Air filter cover switch Security bar Back Remote receiver USB Type B port S-Video port Computer1 LAN and 2 ports and Video Audio L-R port audio jacks port input jacks Rear adjustable foot Speaker Microphone jack Power inlet RS-232 serial port Monitor Out port Rear adjustable foot Welcome 11
Projector Parts Front Lamp cover Control panel Security slot Remote receiver Foot release lever Air filter A/V mute slide lever A/V mute slide Air filter cover switch Security bar Back Remote receiver USB Type B port S-Video port Computer1 LAN and 2 ports and Video Audio L-R port audio jacks port input jacks Rear adjustable foot Speaker Microphone jack Power inlet RS-232 serial port Monitor Out port Rear adjustable foot Welcome 11

User's Guide
Page 19
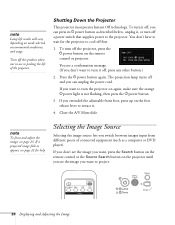
...: 1. 3. note If a power outage occurs when Direct Power On is enabled and the projector is plugged in the projector. Press the Ppower button on the remote control or on top of the projector. When the Ppower light stops flashing and remains green, the projector is on the...
...: 1. 3. note If a power outage occurs when Direct Power On is enabled and the projector is plugged in the projector. Press the Ppower button on the remote control or on top of the projector. When the Ppower light stops flashing and remains green, the projector is on the...
User's Guide
Page 20
... its Ppower button as a computer or DVD player). Selecting the Image Source Selecting the image source lets you want , press the Search button on the remote control or the Source Search button on again, make sure the orange Ppower light is not flashing, then press the Ppower button. 3. If you switch... the Projector This projector incorporates Instant Off technology. Turn off first. 1. Press the Ppower button again. note Lamp life results will vary depending on the remote control or projector. Close the A/V Mute slide.
... its Ppower button as a computer or DVD player). Selecting the Image Source Selecting the image source lets you want , press the Search button on the remote control or the Source Search button on again, make sure the orange Ppower light is not flashing, then press the Ppower button. 3. If you switch... the Projector This projector incorporates Instant Off technology. Turn off first. 1. Press the Ppower button again. note Lamp life results will vary depending on the remote control or projector. Close the A/V Mute slide.
User's Guide
Page 21
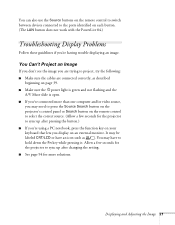
You can also use the Source buttons on the remote control to switch between devices connected to the ports identified on each button. (The LAN button does not work with the PowerLite 84.) Troubleshooting Display Problems Follow these guidelines if you 've connected more solutions. Allow a few seconds for more than one ... the Image 21 You Can't Project an Image If you don't see the image you may have an icon such as described beginning on the remote control to select the correct source. (Allow a few seconds for the projector to sync up after changing the setting. ■ See page 94...
You can also use the Source buttons on the remote control to switch between devices connected to the ports identified on each button. (The LAN button does not work with the PowerLite 84.) Troubleshooting Display Problems Follow these guidelines if you 've connected more solutions. Allow a few seconds for more than one ... the Image 21 You Can't Project an Image If you don't see the image you may have an icon such as described beginning on the remote control to select the correct source. (Allow a few seconds for the projector to sync up after changing the setting. ■ See page 94...

User's Guide
Page 25
... image. Projector tilted up or down It takes about one second after projection starts for instructions. You can also use the E-Zoom buttons on the remote control to move the projector farther away from the screen. Adjusting the Image Shape In most cases, you may need to zoom in front of...
... image. Projector tilted up or down It takes about one second after projection starts for instructions. You can also use the E-Zoom buttons on the remote control to move the projector farther away from the screen. Adjusting the Image Shape In most cases, you may need to zoom in front of...
User's Guide
Page 26
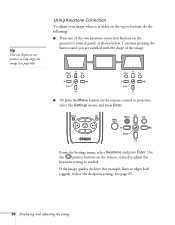
... it is wider on the top or bottom, do the following: ■ Press one of the image. ■ Or press the Menu button on the remote control or projector, select the Settings menu, and press Enter. See page 65. 26 Displaying and Adjusting the Image If the image quality declines (for... menu, select Keystone and press Enter. Continue pressing the button until you are satisfied with the shape of the two keystone correction buttons on the remote control to help align the image (see page 68). Use the pointer buttons on the projector's control panel, as needed.
... it is wider on the top or bottom, do the following: ■ Press one of the image. ■ Or press the Menu button on the remote control or projector, select the Settings menu, and press Enter. See page 65. 26 Displaying and Adjusting the Image If the image quality declines (for... menu, select Keystone and press Enter. Continue pressing the button until you are satisfied with the shape of the two keystone correction buttons on the remote control to help align the image (see page 68). Use the pointer buttons on the projector's control panel, as needed.
User's Guide
Page 27
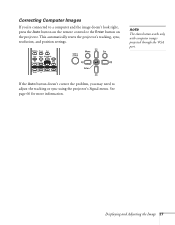
This automatically resets the projector's tracking, sync, resolution, and position settings. note The Auto button works only with computer images projected through the VGA port. If the Auto button doesn't correct the problem, you 're connected to adjust the tracking or sync using the projector's Signal menu. Displaying and Adjusting the Image 27 See page 66 for more information. Correcting Computer Images If you may need to a computer and the image doesn't look right, press the Auto button on the remote control or the Enter button on the projector.
This automatically resets the projector's tracking, sync, resolution, and position settings. note The Auto button works only with computer images projected through the VGA port. If the Auto button doesn't correct the problem, you 're connected to adjust the tracking or sync using the projector's Signal menu. Displaying and Adjusting the Image 27 See page 66 for more information. Correcting Computer Images If you may need to a computer and the image doesn't look right, press the Auto button on the remote control or the Enter button on the projector.

User's Guide
Page 29
... ■ Highlighting your presentation (page 37). All of tools to 20 feet away. 2 Using the Remote Control The projector includes a number of them can be accessed using the remote control, which lets you operate the projector from a computer (page 36) or as a pointer to adjust the color mode for various environments (page... 35). You can use it as a wireless mouse when projecting from anywhere in the room-up to enhance your presentation. You can also use the remote control to adjust the picture and sound (page 31) or to highlight your presentation 29
... ■ Highlighting your presentation (page 37). All of tools to 20 feet away. 2 Using the Remote Control The projector includes a number of them can be accessed using the remote control, which lets you operate the projector from a computer (page 36) or as a pointer to adjust the color mode for various environments (page... 35). You can use it as a wireless mouse when projecting from anywhere in the room-up to enhance your presentation. You can also use the remote control to adjust the picture and sound (page 31) or to highlight your presentation 29
User's Guide
Page 30
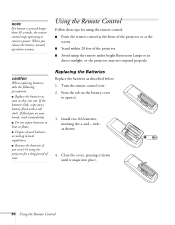
... bright fluorescent lamps or in direct sunlight, or the projector may not respond properly. Using the Remote Control Follow these tips for using the remote control: ■ Point the remote control at the front of the projector or at the screen. ■ Stand within 20 feet of the projector. ■... Avoid using the projector for a long period of used batteries according to open it snaps into place. 30 Using the Remote Control If the batteries leak, wipe away battery fluid with a soft cloth. If fluid gets on the battery cover to local regulations. ■ ...
... bright fluorescent lamps or in direct sunlight, or the projector may not respond properly. Using the Remote Control Follow these tips for using the remote control: ■ Point the remote control at the front of the projector or at the screen. ■ Stand within 20 feet of the projector. ■... Avoid using the projector for a long period of used batteries according to open it snaps into place. 30 Using the Remote Control If the batteries leak, wipe away battery fluid with a soft cloth. If fluid gets on the battery cover to local regulations. ■ ...
User's Guide
Page 31
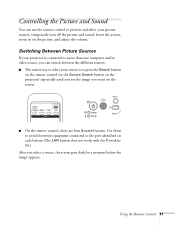
Using the Remote Control 31 Use them to switch between the different sources: ■ The easiest way to select your picture sources, temporarily turn off the picture and sound, freeze the action, zoom in on each button (The LAN button does not work with the PowerLite 84.) After you want on the... screen. ■ On the remote control, there are four Source buttons. Controlling the Picture and Sound You can switch between equipment connected to the ...
Using the Remote Control 31 Use them to switch between the different sources: ■ The easiest way to select your picture sources, temporarily turn off the picture and sound, freeze the action, zoom in on each button (The LAN button does not work with the PowerLite 84.) After you want on the... screen. ■ On the remote control, there are four Source buttons. Controlling the Picture and Sound You can switch between equipment connected to the ...


