Quick Start
Page 1
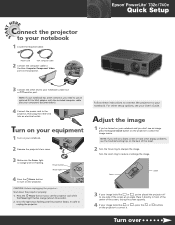
Epson® PowerLite® 732c/740c Quick Setup 3 Connect the other display problems, see an image, press the Source Search button on the projector. Press the Power button twice. Adjust the image 1 If you've turned on your notebook and you still see a blank screen or have ... the Power light is orange and not flashing. NOTE: If your notebook has a DVI connector, you 've placed the projector off to the blue Computer/Component Video port on the projector to -VGA adapter with the included computer cable (see your User's Guide. For other end into an electrical outlet. CAUTION...
Epson® PowerLite® 732c/740c Quick Setup 3 Connect the other display problems, see an image, press the Source Search button on the projector. Press the Power button twice. Adjust the image 1 If you've turned on your notebook and you still see a blank screen or have ... the Power light is orange and not flashing. NOTE: If your notebook has a DVI connector, you 've placed the projector off to the blue Computer/Component Video port on the projector to -VGA adapter with the included computer cable (see your User's Guide. For other end into an electrical outlet. CAUTION...

User's Guide
Page 4
...Sources 29 Turning Off the Picture and Sound 30 Stopping Action 30 Zooming Part of Your Image 31 Controlling the Volume 31 Resizing Video images 32 Adjusting the Color Mode 32 Operating Your Computer with the Remote Control . . . . . 33 Highlighting Your ...36 Using the Macintosh Desktop Adapter 37 Connecting the Cable for Remote Mouse Control . . . 38 Connecting to Video Equipment 39 Connecting a Composite Video Source 40 Connecting an S-Video Source 41 Connecting a Component Video Source 42 Connecting an RGB Video Source 43 Playing Sound Through the Projector 44 4 Contents
...Sources 29 Turning Off the Picture and Sound 30 Stopping Action 30 Zooming Part of Your Image 31 Controlling the Volume 31 Resizing Video images 32 Adjusting the Color Mode 32 Operating Your Computer with the Remote Control . . . . . 33 Highlighting Your ...36 Using the Macintosh Desktop Adapter 37 Connecting the Cable for Remote Mouse Control . . . 38 Connecting to Video Equipment 39 Connecting a Composite Video Source 40 Connecting an S-Video Source 41 Connecting a Component Video Source 42 Connecting an RGB Video Source 43 Playing Sound Through the Projector 44 4 Contents

User's Guide
Page 6
A Projector Installation 81 B Technical Specifications 83 General 83 Projection Lamp 84 Remote Control 84 Dimensions 84 Electrical 84 Environmental 84 Safety 85 Compatible Video Formats 85 C Notices 87 Important Safety Instructions 87 Remote Control Information 89 Declaration of Conformity 90 FCC Compliance Statement 91 Warranty 92 Index 95 6 Contents
A Projector Installation 81 B Technical Specifications 83 General 83 Projection Lamp 84 Remote Control 84 Dimensions 84 Electrical 84 Environmental 84 Safety 85 Compatible Video Formats 85 C Notices 87 Important Safety Instructions 87 Remote Control Information 89 Declaration of Conformity 90 FCC Compliance Statement 91 Warranty 92 Index 95 6 Contents

User's Guide
Page 7
...brightness. Welcome The Epson® PowerLite® 732c/740c is an easy-to lock the projector buttons. 7 Security To prevent unauthorized use, this projector includes several security features including a password, user's logo, and the ability to -use it to 2500 lumens (740c) or 2000 lumens (732c) of the picture,... room. You can connect it in place of your computer's mouse to take charge of computers and video sources. You can use the remote as a pointer. Easy control The projector's keystone correction feature automatically corrects image distortion, and you can even use...
...brightness. Welcome The Epson® PowerLite® 732c/740c is an easy-to lock the projector buttons. 7 Security To prevent unauthorized use, this projector includes several security features including a password, user's logo, and the ability to -use it to 2500 lumens (740c) or 2000 lumens (732c) of the picture,... room. You can connect it in place of your computer's mouse to take charge of computers and video sources. You can use the remote as a pointer. Easy control The projector's keystone correction feature automatically corrects image distortion, and you can even use...

User's Guide
Page 10
... Depending on how you 'll need an S-Video cable. You can purchase one from Epson; If you can purchase one from a VCR or other video device, you need to ship the projector. One may be provided with your video equipment, or you are moving the projector by hand, use the projector, you may need additional components: ■...
... Depending on how you 'll need an S-Video cable. You can purchase one from Epson; If you can purchase one from a VCR or other video device, you need to ship the projector. One may be provided with your video equipment, or you are moving the projector by hand, use the projector, you may need additional components: ■...

User's Guide
Page 11
... Accessories To enhance your computer dealer. Welcome 11 In Canada, please call 800-GO-EPSON (800-463-7766) or browse our catalog of the projector, Epson provides the following optional accessories: Product Replacement lamp Air filter replacement set Component video cable S-Video cable Distribution amplifier Image presentation camera (ELPDC05) Part number V13H010L32 V13H134A08 ELPKS42 ELPKS35...
... Accessories To enhance your computer dealer. Welcome 11 In Canada, please call 800-GO-EPSON (800-463-7766) or browse our catalog of the projector, Epson provides the following optional accessories: Product Replacement lamp Air filter replacement set Component video cable S-Video cable Distribution amplifier Image presentation camera (ELPDC05) Part number V13H010L32 V13H134A08 ELPKS42 ELPKS35...

User's Guide
Page 13
Follow the guidelines in this chapter for: ■ Positioning the projector ■ Turning the projector on the screen. 1 Displaying and Adjusting the Image Whether you're presenting from a computer or video equipment, you need to follow some basic steps to display your image on and selecting the image source ■ Troubleshooting display problems ■ Adjusting the image ■ Turning off the projector 13
Follow the guidelines in this chapter for: ■ Positioning the projector ■ Turning the projector on the screen. 1 Displaying and Adjusting the Image Whether you're presenting from a computer or video equipment, you need to follow some basic steps to display your image on and selecting the image source ■ Troubleshooting display problems ■ Adjusting the image ■ Turning off the projector 13
User's Guide
Page 16
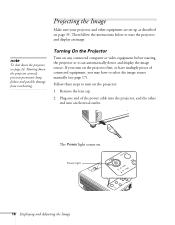
...the instructions below to select the image source manually (see page 24. Turning On the Projector Turn on the projector: 1. If you turn on any connected computer or video equipment before starting the projector so it can automatically detect and display the image source. Follow these steps to turn... on the projector first, or have to start the projector and display an image. The Power light comes on page ...
...the instructions below to select the image source manually (see page 24. Turning On the Projector Turn on the projector: 1. If you turn on any connected computer or video equipment before starting the projector so it can automatically detect and display the image source. Follow these steps to turn... on the projector first, or have to start the projector and display an image. The Power light comes on page ...

User's Guide
Page 18
... labeled CRT/LCD or have to hold down the Fn key while pressing it . Troubleshooting Display Problems Follow these guidelines. Allow a few seconds for the projector to sync up after changing the setting. You may have an icon such as . If you're using a PC notebook, press the function key on... green and not flashing and the lens cap is off. ■ If you've connected more than one computer and/or video source, you may need to press the Source Search button on the projector's control panel or Search button on your computer at the same time. Allow a few seconds for the...
... labeled CRT/LCD or have to hold down the Fn key while pressing it . Troubleshooting Display Problems Follow these guidelines. Allow a few seconds for the projector to sync up after changing the setting. You may have an icon such as . If you're using a PC notebook, press the function key on... green and not flashing and the lens cap is off. ■ If you've connected more than one computer and/or video source, you may need to press the Source Search button on the projector's control panel or Search button on your computer at the same time. Allow a few seconds for the...

User's Guide
Page 29
...control, there are four Source buttons. Using the Remote Control 29 Switching Between Picture Sources If your projector is to preview and select your source is connected to more than one computer and/or video source, you can use the remote control to press the Search button on the remote control (...or the Source Search button on the projector) repeatedly until you see the image you select a source, the screen goes...
...control, there are four Source buttons. Using the Remote Control 29 Switching Between Picture Sources If your projector is to preview and select your source is connected to more than one computer and/or video source, you can use the remote control to press the Search button on the remote control (...or the Source Search button on the projector) repeatedly until you see the image you select a source, the screen goes...

User's Guide
Page 32
...movie images for increased contrast ■ Living Room: To increase brightness when projecting TV or video images in 16:9 widescreen format. If the resolution of the image is normally unnecessary, since the projector automatically resizes the image to make the best use of the display area. For computer images..., resizing is the same as the projector's (1024 × 768), pressing Resize has no effect. Resizing Video images You can use the Color Mode button on the remote control to adjust the vividness of your image....
...movie images for increased contrast ■ Living Room: To increase brightness when projecting TV or video images in 16:9 widescreen format. If the resolution of the image is normally unnecessary, since the projector automatically resizes the image to make the best use of the display area. For computer images..., resizing is the same as the projector's (1024 × 768), pressing Resize has no effect. Resizing Video images You can use the Color Mode button on the remote control to adjust the vividness of your image....

User's Guide
Page 35
1 Connecting to Computers and Other Equipment This chapter tells you how to connect the projector to a notebook or desktop computer, and/or to a computer ■ Connecting video equipment ■ Playing sound through the projector 35 Follow the instructions in this chapter on: ■ Connecting to video equipment, such as a VCR, DVD player, or video camera.
1 Connecting to Computers and Other Equipment This chapter tells you how to connect the projector to a notebook or desktop computer, and/or to a computer ■ Connecting video equipment ■ Playing sound through the projector 35 Follow the instructions in this chapter on: ■ Connecting to video equipment, such as a VCR, DVD player, or video camera.

User's Guide
Page 36
... remote control as a mouse; Then go to the blue Computer/ Component Video port (standard VGA cable connection), see the instructions below. You can connect the PowerLite projector to any computer that came with the projector (the monitor port on page 37 (available from Epson; Connecting to a Computer You can connect an optional stereo mini-jack...
... remote control as a mouse; Then go to the blue Computer/ Component Video port (standard VGA cable connection), see the instructions below. You can connect the PowerLite projector to any computer that came with the projector (the monitor port on page 37 (available from Epson; Connecting to a Computer You can connect an optional stereo mini-jack...

User's Guide
Page 37
3. This is available from Epson (see page 16 for instructions. 2. See your Macintosh documentation for instructions on turning on the projector and adjusting the image. Then plug the cable (with the adapter) into the video port on the connectors. Tighten the screws on your computer. Replace the cover and connect the adapter to connect...
3. This is available from Epson (see page 16 for instructions. 2. See your Macintosh documentation for instructions on turning on the projector and adjusting the image. Then plug the cable (with the adapter) into the video port on the connectors. Tighten the screws on your computer. Replace the cover and connect the adapter to connect...

User's Guide
Page 38
...cable to any available USB port on systems with an external USB mouse. USB cable Move Left cursor click Right click 3. See your projector. 2. Locate the USB cable that have been upgraded from up to 20 feet away. If necessary, configure your notebook or desktop computer...The remote mouse control function may not operate correctly on using the remote control in this chapter (using the Computer/Component Video port), you can use the projector's remote control as a wireless mouse. The wireless mouse function is supported on your computer to Computers and Other Equipment...
...cable to any available USB port on systems with an external USB mouse. USB cable Move Left cursor click Right click 3. See your projector. 2. Locate the USB cable that have been upgraded from up to 20 feet away. If necessary, configure your notebook or desktop computer...The remote mouse control function may not operate correctly on using the remote control in this chapter (using the Computer/Component Video port), you can use the projector's remote control as a wireless mouse. The wireless mouse function is supported on your computer to Computers and Other Equipment...

User's Guide
Page 39
... 43. Connecting to Video Equipment You can connect several video sources to the projector at your video equipment to determine its available video output connections: ■ If your video player has a yellow RCA-style video output connector, see "Connecting a Composite Video Source" on page 40. ■ If your video player has an S-Video connector, see "Connecting an S-Video Source" on page...
... 43. Connecting to Video Equipment You can connect several video sources to the projector at your video equipment to determine its available video output connections: ■ If your video player has a yellow RCA-style video output connector, see "Connecting a Composite Video Source" on page 40. ■ If your video player has an S-Video connector, see "Connecting an S-Video Source" on page...

User's Guide
Page 40
...16 or the Quick Setup sheet for instructions on turning on the projector's control panel repeatedly until the image appears. 40 Connecting to make any other connections, see page 44 for instructions on the projector: 3. Locate an RCA-style video cable (one is turned on, select the image source: press... the Search button on the remote control or press the Source Search button on the projector and adjusting the image. If you can purchase ...
...16 or the Quick Setup sheet for instructions on turning on the projector's control panel repeatedly until the image appears. 40 Connecting to make any other connections, see page 44 for instructions on the projector: 3. Locate an RCA-style video cable (one is turned on, select the image source: press... the Search button on the remote control or press the Source Search button on the projector and adjusting the image. If you can purchase ...

User's Guide
Page 41
... source: press the Search button on the remote control or press the Source Search button on the projector: 3. Connect the cable to the S-Video connector on your video equipment or you don't need to Computers and Other Equipment 41 see page 16 or the Quick Setup... sheet for instructions on the projector and adjusting the image. Connecting an S-Video Source 1. Connecting to make any other connections, see page 10). 2. Once the projector is usually provided with your player and the S-Video connector on the projector's control panel repeatedly until the image appears...
... source: press the Search button on the remote control or press the Source Search button on the projector: 3. Connect the cable to the S-Video connector on your video equipment or you don't need to Computers and Other Equipment 41 see page 16 or the Quick Setup... sheet for instructions on the projector and adjusting the image. Connecting an S-Video Source 1. Connecting to make any other connections, see page 10). 2. Once the projector is usually provided with your player and the S-Video connector on the projector's control panel repeatedly until the image appears...

User's Guide
Page 42
...44 for instructions on turning on the projector and adjusting the image. Component-toVGA adapter Component-to -VGA video cable or adapter. 2. If you want to play sound through the projector, see page 11 for this cable (ELPKC19) from Epson; You can order this connection. Connect ...the cable to your video player's documentation. Also, make any other ...
...44 for instructions on turning on the projector and adjusting the image. Component-toVGA adapter Component-to -VGA video cable or adapter. 2. If you want to play sound through the projector, see page 11 for this cable (ELPKC19) from Epson; You can order this connection. Connect ...the cable to your video player's documentation. Also, make any other ...

User's Guide
Page 43
If you want to make any other connections, see page 44 for instructions on turning on the projector. Locate the VGA computer cable provided with the projector. 2. note Be sure your video player is turned on, select the image source: press the Search button on the remote control or... press the Source Search button on your video player's documentation. 3. If you select the wrong source, image quality may suffer. Connecting to the video port on the projector's control panel repeatedly until the image appears. If you don't need to play...
If you want to make any other connections, see page 44 for instructions on turning on the projector. Locate the VGA computer cable provided with the projector. 2. note Be sure your video player is turned on, select the image source: press the Search button on the remote control or... press the Source Search button on your video player's documentation. 3. If you select the wrong source, image quality may suffer. Connecting to the video port on the projector's control panel repeatedly until the image appears. If you don't need to play...


