User Manual
Page 2
... stand 7 Attaching the paper basket (SC-P6000/SC-P7000 9 Attaching the paper basket (SC-P8000/SC-P9000 16 Installing the optional internal print server 24 Completing setup and connecting the power cord 26 Installing ink ...29 Loading roll paper ...33 Placing roll paper in the printer 33 Loading roll paper for printing...
... stand 7 Attaching the paper basket (SC-P6000/SC-P7000 9 Attaching the paper basket (SC-P8000/SC-P9000 16 Installing the optional internal print server 24 Completing setup and connecting the power cord 26 Installing ink ...29 Loading roll paper ...33 Placing roll paper in the printer 33 Loading roll paper for printing...
User Manual
Page 4
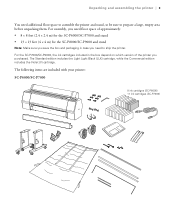
... (SC-P7000) Unpacking and assembling the printer | 3 You need to prepare a large, empty area before unpacking them. For the SC-P7000/SC-P9000, the ink cartridges included in case you purchased. For assembly, you need floor space of approximately: • 8 × 8 feet (2.4 × 2.4 m) for the SC-...P6000/SC-P7000 and stand • 13 × 13 feet (4 × 4 m) for the SC-P8000/SC-P9000 and stand Note: Make sure you save the ...
... (SC-P7000) Unpacking and assembling the printer | 3 You need to prepare a large, empty area before unpacking them. For the SC-P7000/SC-P9000, the ink cartridges included in case you purchased. For assembly, you need floor space of approximately: • 8 × 8 feet (2.4 × 2.4 m) for the SC-...P6000/SC-P7000 and stand • 13 × 13 feet (4 × 4 m) for the SC-P8000/SC-P9000 and stand Note: Make sure you save the ...
User Manual
Page 5
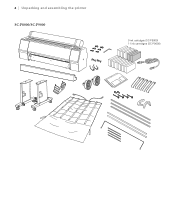
4 | Unpacking and assembling the printer SC-P8000/SC-P9000 9 ink cartidges (SC-P8000) 11 ink cartridges (SC-P9000)
4 | Unpacking and assembling the printer SC-P8000/SC-P9000 9 ink cartidges (SC-P8000) 11 ink cartridges (SC-P9000)
User Manual
Page 28
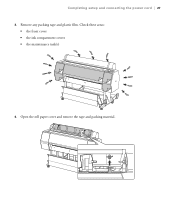
Open the roll paper cover and remove the tape and packing material. Completing setup and connecting the power cord | 27 3. Check these areas: • the front cover • the ink compartment covers • the maintenance tank(s) 4. Remove any packing tape and plastic film.
Open the roll paper cover and remove the tape and packing material. Completing setup and connecting the power cord | 27 3. Check these areas: • the front cover • the ink compartment covers • the maintenance tank(s) 4. Remove any packing tape and plastic film.
User Manual
Page 30
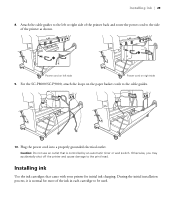
... guides to the left side Power cord on right side 9. Caution: Do not use an outlet that came with your printer for most of the ink in each cartridge to the side of the printer back and route the power cord to be used. Plug the power cord into a properly grounded... electrical outlet. Installing ink Use the ink cartridges that is normal for initial ink charging. For the SC-P8000/SC-P9000, attach the loops on left or right side of the printer as shown. Installing...
... guides to the left side Power cord on right side 9. Caution: Do not use an outlet that came with your printer for most of the ink in each cartridge to the side of the printer back and route the power cord to be used. Plug the power cord into a properly grounded... electrical outlet. Installing ink Use the ink cartridges that is normal for initial ink charging. For the SC-P8000/SC-P9000, attach the loops on left or right side of the printer as shown. Installing...

User Manual
Page 31
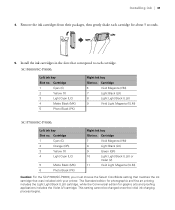
... Press the P power button to charge the ink system. Select the language, date/time, and units of cartridges as soon as possible. 1. Note: For the SC-P7000/SC-P9000, choose the Select ColorMode setting that matches the ink cartridge that was included with your printer. Caution...: Do not open slightly. This setting cannot be changed once the initial ink charging process begins. Open both ink covers. 30 | Installing ink The cartridges shipped with...
... Press the P power button to charge the ink system. Select the language, date/time, and units of cartridges as soon as possible. 1. Note: For the SC-P7000/SC-P9000, choose the Select ColorMode setting that matches the ink cartridge that was included with your printer. Caution...: Do not open slightly. This setting cannot be changed once the initial ink charging process begins. Open both ink covers. 30 | Installing ink The cartridges shipped with...
User Manual
Page 32
... . Cartridge 6 Vivid Magenta (VM) 7 Light Black (LK) 8 Light Light Black (LLK) 9 Vivid Light Magenta (VLM) SC-P7000/SC-P9000: Left ink bay Slot no . Installing ink | 31 4. Cartridge 7 Vivid Magenta (VM) 8 Light Black (LK) 9 Green (GR) 10 Light Light Black (LLK) or Violet (V) 11... Vivid Light Magenta (VLM) Caution: For the SC-P7000/SC-P9000, you must choose the Select ColorMode setting that matches the ink cartridge that correspond to each cartridge for graphic arts and proofing applications includes the Violet (V) cartridge. Remove ...
... . Cartridge 6 Vivid Magenta (VM) 7 Light Black (LK) 8 Light Light Black (LLK) 9 Vivid Light Magenta (VLM) SC-P7000/SC-P9000: Left ink bay Slot no . Installing ink | 31 4. Cartridge 7 Vivid Magenta (VM) 8 Light Black (LK) 9 Green (GR) 10 Light Light Black (LLK) or Violet (V) 11... Vivid Light Magenta (VLM) Caution: For the SC-P7000/SC-P9000, you must choose the Select ColorMode setting that matches the ink cartridge that correspond to each cartridge for graphic arts and proofing applications includes the Violet (V) cartridge. Remove ...
User Manual
Page 33
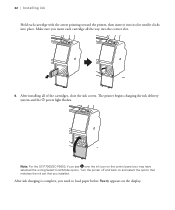
Note: For the SC-P7000/SC-P9000, if you see over the ink icon on the control panel you need to load paper before Ready appears on and select the option that matches the ink set that you insert each cartridge with the arrow pointing toward the printer, then insert it into its ...slot until it clicks into the correct slot. 6. After ink charging is complete, you may have selected the wrong Select ColorMode option. 32 | Installing ink Hold each cartridge all of the cartridges, close the ink covers. Turn the printer off and back on the display. Make sure you ...
Note: For the SC-P7000/SC-P9000, if you see over the ink icon on the control panel you need to load paper before Ready appears on and select the option that matches the ink set that you insert each cartridge with the arrow pointing toward the printer, then insert it into its ...slot until it clicks into the correct slot. 6. After ink charging is complete, you may have selected the wrong Select ColorMode option. 32 | Installing ink Hold each cartridge all of the cartridges, close the ink covers. Turn the printer off and back on the display. Make sure you ...

User Manual
Page 5
... Status with Windows 142 Checking Cartridge Status with OS X 145 Purchase Epson Ink Cartridges...146 Ink Cartridge and Maintenance Box Part Numbers 146 Removing and Installing Ink Cartridges 148 Replacing Maintenance Boxes...151 Switch Black Ink Type ...153 Switching the Black Ink Type...154 Black Ink Type Media List...154 Adjusting Print Quality...156 Print Head Maintenance...
... Status with Windows 142 Checking Cartridge Status with OS X 145 Purchase Epson Ink Cartridges...146 Ink Cartridge and Maintenance Box Part Numbers 146 Removing and Installing Ink Cartridges 148 Replacing Maintenance Boxes...151 Switch Black Ink Type ...153 Switching the Black Ink Type...154 Black Ink Type Media List...154 Adjusting Print Quality...156 Print Head Maintenance...

User Manual
Page 7
... ...202 Windows System Requirements ...202 Mac System Requirements ...203 Paper Specifications ...203 Printable Area Specifications ...205 Ink Cartridge Specifications...208 Dimension Specifications ...209 Electrical Specifications ...210 Environmental Specifications ...210 Interface Specifications ...211 Safety and... Approvals Specifications 211 Notices ...212 Important Safety Instructions...212 General Product Safety Instructions 212 Ink Cartridge Safety Instructions 214 FCC Compliance Statement...215 Open Source Software License ...215 Trademarks ...225 Copyright Notice...
... ...202 Windows System Requirements ...202 Mac System Requirements ...203 Paper Specifications ...203 Printable Area Specifications ...205 Ink Cartridge Specifications...208 Dimension Specifications ...209 Electrical Specifications ...210 Environmental Specifications ...210 Interface Specifications ...211 Safety and... Approvals Specifications 211 Notices ...212 Important Safety Instructions...212 General Product Safety Instructions 212 Ink Cartridge Safety Instructions 214 FCC Compliance Statement...215 Open Source Software License ...215 Trademarks ...225 Copyright Notice...
User Manual
Page 10
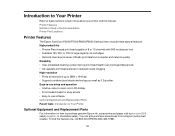
Printer Features Notations Used in the Documentation Printer Part Locations Printer Features The Epson SureColor P6000/P7000/P8000/P9000 Series printers include these sections to learn more about your printer and this manual. Introduction to Your Printer Refer to ... channels with 360 nozzles per inch • Available 150, 300, or 700 ml large-capacity ink cartridges • Optional internal print server offloads print data from an Epson authorized reseller. sales) or epson.ca (Canadian sales). You can also purchase accessories from computer and network quickly Reliability • ...
Printer Features Notations Used in the Documentation Printer Part Locations Printer Features The Epson SureColor P6000/P7000/P8000/P9000 Series printers include these sections to learn more about your printer and this manual. Introduction to Your Printer Refer to ... channels with 360 nozzles per inch • Available 150, 300, or 700 ml large-capacity ink cartridges • Optional internal print server offloads print data from an Epson authorized reseller. sales) or epson.ca (Canadian sales). You can also purchase accessories from computer and network quickly Reliability • ...
User Manual
Page 11
... about your printer. Option or part Replacement ink maintenance box SpectroProofer 24" UVS (SC-P6000/SC-P7000) SpectroProofer 44" UVS (SC-P8000/SC-P9000) Automatic Take-Up Reel System (SC-P8000/SC-P9000) Internal print server Additional roll media adapters Replacement printer cutter blade 1-year extended Epson Preferred Plus service plan for SpectroProofer 1-year...
... about your printer. Option or part Replacement ink maintenance box SpectroProofer 24" UVS (SC-P6000/SC-P7000) SpectroProofer 44" UVS (SC-P8000/SC-P9000) Automatic Take-Up Reel System (SC-P8000/SC-P9000) Internal print server Additional roll media adapters Replacement printer cutter blade 1-year extended Epson Preferred Plus service plan for SpectroProofer 1-year...

User Manual
Page 12
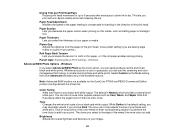
Front 1 Front cover 2 Left and right ink bays 3 Paper basket 4 Casters 5 Paper supports 6 Manual holder 7 Control panel 8 Paper feed slot 12 Product Parts -
Front 1 Front cover 2 Left and right ink bays 3 Paper basket 4 Casters 5 Paper supports 6 Manual holder 7 Control panel 8 Paper feed slot 12 Product Parts -

User Manual
Page 14
Parent topic: Printer Part Locations Control Panel Parts 1 The power light 2 The power button 3 The pause/cancel button 4 The pause/cancel light 5 LCD screen 6 The open ink cover button 7 The paper source and left arrow button 8 The paper feed/ paper feed and arrow buttons 9 The Menu and right arrow button 10 The paper cut button 11 The load paper button 12 The load paper light 13 The OK button 14 The Black ink button 14
Parent topic: Printer Part Locations Control Panel Parts 1 The power light 2 The power button 3 The pause/cancel button 4 The pause/cancel light 5 LCD screen 6 The open ink cover button 7 The paper source and left arrow button 8 The paper feed/ paper feed and arrow buttons 9 The Menu and right arrow button 10 The paper cut button 11 The load paper button 12 The load paper light 13 The OK button 14 The Black ink button 14

User Manual
Page 15
The selected Paper Type is listed to the right of the icon. : Roll paper with Auto Cut enabled : Roll paper with Auto Cut disabled : Cut sheet paper 15 15 The Check ink light 16 The Check paper paper light LCD Screen Display 1 Status messages 2 Paper source and the selected Paper Type The icon indicates the current paper source settings.
The selected Paper Type is listed to the right of the icon. : Roll paper with Auto Cut enabled : Roll paper with Auto Cut disabled : Cut sheet paper 15 15 The Check ink light 16 The Check paper paper light LCD Screen Display 1 Status messages 2 Paper source and the selected Paper Type The icon indicates the current paper source settings.

User Manual
Page 16
check the status message on the LCD screen 6 Optional accessory status (if applicable) : Auto-Take Up Reel (SC-P8000/SC-P9000 only) : SpectroProofer® : Optional Internal Print Server is installed : Optional Internal Print Server is expended : Ink error; 3 Platen gap setting : Standard : Narrow : Wide : Wider : Widest 4 Roll paper margin setting 5 Ink status : Amount of ink remaining in the cartridge : Ink level is low : Ink cartridge is being accessed 7 Photo Black or Matte Black ink selected Press the Black ink ink button to switch cartridge types 16
check the status message on the LCD screen 6 Optional accessory status (if applicable) : Auto-Take Up Reel (SC-P8000/SC-P9000 only) : SpectroProofer® : Optional Internal Print Server is installed : Optional Internal Print Server is expended : Ink error; 3 Platen gap setting : Standard : Narrow : Wide : Wider : Widest 4 Roll paper margin setting 5 Ink status : Amount of ink remaining in the cartridge : Ink level is low : Ink cartridge is being accessed 7 Photo Black or Matte Black ink selected Press the Black ink ink button to switch cartridge types 16

User Manual
Page 69
sales) or epson.ca (Canadian sales). Note: Support the reel with one , call 800-GO-EPSON (800-463-7766). Note: Paper/media availability varies by country. 69 You can also purchase accessories from the take-up Reel Available Epson Papers For information on how to purchase genuine Epson ink, accessories and paper visit epson.com (U.S. Turn the lever to unlock the reel, then slide the paper holder to keep it from falling. 4. 3. Parent topic: Using the Auto Take-up reel unit. Remove the roll core from an Epson authorized reseller. To find the nearest one hand to the left.
sales) or epson.ca (Canadian sales). Note: Support the reel with one , call 800-GO-EPSON (800-463-7766). Note: Paper/media availability varies by country. 69 You can also purchase accessories from the take-up Reel Available Epson Papers For information on how to purchase genuine Epson ink, accessories and paper visit epson.com (U.S. Turn the lever to unlock the reel, then slide the paper holder to keep it from falling. 4. 3. Parent topic: Using the Auto Take-up reel unit. Remove the roll core from an Epson authorized reseller. To find the nearest one hand to the left.

User Manual
Page 81
... selected when you click Print but before printing starts.) 15. Select the Source setting that matches the print quality you set the Auto Black Ink Change option to print a photo without borders. Note: You must select a compatible borderless paper type and size to fine-tune its performance,.... Note: You can also select the User-Defined setting to the media type you are using non-Epson paper or media and you want to use. 9. Select the Photo Black Ink or Matte Black Ink setting according to create a custom paper size. 12. For the Print Quality setting, select Speed, ...
... selected when you click Print but before printing starts.) 15. Select the Source setting that matches the print quality you set the Auto Black Ink Change option to print a photo without borders. Note: You must select a compatible borderless paper type and size to fine-tune its performance,.... Note: You can also select the User-Defined setting to the media type you are using non-Epson paper or media and you want to use. 9. Select the Photo Black Ink or Matte Black Ink setting according to create a custom paper size. 12. For the Print Quality setting, select Speed, ...

User Manual
Page 83
Color Density Adjusts the ink saturation level. 83 Paper Configuration Options - Windows Select any of the available Paper Configuration options to fine-tune the quality of your print.
Color Density Adjusts the ink saturation level. 83 Paper Configuration Options - Windows Select any of the available Paper Configuration options to fine-tune the quality of your print.
User Manual
Page 84
...in the direction of your photo is not available for up to 5 seconds after each pass to allow ink to your print. Paper Suction Lets you print with the Violet ink). This lets you decrease the paper suction when printing on your prints.) Roll Paper Back Tension Lets ... wrinkles during printing. Drying Time per Print Head Pass Pauses print head movement for the SureColor P7000 and P9000 Commercial Edition printers (configured with non-Epson media and avoid smearing the ink. Paper Feed Adjustment Modifies the speed of the paper feeding to the edge of your paper or media....
...in the direction of your photo is not available for up to 5 seconds after each pass to allow ink to your print. Paper Suction Lets you print with the Violet ink). This lets you decrease the paper suction when printing on your prints.) Roll Paper Back Tension Lets ... wrinkles during printing. Drying Time per Print Head Pass Pauses print head movement for the SureColor P7000 and P9000 Commercial Edition printers (configured with non-Epson media and avoid smearing the ink. Paper Feed Adjustment Modifies the speed of the paper feeding to the edge of your paper or media....


