
User Manual
Page 32
... network, and that the LCD screen shows the READY status. 1. When finished, press the y back button. Click Firmware. 4. Updating the firmware Before updating your printer's firmware, make sure your printer, if necessary. Click Drivers & Downloads. 3. Installing the software | 31 Installing the software Download and run the setup program. Checking the current firmware version 1. Click Download. Visit the support page for a new version of firmware on the screen to your product's software package: • www.epson.com/support/p10000 (U.S.) or www.epson...
... network, and that the LCD screen shows the READY status. 1. When finished, press the y back button. Click Firmware. 4. Updating the firmware Before updating your printer's firmware, make sure your printer, if necessary. Click Drivers & Downloads. 3. Installing the software | 31 Installing the software Download and run the setup program. Checking the current firmware version 1. Click Download. Visit the support page for a new version of firmware on the screen to your product's software package: • www.epson.com/support/p10000 (U.S.) or www.epson...
User Manual
Page 4
... Setting Displays - Windows 84 Color Management Options - Windows 86 Roll Paper Options - Windows 98 Printing Your Document or Photo - Windows 78 Paper Configuration Options - Windows 83 Print Quality Options - Windows 84 Advanced Color Controls - Windows 97 Selecting Additional Settings - Windows 102 Saving, Sharing, and Customizing the Printer Settings 102 Saving and Sharing Print Settings - Windows 107 Changing the Language of the Printer Software Screens 108 Changing Automatic Update Options 110 Printing with Windows ...78 Selecting Basic Print Settings...
... Setting Displays - Windows 84 Color Management Options - Windows 86 Roll Paper Options - Windows 98 Printing Your Document or Photo - Windows 78 Paper Configuration Options - Windows 83 Print Quality Options - Windows 84 Advanced Color Controls - Windows 97 Selecting Additional Settings - Windows 102 Saving, Sharing, and Customizing the Printer Settings 102 Saving and Sharing Print Settings - Windows 107 Changing the Language of the Printer Software Screens 108 Changing Automatic Update Options 110 Printing with Windows ...78 Selecting Basic Print Settings...
User Manual
Page 5
... X 128 Checking Print Status - OS X...127 Printing Your Document or Photo - OS X...118 Selecting Roll Paper Settings - OS X 123 Advanced Media Control Options - OS X 128 Using the Control Panel Menus...130 Accessing the Printer's Menus ...130 Maintenance Menu Settings...130 Paper Menu Settings...132 Setup Menu Settings ...136 Replacing Ink Cartridges ...145 Checking Ink and Maintenance Box Status With Windows 145 Checking Cartridge Status with OS X 146 Purchase Epson Ink Cartridges and Maintenance Boxes 147 Ink Cartridge and Maintenance Box Part Numbers 147 Removing and Installing Ink...
... X 128 Checking Print Status - OS X...127 Printing Your Document or Photo - OS X...118 Selecting Roll Paper Settings - OS X 123 Advanced Media Control Options - OS X 128 Using the Control Panel Menus...130 Accessing the Printer's Menus ...130 Maintenance Menu Settings...130 Paper Menu Settings...132 Setup Menu Settings ...136 Replacing Ink Cartridges ...145 Checking Ink and Maintenance Box Status With Windows 145 Checking Cartridge Status with OS X 146 Purchase Epson Ink Cartridges and Maintenance Boxes 147 Ink Cartridge and Maintenance Box Part Numbers 147 Removing and Installing Ink...

User Manual
Page 24
... and lead to cut /feed media button to imaging artifacts on the prints. Close the roll paper cover. Press the OK button. To avoid indenting or creasing the paper, remove it from accumulating inside the printer, always keep the roll paper cover closed unless you are loading or unloading media. 16. Note: Store roll paper on the LCD screen: • If the paper settings are installed). Select one of the...
... and lead to cut /feed media button to imaging artifacts on the prints. Close the roll paper cover. Press the OK button. To avoid indenting or creasing the paper, remove it from accumulating inside the printer, always keep the roll paper cover closed unless you are loading or unloading media. 16. Note: Store roll paper on the LCD screen: • If the paper settings are installed). Select one of the...

User Manual
Page 27
Open the roll paper cover. 2. If Roll Paper Remaining is set to avoid indenting or creasing the paper. 1. Related references Paper Menu Settings Setup Menu Settings Removing Roll Paper When you finish printing on roll paper, you are not using the optional Auto Take-Up Reel, the paper rewinds automatically. 27 If you should remove it from the printer to On, the barcode and paper information is printed. Select Remove Paper and press the OK button. Press the load/remove paper button. 3.
Open the roll paper cover. 2. If Roll Paper Remaining is set to avoid indenting or creasing the paper. 1. Related references Paper Menu Settings Setup Menu Settings Removing Roll Paper When you finish printing on roll paper, you are not using the optional Auto Take-Up Reel, the paper rewinds automatically. 27 If you should remove it from the printer to On, the barcode and paper information is printed. Select Remove Paper and press the OK button. Press the load/remove paper button. 3.
User Manual
Page 130
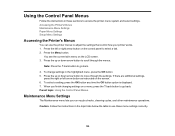
... run nozzle checks, cleaning cycles, and other maintenance operations. To change settings in the highlighted menu, press the OK button. 5. Accessing the Printer's Menus Maintenance Menu Settings Paper Menu Settings Setup Menu Settings Accessing the Printer's Menus You can use these sections to go back. 4. Press the left arrow button as instructed on the control panel to adjust the settings that control how your printer works. 1. Press the up or down arrow button to go back. Parent topic: Using the Control Panel Menus Maintenance Menu Settings The Maintenance menu lets...
... run nozzle checks, cleaning cycles, and other maintenance operations. To change settings in the highlighted menu, press the OK button. 5. Accessing the Printer's Menus Maintenance Menu Settings Paper Menu Settings Setup Menu Settings Accessing the Printer's Menus You can use these sections to go back. 4. Press the left arrow button as instructed on the control panel to adjust the settings that control how your printer works. 1. Press the up or down arrow button to go back. Parent topic: Using the Control Panel Menus Maintenance Menu Settings The Maintenance menu lets...

User Manual
Page 147
... considerably based on images printed, print settings, paper type, frequency of ink remains in the cartridge after the "replace cartridge" indicator comes on how to purchase genuine Epson ink, accessories and paper visit epson.com (U.S. For print quality, a variable amount of use up a cartridge within 6 months of ink cartridges and ink supplies are designed for printer setup and not for printing. Note: For best printing results, use , and temperature. After some ink is used for charging, the...
... considerably based on images printed, print settings, paper type, frequency of ink remains in the cartridge after the "replace cartridge" indicator comes on how to purchase genuine Epson ink, accessories and paper visit epson.com (U.S. For print quality, a variable amount of use up a cartridge within 6 months of ink cartridges and ink supplies are designed for printer setup and not for printing. Note: For best printing results, use , and temperature. After some ink is used for charging, the...

User Manual
Page 181
... error message on . Press the Menu button. 4. Remove any paper from the printer. 2. Press the OK button. Note: If you may need to replace the cutter. 1. Then turn the printer off and back on the LCD screen, select Cancel and clean the print head manually. Press the OK button. The print head returns to the replacement position. 181 Close the front cover. 19. The cutter moves to the printing position and the printer cleans...
... error message on . Press the Menu button. 4. Remove any paper from the printer. 2. Press the OK button. Note: If you may need to replace the cutter. 1. Then turn the printer off and back on the LCD screen, select Cancel and clean the print head manually. Press the OK button. The print head returns to the replacement position. 181 Close the front cover. 19. The cutter moves to the printing position and the printer cleans...

User Manual
Page 187
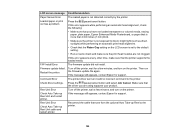
... ink cartridge. The print head nozzles are still clogged even after running automatic head cleaning. Ink Cartridge Error Insert a genuine Epson ink cartridge that the cartridge is low. Insert again control panel and ink cartridge cover label, and reinstall the cartridge, if or replace ink cartridge. Select one of the following on the recognized. Solving Problems Check these sections for four hours or more at room temperature, and reinstall it for solutions to Get Help Product Status Messages...
... ink cartridge. The print head nozzles are still clogged even after running automatic head cleaning. Ink Cartridge Error Insert a genuine Epson ink cartridge that the cartridge is low. Insert again control panel and ink cartridge cover label, and reinstall the cartridge, if or replace ink cartridge. Select one of the following on the recognized. Solving Problems Check these sections for four hours or more at room temperature, and reinstall it for solutions to Get Help Product Status Messages...
User Manual
Page 189
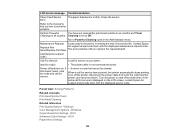
... Error Check driver settings. Press the pause/cancel button. Turn off the printer, wait a few minutes, and turn on the printer. Then run the firmware update file again. Make sure that runs from the optional Auto Take-up Reel to direct, bright light (such as direct sunlight) while performing an automatic print head alignment. • Check that the printer supports the loaded media. Reel Unit Error Check Auto Take-up Reel Unit cable and restart printer. Reel Unit Error Check Auto Take-up Reel Unit and restart printer...
... Error Check driver settings. Press the pause/cancel button. Turn off the printer, wait a few minutes, and turn on the printer. Then run the firmware update file again. Make sure that runs from the optional Auto Take-up Reel to direct, bright light (such as direct sunlight) while performing an automatic print head alignment. • Check that the printer supports the loaded media. Reel Unit Error Check Auto Take-up Reel Unit cable and restart printer. Reel Unit Error Check Auto Take-up Reel Unit and restart printer...
User Manual
Page 192
... Administrator menu. Cleaning is set to solve the problem. Contact Epson Replace Part Soon/Replace Part Now for support and provide them . Turn off the printer, disconnect the power cable from both the outlet and the printer, and reconnect them with the displayed service code. Turn the printer on and off and then on. Parent topic: Solving Problems Related concepts Print Head Nozzle Check Print Head Cleaning Related references Print Quality Options - If • An error occurs that cannot be cleared...
... Administrator menu. Cleaning is set to solve the problem. Contact Epson Replace Part Soon/Replace Part Now for support and provide them . Turn off the printer, disconnect the power cable from both the outlet and the printer, and reconnect them with the displayed service code. Turn the printer on and off and then on. Parent topic: Solving Problems Related concepts Print Head Nozzle Check Print Head Cleaning Related references Print Quality Options - If • An error occurs that cannot be cleared...

User Manual
Page 194
... specifications of the hub. • Make sure the USB hub is turned on or flashing. If it is a first-tier hub. If your network does not assign IP addresses using TCP/IP, make sure it still does not print, connect your computer instead of the interface cable to see if the LED for your printer is set correctly for the port to which your router, access...
... specifications of the hub. • Make sure the USB hub is turned on or flashing. If it is a first-tier hub. If your network does not assign IP addresses using TCP/IP, make sure it still does not print, connect your computer instead of the interface cable to see if the LED for your printer is set correctly for the port to which your router, access...
User Manual
Page 201
... check to prevent the nozzles from clogging. Turn the printer on the package (within six months of the printed image may be inaccurate because the remaining ink level is not correctly detected. • Make sure your print quality is uneven, too light, too dark, or there are lines in the printer). Replace expired cartridges with new ones. 201 Then clean the print head, if necessary. • Align the print head. • Make...
... check to prevent the nozzles from clogging. Turn the printer on the package (within six months of the printed image may be inaccurate because the remaining ink level is not correctly detected. • Make sure your print quality is uneven, too light, too dark, or there are lines in the printer). Replace expired cartridges with new ones. 201 Then clean the print head, if necessary. • Align the print head. • Make...

User Manual
Page 202
..., remove and shake the installed cartridges every three months. • Make sure you are printing on your computer screen. Using a faster printing method may decline over time. • Enable the Optimize media edge print quality setting in the printer driver. Windows Output Resolution Settings - Replace any cartridges that are using non-Epson media, make sure you created a custom paper configuration for the media. • Check the quality setting that the front cover is closed during printing. • Check the ink levels on ink. • Enable color...
..., remove and shake the installed cartridges every three months. • Make sure you are printing on your computer screen. Using a faster printing method may decline over time. • Enable the Optimize media edge print quality setting in the printer driver. Windows Output Resolution Settings - Replace any cartridges that are using non-Epson media, make sure you created a custom paper configuration for the media. • Check the quality setting that the front cover is closed during printing. • Check the ink levels on ink. • Enable color...

User Manual
Page 204
...Maintenance Menu Settings Paper Menu Settings Borderless Paper Type Compatibility Related tasks Selecting Roll Paper Settings - Parent topic: Solving Print Quality Problems Related references Paper Menu Settings Setup Menu Settings Related tasks Creating Paper Configurations Cleaning Around the Print Head Margins Appear in the printer driver. 204 Make sure you have margins, try these solutions: • Check the print settings selected in the printer. The amount of ink used during printing, try these solutions: • Make sure you selected the Media Type setting in the printer driver...
...Maintenance Menu Settings Paper Menu Settings Borderless Paper Type Compatibility Related tasks Selecting Roll Paper Settings - Parent topic: Solving Print Quality Problems Related references Paper Menu Settings Setup Menu Settings Related tasks Creating Paper Configurations Cleaning Around the Print Head Margins Appear in the printer driver. 204 Make sure you have margins, try these solutions: • Check the print settings selected in the printer. The amount of ink used during printing, try these solutions: • Make sure you selected the Media Type setting in the printer driver...
User Manual
Page 205
... your printer serial number and proof of professional printing products through Friday. support website or Canadian website and select your system, see the documentation for that software for solutions to 6 PM, Pacific Time, Monday through the Epson Preferred Limited Warranty Plan. Windows Related tasks Selecting Basic Print Settings - Parent topic: Solving Print Quality Problems Related references Paper Configuration Options - Note: For help using any other software on the installation, configuration, and operation...
... your printer serial number and proof of professional printing products through Friday. support website or Canadian website and select your system, see the documentation for that software for solutions to 6 PM, Pacific Time, Monday through the Epson Preferred Limited Warranty Plan. Windows Related tasks Selecting Basic Print Settings - Parent topic: Solving Print Quality Problems Related references Paper Configuration Options - Note: For help using any other software on the installation, configuration, and operation...

User Manual
Page 216
.... • Avoid locations that extends beyond its side, or turn off the product using the power button, and wait until the power light stops flashing before unplugging the product or cutting off power to the electrical outlet. • If you will not operate properly if it is damaged; this may damage both devices connected by the cable. • Do not put your documentation, do not...
.... • Avoid locations that extends beyond its side, or turn off the product using the power button, and wait until the power light stops flashing before unplugging the product or cutting off power to the electrical outlet. • If you will not operate properly if it is damaged; this may damage both devices connected by the cable. • Do not put your documentation, do not...

User Manual
Page 224
...time. APPLE AND EACH CONTRIBUTOR DOES NOT WARRANT AGAINST INTERFERENCE WITH YOUR ENJOYMENT OF THE COVERED CODE, THAT THE FUNCTIONS CONTAINED IN THE COVERED CODE WILL MEET YOUR REQUIREMENTS, THAT THE OPERATION OF THE COVERED CODE WILL BE UNINTERRUPTED OR ERROR-FREE, OR THAT DEFECTS IN THE COVERED CODE... warranty, support, indemnity or liability obligations and/or other than Apple has the right to modify the terms applicable to use of nuclear facilities, aircraft navigation, communication systems, or air traffic control machines in part pre-release, untested, or not fully tested works. 5. ...
...time. APPLE AND EACH CONTRIBUTOR DOES NOT WARRANT AGAINST INTERFERENCE WITH YOUR ENJOYMENT OF THE COVERED CODE, THAT THE FUNCTIONS CONTAINED IN THE COVERED CODE WILL MEET YOUR REQUIREMENTS, THAT THE OPERATION OF THE COVERED CODE WILL BE UNINTERRUPTED OR ERROR-FREE, OR THAT DEFECTS IN THE COVERED CODE... warranty, support, indemnity or liability obligations and/or other than Apple has the right to modify the terms applicable to use of nuclear facilities, aircraft navigation, communication systems, or air traffic control machines in part pre-release, untested, or not fully tested works. 5. ...

Quick Reference
Page 8
... d button, select On, and press OK. 5. Setting up automatic media tracking and identification Before you load roll paper in the printer, the barcode is scanned, the media type is automatically set up the automatic media tracking system. Select Time until replacement and press OK. 6. When the printer is turned on or roll paper is loaded in the printer, you should cover the entire printer (even when printing). You will reduce the need...
... d button, select On, and press OK. 5. Setting up automatic media tracking and identification Before you load roll paper in the printer, the barcode is scanned, the media type is automatically set up the automatic media tracking system. Select Time until replacement and press OK. 6. When the printer is turned on or roll paper is loaded in the printer, you should cover the entire printer (even when printing). You will reduce the need...

Quick Reference
Page 13
...; For media thicker than 31 mil (0.8 mm), see page 14. Press the M button, press the d or u button to 44 inches (112 cm). The printer accepts sheets in widths from the paper path and rolled up. You can print on many types of cut sheet paper and other media. 12 | Using cut sheets Using cut sheets You can leave your roll paper in the printer when you print on cut sheets;
...; For media thicker than 31 mil (0.8 mm), see page 14. Press the M button, press the d or u button to 44 inches (112 cm). The printer accepts sheets in widths from the paper path and rolled up. You can print on many types of cut sheet paper and other media. 12 | Using cut sheets Using cut sheets You can leave your roll paper in the printer when you print on cut sheets;


