Product Brochure
Page 1
...-dry DURABrite® Ultra pigment ink • Automatically correct digital images - Built-in, 30-page Automatic Document Feeder • Fax in -One Epson Stylus® NX300 Print | Copy | Scan | Fax Great features at a great value. All-in color or black-and-white - With Auto Photo Correction • Archive documents / photos with ease - One-touch copying; Plain...
...-dry DURABrite® Ultra pigment ink • Automatically correct digital images - Built-in, 30-page Automatic Document Feeder • Fax in -One Epson Stylus® NX300 Print | Copy | Scan | Fax Great features at a great value. All-in color or black-and-white - With Auto Photo Correction • Archive documents / photos with ease - One-touch copying; Plain...
Product Brochure
Page 2
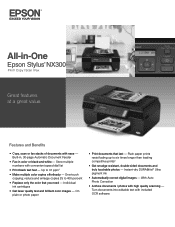
The use of genuine Epson ink cartridges. Copyright 2008 Epson America, Inc. Epson Stylus NX300 Print | Copy | Scan | Fax Printing Technology 4-color (CMYK) drop-on-demand MicroPiezo® ink jet technology Nozzle Configuration 90 Black, 29 Cyan, Magenta and ...prints on specialty media, displayed indoors, under glass or properly store them. and Canada Epson Stylus NX300 ink jet all-in-one, Instruction booklet, CD-ROM containing all -in Draft Mode on . Epson, Epson Stylus and MicroPiezo are subject to media, printed image, display conditions, light intensity, humidity and...
The use of genuine Epson ink cartridges. Copyright 2008 Epson America, Inc. Epson Stylus NX300 Print | Copy | Scan | Fax Printing Technology 4-color (CMYK) drop-on-demand MicroPiezo® ink jet technology Nozzle Configuration 90 Black, 29 Cyan, Magenta and ...prints on specialty media, displayed indoors, under glass or properly store them. and Canada Epson Stylus NX300 ink jet all-in-one, Instruction booklet, CD-ROM containing all -in Draft Mode on . Epson, Epson Stylus and MicroPiezo are subject to media, printed image, display conditions, light intensity, humidity and...

Quick Guide
Page 1
Epson Stylus® NX300 Series Quick Guide Basic Printing, Copying, Scanning, and Faxing Maintaining Your All-in-One Solving Problems
Epson Stylus® NX300 Series Quick Guide Basic Printing, Copying, Scanning, and Faxing Maintaining Your All-in-One Solving Problems
Quick Guide
Page 2
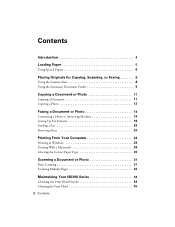
... 9 Copying a Document or Photo 11 Copying a Document 11 Copying a Photo 12 Faxing a Document or Photo 14 Connecting a Phone or Answering Machine 14 Setting Up Fax Features 16 Sending a Fax 20 Receiving Faxes 22 Printing From Your Computer 24 Printing in Windows 24 Printing With a Macintosh 26 ...Selecting the Correct Paper Type 30 Scanning a Document or Photo 31 Basic Scanning 31 Scanning Multiple Pages 32 Maintaining Your NX300 Series ...
... 9 Copying a Document or Photo 11 Copying a Document 11 Copying a Photo 12 Faxing a Document or Photo 14 Connecting a Phone or Answering Machine 14 Setting Up Fax Features 16 Sending a Fax 20 Receiving Faxes 22 Printing From Your Computer 24 Printing in Windows 24 Printing With a Macintosh 26 ...Selecting the Correct Paper Type 30 Scanning a Document or Photo 31 Basic Scanning 31 Scanning Multiple Pages 32 Maintaining Your NX300 Series ...
Quick Guide
Page 4
...when you connect it to your desktop. Introduction After you have set up your Epson Stylus® NX300 Series as you read your NX300 Series instructions: Warning: Warnings must be followed carefully to your NX300 Series. Please follow these guidelines as described on the Start Here sheet, turn...must be observed to avoid damage to avoid bodily injury. Of course, your NX300 Series can do most of a document or photo ■ Fax a document or photo ■ Get the basic steps for better faxing, copying, scanning, and printing. 4 Introduction Note: Notes contain important information ...
...when you connect it to your desktop. Introduction After you have set up your Epson Stylus® NX300 Series as you read your NX300 Series instructions: Warning: Warnings must be followed carefully to your NX300 Series. Please follow these guidelines as described on the Start Here sheet, turn...must be observed to avoid damage to avoid bodily injury. Of course, your NX300 Series can do most of a document or photo ■ Fax a document or photo ■ Get the basic steps for better faxing, copying, scanning, and printing. 4 Introduction Note: Notes contain important information ...
Quick Guide
Page 8
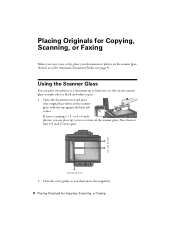
... so you don't move the original(s). 8 Placing Originals for Copying, Scanning, or Faxing Before you copy, scan, or fax, place your original face-down on the scanner glass to make color or black-and-white copies. 1. Placing Originals for Copying, Scanning, or Faxing 1/4 inch (5 mm) If you can place two photos or a document up...
... so you don't move the original(s). 8 Placing Originals for Copying, Scanning, or Faxing Before you copy, scan, or fax, place your original face-down on the scanner glass to make color or black-and-white copies. 1. Placing Originals for Copying, Scanning, or Faxing 1/4 inch (5 mm) If you can place two photos or a document up...

Quick Guide
Page 10
5. Slide the edge guide against the originals. If you can copy, scan, or fax. Once the original document is automatically selected for Copying, Scanning, or Faxing Note: When you use the Copy function, letter-size paper is loaded, you copy a legal-size document, the image will be cropped to fit lettersize paper. 10 Placing Originals for your printed copies.
5. Slide the edge guide against the originals. If you can copy, scan, or fax. Once the original document is automatically selected for Copying, Scanning, or Faxing Note: When you use the Copy function, letter-size paper is loaded, you copy a legal-size document, the image will be cropped to fit lettersize paper. 10 Placing Originals for your printed copies.
Quick Guide
Page 11
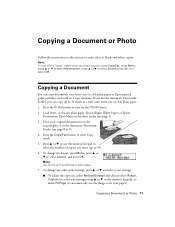
... keypad to select the number of copies you press a button, press Copy/Fax, press Menu, press u or d to select Maintenance, press u or d to make color or black-and-white copies. or A4-size plain paper, Epson Bright White Paper, or Epson Presentation Paper Matte in the sheet feeder (see page 8 or 9). 4. ...keypad), or Auto Fit Page (to automatically size the image to fit your original document(s) on a copy machine. Note: You cannot print borderless on the NX300 Series. 2. Copying a Document or Photo 11 Press the P On button to turn off the "beep" heard when you want (up to select Layout,...
... keypad to select the number of copies you press a button, press Copy/Fax, press Menu, press u or d to select Maintenance, press u or d to make color or black-and-white copies. or A4-size plain paper, Epson Bright White Paper, or Epson Presentation Paper Matte in the sheet feeder (see page 8 or 9). 4. ...keypad), or Auto Fit Page (to automatically size the image to fit your original document(s) on a copy machine. Note: You cannot print borderless on the NX300 Series. 2. Copying a Document or Photo 11 Press the P On button to turn off the "beep" heard when you want (up to select Layout,...
Quick Guide
Page 12
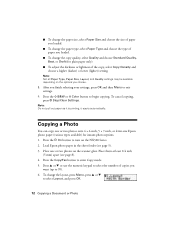
...higher (darker) or lower (lighter) setting. Place them at least 1/4 inch (5 mm) apart (see page 5). 3. Press the Copy/Fax button to turn on the NX300 Series. 2. Load Epson photo paper in the sheet feeder (see page 8). 4. Copying a Photo You can copy one or two photos on the options you ... Paper Type, Paper Size, Layout, and Quality settings may be available depending on the scanner glass. After you choose. 8. Press the x B&W or x Color button to 99). 6. To cancel copying, press y Stop/Clear Settings. Press u or d or use the numeric keypad to select the number of copies ...
...higher (darker) or lower (lighter) setting. Place them at least 1/4 inch (5 mm) apart (see page 5). 3. Press the Copy/Fax button to turn on the NX300 Series. 2. Load Epson photo paper in the sheet feeder (see page 8). 4. Copying a Photo You can copy one or two photos on the options you ... Paper Type, Paper Size, Layout, and Quality settings may be available depending on the scanner glass. After you choose. 8. Press the x B&W or x Color button to 99). 6. To cancel copying, press y Stop/Clear Settings. Press u or d or use the numeric keypad to select the number of copies ...
Quick Guide
Page 14
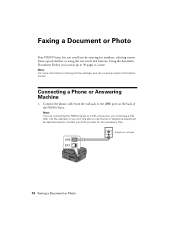
... Photo Your NX300 Series lets you send faxes by entering fax numbers, selecting entries from the wall jack to the LINE port on -screen Epson Information Center. Connect the phone cable from a speed dial list, or using the one-touch dial buttons. Using the Automatic Document Feeder, you won...'t be able to 30 pages at a time. Telephone wall jack 14 Faxing a Document or Photo Connecting a Phone or Answering Machine 1. Note: For more information on faxing and fax settings, see the on the back of the NX300 Series. Contact your DSL provider for the necessary filter. Note: If you're ...
... Photo Your NX300 Series lets you send faxes by entering fax numbers, selecting entries from the wall jack to the LINE port on -screen Epson Information Center. Connect the phone cable from a speed dial list, or using the one-touch dial buttons. Using the Automatic Document Feeder, you won...'t be able to 30 pages at a time. Telephone wall jack 14 Faxing a Document or Photo Connecting a Phone or Answering Machine 1. Note: For more information on faxing and fax settings, see the on the back of the NX300 Series. Contact your DSL provider for the necessary filter. Note: If you're ...
Quick Guide
Page 15
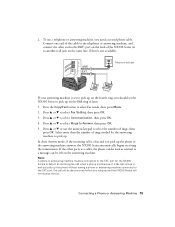
... d to Answer, then press OK. 5. Press u or d to select Rings to select Communication, then press OK. 4. If a fax call when a phone is set to pick up on the fourth ring, you should set the NX300 Series to pick up the phone without having a phone or answering machine connected to the EXT. Press... machine must be disconnected when you need a second phone cable. To use the numeric keypad to detect an incoming fax call comes in, and you pick up . port on the back of the NX300 Series (or to another wall jack on the same line, if there's one end of rings needed for...
... d to Answer, then press OK. 5. Press u or d to select Rings to select Communication, then press OK. 4. If a fax call when a phone is set to pick up on the fourth ring, you should set the NX300 Series to pick up the phone without having a phone or answering machine connected to the EXT. Press... machine must be disconnected when you need a second phone cable. To use the numeric keypad to detect an incoming fax call comes in, and you pick up . port on the back of the NX300 Series (or to another wall jack on the same line, if there's one end of rings needed for...
Quick Guide
Page 16
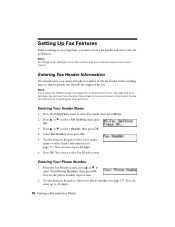
...name or other settings or print fax reports, see the phone number input screen. 2. You see the on setting the date and time. Setting Up Fax Features Before sending or receiving faxes, you leave the NX300 Series unplugged for instructions on -screen Epson Information Center. Use the numeric... keypad to the Fax Header screen. You can enter up to enter your name and ...
...name or other settings or print fax reports, see the phone number input screen. 2. You see the on setting the date and time. Setting Up Fax Features Before sending or receiving faxes, you leave the NX300 Series unplugged for instructions on -screen Epson Information Center. Use the numeric... keypad to the Fax Header screen. You can enter up to enter your name and ...

Quick Guide
Page 17
Use the # button to type the + symbol when entering a phone number in Fax mode, follow these special characters Setting Up Fax Features 17 Press OK. Using the Keypad to Enter Numbers and Characters When entering phone numbers and text in international dialing format. ■...; To enter characters, press a keypad number repeatedly to the left . ■ To enter a fax number, use the numeric keypad. Press 1symb to the Your Phone Number screen. Inserts a space and moves the cursor one space to the left or...
Use the # button to type the + symbol when entering a phone number in Fax mode, follow these special characters Setting Up Fax Features 17 Press OK. Using the Keypad to Enter Numbers and Characters When entering phone numbers and text in international dialing format. ■...; To enter characters, press a keypad number repeatedly to the left . ■ To enter a fax number, use the numeric keypad. Press 1symb to the Your Phone Number screen. Inserts a space and moves the cursor one space to the left or...
Quick Guide
Page 18
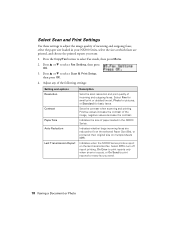
... of incoming and outgoing faxes. Indicates the size of incoming and outgoing faxes, select the paper size loaded in the NX300 Series. Indicates whether large incoming faxes are printed, and choose the printed reports you send. 18 Faxing a Document or Photo Indicates when the NX300 Series prints a report on...the image quality of paper loaded in your NX300 Series, select the size at their original size on the last transmitted fax. Select Scan and Print Settings Use these settings to print reports for basic faxes. Press u or d to select Fax Setting, then press OK. 3. Sets the...
... of incoming and outgoing faxes. Indicates the size of incoming and outgoing faxes, select the paper size loaded in the NX300 Series. Indicates whether large incoming faxes are printed, and choose the printed reports you send. 18 Faxing a Document or Photo Indicates when the NX300 Series prints a report on...the image quality of paper loaded in your NX300 Series, select the size at their original size on the last transmitted fax. Select Scan and Print Settings Use these settings to print reports for basic faxes. Press u or d to select Fax Setting, then press OK. 3. Sets the...

Quick Guide
Page 19
... add another speed dial entry, press OK and repeat the steps above. If you want to select Fax mode, then press Menu. 2. You can create up a group dial list to automatically send the same fax message to multiple speed dial numbers. Press u or d to select Speed Dial Setup, then press OK...entry from an existing list, select Edit or Delete instead. 5. Use the numeric keypad to enter a name to select Create, then press OK. Setting Up Fax Features 19 Creating a Group Dial List 1. Press u or d to select Create, then press OK. Setting Up a Speed Dial and Group Dial List You...
... add another speed dial entry, press OK and repeat the steps above. If you want to select Fax mode, then press Menu. 2. You can create up a group dial list to automatically send the same fax message to multiple speed dial numbers. Press u or d to select Speed Dial Setup, then press OK...entry from an existing list, select Edit or Delete instead. 5. Use the numeric keypad to enter a name to select Create, then press OK. Setting Up Fax Features 19 Creating a Group Dial List 1. Press u or d to select Create, then press OK. Setting Up a Speed Dial and Group Dial List You...
Quick Guide
Page 20
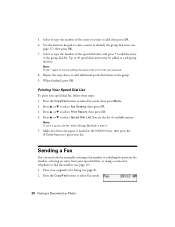
... to enter a name to identify the group dial entry (see the list of available entries. Printing Your Speed Dial List To print your original(s) for faxing (see page 19). 1. You see page 17), then press OK. 7. Place your speed dial list, follow these steps: 1. 5. When finished, press OK.... Press u or d to the group. 9. Note: To print a group dial list, select Group Dial List in the NX300 Series, then press the x Color button to print your speed dial list, or using a connected telephone to the group dial list. Repeat the steps above to add additional...
... to enter a name to identify the group dial entry (see the list of available entries. Printing Your Speed Dial List To print your original(s) for faxing (see page 19). 1. You see page 17), then press OK. 7. Place your speed dial list, follow these steps: 1. 5. When finished, press OK.... Press u or d to the group. 9. Note: To print a group dial list, select Group Dial List in the NX300 Series, then press the x Color button to print your speed dial list, or using a connected telephone to the group dial list. Repeat the steps above to add additional...
Quick Guide
Page 21
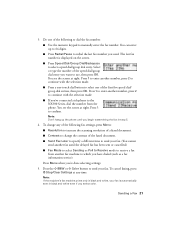
... have dialed (such as a fax information service). Press the x B&W or x Color button to send your fax is displayed on the screen. ■ Press Speed Dial/Group Dial/Backspace to send your fax. (You cannot send another fax until you select color. Note: If the recipient's fax machine prints only in black and.... You can enter up the phone until the delayed fax has been sent or cancelled.) ■ Fax Mode to select Sending or Poll to Receive mode to receive a fax from the phone. Press 1 to enter another fax machine to the NX300 Series, dial the number from another number, press 2 ...
... have dialed (such as a fax information service). Press the x B&W or x Color button to send your fax is displayed on the screen. ■ Press Speed Dial/Group Dial/Backspace to send your fax. (You cannot send another fax until you select color. Note: If the recipient's fax machine prints only in black and.... You can enter up the phone until the delayed fax has been sent or cancelled.) ■ Fax Mode to select Sending or Poll to Receive mode to receive a fax from the phone. Press 1 to enter another fax machine to the NX300 Series, dial the number from another number, press 2 ...
Quick Guide
Page 22
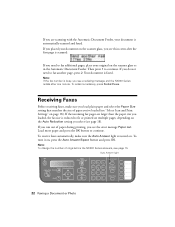
... To change the number of paper during printing, you need to fax another page, press 2. Auto Answer light Stop/ Clear Settings Auto Answer/ Space Copy/Fax B&W Color Speed Dial Group Dial/ Backspace Redial/Pause 22 Faxing a Document or Photo If you placed your document is automatically scanned...scanner glass or in the Automatic Document Feeder. Your document is faxed. Receiving Faxes Before receiving faxes, make sure the Auto Answer light is turned on the Auto Reduction setting you run out of rings before the NX300 Series answers, see the error message Paper out. Then press...
... To change the number of paper during printing, you need to fax another page, press 2. Auto Answer light Stop/ Clear Settings Auto Answer/ Space Copy/Fax B&W Color Speed Dial Group Dial/ Backspace Redial/Pause 22 Faxing a Document or Photo If you placed your document is automatically scanned...scanner glass or in the Automatic Document Feeder. Your document is faxed. Receiving Faxes Before receiving faxes, make sure the Auto Answer light is turned on the Auto Reduction setting you run out of rings before the NX300 Series answers, see the error message Paper out. Then press...
Quick Guide
Page 23
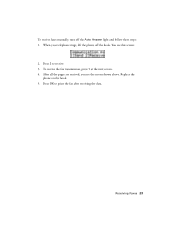
Press OK to receive. 3. You see the screen shown above. After all the pages are received, you see this screen: 2. To receive the fax transmission, press 1 at the next screen. 4. Receiving Faxes 23 Press 2 to print the fax after receiving the data. To receive faxes manually, turn off the hook. When your telephone rings, lift the phone off the Auto Answer light and follow these steps: 1. Replace the phone on the hook. 5.
Press OK to receive. 3. You see the screen shown above. After all the pages are received, you see this screen: 2. To receive the fax transmission, press 1 at the next screen. 4. Receiving Faxes 23 Press 2 to print the fax after receiving the data. To receive faxes manually, turn off the hook. When your telephone rings, lift the phone off the Auto Answer light and follow these steps: 1. Replace the phone on the hook. 5.
Quick Guide
Page 33
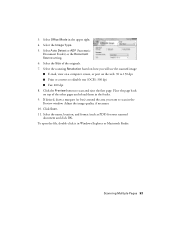
... necessary. 10. Select the name, location, and format (such as the Document Source setting. 6. Click the Preview button to editable text (OCR): 300 dpi ■ Fax: 200 dpi 8. Scanning Multiple Pages 33 Select Auto Detect or ADF (Automatic Document Feeder) as PDF) for your scanned document and click OK. Select Office...
... necessary. 10. Select the name, location, and format (such as the Document Source setting. 6. Click the Preview button to editable text (OCR): 300 dpi ■ Fax: 200 dpi 8. Scanning Multiple Pages 33 Select Auto Detect or ADF (Automatic Document Feeder) as PDF) for your scanned document and click OK. Select Office...


