
User Manual
Page 3
Contents List of Figures vii List of Tables Viii Introduction 1 LX-86 Features 1 About This Manual 2 1 Setting Up Your LX-86 Printer 3 Printer Parts Printer Location 3 4 Paper Feed Knob Installation 4 Ribbon Installation 5 Ribbon Replacement 8 Paper Loading 9 Control Panel 10 Lights 11 Buttons 11 Test Pattern 12 Connecting the LX-86 to Your Computer 13 First Printing Exercise 14 2 SelecType 15 SelecType Operation...
Contents List of Figures vii List of Tables Viii Introduction 1 LX-86 Features 1 About This Manual 2 1 Setting Up Your LX-86 Printer 3 Printer Parts Printer Location 3 4 Paper Feed Knob Installation 4 Ribbon Installation 5 Ribbon Replacement 8 Paper Loading 9 Control Panel 10 Lights 11 Buttons 11 Test Pattern 12 Connecting the LX-86 to Your Computer 13 First Printing Exercise 14 2 SelecType 15 SelecType Operation...

User Manual
Page 7
List of Figures l-l Printer parts 3 l-2 Paper feed knob installation 5 l-3 Ribbon cassette l-4 Print head assembly 6 l-5 Ribbon cassette installation 7 l-6 Ribbon placement 8 l-7 IX-86 ready for paper loading 9 l-8 Control panel 10 l-9 Test patterns 12 l-10 Cable connection 13 2-l Turning SelecType on 16 3-l A capital T 21 3-2 The three pitches of the LX-86 23 3-3 IX-86 dot matrix characters 24 6-l Emphasized and standard print...
List of Figures l-l Printer parts 3 l-2 Paper feed knob installation 5 l-3 Ribbon cassette l-4 Print head assembly 6 l-5 Ribbon cassette installation 7 l-6 Ribbon placement 8 l-7 IX-86 ready for paper loading 9 l-8 Control panel 10 l-9 Test patterns 12 l-10 Cable connection 13 2-l Turning SelecType on 16 3-l A capital T 21 3-2 The three pitches of the LX-86 23 3-3 IX-86 dot matrix characters 24 6-l Emphasized and standard print...

User Manual
Page 9
...widths, and two kinds of bold printing l User-definable characters so you 've come to expect from Epson printers, the LX-86 offers: l Draft mode for quick printing of typestyles with the high quality and advanced features formerly available ...LX-86 Features In addition to the high performance and reliability you can create and print your own symbols or characters l High-resolution graphics for charts, diagrams, and illustrations l Easy paper loading l Ribbon cassette for top quality printing l Selection of ordinary work l Near Letter Quality mode for quick and clean ribbon changing l Epson...
...widths, and two kinds of bold printing l User-definable characters so you 've come to expect from Epson printers, the LX-86 offers: l Draft mode for quick printing of typestyles with the high quality and advanced features formerly available ...LX-86 Features In addition to the high performance and reliability you can create and print your own symbols or characters l High-resolution graphics for charts, diagrams, and illustrations l Easy paper loading l Ribbon cassette for top quality printing l Selection of ordinary work l Near Letter Quality mode for quick and clean ribbon changing l Epson...
User Manual
Page 11
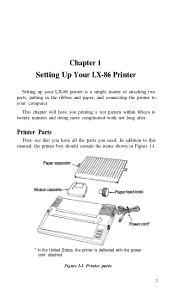
... two parts, putting in the ribbon and paper, and connecting the printer to twenty minutes and doing more complicated work not long after. Figure l-l. Printer Parts First, see that you have you need. Printer parts 3 Chapter 1 Setting Up Your LX-86 Printer Setting up your computer. This ...chapter will have all the parts you printing a test pattern within fifteen to your LX-86 printer is delivered with the power...
... two parts, putting in the ribbon and paper, and connecting the printer to twenty minutes and doing more complicated work not long after. Figure l-l. Printer Parts First, see that you have you need. Printer parts 3 Chapter 1 Setting Up Your LX-86 Printer Setting up your computer. This ...chapter will have all the parts you printing a test pattern within fifteen to your LX-86 printer is delivered with the power...

User Manual
Page 13
Paper feed knob installation Ribbon Installation The LX-86 printer uses a continuous-loop, inked fabric ribbon, which is enclosed in Figure l-3. Figure 1-2. Ribbon cassette Pin 5 Ribbon Knob Pin Figure l-3. The parts of this cassette are labelled in a cassette that makes ribbon installation and replacement a clean and easy job.
Paper feed knob installation Ribbon Installation The LX-86 printer uses a continuous-loop, inked fabric ribbon, which is enclosed in Figure l-3. Figure 1-2. Ribbon cassette Pin 5 Ribbon Knob Pin Figure l-3. The parts of this cassette are labelled in a cassette that makes ribbon installation and replacement a clean and easy job.

User Manual
Page 14
Print bead assembly 6 Always be in your way. Figure 1-4. Note: Moving the print head by hand to the center of the printer so that the other parts of the LX-86 so that you move the print head. To install the ribbon, first open the lid at the front of the printer will not be sure that the printer is turned on can see the print head assembly shown in your way. Move the assembly by hand when the printer is turned off before you can harm the printer. Also be sure that the paper bail is against the black roller so it too will not get in Figure l-4.
Print bead assembly 6 Always be in your way. Figure 1-4. Note: Moving the print head by hand to the center of the printer so that the other parts of the LX-86 so that you move the print head. To install the ribbon, first open the lid at the front of the printer will not be sure that the printer is turned on can see the print head assembly shown in your way. Move the assembly by hand when the printer is turned off before you can harm the printer. Also be sure that the paper bail is against the black roller so it too will not get in Figure l-4.

User Manual
Page 16
...down into its proper place between the print head nose and the silver ribbon guide (Figure l-6). Also remember never to touch it with a new cassette. Be careful not to move the print head by hand when the printer is turned on the cassette in the direction of the cassette to ...tighten the ribbon. Now turn the knob, see that the print head becomes hot during use. Ribbon placement Ribbon Replacement When your printer just before you need to replace the ribbon, lift the front of the arrow to remove it and then follow...
...down into its proper place between the print head nose and the silver ribbon guide (Figure l-6). Also remember never to touch it with a new cassette. Be careful not to move the print head by hand when the printer is turned on the cassette in the direction of the cassette to ...tighten the ribbon. Now turn the knob, see that the print head becomes hot during use. Ribbon placement Ribbon Replacement When your printer just before you need to replace the ribbon, lift the front of the arrow to remove it and then follow...

User Manual
Page 18
... the paper bail against the paper. Figure l-8. See that the power switch on the right side of the printer is off , open the front lid, and push the friction lever back and the paper bail forward. First..., see what the buttons on the control panel do. Turn the knob until the top of the printer and feed the paper into the paper slot in the power cord. Control Panel Now that your paper ...-feed paper, see Appendix E for instructions on the power switch and look at least 3/4-inch above the ribbon guide. Now turn the paper feed knob to advance it is time to the center of the paper is...
... the paper bail against the paper. Figure l-8. See that the power switch on the right side of the printer is off , open the front lid, and push the friction lever back and the paper bail forward. First..., see what the buttons on the control panel do. Turn the knob until the top of the printer and feed the paper into the paper slot in the power cord. Control Panel Now that your paper ...-feed paper, see Appendix E for instructions on the power switch and look at least 3/4-inch above the ribbon guide. Now turn the paper feed knob to advance it is time to the center of the paper is...

User Manual
Page 28
... for those of an inch, and fires the top pin once more to finish the letter. Figure 3-l. A capital T 21 The Print Head The IX-86 uses a print head with nine pins or wires mounted vertically. As the head moves horizontally across the page, these pins are fired time after time... in diameter. For example, to know something about 1/72nd of paper used. Each time a pin is about how your printer works. This dot is fired, it strikes the inked ribbon and presses it against the paper to produce letters, numbers, symbols, or graphics. The size varies slightly depending upon the ...
... for those of an inch, and fires the top pin once more to finish the letter. Figure 3-l. A capital T 21 The Print Head The IX-86 uses a print head with nine pins or wires mounted vertically. As the head moves horizontally across the page, these pins are fired time after time... in diameter. For example, to know something about 1/72nd of paper used. Each time a pin is about how your printer works. This dot is fired, it strikes the inked ribbon and presses it against the paper to produce letters, numbers, symbols, or graphics. The size varies slightly depending upon the ...

User Manual
Page 62
Therefore, if you use single-sheet paper in your print head, ribbon, and platen, but because of the DIP switches described in the printer. Some systems, however, ignore the ESCape code and the DIP switch setting. Paper-Out Sensor Under the platen (the black roller) of the page. When ...-out sensor or change one of the distance between the switch and the print head, it sends a signal that sounds the beeper and stops your LX-86 printer is a small switch that senses whether or not paper is in Appendix D. For most computer systems, you can 't print on your IX...
Therefore, if you use single-sheet paper in your print head, ribbon, and platen, but because of the DIP switches described in the printer. Some systems, however, ignore the ESCape code and the DIP switch setting. Paper-Out Sensor Under the platen (the black roller) of the page. When ...-out sensor or change one of the distance between the switch and the print head, it sends a signal that sounds the beeper and stops your LX-86 printer is a small switch that senses whether or not paper is in Appendix D. For most computer systems, you can 't print on your IX...

User Manual
Page 131
...to set the top of page, each time you finish printing a document, push the ON LINE button to put the printer off-line and then push the FF button once o advance the paper so that you are ready to see in the...to match the width of the paper. Once you see that your word processing or other applications program is putting your LX-86, it will remember this top of page setting and will be in Figure E-8. Now fit the right side of the... up until a perforation between sheets is approximately l/8 of an inch below the top of the ribbon guide, as needed to begin the next docume n t .
...to set the top of page, each time you finish printing a document, push the ON LINE button to put the printer off-line and then push the FF button once o advance the paper so that you are ready to see in the...to match the width of the paper. Once you see that your word processing or other applications program is putting your LX-86, it will remember this top of page setting and will be in Figure E-8. Now fit the right side of the... up until a perforation between sheets is approximately l/8 of an inch below the top of the ribbon guide, as needed to begin the next docume n t .

User Manual
Page 141
Printer total thickness not to exceed 0.005" Ribbon Cassette ribbon, black MTBF 3 million lines (excluding print-head life) Print head life 100 million characters Dimensions and Weight Height 3.3 in Width 16.6 in Depth (without paper ...
Printer total thickness not to exceed 0.005" Ribbon Cassette ribbon, black MTBF 3 million lines (excluding print-head life) Print head life 100 million characters Dimensions and Weight Height 3.3 in Width 16.6 in Depth (without paper ...


