User Manual
Page 3
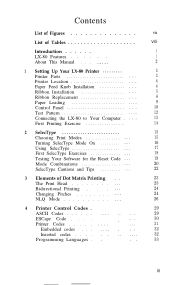
... 33 . . . III Vlll Introduction . . . . . . 1 LX-80 Features About This Manual . . . 1 2 1 Setting Up Your LX-80 Printer Printer Parts 3 3 Printer Location Paper Feed Knob Installation Ribbon Installation Ribbon Replacement 4 4 5 8 Paper Loading 9 Control Panel Test Pattern 10 12 Connecting the LX-80 to Your Computer . . . . 13 First Printing Exercise 14 2 SelecType... . . 23 The Print Head 23 Bidirectional Printing . . . . . . 24 Changing Pitches 24 NLQ Mode 26 4 Printer Control Codes . 29 ASCII Codes 29 ESCape Code . . . . . . .
... 33 . . . III Vlll Introduction . . . . . . 1 LX-80 Features About This Manual . . . 1 2 1 Setting Up Your LX-80 Printer Printer Parts 3 3 Printer Location Paper Feed Knob Installation Ribbon Installation Ribbon Replacement 4 4 5 8 Paper Loading 9 Control Panel Test Pattern 10 12 Connecting the LX-80 to Your Computer . . . . 13 First Printing Exercise 14 2 SelecType... . . 23 The Print Head 23 Bidirectional Printing . . . . . . 24 Changing Pitches 24 NLQ Mode 26 4 Printer Control Codes . 29 ASCII Codes 29 ESCape Code . . . . . . .
User Manual
Page 4
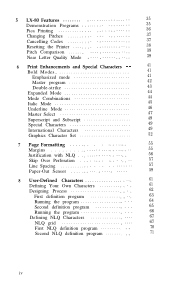
... First NLQ definition program Second NLQ definition program 61 61 62 63 64 65 66 67 67 70 71 iv 5 LX-80 Features Demonstration Programs Pica Printing Changing Pitches Cancelling Codes Resetting the Printer Pitch Comparison Near Letter Quality Mode 35 35 36 37 37 38 38 39 6 Print Enhancements and Special Characters...
... First NLQ definition program Second NLQ definition program 61 61 62 63 64 65 66 67 67 70 71 iv 5 LX-80 Features Demonstration Programs Pica Printing Changing Pitches Cancelling Codes Resetting the Printer Pitch Comparison Near Letter Quality Mode 35 35 36 37 37 38 38 39 6 Print Enhancements and Special Characters...
User Manual
Page 5
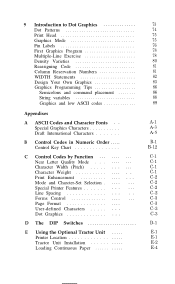
... Mode and Charcter-Set Selection Special Printer Features Line Spacing Forms Control Page Format User-defined Characters Dot Graphics D The DIP Switches E Using the Optional Tractor Unit . . . . . Printer Location Tractor Unit Installation Loading Continuous Paper... 73 74 75 75 76 78 78 80 81 81 82 83 86 86 88 89 A-1 A-3 A-5 B-1 B-12 C-1 C-1 C-1 C-1 C-2 C-2 C-2 C-2 C-3 C-3 C-3...
... Mode and Charcter-Set Selection Special Printer Features Line Spacing Forms Control Page Format User-defined Characters Dot Graphics D The DIP Switches E Using the Optional Tractor Unit . . . . . Printer Location Tractor Unit Installation Loading Continuous Paper... 73 74 75 75 76 78 78 80 81 81 82 83 86 86 88 89 A-1 A-3 A-5 B-1 B-12 C-1 C-1 C-1 C-1 C-2 C-2 C-2 C-2 C-3 C-3 C-3...

User Manual
Page 6
NowandThen Rarely H Technical Specifications Printing Character size Characters per line Paper Printer Dimensions and Weight Environment Interface I The Parallel Interface Data Transfer Sequence Interface timing Signal relationships F-1 F-1 F-1 F-1 F-1 F-3 F-3 F-3 F-3 F-4 F-4 F-4 F-6 ... Cancelling Functions with SelecType Other software Beeper Error Warnings Data Dump Mode Coding Solutions POKEing codes Special printer drivers Solutions for Seven-Bit Systems Solutions for Specific Systems Applesoft BASIC solutions Apple II solutions TIBRMS-8P0CTT"Msos ...
NowandThen Rarely H Technical Specifications Printing Character size Characters per line Paper Printer Dimensions and Weight Environment Interface I The Parallel Interface Data Transfer Sequence Interface timing Signal relationships F-1 F-1 F-1 F-1 F-1 F-3 F-3 F-3 F-3 F-4 F-4 F-4 F-6 ... Cancelling Functions with SelecType Other software Beeper Error Warnings Data Dump Mode Coding Solutions POKEing codes Special printer drivers Solutions for Seven-Bit Systems Solutions for Specific Systems Applesoft BASIC solutions Apple II solutions TIBRMS-8P0CTT"Msos ...
User Manual
Page 7
List of Figures 1-1 Printer parts 1-2 Paper feed knob installation 1-3 Ribbon cassette 1-4 Print head assembly 1-5 Ribbon cassette installation 1-6 Ribbon placement . . . . 1-7 LX-80 ready for paper loading . . . . . . 1-8 Control panel 1-9 Test patterns 1-10 Cable connection 3 5 5 6 7 8 9 10 12 14 2-1 SelecType setting and functions 17 3-1 A capital T 3-2 The three pitches of the LX-80 3-3 LX-80 dot matrix characters 23 25 26 6-1 Emphasized and...
List of Figures 1-1 Printer parts 1-2 Paper feed knob installation 1-3 Ribbon cassette 1-4 Print head assembly 1-5 Ribbon cassette installation 1-6 Ribbon placement . . . . 1-7 LX-80 ready for paper loading . . . . . . 1-8 Control panel 1-9 Test patterns 1-10 Cable connection 3 5 5 6 7 8 9 10 12 14 2-1 SelecType setting and functions 17 3-1 A capital T 3-2 The three pitches of the LX-80 3-3 LX-80 dot matrix characters 23 25 26 6-1 Emphasized and...

User Manual
Page 8
... levers E-4 E-6 Pin feed holder adjustment E-5 E-7 Open in feed cover E-5 E-8 Top of page position E-6 I-1 Parallel interface timing I-3 List of Tables 2-1 SelecType modes 2-2 Mode combinations 5-1 Summary of LX-80 pitches 6-1 International characters in NLQ mode 6-2 International characters in draft mode 6-3 International characters in draft italic 9-1 Graphics modes D-1 DIP switch functions D-2 International DIP switch settings...
... levers E-4 E-6 Pin feed holder adjustment E-5 E-7 Open in feed cover E-5 E-8 Top of page position E-6 I-1 Parallel interface timing I-3 List of Tables 2-1 SelecType modes 2-2 Mode combinations 5-1 Summary of LX-80 pitches 6-1 International characters in NLQ mode 6-2 International characters in draft mode 6-3 International characters in draft italic 9-1 Graphics modes D-1 DIP switch functions D-2 International DIP switch settings...
User Manual
Page 9
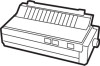
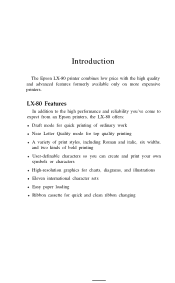
Introduction The Epson LX-80 printer combines low price with the high quality and advanced features formerly available only on more expensive printers. LX-80 Features In addition to the high performance and reliability you've come to expect from an Epson printers, the LX-80 offers: l Draft mode for quick printing of ordinary work l Near Letter Quality mode for top quality...
Introduction The Epson LX-80 printer combines low price with the high quality and advanced features formerly available only on more expensive printers. LX-80 Features In addition to the high performance and reliability you've come to expect from an Epson printers, the LX-80 offers: l Draft mode for quick printing of ordinary work l Near Letter Quality mode for top quality...
User Manual
Page 10
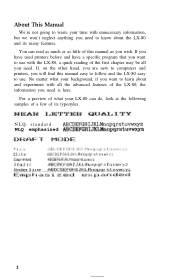
...background, if you want to use . If, on the other hand, you are new to computers and printers, you will find this manual as little of this manual easy to follow and the LX-80 easy to use with all you need is here. standard ABCDEFGHIJKLMnopqrstuvwxyz WLQ emphasized ABCDEFGHIJKLMnopqrstuvwxyz 2 You can do,... of a few of its many features. NLQ. No matter what your LX-80 can read as much or as you wish. If you have used printers before and have a specific program that you want to learn about the LX-80 and its typestyles. About This Manual We're not going to waste your...
...background, if you want to use . If, on the other hand, you are new to computers and printers, you will find this manual as little of this manual easy to follow and the LX-80 easy to use with all you need is here. standard ABCDEFGHIJKLMnopqrstuvwxyz WLQ emphasized ABCDEFGHIJKLMnopqrstuvwxyz 2 You can do,... of a few of its many features. NLQ. No matter what your LX-80 can read as much or as you wish. If you have used printers before and have a specific program that you want to learn about the LX-80 and its typestyles. About This Manual We're not going to waste your...
User Manual
Page 11
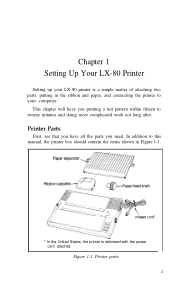
... should contain the items shown in the ribbon and paper, and connecting the printer to twenty minutes and doing more complicated work not long after. This chapter will have all the parts you printing a test pattern within fifteen to your LX-80 printer is delivered with the power cord attached. Chapter 1 Setting Up Your...
... should contain the items shown in the ribbon and paper, and connecting the printer to twenty minutes and doing more complicated work not long after. This chapter will have all the parts you printing a test pattern within fifteen to your LX-80 printer is delivered with the power cord attached. Chapter 1 Setting Up Your...

User Manual
Page 12
...is not close enough to your printer and computer away from direct sunlight, excessive heat, moisture, and dust. The main requirement, of the hole in your computer's memory and disrupt your dealer will tell you which you do not use the LX-80's Centronics® parallel interface. l... the knob, merely push it . Paper Feed Knob Installation Now that you have unpacked your LX-80, the first and simplest piece to install is that you have chosen where to set up your printer, you need a special interface. Accidentally turning off a switch can cause disruptive power fluctuations. ...
...is not close enough to your printer and computer away from direct sunlight, excessive heat, moisture, and dust. The main requirement, of the hole in your computer's memory and disrupt your dealer will tell you which you do not use the LX-80's Centronics® parallel interface. l... the knob, merely push it . Paper Feed Knob Installation Now that you have unpacked your LX-80, the first and simplest piece to install is that you have chosen where to set up your printer, you need a special interface. Accidentally turning off a switch can cause disruptive power fluctuations. ...

User Manual
Page 13
The parts of this cassette are labelled in a cassette that makes ribbon installation and replacement a clean and easy job. Figure 1-3. Paper feed knob installation Ribbon Installation The LX-80 printer uses a continuous-loop, inked fabric ribbon, which is enclosed in Figure 1-3. Ribbon cassette 5 Figure 1-2.
The parts of this cassette are labelled in a cassette that makes ribbon installation and replacement a clean and easy job. Figure 1-3. Paper feed knob installation Ribbon Installation The LX-80 printer uses a continuous-loop, inked fabric ribbon, which is enclosed in Figure 1-3. Ribbon cassette 5 Figure 1-2.

User Manual
Page 14
Note: Moving the print head by hand to the center of the printer so that the printer is turned off before you can harm the printer. To install the ribbon, first open the lid at the front of the LX-80 so that the paper bail is against the black roller so it too will not get in your way. Also be sure that the other parts of the printer will not be in Figure 1-4. Always be sure that you move the print head. Figure l-4. Print bead assembly Move the assembly by hand when the printer is turned on can see the print head assembly shown in your way.
Note: Moving the print head by hand to the center of the printer so that the printer is turned off before you can harm the printer. To install the ribbon, first open the lid at the front of the LX-80 so that the paper bail is against the black roller so it too will not get in your way. Also be sure that the other parts of the printer will not be in Figure 1-4. Always be sure that you move the print head. Figure l-4. Print bead assembly Move the assembly by hand when the printer is turned on can see the print head assembly shown in your way.
User Manual
Page 16
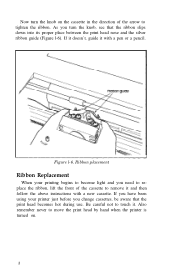
...ribbon, lift the front of the arrow to touch it with a new cassette. Also remember never to move the print head by hand when the printer is turned on the cassette in the direction of the cassette to remove it and then follow the above instructions with a pen or a pencil. ...Ribbon placement Ribbon Replacement When your printer just before you turn the knob on . 8 Figure l-6. Be careful not to tighten the ribbon. If it doesn't, guide it . As you change cassettes, ...
...ribbon, lift the front of the arrow to touch it with a new cassette. Also remember never to move the print head by hand when the printer is turned on the cassette in the direction of the cassette to remove it and then follow the above instructions with a pen or a pencil. ...Ribbon placement Ribbon Replacement When your printer just before you turn the knob on . 8 Figure l-6. Be careful not to tighten the ribbon. If it doesn't, guide it . As you change cassettes, ...
User Manual
Page 18
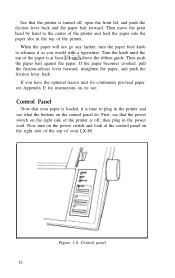
... in the top of the printer, When the paper will not go any farther, turn on the power switch and look at least 3/+inch above the ribbon guide. Figure 1-8. Control Panel Now that your LX-80. First, see that the ...power switch on the right side of the printer is time to the center of the printer and feed the paper into the paper slot in the ...power cord. Control panel 10 See that the printer is at the control panel on the right side of the top of your paper...
... in the top of the printer, When the paper will not go any farther, turn on the power switch and look at least 3/+inch above the ribbon guide. Figure 1-8. Control Panel Now that your LX-80. First, see that the ...power switch on the right side of the printer is time to the center of the printer and feed the paper into the paper slot in the ...power cord. Control panel 10 See that the printer is at the control panel on the right side of the top of your paper...
User Manual
Page 19
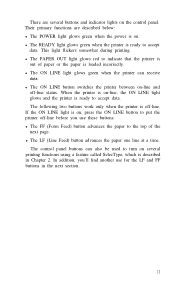
... the paper to accept data. In addition, you use for the LF and FF buttons in Chapter 2. The following two buttons work only when the printer is described in the next section. 11 l The LF (Line Feed) button advances the paper one line at a time. l The ON LINE button switches the... printer between on the control panel. When the printer is on several buttons and indicator lights on -line and off-line status. The control panel buttons can receive data. If the...
... the paper to accept data. In addition, you use for the LF and FF buttons in Chapter 2. The following two buttons work only when the printer is described in the next section. 11 l The LF (Line Feed) button advances the paper one line at a time. l The ON LINE button switches the... printer between on the control panel. When the printer is on several buttons and indicator lights on -line and off-line status. The control panel buttons can receive data. If the...

User Manual
Page 20
...) for the draft mode. Partial results of the page. Make sure that your LX-80 print something even though it and that are shown in Figure 1-9. The LX-80 will continue until you turn the printer off . To see your printer has paper in it 's not connected to a computer yet. When the printing ...starts, you turn the printer on while holding down the FF button. Now, hold down ...
...) for the draft mode. Partial results of the page. Make sure that your LX-80 print something even though it and that are shown in Figure 1-9. The LX-80 will continue until you turn the printer off . To see your printer has paper in it 's not connected to a computer yet. When the printing ...starts, you turn the printer on while holding down the FF button. Now, hold down ...

User Manual
Page 21
... computer are shown in connecting your computer requires any other kind of the connector. Connecting the LX-80 to Your Computer Now that the test pattern has shown that your printer is working well, it's time to hook it to the grounding screw below the connector. 13 Then..., you need is only one end of your printer cable into your printer and computer, you will tell you what a Centronics parallel interface is, your computer manual or your LX-80 printer. Remember that your computer expects to have plugged your printer cable into the cable connector of your dealer will...
... computer are shown in connecting your computer requires any other kind of the connector. Connecting the LX-80 to Your Computer Now that the test pattern has shown that your printer is working well, it's time to hook it to the grounding screw below the connector. 13 Then..., you need is only one end of your printer cable into your printer and computer, you will tell you what a Centronics parallel interface is, your computer manual or your LX-80 printer. Remember that your computer expects to have plugged your printer cable into the cable connector of your dealer will...

User Manual
Page 22
...computer, follow its printing instructions, and watch your computer. Note: If all the lines of the printer cable to use your LX-80 for printing program listings, load a program and use your printer. See the section on top of your computer system's listing command (LLIST for Microsoft™ BASIC... . If you have a word processing or other end of your first printing exercise are not sure, consult your computer manual or your LX-80 printer. All you have to see something more interesting than the test pattern from your dealer. Groundin{ screw Wire clip Figure 1-10. Cable ...
...computer, follow its printing instructions, and watch your computer. Note: If all the lines of the printer cable to use your LX-80 for printing program listings, load a program and use your printer. See the section on top of your computer system's listing command (LLIST for Microsoft™ BASIC... . If you have a word processing or other end of your first printing exercise are not sure, consult your computer manual or your LX-80 printer. All you have to see something more interesting than the test pattern from your dealer. Groundin{ screw Wire clip Figure 1-10. Cable ...
User Manual
Page 23
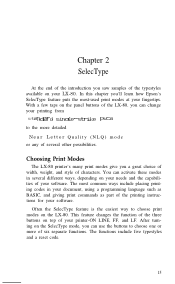
With a few taps on the panel buttons of the typestyles available on your printing from $:ll~~, i!+, 1") (I:/ cl r' (:I j, r) (:.:I.. 1, Et! ..' !:I;. 't;, r j, 1.: ( Chapter 2 SelecType At the end of the introduction you saw samples of the LX-80, you can change your LX-80. In this chapter you'll learn how Epson's SelecType feature puts the most-used print modes at your fingertips.
With a few taps on the panel buttons of the typestyles available on your printing from $:ll~~, i!+, 1") (I:/ cl r' (:I j, r) (:.:I.. 1, Et! ..' !:I;. 't;, r j, 1.: ( Chapter 2 SelecType At the end of the introduction you saw samples of the LX-80, you can change your LX-80. In this chapter you'll learn how Epson's SelecType feature puts the most-used print modes at your fingertips.
User Manual
Page 24
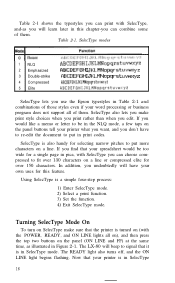
... turned on SelecType make print style choices when you print rather than when you undoubtedly will beep to signal that your printer is in print codes. The LX-80 will have your printer what you want, and you don't have to re-edit the document to put in SelecType mode. SelecType also lets you... all of them . SelecType modes 1 NLQ 2 Emphasized 3 Double-strike 4 Compressed 5 Elite ABCDEFGHIJKL,MNopqrst,uvwxyz ABCDEFGH I JKL.MNop qrstUswx yz 0 Ix:: 1:) 1.: F" G I.-I :I ;I ~~~~ SelecType lets you use the Epson typestyles in SelecType 16
... turned on SelecType make print style choices when you print rather than when you undoubtedly will beep to signal that your printer is in print codes. The LX-80 will have your printer what you want, and you don't have to re-edit the document to put in SelecType mode. SelecType also lets you... all of them . SelecType modes 1 NLQ 2 Emphasized 3 Double-strike 4 Compressed 5 Elite ABCDEFGHIJKL,MNopqrst,uvwxyz ABCDEFGH I JKL.MNop qrstUswx yz 0 Ix:: 1:) 1.: F" G I.-I :I ;I ~~~~ SelecType lets you use the Epson typestyles in SelecType 16


