

Product Information Guide
Page 14
.... 8. If you want to restore all the factory default settings, turn off the printer. Restoring the printer's default settings If you want to change them again or reset the printer's defaults. Epson LX-300+II Default Settings While you can select in this mode. (For more information, see the... to scroll through your application software or printer driver, you want to print a list of paper each time the printer ejects a printed page. 1. When you 'll need to change any settings, go to exit Default Setting mode. Epson LX-300+II 7/06 Changing Default Settings Follow the steps...
.... 8. If you want to restore all the factory default settings, turn off the printer. Restoring the printer's default settings If you want to change them again or reset the printer's defaults. Epson LX-300+II Default Settings While you can select in this mode. (For more information, see the... to scroll through your application software or printer driver, you want to print a list of paper each time the printer ejects a printed page. 1. When you 'll need to change any settings, go to exit Default Setting mode. Epson LX-300+II 7/06 Changing Default Settings Follow the steps...
Product Information Guide
Page 15
... To run the test using a draft font, turn off the printer. then disconnect the interface cable from the electrical outlet; Remove the paper guide. Epson LX-300+II Clearing a Paper Jam If paper becomes jammed in the printer, follow these steps: 1. To complete the steps below, you need... self test does not print properly, there is turned off the printer and exit the bidirectional adjustment mode. If the self test results are having printing problems, you select the best pattern in your printer driver settings, application settings, computer, or interface cable. (Be sure...
... To run the test using a draft font, turn off the printer. then disconnect the interface cable from the electrical outlet; Remove the paper guide. Epson LX-300+II Clearing a Paper Jam If paper becomes jammed in the printer, follow these steps: 1. To complete the steps below, you need... self test does not print properly, there is turned off the printer and exit the bidirectional adjustment mode. If the self test results are having printing problems, you select the best pattern in your printer driver settings, application settings, computer, or interface cable. (Be sure...
Reference Guide
Page 3
... This Manual 6 Warnings, Cautions, and Notes 7 Safety Instructions 7 Hot parts caution symbol 7 When setting up the printer 8 When operating the printer 9 When handling paper 9 When maintaining the printer 10 Chapter 1 Paper Handling Printing on Continuous Paper 11 Printing with the push tractor 12 Printing with the pull tractor 17... Printing on Special Paper 29 Adjusting the paper thickness lever 29 Multipart forms 30 Labels 31 Envelopes 32 Chapter 2 Using the Printer Software Accessing the Printer Driver 34 From Windows applications 34 From the Start menu 36 Changing the...
... This Manual 6 Warnings, Cautions, and Notes 7 Safety Instructions 7 Hot parts caution symbol 7 When setting up the printer 8 When operating the printer 9 When handling paper 9 When maintaining the printer 10 Chapter 1 Paper Handling Printing on Continuous Paper 11 Printing with the push tractor 12 Printing with the pull tractor 17... Printing on Special Paper 29 Adjusting the paper thickness lever 29 Multipart forms 30 Labels 31 Envelopes 32 Chapter 2 Using the Printer Software Accessing the Printer Driver 34 From Windows applications 34 From the Start menu 36 Changing the...

Reference Guide
Page 4
... 3 41 Setting up EPSON Status Monitor 3 42 Accessing EPSON Status Monitor 3 43 Installing EPSON Status Monitor 3 44 Setting Up Your Printer on a Network 45 Setting up the printer server 45 Setting up the clients 49 Installing the printer driver from the CD-ROM 57 Canceling Printing 58 Uninstalling the Printer Software 59 Uninstalling the printer driver and EPSON Status Monitor 3 59...
... 3 41 Setting up EPSON Status Monitor 3 42 Accessing EPSON Status Monitor 3 43 Installing EPSON Status Monitor 3 44 Setting Up Your Printer on a Network 45 Setting up the printer server 45 Setting up the clients 49 Installing the printer driver from the CD-ROM 57 Canceling Printing 58 Uninstalling the Printer Software 59 Uninstalling the printer driver and EPSON Status Monitor 3 59...
Reference Guide
Page 6
... with one original and up to possible problems. 6 Introduction About This Manual This manual provides detailed information about your printer contains the printer driver for Microsoft® Windows® 98, Me, 2000, XP and NT 4.0, plus the EPSON Status Monitor 3 utility. Introduction Your Epson® LX-300+II printer provides high-quality printing and superior performance in a compact design.
... with one original and up to possible problems. 6 Introduction About This Manual This manual provides detailed information about your printer contains the printer driver for Microsoft® Windows® 98, Me, 2000, XP and NT 4.0, plus the EPSON Status Monitor 3 utility. Introduction Your Epson® LX-300+II printer provides high-quality printing and superior performance in a compact design.

Reference Guide
Page 33
... 67 for more information.) ❏ Windows NT does not support the USB interface. Chapter 2 Using the Printer Software The Epson software includes the printer driver software and EPSON Status Monitor 3. Status Monitor 3 lets you install the printer driver. The printer driver software and EPSON Status Monitor 3 can function only in the User's Guide. ❏ Make sure the software setting is...
... 67 for more information.) ❏ Windows NT does not support the USB interface. Chapter 2 Using the Printer Software The Epson software includes the printer driver software and EPSON Status Monitor 3. Status Monitor 3 lets you install the printer driver. The printer driver software and EPSON Status Monitor 3 can function only in the User's Guide. ❏ Make sure the software setting is...
Reference Guide
Page 34
.... See "From the Start menu" on page 34 for more information. ❏ When you access the printer driver from the Start menu, the printer driver settings you make apply to access the printer driver from a Windows application: 1. Accessing the Printer Driver You can access the printer driver from your applications. See "From Windows applications" on page 36 for more information.
.... See "From the Start menu" on page 34 for more information. ❏ When you access the printer driver from the Start menu, the printer driver settings you make apply to access the printer driver from a Windows application: 1. Accessing the Printer Driver You can access the printer driver from your applications. See "From Windows applications" on page 36 for more information.
Reference Guide
Page 35
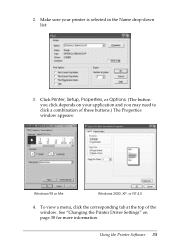
2. See "Changing the Printer Driver Settings" on your printer is selected in the Name drop-down list: 3. Make sure your application and you may need to click a combination of the window. Using the Printer Software 35 Click Printer, Setup, Properties, or Options. (The button you click depends on page 38 for more information. To view a menu, click the corresponding tab at the top of these buttons.) The Properties window appears: Windows 98 or Me Windows 2000, XP, or NT 4.0 4.
2. See "Changing the Printer Driver Settings" on your printer is selected in the Name drop-down list: 3. Make sure your application and you may need to click a combination of the window. Using the Printer Software 35 Click Printer, Setup, Properties, or Options. (The button you click depends on page 38 for more information. To view a menu, click the corresponding tab at the top of these buttons.) The Properties window appears: Windows 98 or Me Windows 2000, XP, or NT 4.0 4.
Reference Guide
Page 36
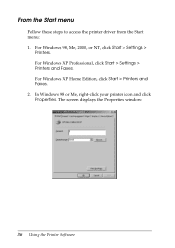
In Windows 98 or Me, right-click your printer icon and click Properties. The screen displays the Properties window: . 36 Using the Printer Software For Windows XP Home Edition, click Start > Printers and Faxes. 2. For Windows 98, Me, 2000, or NT, click Start > Settings > Printers. From the Start menu Follow these steps to access the printer driver from the Start menu: 1. For Windows XP Professional, click Start > Settings > Printers and Faxes.
In Windows 98 or Me, right-click your printer icon and click Properties. The screen displays the Properties window: . 36 Using the Printer Software For Windows XP Home Edition, click Start > Printers and Faxes. 2. For Windows 98, Me, 2000, or NT, click Start > Settings > Printers. From the Start menu Follow these steps to access the printer driver from the Start menu: 1. For Windows XP Professional, click Start > Settings > Printers and Faxes.
Reference Guide
Page 37
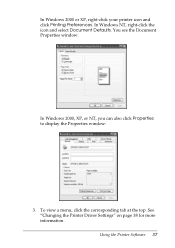
Using the Printer Software 37 See "Changing the Printer Driver Settings" on page 38 for more information. You see the Document Properties window: In Windows 2000, XP, or NT, you can also click Properties to display the Properties window: 3. In Windows NT, right-click the icon and select Document Defaults. In Windows 2000 or XP, right-click your printer icon and click Printing Preferences. To view a menu, click the corresponding tab at the top.
Using the Printer Software 37 See "Changing the Printer Driver Settings" on page 38 for more information. You see the Document Properties window: In Windows 2000, XP, or NT, you can also click Properties to display the Properties window: 3. In Windows NT, right-click the icon and select Document Defaults. In Windows 2000 or XP, right-click your printer icon and click Printing Preferences. To view a menu, click the corresponding tab at the top.
Reference Guide
Page 38
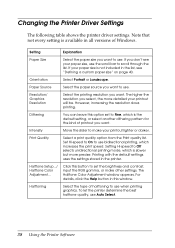
... through the list. Dithering You can leave this window. Print Quality Select a print quality option from the Print quality list. Changing the Printer Driver Settings The following table shows the printer driver settings. Orientation Select Portrait or Landscape. Resolution/ Graphics Resolution Select the printing resolution you want to use when printing graphics. The higher...
... through the list. Dithering You can leave this window. Print Quality Select a print quality option from the Print quality list. Changing the Printer Driver Settings The following table shows the printer driver settings. Orientation Select Portrait or Landscape. Resolution/ Graphics Resolution Select the printing resolution you want to use when printing graphics. The higher...

Reference Guide
Page 41
... when needed. Using the Printer Software 41 Status Monitor 3 is configured to monitor your printer's status, alerts you install the printer driver (as described in the User's Guide). Click this button. To monitor the printer, make settings for more information. See "Setting up the printer server" on the printer server. Using EPSON Status Monitor 3 EPSON Status Monitor 3 allows you...
... when needed. Using the Printer Software 41 Status Monitor 3 is configured to monitor your printer's status, alerts you install the printer driver (as described in the User's Guide). Click this button. To monitor the printer, make settings for more information. See "Setting up the printer server" on the printer server. Using EPSON Status Monitor 3 EPSON Status Monitor 3 allows you...
Reference Guide
Page 42
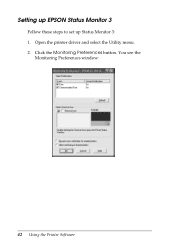
Setting up EPSON Status Monitor 3 Follow these steps to set up Status Monitor 3: 1. Open the printer driver and select the Utility menu. 2. Click the Monitoring Preferences button. You see the Monitoring Preferences window: 42 Using the Printer Software
Setting up EPSON Status Monitor 3 Follow these steps to set up Status Monitor 3: 1. Open the printer driver and select the Utility menu. 2. Click the Monitoring Preferences button. You see the Monitoring Preferences window: 42 Using the Printer Software

Reference Guide
Page 49
... instructions on page 49 to set up the clients This section describes how to install the printer driver on the client computers by accessing the shared printer on a network. Follow the instructions for the share name. Using the Printer Software 49 Setting up the client computers so they can use spaces or hyphens for... or Me: see page 50. ❏ Windows 2000 or XP: see page 52. ❏ Windows NT 4.0: see page 55. In Windows XP, select Share this printer, then type the name in the Share name box and click OK.
... instructions on page 49 to set up the clients This section describes how to install the printer driver on the client computers by accessing the shared printer on a network. Follow the instructions for the share name. Using the Printer Software 49 Setting up the client computers so they can use spaces or hyphens for... or Me: see page 50. ❏ Windows 2000 or XP: see page 52. ❏ Windows NT 4.0: see page 55. In Windows XP, select Share this printer, then type the name in the Share name box and click OK.

Reference Guide
Page 50
...use Status Monitor 3 on the clients, you cannot access the shared printer due to the network system, ask your network administrator for assistance. ❏ This section describes how to install the printer driver by accessing the shared printer from the CD-ROM. You can also type "\\(the name of ...the computer that is locally connected to the shared printer)\(the shared printer's name)" in the Network path or queue name. 50 ...
...use Status Monitor 3 on the clients, you cannot access the shared printer due to the network system, ask your network administrator for assistance. ❏ This section describes how to install the printer driver by accessing the shared printer from the CD-ROM. You can also type "\\(the name of ...the computer that is locally connected to the shared printer)\(the shared printer's name)" in the Network path or queue name. 50 ...

Reference Guide
Page 51
...next step. Then click OK. If the printer driver was installed on the printer server is not Windows 98 or Me, go to use it is connected to select the new printer driver or the current printer driver when you 're not sure about the shared printer's name, ask the network administrator. 6. ...Click the computer or server that is connected to "Installing the printer driver from the CD-ROM" on page 57. 7. If ...
...next step. Then click OK. If the printer driver was installed on the printer server is not Windows 98 or Me, go to use it is connected to select the new printer driver or the current printer driver when you 're not sure about the shared printer's name, ask the network administrator. 6. ...Click the computer or server that is connected to "Installing the printer driver from the CD-ROM" on page 57. 7. If ...

Reference Guide
Page 54
... computer or server that is Windows 98, Me, or NT, you'll need to select either the new printer driver or the current printer driver when prompted. ❏ If the operating system on the printer server is Windows 2000 or XP, go to the next step. ❏ If the operating system on the... printer server is connected to install the printer driver from the CD-ROM. Click the icon of the shared printer, ask the network administrator. ❏ If the printer driver was installed on the client previously, you need to the shared...
... computer or server that is Windows 98, Me, or NT, you'll need to select either the new printer driver or the current printer driver when prompted. ❏ If the operating system on the printer server is Windows 2000 or XP, go to the next step. ❏ If the operating system on the... printer server is connected to install the printer driver from the CD-ROM. Click the icon of the shared printer, ask the network administrator. ❏ If the printer driver was installed on the client previously, you need to the shared...
Reference Guide
Page 56
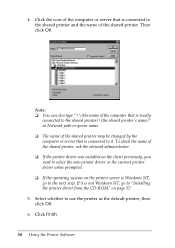
... connected to the shared printer and the name of the shared printer. Click Finish. 56 Using the Printer Software If it . Click the icon of the shared printer, ask the network administrator. ❏ If the printer driver was installed on the client previously, you need to select the new printer driver or the current printer driver when prompted. ❏ If...
... connected to the shared printer and the name of the shared printer. Click Finish. 56 Using the Printer Software If it . Click the icon of the shared printer, ask the network administrator. ❏ If the printer driver was installed on the client previously, you need to select the new printer driver or the current printer driver when prompted. ❏ If...
Reference Guide
Page 57
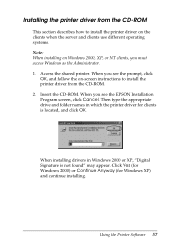
...the on Windows 2000, XP, or NT clients, you see the EPSON Installation Program screen, click Cancel. Insert the CD-ROM. When you must access Windows as the Administrator. 1. When installing drivers in which the printer driver for Windows XP) and continue installing. Click Yes (for Windows ... or XP, "Digital Signature is located, and click OK. Using the Printer Software 57 Access the shared printer. Installing the printer driver from the CD-ROM This section describes how to install the printer driver on the clients when the server and clients use different operating systems. Note...
...the on Windows 2000, XP, or NT clients, you see the EPSON Installation Program screen, click Cancel. Insert the CD-ROM. When you must access Windows as the Administrator. 1. When installing drivers in which the printer driver for Windows XP) and continue installing. Click Yes (for Windows ... or XP, "Digital Signature is located, and click OK. Using the Printer Software 57 Access the shared printer. Installing the printer driver from the CD-ROM This section describes how to install the printer driver on the clients when the server and clients use different operating systems. Note...

Reference Guide
Page 59
Uninstalling the Printer Software If you need to reinstall or upgrade the printer driver, first uninstall the current printer driver. Uninstalling the printer driver and EPSON Status Monitor 3 1. Quit all documents, select Purge Print Documents (Windows 98 or Me) or Cancel All Documents (Windows 2000, XP, or NT) on the Printer menu. To cancel printing of all applications. 2. Click Start > Control Panel or Start > Settings > Control Panel. 3. Double-click the Add/Remove Programs icon. Using the Printer Software 59
Uninstalling the Printer Software If you need to reinstall or upgrade the printer driver, first uninstall the current printer driver. Uninstalling the printer driver and EPSON Status Monitor 3 1. Quit all documents, select Purge Print Documents (Windows 98 or Me) or Cancel All Documents (Windows 2000, XP, or NT) on the Printer menu. To cancel printing of all applications. 2. Click Start > Control Panel or Start > Settings > Control Panel. 3. Double-click the Add/Remove Programs icon. Using the Printer Software 59


