
Technical Brief (Impact Printers)
Page 1
... multiple paper paths that the printer are either 9- EPSON impact printers are renowned for their reliability with LQ FX-980-Nine-pin narrow carriage Wide carriage printers have 4 number in their names Narrow carriage printers have 3 numbers in their ...Ribbon cartridge reliability M Total Print Volume vs. L LL L Nine-pin impact printers - An impact printer has several advantages over any other type of ownership Flexible paper handling - Contents This technical brief provides detailed information on the following topics, related to all EPSON impact printers: Functionality...
... multiple paper paths that the printer are either 9- EPSON impact printers are renowned for their reliability with LQ FX-980-Nine-pin narrow carriage Wide carriage printers have 4 number in their names Narrow carriage printers have 3 numbers in their ...Ribbon cartridge reliability M Total Print Volume vs. L LL L Nine-pin impact printers - An impact printer has several advantages over any other type of ownership Flexible paper handling - Contents This technical brief provides detailed information on the following topics, related to all EPSON impact printers: Functionality...

Technical Brief (Impact Printers)
Page 6
... motor, which can jam or damage the print head Protects and extends the life of extended use a stationary ribbon cartridge. Because the carriage does not have to every sale 5 Reliability-Ribbon cartridge reliability Most EPSON impact printers use and extreme temperature changes L L Easy to the less expensive compatible ribbons. This lower weight on the carriage...
... motor, which can jam or damage the print head Protects and extends the life of extended use a stationary ribbon cartridge. Because the carriage does not have to every sale 5 Reliability-Ribbon cartridge reliability Most EPSON impact printers use and extreme temperature changes L L Easy to the less expensive compatible ribbons. This lower weight on the carriage...
Product Support Bulletin(s)
Page 2
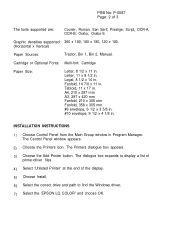
...x 11 in Program Manager. The Control Panel window appears. 2) Choose the Printers icon. The Printers dialogue box appears. 3) Choose the Add Printer button. Legal, 8 1/2 x 14 in . Tabloid, 11 x 17 in . Cartridge or Optional Fonts: Multi-font Cartridge Paper Size: Letter, 8 1/2 x 11 in . A4, 210 x ...of printer-driver files. 4) Select 'Unlisted Printer" at the end of 3 The fonts supported are: Courier, Roman, San Serif, Prestige, Script, OCR-A, OCR-B, Orator, Orator-S. Letter, 11 x 8 1/2 in. The dialogue box expands to find the Windows driver. 7) Select the 'EPSON LQ COLOR...
...x 11 in Program Manager. The Control Panel window appears. 2) Choose the Printers icon. The Printers dialogue box appears. 3) Choose the Add Printer button. Legal, 8 1/2 x 14 in . Tabloid, 11 x 17 in . Cartridge or Optional Fonts: Multi-font Cartridge Paper Size: Letter, 8 1/2 x 11 in . A4, 210 x ...of printer-driver files. 4) Select 'Unlisted Printer" at the end of 3 The fonts supported are: Courier, Roman, San Serif, Prestige, Script, OCR-A, OCR-B, Orator, Orator-S. Letter, 11 x 8 1/2 in. The dialogue box expands to find the Windows driver. 7) Select the 'EPSON LQ COLOR...
User Manual
Page 12
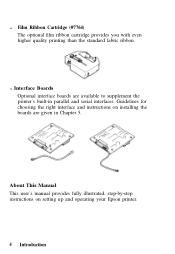
About This Manual This user's manual provides fully illustrated, step-by-step instructions on installing the boards are available to supplement the printer's built-in Chapter 5. l Interface Boards Optional interface boards are given in parallel and serial interfaces. l Film Ribbon Cartridge (#7764) The optional film ribbon cartridge provides you with even higher quality printing than the standard fabric ribbon. Guidelines for choosing the right interface and instructions on setting up and operating your Epson printer. 4 Introduction
About This Manual This user's manual provides fully illustrated, step-by-step instructions on installing the boards are available to supplement the printer's built-in Chapter 5. l Interface Boards Optional interface boards are given in parallel and serial interfaces. l Film Ribbon Cartridge (#7764) The optional film ribbon cartridge provides you with even higher quality printing than the standard fabric ribbon. Guidelines for choosing the right interface and instructions on setting up and operating your Epson printer. 4 Introduction

User Manual
Page 15
... the Protective Materials 1-3 Choosing a Place for the Printer 1-6 Assembling the Printer 1-8 Installing the Platen Knob 1-8 Installing the Ribbon Cartridge 1-9 Attaching the Paper Guide 1-14 Testing the Printer 1-16 Plugging in the Printer 1-16 Running the Self Test 1-16 If the Self Test Doesn't Print 1-23 Connecting the Printer to Your Computer 1-27 The Parallel Interface 1-28...
... the Protective Materials 1-3 Choosing a Place for the Printer 1-6 Assembling the Printer 1-8 Installing the Platen Knob 1-8 Installing the Ribbon Cartridge 1-9 Attaching the Paper Guide 1-14 Testing the Printer 1-16 Plugging in the Printer 1-16 Running the Self Test 1-16 If the Self Test Doesn't Print 1-23 Connecting the Printer to Your Computer 1-27 The Parallel Interface 1-28...

User Manual
Page 16
Unpacking the Printer Checking the Parts When you unpack the printer, make sure that you have all the parts shown below and that none have been damaged. Platen knob Cross-head screwdriver Color ribbon cartridge Connector lock nuts Black ribbon cartridge 1-2 Setting Up the Printer
Unpacking the Printer Checking the Parts When you unpack the printer, make sure that you have all the parts shown below and that none have been damaged. Platen knob Cross-head screwdriver Color ribbon cartridge Connector lock nuts Black ribbon cartridge 1-2 Setting Up the Printer
User Manual
Page 17
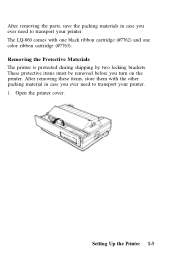
After removing the parts, save the packing materials in case you ever need to transport your printer. 1. After removing these items, store them with one black ribbon cartridge (#7762) and one color ribbon cartridge (#7763). Setting Up the Printer 1-3 Open the printer cover. The LQ-860 comes with the other packing material in case you ever need to transport your printer. Removing the Protective Materials The printer is protected during shipping by two locking brackets. These protective items must be removed before you turn on the printer.
After removing the parts, save the packing materials in case you ever need to transport your printer. 1. After removing these items, store them with one black ribbon cartridge (#7762) and one color ribbon cartridge (#7763). Setting Up the Printer 1-3 Open the printer cover. The LQ-860 comes with the other packing material in case you ever need to transport your printer. Removing the Protective Materials The printer is protected during shipping by two locking brackets. These protective items must be removed before you turn on the printer.
User Manual
Page 23
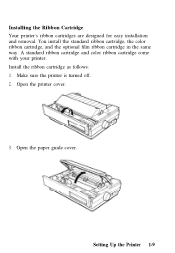
Open the paper guide cover. You install the standard ribbon cartridge, the color ribbon cartridge, and the optional film ribbon cartridge in the same way. Install the ribbon cartridge as follows: 1. Open the printer cover. 3. Make sure the printer is turned off. 2. A standard ribbon cartridge and color ribbon cartridge come with your printer. Setting Up the Printer 1-9 Installing the Ribbon Cartridge Your printer's ribbon cartridges are designed for easy installation and removal.
Open the paper guide cover. You install the standard ribbon cartridge, the color ribbon cartridge, and the optional film ribbon cartridge in the same way. Install the ribbon cartridge as follows: 1. Open the printer cover. 3. Make sure the printer is turned off. 2. A standard ribbon cartridge and color ribbon cartridge come with your printer. Setting Up the Printer 1-9 Installing the Ribbon Cartridge Your printer's ribbon cartridges are designed for easy installation and removal.
User Manual
Page 25
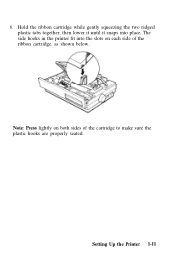
Hold the ribbon cartridge while gently squeezing the two ridged plastic tabs together; The side hooks in the printer fit into place. Setting Up the Printer 1-11 Note: Press lightly on each side of the cartridge to make sure the plastic hooks are properly seated. then lower it until it snaps into the slots on both sides of the ribbon cartridge, as shown below. 6.
Hold the ribbon cartridge while gently squeezing the two ridged plastic tabs together; The side hooks in the printer fit into place. Setting Up the Printer 1-11 Note: Press lightly on each side of the cartridge to make sure the plastic hooks are properly seated. then lower it until it snaps into the slots on both sides of the ribbon cartridge, as shown below. 6.
User Manual
Page 26
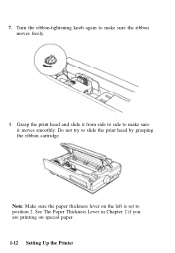
7. Turn the ribbon-tightening knob again to make sure the ribbon moves freely. 8. Grasp the print head and slide it from side to side to make sure it moves smoothly. Do not try to position 2. Note: Make sure the paper thickness lever on special paper. 1-12 Setting Up the Printer See The Paper Thickness Lever in Chapter 2 if you are printing on the left is set to slide the print head by grasping the ribbon cartridge.
7. Turn the ribbon-tightening knob again to make sure the ribbon moves freely. 8. Grasp the print head and slide it from side to side to make sure it moves smoothly. Do not try to position 2. Note: Make sure the paper thickness lever on special paper. 1-12 Setting Up the Printer See The Paper Thickness Lever in Chapter 2 if you are printing on the left is set to slide the print head by grasping the ribbon cartridge.
User Manual
Page 27
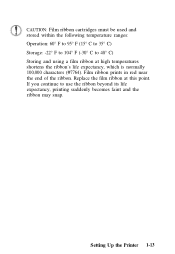
Replace the film ribbon at high temperatures shortens the ribbon's life expectancy, which is normally 100,000 characters (#7764). Setting Up the Printer 1-13 CAUTION: Film ribbon cartridges must be used and stored within the following temperature ranges: Operation: 60° F to 95° F (15° C to 35° C) Storage: -22° F to...
Replace the film ribbon at high temperatures shortens the ribbon's life expectancy, which is normally 100,000 characters (#7764). Setting Up the Printer 1-13 CAUTION: Film ribbon cartridges must be used and stored within the following temperature ranges: Operation: 60° F to 95° F (15° C to 35° C) Storage: -22° F to...
User Manual
Page 31
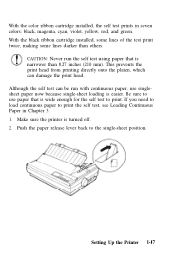
... self test using paper that is narrower than others. With the color ribbon cartridge installed, the self test prints in Chapter 3. 1. If you need to load continuous paper to print. ...With the black ribbon cartridge installed, some lines of the test print twice, making some lines darker than 8.27 inches ...singlesheet paper now because single-sheet loading is turned off. 2. Make sure the printer is easier. Setting Up the Printer 1-17 Although the self test can damage the print head. Be sure to the single-sheet...
... self test using paper that is narrower than others. With the color ribbon cartridge installed, the self test prints in Chapter 3. 1. If you need to load continuous paper to print. ...With the black ribbon cartridge installed, some lines of the test print twice, making some lines darker than 8.27 inches ...singlesheet paper now because single-sheet loading is turned off. 2. Make sure the printer is easier. Setting Up the Printer 1-17 Although the self test can damage the print head. Be sure to the single-sheet...
User Manual
Page 38
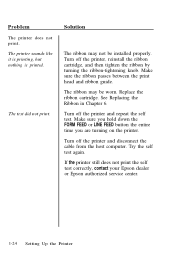
...turning the ribbon-tightening knob. Try the self test again. Replace the ribbon cartridge. Make sure you hold down the FORM FEED or LINE FEED button the entire time you are turning on the printer. Make sure the ribbon passes between the print head and ribbon guide. ... Chapter 6. Turn off the printer and repeat the self test. Solution The ribbon may be installed properly. Turn off the printer and disconnect the cable from the host computer. If the printer still does not print the self test correctly, contact your Epson dealer or Epson authorized service center. 1-24...
...turning the ribbon-tightening knob. Try the self test again. Replace the ribbon cartridge. Make sure you hold down the FORM FEED or LINE FEED button the entire time you are turning on the printer. Make sure the ribbon passes between the print head and ribbon guide. ... Chapter 6. Turn off the printer and repeat the self test. Solution The ribbon may be installed properly. Turn off the printer and disconnect the cable from the host computer. If the printer still does not print the self test correctly, contact your Epson dealer or Epson authorized service center. 1-24...
User Manual
Page 39
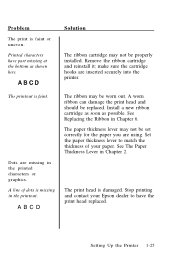
A line of your Epson dealer to have part missing at the bottom...lever to match the thickness of dots is faint or uneven. Setting Up the Printer 1-25 Dots are inserted securely into the printer. See The Paper Thickness Lever in the printed characters or graphics. ABCD The... printout is damaged. A worn ribbon can damage the print head and should be properly installed. Remove the ribbon cartridge and reinstall it; The print head is faint. ABCD Solution The ribbon cartridge...
A line of your Epson dealer to have part missing at the bottom...lever to match the thickness of dots is faint or uneven. Setting Up the Printer 1-25 Dots are inserted securely into the printer. See The Paper Thickness Lever in the printed characters or graphics. ABCD The... printout is damaged. A worn ribbon can damage the print head and should be properly installed. Remove the ribbon cartridge and reinstall it; The print head is faint. ABCD Solution The ribbon cartridge...
User Manual
Page 40
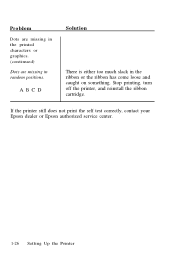
Problem Dots are missing in the printed characters or graphics. (continued) Dots are missing in the ribbon or the ribbon has come loose and caught on something. Stop printing, turn off the printer, and reinstall the ribbon cartridge. ABCD Solution There is either too much slack in random positions. If the printer still does not print the self test correctly, contact your Epson dealer or Epson authorized service center. 1-26 Setting Up the Printer
Problem Dots are missing in the printed characters or graphics. (continued) Dots are missing in the ribbon or the ribbon has come loose and caught on something. Stop printing, turn off the printer, and reinstall the ribbon cartridge. ABCD Solution There is either too much slack in random positions. If the printer still does not print the self test correctly, contact your Epson dealer or Epson authorized service center. 1-26 Setting Up the Printer

User Manual
Page 70
... paper thickness lever to position 4 or higher, the printing speed may be reduced slightly. 2-24 Paper Handling If you have installed the optional film ribbon cartridge, and you are using: Paper type Paper (single sheets or continuous paper with film ribbon installed) Thin paper Paper (single sheets or continuous paper with...
... paper thickness lever to position 4 or higher, the printing speed may be reduced slightly. 2-24 Paper Handling If you have installed the optional film ribbon cartridge, and you are using: Paper type Paper (single sheets or continuous paper with film ribbon installed) Thin paper Paper (single sheets or continuous paper with...

User Manual
Page 81
...with draft mode. (Draft mode overrides proportional spacing.) 3-4 Using the Printer SelecType FONT Press this button to select the character spacing. PITCH Press this button to select LQ ROMAN, LQ SANS SERIF, DRAFT mode, or a cartridge font (if installed). The orange indicator light shows the spacing you ...select. TEAR OFF Press this button to feed the perforation of the printer. After tearing off edge of continuous ...
...with draft mode. (Draft mode overrides proportional spacing.) 3-4 Using the Printer SelecType FONT Press this button to select the character spacing. PITCH Press this button to select LQ ROMAN, LQ SANS SERIF, DRAFT mode, or a cartridge font (if installed). The orange indicator light shows the spacing you ...select. TEAR OFF Press this button to feed the perforation of the printer. After tearing off edge of continuous ...

User Manual
Page 100
..., which makes it ideal for most documentation requirements. ROMAN and SANS SERIF are available on optional font cartridges. See The MultiFont Module in Chapter 5. Using the Printer 3-23 Letter Quality fonts take a little longer to print, but produce nicely formed characters suitable for ...rough drafts and editing work. SANS SERIF We've just seen your excellent ad for miniature zebras in a recent back issue of Trader's Times. Other fonts are Letter Quality (LQ...
..., which makes it ideal for most documentation requirements. ROMAN and SANS SERIF are available on optional font cartridges. See The MultiFont Module in Chapter 5. Using the Printer 3-23 Letter Quality fonts take a little longer to print, but produce nicely formed characters suitable for ...rough drafts and editing work. SANS SERIF We've just seen your excellent ad for miniature zebras in a recent back issue of Trader's Times. Other fonts are Letter Quality (LQ...
User Manual
Page 193
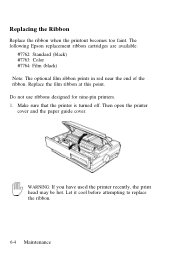
... turned off. WARNING: If you have used the printer recently, the print head may be hot. Replace the film ribbon at this point. Let it cool before attempting to replace the ribbon. 6-4 Maintenance Replacing ...the Ribbon Replace the ribbon when the printout becomes too faint. Do not use ribbons designed for nine-pin printers. 1. Then open the printer cover and the paper guide cover. The following Epson replacement ribbon cartridges are available: #7762: Standard (black) #7763: Color #7764: Film (black) Note: The optional film ribbon prints in red...
... turned off. WARNING: If you have used the printer recently, the print head may be hot. Replace the film ribbon at this point. Let it cool before attempting to replace the ribbon. 6-4 Maintenance Replacing ...the Ribbon Replace the ribbon when the printout becomes too faint. Do not use ribbons designed for nine-pin printers. 1. Then open the printer cover and the paper guide cover. The following Epson replacement ribbon cartridges are available: #7762: Standard (black) #7763: Color #7764: Film (black) Note: The optional film ribbon prints in red...

User Manual
Page 194
Holding the print head, not the ribbon cartridge, move the print head to about three inches from the left of the cartridge holder. Maintenance 6-5 Then lift the cartridge straight up and out of the printer. 3. 2. To release the ribbon cartridge, gently press the tab at the top left side toward the center of the printer.
Holding the print head, not the ribbon cartridge, move the print head to about three inches from the left of the cartridge holder. Maintenance 6-5 Then lift the cartridge straight up and out of the printer. 3. 2. To release the ribbon cartridge, gently press the tab at the top left side toward the center of the printer.

