
User Manual
Page 18
Place the paper guide on the printer. 2. Raise the paper guide until it locks into place. Follow these steps to feed the paper smoothly and efficiently. Setting Up the Printer 1-11 Assembling the Printer Attaching the paper guide The paper guide functions to install the paper guide: 1.
Place the paper guide on the printer. 2. Raise the paper guide until it locks into place. Follow these steps to feed the paper smoothly and efficiently. Setting Up the Printer 1-11 Assembling the Printer Attaching the paper guide The paper guide functions to install the paper guide: 1.
User Manual
Page 22
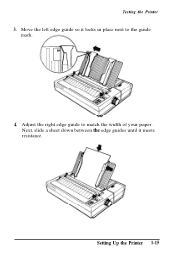
Adjust the right edge guide to the guide mark. 4. Move the left edge guide so it meets resistance. Setting Up the Printer 1-15 Next, slide a sheet down between the edge guides until it locks in place next to match the width of your paper. Testing the Printer 3.
Adjust the right edge guide to the guide mark. 4. Move the left edge guide so it meets resistance. Setting Up the Printer 1-15 Next, slide a sheet down between the edge guides until it locks in place next to match the width of your paper. Testing the Printer 3.
User Manual
Page 27
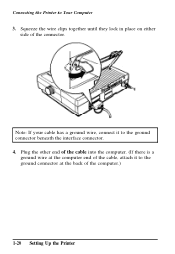
Squeeze the wire clips together until they lock in place on either side of the cable, attach it to the ground connector beneath the interface connector. 4. Note: If your cable has a ground wire, connect it to Your Computer 3. Connecting the Printer to the ground connector at the computer end of the connector. Plug the other end of the cable into the computer. (If there is a ground wire at the back of the computer.) 1-20 Setting Up the Printer
Squeeze the wire clips together until they lock in place on either side of the cable, attach it to the ground connector beneath the interface connector. 4. Note: If your cable has a ground wire, connect it to Your Computer 3. Connecting the Printer to the ground connector at the computer end of the connector. Plug the other end of the cable into the computer. (If there is a ground wire at the back of the computer.) 1-20 Setting Up the Printer
User Manual
Page 31
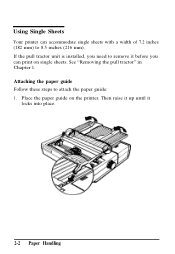
See "Removing the pull tractor" in Chapter 1. Then raise it up until it before you need to remove it locks into place. 2-2 Paper Handling Using Single Sheets Your printer can print on the printer. Attaching the paper guide Follow these steps to 8.5 inches (216 mm). Place the paper guide on single sheets. If the pull tractor unit is installed, you can accommodate single sheets with a width of 7.2 inches (182 mm) to attach the paper guide: 1.
See "Removing the pull tractor" in Chapter 1. Then raise it up until it before you need to remove it locks into place. 2-2 Paper Handling Using Single Sheets Your printer can print on the printer. Attaching the paper guide Follow these steps to 8.5 inches (216 mm). Place the paper guide on single sheets. If the pull tractor unit is installed, you can accommodate single sheets with a width of 7.2 inches (182 mm) to attach the paper guide: 1.
User Manual
Page 32
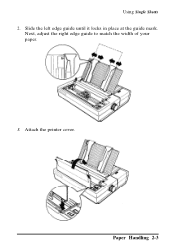
Paper Handling 2-3 Using Single Sheets 2. Attach the printer cover. Slide the left edge guide until it locks in place at the guide mark. Next, adjust the right edge guide to match the width of your paper. 3.
Paper Handling 2-3 Using Single Sheets 2. Attach the printer cover. Slide the left edge guide until it locks in place at the guide mark. Next, adjust the right edge guide to match the width of your paper. 3.
User Manual
Page 39
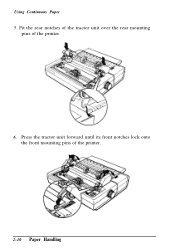
Using Continuous Paper 5. Fit the rear notches of the tractor unit over the rear mounting pins of the printer. 2-10 Paper Handling Press the tractor unit forward until its front notches lock onto the front mounting pins of the printer. 6.
Using Continuous Paper 5. Fit the rear notches of the tractor unit over the rear mounting pins of the printer. 2-10 Paper Handling Press the tractor unit forward until its front notches lock onto the front mounting pins of the printer. 6.
User Manual
Page 41
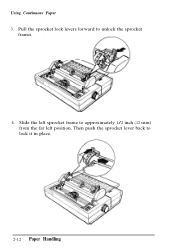
Slide the left sprocket frame to approximately 1/2 inch (12 mm) from the far left position, Then push the sprocket lever back to unlock the sprocket frames. 4. Using Continuous Paper 3. Pull the sprocket lock levers forward to lock it in place. 2-12 Paper Handling
Slide the left sprocket frame to approximately 1/2 inch (12 mm) from the far left position, Then push the sprocket lever back to unlock the sprocket frames. 4. Using Continuous Paper 3. Pull the sprocket lock levers forward to lock it in place. 2-12 Paper Handling
User Manual
Page 42
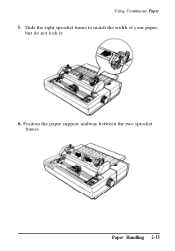
Position the paper support midway between the two sprocket frames. Paper Handling 2-13 Using Continuous Paper 5. Slide the right sprocket frame to match the width of your paper, but do not lock it. 6.
Position the paper support midway between the two sprocket frames. Paper Handling 2-13 Using Continuous Paper 5. Slide the right sprocket frame to match the width of your paper, but do not lock it. 6.
User Manual
Page 44
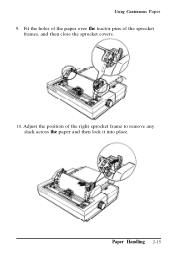
Using Continuous Paper 9. Adjust the position of the sprocket frames, and then close the sprocket covers. 10. Paper Handling 2-15 Fit the holes of the paper over the tractor pins of the right sprocket frame to remove any slack across the paper and then lock it into place.
Using Continuous Paper 9. Adjust the position of the sprocket frames, and then close the sprocket covers. 10. Paper Handling 2-15 Fit the holes of the paper over the tractor pins of the right sprocket frame to remove any slack across the paper and then lock it into place.
User Manual
Page 110
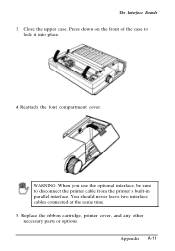
The Interface Boards 3. Close the upper case. WARNING: When you use the optional interface, be sure to lock it into place. 4. Appendix A-11 Reattach the font compartment cover. Replace the ribbon cartridge, printer cover, and any other necessary parts or options. Press down on the front of the case to disconnect the printer cable from the printer's built-in parallel interface. You should never leave two interface cables connected at the same time. 5.
The Interface Boards 3. Close the upper case. WARNING: When you use the optional interface, be sure to lock it into place. 4. Appendix A-11 Reattach the font compartment cover. Replace the ribbon cartridge, printer cover, and any other necessary parts or options. Press down on the front of the case to disconnect the printer cable from the printer's built-in parallel interface. You should never leave two interface cables connected at the same time. 5.