User Manual
Page 2
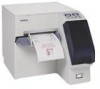
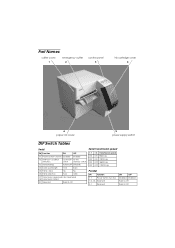
... OFF OFF 115200 bps Parallel SW Function 1-1 Power button function 1-2~1-8 Reserved 2-1 Reserved ON OFF Disabled Enabled Fixed to Off. Part Names cutter cover 1 emergency cutter 2 control panel 3 ink cartridge cover 4 6 paper roll cover 5 power supply switch DIP Switch Tables Serial SW Function ON OFF 1-1 Power button function Disabled Enabled 1-2 Interface condition selection by the DIP by the switch memory switch 1-3 Handshaking XON/XOFF DTR/DSR 1-4 Data word length 7 bits 8 bits 1-5 Parity check Yes No 1-6 Parity selection Even Odd...
... OFF OFF 115200 bps Parallel SW Function 1-1 Power button function 1-2~1-8 Reserved 2-1 Reserved ON OFF Disabled Enabled Fixed to Off. Part Names cutter cover 1 emergency cutter 2 control panel 3 ink cartridge cover 4 6 paper roll cover 5 power supply switch DIP Switch Tables Serial SW Function ON OFF 1-1 Power button function Disabled Enabled 1-2 Interface condition selection by the DIP by the switch memory switch 1-3 Handshaking XON/XOFF DTR/DSR 1-4 Data word length 7 bits 8 bits 1-5 Parity check Yes No 1-6 Parity selection Even Odd...
User Manual
Page 3
... a residential area is tested using the Epson power supplies.) Europe: CE marking Safety: EN 60950 North America: EMI: FCC/ICES-003 Class A Safety: UL 1950/CSA C22.2 No. 950 Japan: EMC: VCCI Class A JEIDA-52 Oceania: EMC: AS/NZS 3548 Class B WARNING The connection of a non-shielded printer interface cable to Part 15 of this printer will be liable to...
... a residential area is tested using the Epson power supplies.) Europe: CE marking Safety: EN 60950 North America: EMI: FCC/ICES-003 Class A Safety: UL 1950/CSA C22.2 No. 950 Japan: EMC: VCCI Class A JEIDA-52 Oceania: EMC: AS/NZS 3548 Class B WARNING The connection of a non-shielded printer interface cable to Part 15 of this printer will be liable to...
User Manual
Page 4
... power cord immediately, and then contact your dealer or a SEIKO EPSON service center for the Ink Cartridge Keep the ink cartridge out of the reach of this product. Continued usage may lead to fire. English Safety Precautions This section presents important information intended to an improper power source may cause fire. Caution for advice. Connection to ensure safe and effective use the specified power source...
... power cord immediately, and then contact your dealer or a SEIKO EPSON service center for the Ink Cartridge Keep the ink cartridge out of the reach of this product. Continued usage may lead to fire. English Safety Precautions This section presents important information intended to an improper power source may cause fire. Caution for advice. Connection to ensure safe and effective use the specified power source...
User Manual
Page 5
... serial interface printer) (2) ❏ Power switch cover ❏ Message board (allows you to display an advertisement or other countries, go to the following web site: http://www.epsonexpert.com/ and follow the on-screen instructions. otherwise, the printer and the telephone line may be downloaded from the "Select any product" pulldown menu. Unpacking The following URLs. TM-J2000/J2100 User's Manual 3 Warning Label WARNING: Do not connect a telephone line...
... serial interface printer) (2) ❏ Power switch cover ❏ Message board (allows you to display an advertisement or other countries, go to the following web site: http://www.epsonexpert.com/ and follow the on-screen instructions. otherwise, the printer and the telephone line may be downloaded from the "Select any product" pulldown menu. Unpacking The following URLs. TM-J2000/J2100 User's Manual 3 Warning Label WARNING: Do not connect a telephone line...
User Manual
Page 6
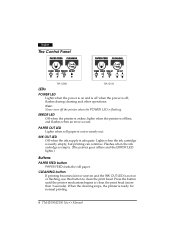
... lights.) Buttons PAPER FEED button PAPER FEED feeds the roll paper. Flashes when the ink cartridge is nearly empty, but printing can continue. CLEANING button If printing becomes faint or uneven and the INK OUT LED is flashing. Note: Never turn off the printer when the POWER LED is not on and is off ; INK OUT LED Off when the ink supply is off when the power is adequate. English The Control Panel TM-J2000 TM-J2100 LEDs POWER LED Lights when the power...
... lights.) Buttons PAPER FEED button PAPER FEED feeds the roll paper. Flashes when the ink cartridge is nearly empty, but printing can continue. CLEANING button If printing becomes faint or uneven and the INK OUT LED is flashing. Note: Never turn off the printer when the POWER LED is not on and is off ; INK OUT LED Off when the ink supply is off when the power is adequate. English The Control Panel TM-J2000 TM-J2100 LEDs POWER LED Lights when the power...
User Manual
Page 7
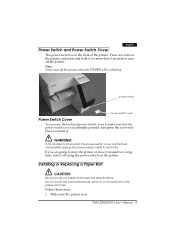
... an accident occurs when the power switch cover is attached, immediately unplug the power supply cable to turn on the printer, and press and hold it for a long time, turn it . Installing or Replacing a Paper Roll CAUTION: Be sure to use the enclosed power switch cover to make sure that meets the specifications. Follow these steps: 1. Just press the cover into place to turn off the printer. If you are going to store...
... an accident occurs when the power switch cover is attached, immediately unplug the power supply cable to turn on the printer, and press and hold it for a long time, turn it . Installing or Replacing a Paper Roll CAUTION: Be sure to use the enclosed power switch cover to make sure that meets the specifications. Follow these steps: 1. Just press the cover into place to turn off the printer. If you are going to store...
User Manual
Page 8
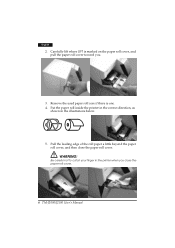
Put the paper roll inside the printer in the correct direction, as shown in the printer when you . 3. English 2. Pull the leading edge of the roll paper a little beyond the paper roll cover, and then close the paper roll cover. 6 TM-J2000/J2100 User's Manual Carefully lift where LIFT is one. 4. WARNING: Be careful not to catch your finger in the illustrations below. 5. Remove the used paper roll core if there is marked on the paper roll cover, and pull the paper roll cover toward you close the paper roll cover.
Put the paper roll inside the printer in the correct direction, as shown in the printer when you . 3. English 2. Pull the leading edge of the roll paper a little beyond the paper roll cover, and then close the paper roll cover. 6 TM-J2000/J2100 User's Manual Carefully lift where LIFT is one. 4. WARNING: Be careful not to catch your finger in the illustrations below. 5. Remove the used paper roll core if there is marked on the paper roll cover, and pull the paper roll cover toward you close the paper roll cover.
User Manual
Page 9
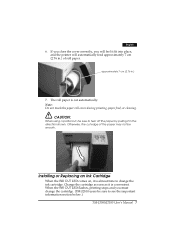
... the printer will feel it in the direction shown. Change the cartridge as soon as it is convenient. The roll paper is cut edge of roll paper. CAUTION: When using a partial cut, be smooth. Otherwise, the cut automatically. English 6. If you close the cover correctly, you must change the ink cartridge. Note: Do not touch the paper roll cover during printing, paper feed, or cleaning. When the INK OUT LED flashes, printing stops and you will automatically feed approximately...
... the printer will feel it in the direction shown. Change the cartridge as soon as it is convenient. The roll paper is cut edge of roll paper. CAUTION: When using a partial cut, be smooth. Otherwise, the cut automatically. English 6. If you close the cover correctly, you must change the ink cartridge. Note: Do not touch the paper roll cover during printing, paper feed, or cleaning. When the INK OUT LED flashes, printing stops and you will automatically feed approximately...
User Manual
Page 10
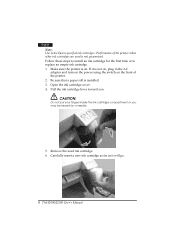
..., plug in the AC adapter and turn on the power using the switch on . Carefully insert a new ink cartridge as far as it is not guaranteed. Performance of the printer. 2. Make sure the printer is installed. 3. Open the ink cartridge cover. 4. English Note: Use Seiko Epson specified ink cartridges. Pull the ink cartridge lever toward you may be injured by a needle. 5. Follow these steps to install an ink cartridge for the first time or to replace an empty ink cartridge. 1.
..., plug in the AC adapter and turn on the power using the switch on . Carefully insert a new ink cartridge as far as it is not guaranteed. Performance of the printer. 2. Make sure the printer is installed. 3. Open the ink cartridge cover. 4. English Note: Use Seiko Epson specified ink cartridges. Pull the ink cartridge lever toward you may be injured by a needle. 5. Follow these steps to install an ink cartridge for the first time or to replace an empty ink cartridge. 1.
User Manual
Page 11
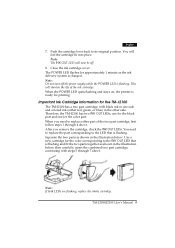
... the power supply while the POWER LED is flashing. When the POWER LED quits flashing and stays on, the printer is charged. After you need to replace the part corresponding to replace either red, green, or blue) in one for the color corresponding to its original position. then carefully insert the combined two part cartridge, continuing with black ink in the other side. When you remove the cartridge, check the INK OUT...
... the power supply while the POWER LED is flashing. When the POWER LED quits flashing and stays on, the printer is charged. After you need to replace the part corresponding to replace either red, green, or blue) in one for the color corresponding to its original position. then carefully insert the combined two part cartridge, continuing with black ink in the other side. When you remove the cartridge, check the INK OUT...
User Manual
Page 12
... CLEANING button unless the print is faint or uneven. Obey the laws and regulations of used ink cartridges as possible, follow these simple rules: ❏ Do not turn the printer on again. Troubleshooting ERROR LED is flashing or lit ❏ If a paper jam has occurred, open Turn off the power supply switch immediately after printing is jammed or the paper roll cover will not open the paper roll cover and remove the jammed paper. Remove the plate inside the cutter cover. If the error...
... CLEANING button unless the print is faint or uneven. Obey the laws and regulations of used ink cartridges as possible, follow these simple rules: ❏ Do not turn the printer on again. Troubleshooting ERROR LED is flashing or lit ❏ If a paper jam has occurred, open Turn off the power supply switch immediately after printing is jammed or the paper roll cover will not open the paper roll cover and remove the jammed paper. Remove the plate inside the cutter cover. If the error...
User Manual
Page 13
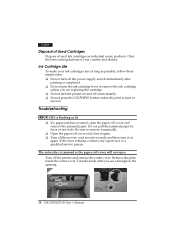
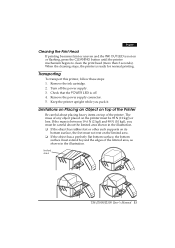
...feet or other such supports on its bottom surface, the feet must not rest on or flashing, press the CLEANING button until the printer mechanism begins to clean the print head (more than 3 ...printer. limited area TM-J2000/J2100 User's Manual 11 When the cleaning stops, the printer is off the power supply. 3. Check that the POWER LED is ready for normal printing. Keep the printer upright while you must be 98 N (10 kgf) or less. Turn off . 4. Remove the ink cartridge. 2. Transporting To transport this printer, follow these steps: 1. English Cleaning the Print Head If printing...
...feet or other such supports on its bottom surface, the feet must not rest on or flashing, press the CLEANING button until the printer mechanism begins to clean the print head (more than 3 ...printer. limited area TM-J2000/J2100 User's Manual 11 When the cleaning stops, the printer is off the power supply. 3. Check that the POWER LED is ready for normal printing. Keep the printer upright while you must be 98 N (10 kgf) or less. Turn off . 4. Remove the ink cartridge. 2. Transporting To transport this printer, follow these steps: 1. English Cleaning the Print Head If printing...
User Manual
Page 14
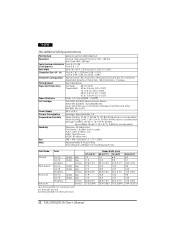
English TM-J2000/J2100 Specifications Print Method Resolution Fonts (Includes Horizontal 2 Dot Spaces) Print Width Character Size: (W × H) Character Configuration Printing Speed Paper Roll Dimensions Paper Thickness Ink Cartridge Power Supply Current Consumption Temperature/Humidity Reliability Size Mass Serial Ink Jet Dot Matrix Method Normal, High speed, Economy: 180 × 180 dpi Bar Code: 360 × 360 dpi Font A: 12 × 24 Font B: 9 × 17 50.8 / 61 / 67.7 / 72.2 mm {2.0 / 2.4 / 2.7 / 2.8"} Font A: 1.41...
English TM-J2000/J2100 Specifications Print Method Resolution Fonts (Includes Horizontal 2 Dot Spaces) Print Width Character Size: (W × H) Character Configuration Printing Speed Paper Roll Dimensions Paper Thickness Ink Cartridge Power Supply Current Consumption Temperature/Humidity Reliability Size Mass Serial Ink Jet Dot Matrix Method Normal, High speed, Economy: 180 × 180 dpi Bar Code: 360 × 360 dpi Font A: 12 × 24 Font B: 9 × 17 50.8 / 61 / 67.7 / 72.2 mm {2.0 / 2.4 / 2.7 / 2.8"} Font A: 1.41...


