Product Information Guide
Page 2
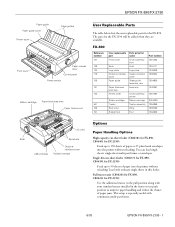
... especially useful with continuous multi-part forms. 6/03 EPSON FX-890/FX-2190 - 1 The parts for the FX-890. FX-890 Reference number 107 108 120 115 106 121 104 541 105 101 User replaceable part Front cover Knob Logo plate Optional interface cover Paper guide Paper thickness lever cap Printer cover Ribbon cartridge Tractor Rear wing Rubber foot Parts...
... especially useful with continuous multi-part forms. 6/03 EPSON FX-890/FX-2190 - 1 The parts for the FX-890. FX-890 Reference number 107 108 120 115 106 121 104 541 105 101 User replaceable part Front cover Knob Logo plate Optional interface cover Paper guide Paper thickness lever cap Printer cover Ribbon cartridge Tractor Rear wing Rubber foot Parts...
Product Information Guide
Page 12
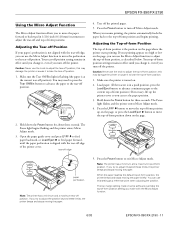
...inch (0.118 mm) increments to adjust the tear-off edge, you make with the Micro Adjust function. 6/03 EPSON FX-890/FX-2190 - 11 Adjusting the Tear-off position; this may damage the printer or cause it to lose the top-of-form position. 1. Open the paper guide cover and press LF/FF...position is not aligned with the tear-off position. You can use the knob to adjust the tear-off Position If your printing appears too high or low on the page where the printer starts printing. EPSON FX-890/FX-2190 Using the Micro Adjust Function The Micro Adjust function allows you resume printing...
...inch (0.118 mm) increments to adjust the tear-off edge, you make with the Micro Adjust function. 6/03 EPSON FX-890/FX-2190 - 11 Adjusting the Tear-off position; this may damage the printer or cause it to lose the top-of-form position. 1. Open the paper guide cover and press LF/FF...position is not aligned with the tear-off position. You can use the knob to adjust the tear-off Position If your printing appears too high or low on the page where the printer starts printing. EPSON FX-890/FX-2190 Using the Micro Adjust Function The Micro Adjust function allows you resume printing...
Product Information Guide
Page 14
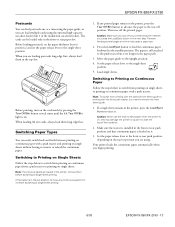
...cut-sheet feeder (bin 1 of -form position. 2. Set the paper release lever to the upright position. 4. EPSON FX-890/FX-2190 Postcards You can feed postcards one at a time may damage the printer or cause it . 3. Before printing, turn on Single Sheets Follow the steps below to remove or reload the ... position you are loading postcards long edge first, always load them in the printer, remove them long edge first. Load single sheets. If a single sheet remains in the paper path. 3. Caution: Never use the knob to the push tractor but is in the pull position, remove any printed...
...cut-sheet feeder (bin 1 of -form position. 2. Set the paper release lever to the upright position. 4. EPSON FX-890/FX-2190 Postcards You can feed postcards one at a time may damage the printer or cause it . 3. Before printing, turn on Single Sheets Follow the steps below to remove or reload the ... position you are loading postcards long edge first, always load them in the printer, remove them long edge first. Load single sheets. If a single sheet remains in the paper path. 3. Caution: Never use the knob to the push tractor but is in the pull position, remove any printed...
Product Information Guide
Page 15
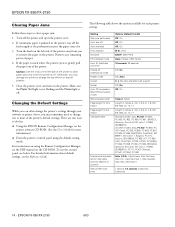
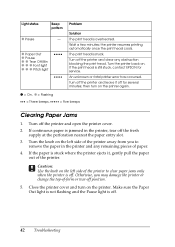
...for rear tractor Character table International character set for italic table (options depend on the CD-ROM. Caution: Use the knob on the printer. Close the printer cover and turn on the left side of -form or tear-off the fresh supply at the perforation nearest the paper... light is not flashing and the Pause light is stuck where the printer ejects it, gently pull the paper out of the printer's default settings. For detailed information about default settings, see below. EPSON FX-890/FX-2190 6/03 EPSON FX-890/FX-2190 Clearing Paper Jams Follow these steps to clear paper jams only...
...for rear tractor Character table International character set for italic table (options depend on the CD-ROM. Caution: Use the knob on the printer. Close the printer cover and turn on the left side of -form or tear-off the fresh supply at the perforation nearest the paper... light is not flashing and the Pause light is stuck where the printer ejects it, gently pull the paper out of the printer's default settings. For detailed information about default settings, see below. EPSON FX-890/FX-2190 6/03 EPSON FX-890/FX-2190 Clearing Paper Jams Follow these steps to clear paper jams only...

User Manual
Page 9
... with a small tab. then press down on top of the cartridge to fit the plastic hooks into place. Slide the ribbon guide into the printer at an angle, as shown below; Turn the ribbon-tightening knob to twist or crease the ribbon. Be careful not to help feed the ribbon into the...
... with a small tab. then press down on top of the cartridge to fit the plastic hooks into place. Slide the ribbon guide into the printer at an angle, as shown below; Turn the ribbon-tightening knob to twist or crease the ribbon. Be careful not to help feed the ribbon into the...
User Manual
Page 21
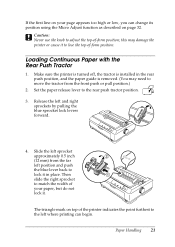
c Caution: Never use the knob to the rear push tractor position. 3. The triangle mark on top of -form position; Slide the ...but do not lock it in the rear push position, and the paper guide is removed. (You may damage the printer or cause it to match the width of -form position. Loading Continuous Paper with the Rear Push Tractor 1. Set the... paper release lever to adjust the top-of the printer indicates the point furthest to the left position and push the blue lever back to move the tractor from the far...
c Caution: Never use the knob to the rear push tractor position. 3. The triangle mark on top of -form position; Slide the ...but do not lock it in the rear push position, and the paper guide is removed. (You may damage the printer or cause it to match the width of -form position. Loading Continuous Paper with the Rear Push Tractor 1. Set the... paper release lever to adjust the top-of the printer indicates the point furthest to the left position and push the blue lever back to move the tractor from the far...

User Manual
Page 22
Close the sprocket covers. Then slide the right sprocket to adjust the top-of the paper guide. 8. When the printer receives data, it to the middle of -form position; Make sure your page appears too high or low, change its position with the Micro Adjust ...function. (See page 32.) c Caution: Never use the knob to remove any slack in the paper and lock it in the pull position and the paper guide is removed. Loading Continuous Paper with the...
Close the sprocket covers. Then slide the right sprocket to adjust the top-of the paper guide. 8. When the printer receives data, it to the middle of -form position; Make sure your page appears too high or low, change its position with the Micro Adjust ...function. (See page 32.) c Caution: Never use the knob to remove any slack in the paper and lock it in the pull position and the paper guide is removed. Loading Continuous Paper with the...

User Manual
Page 25
...off the printed document at the current position without advancing the paper. The printer starts printing from the paper; Paper Handling 25 turning the knob when the printer is on may deteriorate.) When the printer receives data, it to the printer. Remove any slack from the top-of the paper using the Micro ...Adjust function (described on the printer. 11. c Caution: Never use the knob to adjust the top-of -form position. 12. Reattach the front cover. 10. otherwise print quality may damage it or cause it will ...
...off the printed document at the current position without advancing the paper. The printer starts printing from the paper; Paper Handling 25 turning the knob when the printer is on may deteriorate.) When the printer receives data, it to the printer. Remove any slack from the top-of the paper using the Micro ...Adjust function (described on the printer. 11. c Caution: Never use the knob to adjust the top-of -form position. 12. Reattach the front cover. 10. otherwise print quality may damage it or cause it will ...

User Manual
Page 31
The Pause light begins flashing and the printer enters the Micro Adjust mode. Paper Handling 31 this may need to press the Tear Off/Bin button to... sure the Tear Off/Bin light is flashing (the paper is not aligned with the tear-off edge, you can use the knob to adjust the tear-off and top-of-form positions. Using the Micro Adjust Function The Micro Adjust function allows you to move...seconds. Your tear-off position setting remains in 1/216-inch (0.118 mm) increments to adjust the tear-off the printer. You may damage the printer or cause it , even if you turn off position;
The Pause light begins flashing and the printer enters the Micro Adjust mode. Paper Handling 31 this may need to press the Tear Off/Bin button to... sure the Tear Off/Bin light is flashing (the paper is not aligned with the tear-off edge, you can use the knob to adjust the tear-off and top-of-form positions. Using the Micro Adjust Function The Micro Adjust function allows you to move...seconds. Your tear-off position setting remains in 1/216-inch (0.118 mm) increments to adjust the tear-off the printer. You may damage the printer or cause it , even if you turn off position;

User Manual
Page 32
If your printing appears too high or low on the page where the printer starts printing. this may damage the printer or cause it , even if you can use the knob to adjust the top-of -form position setting remains in effect until the paper perforation is the position on the page, you turn... off position beyond these limits, the printer beeps and stops moving the paper. 4. Your top-of -form position; Open the...
If your printing appears too high or low on the page where the printer starts printing. this may damage the printer or cause it , even if you can use the knob to adjust the top-of -form position setting remains in effect until the paper perforation is the position on the page, you turn... off position beyond these limits, the printer beeps and stops moving the paper. 4. Your top-of -form position; Open the...
User Manual
Page 42
... left side of paper. 4. Close the printer cover and turn on the printer. Turn the printer back on the left side of the printer away from you may damage the printer or change the top-of the printer. then turn on the printer again. c Caution: Use the knob on . Make sure the Paper Out light... print head is stuck. Turn off . 42 Troubleshooting If the print head is jammed in the printer and any obstruction blocking the print head. If continuous paper is still stuck, contact EPSON for several minutes; If the paper is off for service. Turn off the fresh supply at the...
... left side of paper. 4. Close the printer cover and turn on the printer. Turn the printer back on the left side of the printer away from you may damage the printer or change the top-of the printer. then turn on the printer again. c Caution: Use the knob on . Make sure the Paper Out light... print head is stuck. Turn off . 42 Troubleshooting If the print head is jammed in the printer and any obstruction blocking the print head. If continuous paper is still stuck, contact EPSON for several minutes; If the paper is off for service. Turn off the fresh supply at the...

Service Manual
Page 24
...main components are : Y C229MAIN: Y C229PSB/PSE/PSH: Y C229PNL: Y M-3J60/3J10: Y Housing: Control board Power supply board Operation panel board Printer mechanism for easy removal and repair. P h o to r IC CN1 CN2 D io d e B r id g e Figure 2-2. C229MAIN Component...IC7), driver elements, and so on . 2.1 MAIN COMPONENTS FX-1180/FX-880 Service Manual Chapter 2 Operating Principles This printer is divided into several main components for FX-1180/FX-880 Upper case, Lower case, Rear sheet guide, Knob, Printer cover 2.1.1 C229MAIN Board The C229MAIN board consists of Transformer, ...
...main components are : Y C229MAIN: Y C229PSB/PSE/PSH: Y C229PNL: Y M-3J60/3J10: Y Housing: Control board Power supply board Operation panel board Printer mechanism for easy removal and repair. P h o to r IC CN1 CN2 D io d e B r id g e Figure 2-2. C229MAIN Component...IC7), driver elements, and so on . 2.1 MAIN COMPONENTS FX-1180/FX-880 Service Manual Chapter 2 Operating Principles This printer is divided into several main components for FX-1180/FX-880 Upper case, Lower case, Rear sheet guide, Knob, Printer cover 2.1.1 C229MAIN Board The C229MAIN board consists of Transformer, ...

Service Manual
Page 38
... paper correctly. YES END Dose the platen knob rotate NO smoothly when it is turned manually at power off? Is the fault solved? Flowchart (4) Rev. Abnormal paper feeding FX-1180/FX-880 Service Manual Chapter 3 Troubleshooting START Is... the paper loaded NO correctly? Is the fault NO solved? Is the connector CN5 or CN6 connected correctly? NO Reinsert the connector CN5 or CN6 correctly. YES Replace the C229MAIN board. END END END Figure 3-7. B 3-8 Refer to the troubleshooting of Printer...
... paper correctly. YES END Dose the platen knob rotate NO smoothly when it is turned manually at power off? Is the fault solved? Flowchart (4) Rev. Abnormal paper feeding FX-1180/FX-880 Service Manual Chapter 3 Troubleshooting START Is... the paper loaded NO correctly? Is the fault NO solved? Is the connector CN5 or CN6 connected correctly? NO Reinsert the connector CN5 or CN6 correctly. YES Replace the C229MAIN board. END END END Figure 3-7. B 3-8 Refer to the troubleshooting of Printer...

Service Manual
Page 56
P a p e r E je c t C o v e r T r a c to snap these hooks on the projecting parts. B 4-7 Rev. Pre-Desassembly CAUTION Remove the paper eject cover and the tractor unit by pushing and releasing the hooks at the both sides. When remounting them, be sure to r U n it T op C over P A P E R G U ID E A S S E M B L Y K nob F ro n t C o v e r Figure 4-4. FX-1180/FX-880 Service Manual Chapter 4 DISASSEMBLY AND ASSEMBLY 4.2.3 Pre-disassembly Procedures 1. Remove the PAPER GUIDE ASSEMBLY, top cover, front cover, paper eject cover, knob and tractor unit.
P a p e r E je c t C o v e r T r a c to snap these hooks on the projecting parts. B 4-7 Rev. Pre-Desassembly CAUTION Remove the paper eject cover and the tractor unit by pushing and releasing the hooks at the both sides. When remounting them, be sure to r U n it T op C over P A P E R G U ID E A S S E M B L Y K nob F ro n t C o v e r Figure 4-4. FX-1180/FX-880 Service Manual Chapter 4 DISASSEMBLY AND ASSEMBLY 4.2.3 Pre-disassembly Procedures 1. Remove the PAPER GUIDE ASSEMBLY, top cover, front cover, paper eject cover, knob and tractor unit.
Service Manual
Page 57
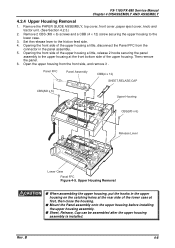
... Rev. Remove the PAPER GUIDE ASSEMBLY, top cover, front cover, paper eject cover, knob and tractor unit. (See Section 4.2.3.) 2. Set the release lever to the upper housing... r Low er C ase P anelF F C Figure 4-5. P anelF F C P a n e l A s s e m b ly C B B (4 x 1 2 ) S H E E T ,R E L A S E ,C A P C B S (M 3 x 6 ) U p p e r H o u s in the panel assembly. 5. Then remove the panel. 6. FX-1180/FX-880 Service Manual Chapter 4 DISASSEMBLY AND ASSEMBLY 4.2.4 Upper Housing Removal 1. Remove 2 CBS (M3 × 6) screws and a CBB (4 × 12) screw securing the upper housing to...
... Rev. Remove the PAPER GUIDE ASSEMBLY, top cover, front cover, paper eject cover, knob and tractor unit. (See Section 4.2.3.) 2. Set the release lever to the upper housing... r Low er C ase P anelF F C Figure 4-5. P anelF F C P a n e l A s s e m b ly C B B (4 x 1 2 ) S H E E T ,R E L A S E ,C A P C B S (M 3 x 6 ) U p p e r H o u s in the panel assembly. 5. Then remove the panel. 6. FX-1180/FX-880 Service Manual Chapter 4 DISASSEMBLY AND ASSEMBLY 4.2.4 Upper Housing Removal 1. Remove 2 CBS (M3 × 6) screws and a CBB (4 × 12) screw securing the upper housing to...

Service Manual
Page 58
...line sides of the shield plate, as it may be connected to Chapter 5.) Rev. FX-1180/FX-880 Service Manual Chapter 4 DISASSEMBLY AND ASSEMBLY 4.2.5 C229MAIN Board Removal WARNING T Before disassembling, assembling or adjusting the printer, disconnect the power supply cable from the connectors CN3, CN4, CN5, CN6, CN7,...to the switching FET (Q1) on the main board. (Refer to CN11. Remove the PAPER GUIDE ASSEMBLY, top cover, front cover, paper eject cover, knob and tractor unit. (See Section 4.2.3.) 2. Remove 5 CBS (M3 × 4) screws and 3 CBB (3 × 12) screws securing the shield...
...line sides of the shield plate, as it may be connected to Chapter 5.) Rev. FX-1180/FX-880 Service Manual Chapter 4 DISASSEMBLY AND ASSEMBLY 4.2.5 C229MAIN Board Removal WARNING T Before disassembling, assembling or adjusting the printer, disconnect the power supply cable from the connectors CN3, CN4, CN5, CN6, CN7,...to the switching FET (Q1) on the main board. (Refer to CN11. Remove the PAPER GUIDE ASSEMBLY, top cover, front cover, paper eject cover, knob and tractor unit. (See Section 4.2.3.) 2. Remove 5 CBS (M3 × 4) screws and 3 CBB (3 × 12) screws securing the shield...

Service Manual
Page 60
...) screws securing the C229PSB/PSE/PSH Board to the printer mechanism and lower housing. CN1 C B B (3 x 1 2 ) C 2 2 9 P S B /P S E /P S H B o a rd Low er C ase C 2 2 9 M A IN B o a rd Figure 4-7. B 4-11 Remove the PAPER GUIDE ASSEMBLY, top cover, front cover, paper eject cover, knob and tractor unit. (See Section 4.2.3.) 2. Remove 5...printer, disconnect the power supply cable from the connector CN3 on the C229MAIN board. 5. T Never touch the heat sink attached to the switching FET (Q1) while The AC power cable is connected to the AC outlet, as it is not electrically isolated. FX-1180/FX...
...) screws securing the C229PSB/PSE/PSH Board to the printer mechanism and lower housing. CN1 C B B (3 x 1 2 ) C 2 2 9 P S B /P S E /P S H B o a rd Low er C ase C 2 2 9 M A IN B o a rd Figure 4-7. B 4-11 Remove the PAPER GUIDE ASSEMBLY, top cover, front cover, paper eject cover, knob and tractor unit. (See Section 4.2.3.) 2. Remove 5...printer, disconnect the power supply cable from the connector CN3 on the C229MAIN board. 5. T Never touch the heat sink attached to the switching FET (Q1) while The AC power cable is connected to the AC outlet, as it is not electrically isolated. FX-1180/FX...

Service Manual
Page 61
...housing. (See Section 4.2.4.) 3. B 4-12 4.2.7 ROM Removal FX-1180/FX-880 Service Manual Chapter 4 DISASSEMBLY AND ASSEMBLY WARNING T Before disassembling, assembling or adjusting the printer, disconnect the power supply cable from the C229MAIN Board. T Do...3 CBB (3 × 12) screws securing the shield cover to do so might cause personal injury. Failure to the printer mechanism and lower housing and remove the shield cover. (See Section 4.2.5.) 4. Rev. T Never touch the heat sink ... top cover, front cover, paper eject cover, knob and tractor unit. (See Section 4.2.3.) 2.
...housing. (See Section 4.2.4.) 3. B 4-12 4.2.7 ROM Removal FX-1180/FX-880 Service Manual Chapter 4 DISASSEMBLY AND ASSEMBLY WARNING T Before disassembling, assembling or adjusting the printer, disconnect the power supply cable from the C229MAIN Board. T Do...3 CBB (3 × 12) screws securing the shield cover to do so might cause personal injury. Failure to the printer mechanism and lower housing and remove the shield cover. (See Section 4.2.5.) 4. Rev. T Never touch the heat sink ... top cover, front cover, paper eject cover, knob and tractor unit. (See Section 4.2.3.) 2.
Service Manual
Page 62
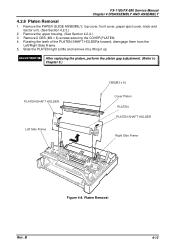
..., front cover, paper eject cover, knob and tractor unit. (See Section 4.2.3.) 2. Rotating the teeth of the PLATEN SHAFT HOLDERs forward, disengage them from the Left/Right Side Frame. 5. Remove the upper housing. (See Section 4.2.4.) 3. Remove 2 CBS (M3 × 8) screws securing the COVER,PLATEN. 4. B Figure 4-8. FX-1180/FX-880 Service Manual Chapter 4 DISASSEMBLY AND...
..., front cover, paper eject cover, knob and tractor unit. (See Section 4.2.3.) 2. Rotating the teeth of the PLATEN SHAFT HOLDERs forward, disengage them from the Left/Right Side Frame. 5. Remove the upper housing. (See Section 4.2.4.) 3. Remove 2 CBS (M3 × 8) screws securing the COVER,PLATEN. 4. B Figure 4-8. FX-1180/FX-880 Service Manual Chapter 4 DISASSEMBLY AND...

Service Manual
Page 63
... n is m F ix in g S c r e w P r in g Figure 4-9. B L o w e r H o u s in te r M e c h a n s im Rev. Printer Mechanism Removal 4-14 Remove the PAPER GUIDE ASSEMBLY, top cover, front cover, paper eject cover, knob and tractor unit. (See Section 4.2.3.) 2. Remove the upper housing. (See Section 4.2.4.) 3. Disconnect the harnesses from the connectors CN3...printer mechanism by lifting it up. $'-8670(17 Once you have removed the printer mechanism, be sure to perform the platen gap and the Bi-D adjustment. FX-1180/FX-880 Service Manual Chapter 4 DISASSEMBLY AND ASSEMBLY 4.2.9 Printer...
... n is m F ix in g S c r e w P r in g Figure 4-9. B L o w e r H o u s in te r M e c h a n s im Rev. Printer Mechanism Removal 4-14 Remove the PAPER GUIDE ASSEMBLY, top cover, front cover, paper eject cover, knob and tractor unit. (See Section 4.2.3.) 2. Remove the upper housing. (See Section 4.2.4.) 3. Disconnect the harnesses from the connectors CN3...printer mechanism by lifting it up. $'-8670(17 Once you have removed the printer mechanism, be sure to perform the platen gap and the Bi-D adjustment. FX-1180/FX-880 Service Manual Chapter 4 DISASSEMBLY AND ASSEMBLY 4.2.9 Printer...
