Product Information Guide
Page 2
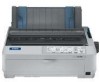
... multi-part forms. 6/03 EPSON FX-890/FX-2190 - 1 Single-bin cut -sheet feeder (C806381 for FX-890, C806401 for FX-2190) Feeds up to 50 sheets of paper jams. This setup is especially useful with your standard tractor installed in this feeder. The parts for the FX-890. EPSON FX-890/FX-2190 Paper guide Paper guide cover Printer cover Edge guides Front cover Paper release lever Control panel Power...
... multi-part forms. 6/03 EPSON FX-890/FX-2190 - 1 Single-bin cut -sheet feeder (C806381 for FX-890, C806401 for FX-2190) Feeds up to 50 sheets of paper jams. This setup is especially useful with your standard tractor installed in this feeder. The parts for the FX-890. EPSON FX-890/FX-2190 Paper guide Paper guide cover Printer cover Edge guides Front cover Paper release lever Control panel Power...
Product Information Guide
Page 3
... with 8.5-inch roll paper. Front paper guide (C814021 for FX-890, C814031 for text and graphics printing. Printer Specifications Mechanical Printing method Printing speed Printing direction Line spacing Printable columns Resolution Paper feed methods Paper feed speed 9-pin impact dot matrix Ultra speed draft 566... tractor is required Cut-sheet feeders (optional) Roll paper holder (optional) Normal mode: 1/6-inch (4.23 mm) feed, 62 msec; EPSON FX-890/FX-2190 Roll paper holder (8310) Allows you to use your printer with your printer's built-in USB and parallel interfaces and provide added...
... with 8.5-inch roll paper. Front paper guide (C814021 for FX-890, C814031 for text and graphics printing. Printer Specifications Mechanical Printing method Printing speed Printing direction Line spacing Printable columns Resolution Paper feed methods Paper feed speed 9-pin impact dot matrix Ultra speed draft 566... tractor is required Cut-sheet feeders (optional) Roll paper holder (optional) Normal mode: 1/6-inch (4.23 mm) feed, 62 msec; EPSON FX-890/FX-2190 Roll paper holder (8310) Allows you to use your printer with your printer's built-in USB and parallel interfaces and provide added...

Product Information Guide
Page 5
... sheet or front paper guide only): Minimum Maximum Width (inch) (mm) FX-890: FX-2190: 3.9 10.1 16.5 100 257 420 Length ((inch) (mm) 3.9 14.3 16.5 100 364 420 Copies 1 original + 5 copies Total thickness (inch) (mm) 0.0047 0.12 0.018 0.46 Weight per sheet of glue at the perforation should be 1 mm or more. EPSON FX-890/FX-2190 Environmental Temperature...
... sheet or front paper guide only): Minimum Maximum Width (inch) (mm) FX-890: FX-2190: 3.9 10.1 16.5 100 257 420 Length ((inch) (mm) 3.9 14.3 16.5 100 364 420 Copies 1 original + 5 copies Total thickness (inch) (mm) 0.0047 0.12 0.018 0.46 Weight per sheet of glue at the perforation should be 1 mm or more. EPSON FX-890/FX-2190 Environmental Temperature...
Product Information Guide
Page 12
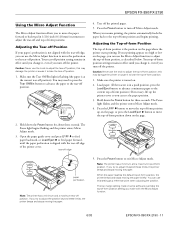
...adjust the top-of -form position and begins printing. Open the paper guide cover and press LF/FF D to feed paper backward, or Load/Eject U to feed paper forward, until you change it, even if you turn off the printer. Press the Pause button to the top-of -form position,...try to adjust the position beyond these limits, the printer beeps and stops moving the paper. 5. The top margin setting made in effect until the paper perforation is at the current tear-off position). this setting as described below. EPSON FX-890/FX-2190 Using the Micro Adjust Function The Micro Adjust ...
...adjust the top-of -form position and begins printing. Open the paper guide cover and press LF/FF D to feed paper backward, or Load/Eject U to feed paper forward, until you change it, even if you turn off the printer. Press the Pause button to the top-of -form position,...try to adjust the position beyond these limits, the printer beeps and stops moving the paper. 5. The top margin setting made in effect until the paper perforation is at the current tear-off position). this setting as described below. EPSON FX-890/FX-2190 Using the Micro Adjust Function The Micro Adjust ...
Product Information Guide
Page 13
...). You can easily peel off their backing sheets inside the printer and cause a paper jam. ❏ Do not load paper that are sensitive to avoid paper jams. Make sure the forms do not exceed 0.018 inch (0.46 mm). EPSON FX-890/FX-2190 6/03 front paper guide front sheet guide Labels When printing on the rear or front push tractor. ❏...
...). You can easily peel off their backing sheets inside the printer and cause a paper jam. ❏ Do not load paper that are sensitive to avoid paper jams. Make sure the forms do not exceed 0.018 inch (0.46 mm). EPSON FX-890/FX-2190 6/03 front paper guide front sheet guide Labels When printing on the rear or front push tractor. ❏...
Product Information Guide
Page 14
...the next step. Then tear off your printed document before you need to the single-sheet position. 5. Set the paper release lever to remove the front sheet guide. 1. Note: To switch from a push tractor to the push tractor but is still attached to printing on ; .... If any printed pages remain in the pull position, remove any continuous paper from printing on single sheets to the standby position. When you begin printing. 6/03 EPSON FX-890/FX-2190 - 13 Your printer loads the continuous paper automatically when you are using the optional high-capacity cut -sheet feeder)....
...the next step. Then tear off your printed document before you need to the single-sheet position. 5. Set the paper release lever to remove the front sheet guide. 1. Note: To switch from a push tractor to the push tractor but is still attached to printing on ; .... If any printed pages remain in the pull position, remove any continuous paper from printing on single sheets to the standby position. When you begin printing. 6/03 EPSON FX-890/FX-2190 - 13 Your printer loads the continuous paper automatically when you are using the optional high-capacity cut -sheet feeder)....
Product Information Guide
Page 16
...load a new sheet of continuous paper that came with your printer. It remains in bold) are restored to FX-890/FX-2190 mode, hold down the Tear Off/Bin and Pause buttons while you may want , as described in Okidata mode. When you switch from the paper guide. 1. The printed instructions list ...Software emulation Auto tear off . See page 14. 6/03 EPSON FX-890/FX-2190 - 15 If you use your FX-890 or FX-2190 work like the Okidata® Microline® 320 Turbo or 321 Turbo. Make sure the printer is on the FX-890/FX-2190. Press the Font button until you repeat the above ...
...load a new sheet of continuous paper that came with your printer. It remains in bold) are restored to FX-890/FX-2190 mode, hold down the Tear Off/Bin and Pause buttons while you may want , as described in Okidata mode. When you switch from the paper guide. 1. The printed instructions list ...Software emulation Auto tear off . See page 14. 6/03 EPSON FX-890/FX-2190 - 15 If you use your FX-890 or FX-2190 work like the Okidata® Microline® 320 Turbo or 321 Turbo. Make sure the printer is on the FX-890/FX-2190. Press the Font button until you repeat the above ...
Product Information Guide
Page 17
.... You select the best alignment pattern from the paper guide. As described in Lock-out mode). EPSON FX-890/FX-2190 6/03 In the default Lock-out mode, you can use the printer's bidirectional adjustment mode to change which functions you want to load a new sheet of paper each time the printer ejects a printed sheet from each of the...
.... You select the best alignment pattern from the paper guide. As described in Lock-out mode). EPSON FX-890/FX-2190 6/03 In the default Lock-out mode, you can use the printer's bidirectional adjustment mode to change which functions you want to load a new sheet of paper each time the printer ejects a printed sheet from each of the...
Product Information Guide
Page 19
... feeder is not hot. Caution: Never use a hard or abrasive brush. EPSON FX-890/FX-2190 6/03 Remove the paper guide. 4. EPSON FX-890/FX-2190 Cleaning the Printer 1. these chemicals can damage the printer mechanism. unsuitable oils can damage the printer components as well as described below. Also make sure the printer cover and front cover are installed, remove them and pack them...
... feeder is not hot. Caution: Never use a hard or abrasive brush. EPSON FX-890/FX-2190 6/03 Remove the paper guide. 4. EPSON FX-890/FX-2190 Cleaning the Printer 1. these chemicals can damage the printer mechanism. unsuitable oils can damage the printer components as well as described below. Also make sure the printer cover and front cover are installed, remove them and pack them...

Technical Brief (Impact Printers)
Page 3
... using the front push and pull tractors in the read push position. L Paper thickness adjustment: Most EPSON impact printers have a Paper Thickness Lever that allows the printer to accommodate various thicknesses of paper Single sheets, envelopes, or postcards. Paper feed method Top friction feed (standard paper guide) Optional high-capacity cutsheet feeder Optional second-bin cutsheet feeder Type of...
... using the front push and pull tractors in the read push position. L Paper thickness adjustment: Most EPSON impact printers have a Paper Thickness Lever that allows the printer to accommodate various thicknesses of paper Single sheets, envelopes, or postcards. Paper feed method Top friction feed (standard paper guide) Optional high-capacity cutsheet feeder Optional second-bin cutsheet feeder Type of...
User Manual
Page 3
... Printer 7 Choosing a Place for the Printer 7 Assembling the Printer 8 Connecting the Printer to Your Computer 11 Installing the Printer Software 12 For Windows XP, Me, or 2000 12 For Windows 98, 95, or NT 4.0 13 For DOS programs 14 Installing and Using the Online Reference Guide 15 Installing the Remote Configuration Manager 15 Paper Handling Setting the Paper...
... Printer 7 Choosing a Place for the Printer 7 Assembling the Printer 8 Connecting the Printer to Your Computer 11 Installing the Printer Software 12 For Windows XP, Me, or 2000 12 For Windows 98, 95, or NT 4.0 13 For DOS programs 14 Installing and Using the Online Reference Guide 15 Installing the Remote Configuration Manager 15 Paper Handling Setting the Paper...

User Manual
Page 7
...233;e facilement. Keep it is tilted or placed at an angle. ❏ Avoid using or storing the printer in places subject to ship the printer in temperature and humidity. Save all packing and protective materials in case you need to rapid changes in the... not interfere with paper feeding. Chapter 1 Setting Up the Printer This chapter describes how to remove the protective materials before you turn on the printer. Setting Up the Printer 7 Unpacking the Printer Make sure you have the following items. Printer Ribbon cartridge Power cord Paper guide Printer software Follow the ...
...233;e facilement. Keep it is tilted or placed at an angle. ❏ Avoid using or storing the printer in places subject to ship the printer in temperature and humidity. Save all packing and protective materials in case you need to rapid changes in the... not interfere with paper feeding. Chapter 1 Setting Up the Printer This chapter describes how to remove the protective materials before you turn on the printer. Setting Up the Printer 7 Unpacking the Printer Make sure you have the following items. Printer Ribbon cartridge Power cord Paper guide Printer software Follow the ...
User Manual
Page 10
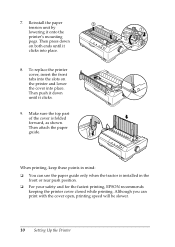
...your safety and for the fastest printing, EPSON recommends keeping the printer cover closed while printing. To replace the printer cover, insert the front tabs into the slots on both ends until it onto the printer's mounting pegs. Although you can use the paper guide only when the tractor is folded forward, ...as shown. Reinstall the paper tension unit by lowering it clicks. 9. Make sure the top part of the...
...your safety and for the fastest printing, EPSON recommends keeping the printer cover closed while printing. To replace the printer cover, insert the front tabs into the slots on both ends until it onto the printer's mounting pegs. Although you can use the paper guide only when the tractor is folded forward, ...as shown. Reinstall the paper tension unit by lowering it clicks. 9. Make sure the top part of the...
User Manual
Page 20
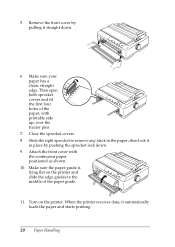
.... 7. Then open both sprocket covers and fit the first four holes of the paper guide. 11. Remove the front cover by pushing the sprocket lock down . 6. Make sure your paper has a clean, straight edge. Turn on the printer and slide the edge guides to remove any slack in place by pulling it automatically loads the...
.... 7. Then open both sprocket covers and fit the first four holes of the paper guide. 11. Remove the front cover by pushing the sprocket lock down . 6. Make sure your paper has a clean, straight edge. Turn on the printer and slide the edge guides to remove any slack in place by pulling it automatically loads the...
User Manual
Page 21
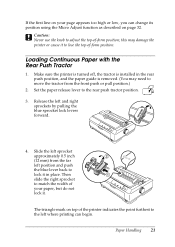
...-of -form position. Make sure the printer is turned off, the tractor is installed in place. Loading Continuous Paper with the Rear Push Tractor 1. Release the left position and push the blue lever back to lock it in the rear push position, and the paper guide is removed. (You may damage the... printer or cause it . c Caution: Never use the knob...
...-of -form position. Make sure the printer is turned off, the tractor is installed in place. Loading Continuous Paper with the Rear Push Tractor 1. Release the left position and push the blue lever back to lock it in the rear push position, and the paper guide is removed. (You may damage the... printer or cause it . c Caution: Never use the knob...

User Manual
Page 22
... the first line on the printer. (You may damage the printer or cause it in the pull position and the paper guide is removed. Attach the paper guide and lay it automatically loads the paper and starts printing. Make sure the printer is turned off, and the printer cover is lying flat on your paper has a clean, straight edge. 5. Then...
... the first line on the printer. (You may damage the printer or cause it in the pull position and the paper guide is removed. Attach the paper guide and lay it automatically loads the paper and starts printing. Make sure the printer is turned off, and the printer cover is lying flat on your paper has a clean, straight edge. 5. Then...

User Manual
Page 25
... will start printing at the perforation nearest the paper exit slot. turning the knob when the printer is on the printer. 11. Close the paper guide cover. 13. Paper Handling 25 The printer starts printing from the paper; c Caution: Never use the knob to the printer. Turn on may deteriorate.) When the printer receives data, it to lose the top...
... will start printing at the perforation nearest the paper exit slot. turning the knob when the printer is on the printer. 11. Close the paper guide cover. 13. Paper Handling 25 The printer starts printing from the paper; c Caution: Never use the knob to the printer. Turn on may deteriorate.) When the printer receives data, it to lose the top...
User Manual
Page 26
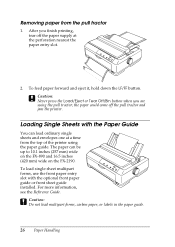
... not load multipart forms, carbon paper, or labels in the paper guide. 26 Paper Handling Removing paper from the top of the printer using the pull tractor; To load single-sheet multipart forms, use the front paper entry slot with the Paper Guide You can be up to 10.1 inches (257 mm) wide on the FX-890 and 16.5 inches (420...
... not load multipart forms, carbon paper, or labels in the paper guide. 26 Paper Handling Removing paper from the top of the printer using the pull tractor; To load single-sheet multipart forms, use the front paper entry slot with the Paper Guide You can be up to 10.1 inches (257 mm) wide on the FX-890 and 16.5 inches (420...
User Manual
Page 27
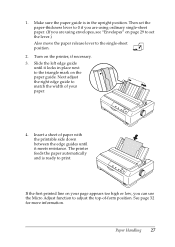
...to print. Make sure the paper guide is ready to adjust the top-of paper with the printable side down between the edge guides until it meets resistance. Insert a sheet of -form position. See page 32 for more information. The printer feeds the paper automatically and is in place ...next to the single-sheet position. 2. Paper Handling 27 Turn on the paper guide. 1. If the first printed line on page 29 to set the paper-thickness lever to 0 if you are using envelopes,...
...to print. Make sure the paper guide is ready to adjust the top-of paper with the printable side down between the edge guides until it meets resistance. Insert a sheet of -form position. See page 32 for more information. The printer feeds the paper automatically and is in place ...next to the single-sheet position. 2. Paper Handling 27 Turn on the paper guide. 1. If the first printed line on page 29 to set the paper-thickness lever to 0 if you are using envelopes,...
User Manual
Page 28
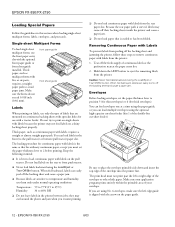
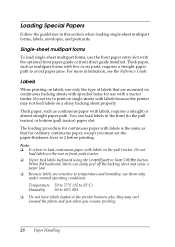
...a straight or almost straight paper path. When fed backward, labels can load labels in the front (to avoid paper jams. For more information, see the Reference Guide. Do not try to 2 before printing. Loading Special Papers Follow the guidelines in the printer between jobs; The loading procedure... for use the front paper entry slot with labels because the printer may curl around ...
...a straight or almost straight paper path. When fed backward, labels can load labels in the front (to avoid paper jams. For more information, see the Reference Guide. Do not try to 2 before printing. Loading Special Papers Follow the guidelines in the printer between jobs; The loading procedure... for use the front paper entry slot with labels because the printer may curl around ...


