
Service Manual
Page 38
YES END Dose the platen knob rotate NO smoothly when it is turned manually at power off? Flowchart (4) Rev. Is the fault solved? Refer to the troubleshooting of Printer Mechanism. YES Replace the C229MAIN board. B 3-8 NO Reinsert the connector CN5 or CN6 correctly. YES Replace the... C229MAIN board. Is the fault NO solved? YES NO Refer to the troubleshooting for Printer Mechanism. YES Load the paper correctly. Is the connector CN5 or CN6 connected correctly? YES NO Is the fault solved? END END ...
YES END Dose the platen knob rotate NO smoothly when it is turned manually at power off? Flowchart (4) Rev. Is the fault solved? Refer to the troubleshooting of Printer Mechanism. YES Replace the C229MAIN board. B 3-8 NO Reinsert the connector CN5 or CN6 correctly. YES Replace the... C229MAIN board. Is the fault NO solved? YES NO Refer to the troubleshooting for Printer Mechanism. YES Load the paper correctly. Is the connector CN5 or CN6 connected correctly? YES NO Is the fault solved? END END ...
Service Manual
Page 62
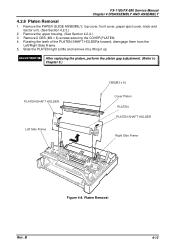
... cover, front cover, paper eject cover, knob and tractor unit. (See Section 4.2.3.) 2. B Figure 4-8. Rotating the teeth of the PLATEN SHAFT HOLDERs forward, disengage them from the Left/Right Side Frame. 5. Slide the PLATEN right a little and remove it by lifting... After replacing the platen, perform the platen gap adjustment. (Refer to Chapter 5.) P LA TE N S H A FT H O LD E R L e ft S id e F r a m e C B S (M 3 x 8 ) C o v e r P la te n P LA TE N P LA TE N S H A FT H O LD E R R ig h t S id e F r a m e Rev. Remove the upper housing. (See Section 4.2.4.) 3. FX-1180/FX-880 Service Manual...
... cover, front cover, paper eject cover, knob and tractor unit. (See Section 4.2.3.) 2. B Figure 4-8. Rotating the teeth of the PLATEN SHAFT HOLDERs forward, disengage them from the Left/Right Side Frame. 5. Slide the PLATEN right a little and remove it by lifting... After replacing the platen, perform the platen gap adjustment. (Refer to Chapter 5.) P LA TE N S H A FT H O LD E R L e ft S id e F r a m e C B S (M 3 x 8 ) C o v e r P la te n P LA TE N P LA TE N S H A FT H O LD E R R ig h t S id e F r a m e Rev. Remove the upper housing. (See Section 4.2.4.) 3. FX-1180/FX-880 Service Manual...

Service Manual
Page 63
...perform the platen gap and the Bi-D adjustment. Remove 4 mechanism fixing screws, and remove the printer mechanism by lifting it up. $'-8670(17 Once you have removed the printer mechanism, be sure to the printer mechanism and lower housing. FX-1180/FX-880 ...Service Manual Chapter 4 DISASSEMBLY AND ASSEMBLY 4.2.9 Printer Mechanism Removal 1. B L o w e r H o u s in te r M e c h a n s im Rev. Printer Mechanism Removal 4-14 Remove the PAPER GUIDE ASSEMBLY, top cover, front cover, paper eject cover, knob...
...perform the platen gap and the Bi-D adjustment. Remove 4 mechanism fixing screws, and remove the printer mechanism by lifting it up. $'-8670(17 Once you have removed the printer mechanism, be sure to the printer mechanism and lower housing. FX-1180/FX-880 ...Service Manual Chapter 4 DISASSEMBLY AND ASSEMBLY 4.2.9 Printer Mechanism Removal 1. B L o w e r H o u s in te r M e c h a n s im Rev. Printer Mechanism Removal 4-14 Remove the PAPER GUIDE ASSEMBLY, top cover, front cover, paper eject cover, knob...
