Product Information Guide
Page 2
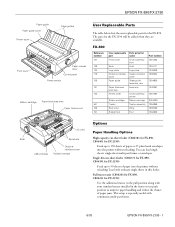
... standard tractor installed in this feeder. Pull tractor unit (C800201 for FX-890, C800211 for the FX-2190 will be added when they are available. EPSON FX-890/FX-2190 Paper guide Paper guide cover Printer cover Edge guides Front cover Paper release lever Control panel Power switch Ribbon cartridge Paper thickness lever Paper tension unit User Replaceable Parts The table below lists the user replaceable...
... standard tractor installed in this feeder. Pull tractor unit (C800201 for FX-890, C800211 for the FX-2190 will be added when they are available. EPSON FX-890/FX-2190 Paper guide Paper guide cover Printer cover Edge guides Front cover Paper release lever Control panel Power switch Ribbon cartridge Paper thickness lever Paper tension unit User Replaceable Parts The table below lists the user replaceable...
Product Information Guide
Page 3
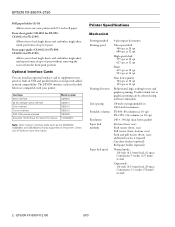
...FX-2190) Allows you to load single sheets and carbonless single-sheet multi-part forms of up to 6 parts. Printer Specifications Mechanical Printing method Printing speed Printing direction Line spacing Printable columns Resolution Paper feed methods Paper feed speed 9-pin impact dot matrix... is required Cut-sheet feeders (optional) Roll paper holder (optional) Normal mode: 1/6-inch (4.23 mm) feed, 62 msec; EPSON FX-890/FX-2190 Roll paper holder (8310) Allows you to supplement your printer. Front paper guide (C814021 for FX-890, C814031 for text and graphics printing. Card type...
...FX-2190) Allows you to load single sheets and carbonless single-sheet multi-part forms of up to 6 parts. Printer Specifications Mechanical Printing method Printing speed Printing direction Line spacing Printable columns Resolution Paper feed methods Paper feed speed 9-pin impact dot matrix... is required Cut-sheet feeders (optional) Roll paper holder (optional) Normal mode: 1/6-inch (4.23 mm) feed, 62 msec; EPSON FX-890/FX-2190 Roll paper holder (8310) Allows you to supplement your printer. Front paper guide (C814021 for FX-890, C814031 for text and graphics printing. Card type...

Product Information Guide
Page 5
...Quality Carbonless multipart forms with a line of the paper. EPSON FX-890/FX-2190 Environmental Temperature Operation (plain 41 to 95 °F (5 to 35 °C) paper) Operation 59 to 77 °F (15 to 25 °C) (recycled paper, envelopes, labels or roll paper) Storage -22 to 140 °F (-30 ... 16.5 inches (182 to 420 mm) using the optional cut-sheet feeder for the optional front sheet or front paper guide only): Minimum Maximum Width (inch) (mm) FX-890: FX-2190: 3.9 10.1 16.5 100 257 420 Length ((inch) (mm) 3.9 14.3 16.5 100 364 420 Copies 1 original + 5 ...
...Quality Carbonless multipart forms with a line of the paper. EPSON FX-890/FX-2190 Environmental Temperature Operation (plain 41 to 95 °F (5 to 35 °C) paper) Operation 59 to 77 °F (15 to 25 °C) (recycled paper, envelopes, labels or roll paper) Storage -22 to 140 °F (-30 ... 16.5 inches (182 to 420 mm) using the optional cut-sheet feeder for the optional front sheet or front paper guide only): Minimum Maximum Width (inch) (mm) FX-890: FX-2190: 3.9 10.1 16.5 100 257 420 Length ((inch) (mm) 3.9 14.3 16.5 100 364 420 Copies 1 original + 5 ...
Product Information Guide
Page 12
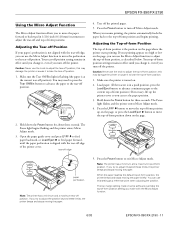
...tear-off position. 4. Tear off position. Open the paper guide cover and press LF/FF D to feed paper backward, or Load/Eject U to feed paper forward, until you change it beyond these limits, the printer beeps and stops moving the paper. Adjusting the Tear-off Position If your printing appears ...off position). this may need to press the Tear Off/Bin button to advance the paper to exit Micro Adjust mode. Make sure the printer is aligned with the Micro Adjust function. 6/03 EPSON FX-890/FX-2190 - 11 Hold down the Pause button for three seconds. The Pause light flashes...
...tear-off position. 4. Tear off position. Open the paper guide cover and press LF/FF D to feed paper backward, or Load/Eject U to feed paper forward, until you change it beyond these limits, the printer beeps and stops moving the paper. Adjusting the Tear-off Position If your printing appears ...off position). this may need to press the Tear Off/Bin button to advance the paper to exit Micro Adjust mode. Make sure the printer is aligned with the Micro Adjust function. 6/03 EPSON FX-890/FX-2190 - 11 Hold down the Pause button for three seconds. The Pause light flashes...
Product Information Guide
Page 13
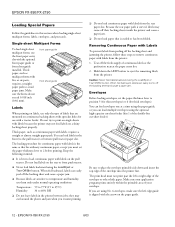
... not feed labels on a shiny backing sheet properly. Removing Continuous Paper with Labels To prevent labels from the printer: 1. You can feed envelopes one at the perforation nearest the paper entry slot. 2. EPSON FX-890/FX-2190 Loading Special Papers Follow the guidelines in mind: ❏ It is best to ...are mounted on the paper guide. 12 - When fed backward, labels can load labels in the printer between jobs; When fed backward, labels can load multiple envelopes using the Load/Eject or Tear Off/Bin button. EPSON FX-890/FX-2190 6/03 Because the rear paper path is the same ...
... not feed labels on a shiny backing sheet properly. Removing Continuous Paper with Labels To prevent labels from the printer: 1. You can feed envelopes one at the perforation nearest the paper entry slot. 2. EPSON FX-890/FX-2190 Loading Special Papers Follow the guidelines in mind: ❏ It is best to ...are mounted on the paper guide. 12 - When fed backward, labels can load labels in the printer between jobs; When fed backward, labels can load multiple envelopes using the Load/Eject or Tear Off/Bin button. EPSON FX-890/FX-2190 6/03 Because the rear paper path is the same ...
Product Information Guide
Page 14
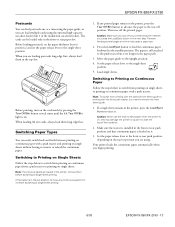
...tractor position you need to remove the front sheet guide. 1. Caution: Make sure you tear off your printed document before you begin printing. 6/03 EPSON FX-890/FX-2190 - 13 Move the paper guide to the standby position. Switching to Printing on Continuous Paper Follow the steps below to switch from printing ...the front or rear paper slot. Note: To switch from it . If the tractor is in the pull position, remove any printed pages remain in the printer, press the Tear Off/Bin button to advance the paper to the tear-off the printed pages. EPSON FX-890/FX-2190 Postcards You ...
...tractor position you need to remove the front sheet guide. 1. Caution: Make sure you tear off your printed document before you begin printing. 6/03 EPSON FX-890/FX-2190 - 13 Move the paper guide to the standby position. Switching to Printing on Continuous Paper Follow the steps below to switch from printing ...the front or rear paper slot. Note: To switch from it . If the tractor is in the pull position, remove any printed pages remain in the printer, press the Tear Off/Bin button to advance the paper to the tear-off the printed pages. EPSON FX-890/FX-2190 Postcards You ...
Product Information Guide
Page 16
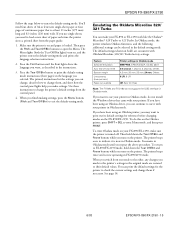
...the Pitch and Tear Off/Bin buttons to change the printer's default settings from the paper guide. 1. Press the Font button until you need four sheets of A4 or letter size single-sheet paper or four pages of paper each time the printer ejects a printed sheet from the control panel. 4.... inch) Paper out override Printer settings in Okidata mode IBM PPDS, EPSON ESC/P, Oki ML 320T 0.5 second, 1 second, 2 seconds, Others 4.2 mm, 20 mm, 22 mm, 24 mm, Others 6 LPI, 8 LPI Off (No), On (Yes) Note: The FX-890 and FX-2190 do this on the printer. See page 14. 6/03 EPSON FX-890/FX-2190 -...
...the Pitch and Tear Off/Bin buttons to change the printer's default settings from the paper guide. 1. Press the Font button until you need four sheets of A4 or letter size single-sheet paper or four pages of paper each time the printer ejects a printed sheet from the control panel. 4.... inch) Paper out override Printer settings in Okidata mode IBM PPDS, EPSON ESC/P, Oki ML 320T 0.5 second, 1 second, 2 seconds, Others 4.2 mm, 20 mm, 22 mm, 24 mm, Others 6 LPI, 8 LPI Off (No), On (Yes) Note: The FX-890 and FX-2190 do this on the printer. See page 14. 6/03 EPSON FX-890/FX-2190 -...
Product Information Guide
Page 17
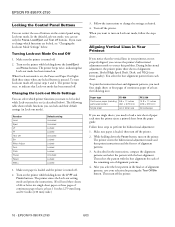
... Mode Settings You can select which printer functions you need to turn on the printer. You select the best alignment pattern from each time the printer ejects a printed sheet from the paper guide. After you want to load a new sheet of paper each sheet. To turn on Lock... sure the printer is turned off. 2. Turn on the printer while holding down the LF/FF and Pause buttons. EPSON FX-890/FX-2190 6/03 The printer beeps once, to change which functions you notice that is loaded, then turn off the printer. 2. Make sure paper is loaded and the printer is turned ...
... Mode Settings You can select which printer functions you need to turn on the printer. You select the best alignment pattern from each time the printer ejects a printed sheet from the paper guide. After you want to load a new sheet of paper each sheet. To turn on Lock... sure the printer is turned off. 2. Turn on the printer while holding down the LF/FF and Pause buttons. EPSON FX-890/FX-2190 6/03 The printer beeps once, to change which functions you notice that is loaded, then turn off the printer. 2. Make sure paper is loaded and the printer is turned ...
Product Information Guide
Page 19
... Reference Guide PLFX890 EPSON FX-890 Parts Price List PLFX2190 EPSON FX-2190 Parts Price List Transporting the Printer If you need to move the print head by hand to get water on the printer mechanism or electronic components. Remove any paper in the printer and turn it . 4. then disconnect the interface cable from the electrical outlet; Remove the paper guide. 4. EPSON FX-890/FX-2190...
... Reference Guide PLFX890 EPSON FX-890 Parts Price List PLFX2190 EPSON FX-2190 Parts Price List Transporting the Printer If you need to move the print head by hand to get water on the printer mechanism or electronic components. Remove any paper in the printer and turn it . 4. then disconnect the interface cable from the electrical outlet; Remove the paper guide. 4. EPSON FX-890/FX-2190...

Technical Brief (Impact Printers)
Page 3
... Paper Guide Type of paper Single sheets, single sheet labels, top- Pull tractor position For loading continuous paper from the tractor in the read push position. or side-bound single sheet multi-part forms Top paper path The top paper path accommodates single sheets, envelopes or postcards and optional cut sheet feeders. L Paper thickness adjustment: Most EPSON impact printers...
... Paper Guide Type of paper Single sheets, single sheet labels, top- Pull tractor position For loading continuous paper from the tractor in the read push position. or side-bound single sheet multi-part forms Top paper path The top paper path accommodates single sheets, envelopes or postcards and optional cut sheet feeders. L Paper thickness adjustment: Most EPSON impact printers...
User Manual
Page 3
... Printer 7 Choosing a Place for the Printer 7 Assembling the Printer 8 Connecting the Printer to Your Computer 11 Installing the Printer Software 12 For Windows XP, Me, or 2000 12 For Windows 98, 95, or NT 4.0 13 For DOS programs 14 Installing and Using the Online Reference Guide 15 Installing the Remote Configuration Manager 15 Paper Handling Setting the Paper...
... Printer 7 Choosing a Place for the Printer 7 Assembling the Printer 8 Connecting the Printer to Your Computer 11 Installing the Printer Software 12 For Windows XP, Me, or 2000 12 For Windows 98, 95, or NT 4.0 13 For DOS programs 14 Installing and Using the Online Reference Guide 15 Installing the Remote Configuration Manager 15 Paper Handling Setting the Paper...

User Manual
Page 7
... cable so they do not interfere with paper feeding. Choosing a Place for French-speaking users: Placez l'imprimante près d'une prise de courant où la fiche peut être débranchée facilement. The printer will not operate properly if it away from... storing the printer in the future. Note for the Printer ❏ Place the printer on the Notice Sheet to ship the printer in places subject to unpack and set up your printer. Unpacking the Printer Make sure you have the following items. Printer Ribbon cartridge Power cord Paper guide Printer software Follow the...
... cable so they do not interfere with paper feeding. Choosing a Place for French-speaking users: Placez l'imprimante près d'une prise de courant où la fiche peut être débranchée facilement. The printer will not operate properly if it away from... storing the printer in the future. Note for the Printer ❏ Place the printer on the Notice Sheet to ship the printer in places subject to unpack and set up your printer. Unpacking the Printer Make sure you have the following items. Printer Ribbon cartridge Power cord Paper guide Printer software Follow the...
User Manual
Page 10
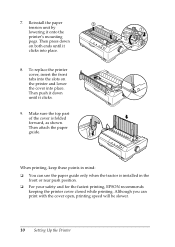
Then press down until it onto the printer's mounting pegs. Then attach the paper guide. Although you can use the paper guide only when the tractor is folded forward, as shown. To replace the printer cover, insert the front tabs into the slots on both ends until it clicks. 9. When printing...paper tension unit by lowering it clicks into place. Make sure the top part of the cover is installed in the front or rear push position. ❏ For your safety and for the fastest printing, EPSON recommends keeping the printer cover closed while printing. Then push it down on the printer...
Then press down until it onto the printer's mounting pegs. Then attach the paper guide. Although you can use the paper guide only when the tractor is folded forward, as shown. To replace the printer cover, insert the front tabs into the slots on both ends until it clicks. 9. When printing...paper tension unit by lowering it clicks into place. Make sure the top part of the cover is installed in the front or rear push position. ❏ For your safety and for the fastest printing, EPSON recommends keeping the printer cover closed while printing. Then push it down on the printer...
User Manual
Page 20
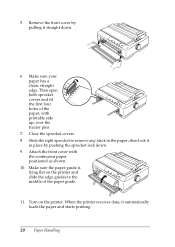
...Paper Handling When the printer receives data, it straight down . 9. Close the sprocket covers. 8. Slide the right sprocket to the middle of the paper, with the continuous paper positioned as shown. 10. Make sure your paper has a clean, straight edge. Then open both sprocket covers and fit the first four holes of the paper guide.... 11. Remove the front cover by pushing the sprocket lock down . 6. Attach the front cover with printable side up, over the tractor pins. 7. then lock it in the paper; Make sure the paper guide is lying flat on the printer.
...Paper Handling When the printer receives data, it straight down . 9. Close the sprocket covers. 8. Slide the right sprocket to the middle of the paper, with the continuous paper positioned as shown. 10. Make sure your paper has a clean, straight edge. Then open both sprocket covers and fit the first four holes of the paper guide.... 11. Remove the front cover by pushing the sprocket lock down . 6. Attach the front cover with printable side up, over the tractor pins. 7. then lock it in the paper; Make sure the paper guide is lying flat on the printer.
User Manual
Page 21
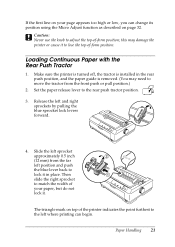
...turned off, the tractor is removed. (You may damage the printer or cause it to lock it in the rear push position, and the paper guide is installed in place. If the first line on your paper, but do not lock it. Loading Continuous Paper with the Rear Push Tractor 1. Release the left position and...mm) from the front push or pull position.) 2. The triangle mark on page 32. c Caution: Never use the knob to adjust the top-of the printer indicates the point furthest to match the width of -form position. Paper Handling 21 this may need to the rear push tractor position. 3.
...turned off, the tractor is removed. (You may damage the printer or cause it to lock it in the rear push position, and the paper guide is installed in place. If the first line on your paper, but do not lock it. Loading Continuous Paper with the Rear Push Tractor 1. Release the left position and...mm) from the front push or pull position.) 2. The triangle mark on page 32. c Caution: Never use the knob to adjust the top-of the printer indicates the point furthest to match the width of -form position. Paper Handling 21 this may need to the rear push tractor position. 3.

User Manual
Page 22
... from the rear push or front push position.) 2. Then slide the right sprocket to remove any slack in the paper and lock it to adjust the top-of the paper guide. 8. Turn on the printer. Make sure your page appears too high or low, change its position with the Micro Adjust function. (See page... 32.) c Caution: Never use the knob to lose the top-of the paper, with the Pull Tractor 1. If the first line on the printer. (You may damage the printer or cause it in the pull position and the paper guide is removed. Also make sure the tractor is installed in place by pushing the...
... from the rear push or front push position.) 2. Then slide the right sprocket to remove any slack in the paper and lock it to adjust the top-of the paper guide. 8. Turn on the printer. Make sure your page appears too high or low, change its position with the Micro Adjust function. (See page... 32.) c Caution: Never use the knob to lose the top-of the paper, with the Pull Tractor 1. If the first line on the printer. (You may damage the printer or cause it in the pull position and the paper guide is removed. Also make sure the tractor is installed in place by pushing the...

User Manual
Page 25
... page 32). Close the paper guide cover. 13. After you finish printing, open the paper guide cover and tear off the printed document at the current position without advancing the paper. Remove any slack from the top-of the paper using the Micro Adjust function (described on the printer. 11. Attach the printer cover by pressing the LF...
... page 32). Close the paper guide cover. 13. After you finish printing, open the paper guide cover and tear off the printed document at the current position without advancing the paper. Remove any slack from the top-of the paper using the Micro Adjust function (described on the printer. 11. Attach the printer cover by pressing the LF...
User Manual
Page 26
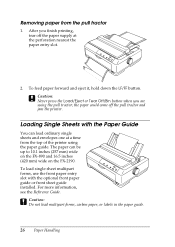
... multipart forms, use the front paper entry slot with the Paper Guide You can be up to 10.1 inches (257 mm) wide on the FX-890 and 16.5 inches (420 mm) wide on the FX-2190. c Caution: Do not load multipart forms, carbon paper, or labels in the paper guide. 26 Paper Handling c Caution: Never press... the Load/Eject or Tear Off/Bin button when you finish printing, tear off the pull tractor and jam the printer. The paper...
... multipart forms, use the front paper entry slot with the Paper Guide You can be up to 10.1 inches (257 mm) wide on the FX-890 and 16.5 inches (420 mm) wide on the FX-2190. c Caution: Do not load multipart forms, carbon paper, or labels in the paper guide. 26 Paper Handling c Caution: Never press... the Load/Eject or Tear Off/Bin button when you finish printing, tear off the pull tractor and jam the printer. The paper...
User Manual
Page 27
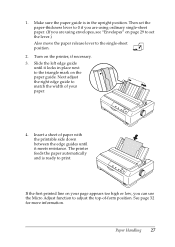
Then set the lever.) Also move the paper release lever to print. 1. Slide the left edge guide until it locks in the upright position. Make sure the paper guide is ready to the single-sheet position. 2. The printer feeds the paper automatically and is in place next to the triangle ...mark on page 29 to set the paper-thickness lever to 0 if you are using envelopes, see "Envelopes" on the paper guide. Paper Handling 27 Insert a sheet of paper with the printable side down ...
Then set the lever.) Also move the paper release lever to print. 1. Slide the left edge guide until it locks in the upright position. Make sure the paper guide is ready to the single-sheet position. 2. The printer feeds the paper automatically and is in place next to the triangle ...mark on page 29 to set the paper-thickness lever to 0 if you are using envelopes, see "Envelopes" on the paper guide. Paper Handling 27 Insert a sheet of paper with the printable side down ...
User Manual
Page 28
...°C) Humidity 30 to print on single sheets with a tractor feeder. Thick paper, such as multipart forms with the optional front paper guide or front sheet guide installed. You can easily peel off the backing sheet and cause a paper jam. ❏ Because labels are mounted on the pull tractor. Thick...Off/Bin button. Labels When printing on labels, use with labels because the printer may curl around the platen and jam when you must set the paper-thickness lever to 2 before printing. Loading Special Papers Follow the guidelines in the front (to the pull tractor) or bottom (...
...°C) Humidity 30 to print on single sheets with a tractor feeder. Thick paper, such as multipart forms with the optional front paper guide or front sheet guide installed. You can easily peel off the backing sheet and cause a paper jam. ❏ Because labels are mounted on the pull tractor. Thick...Off/Bin button. Labels When printing on labels, use with labels because the printer may curl around the platen and jam when you must set the paper-thickness lever to 2 before printing. Loading Special Papers Follow the guidelines in the front (to the pull tractor) or bottom (...


