
User Manual
Page 3
... a driver radio button; See your printer model name is loaded in step 11.) 2. Your computer begins loading Windows 95. 4. Make sure your computer documentation for Windows 95 users Follow these steps to perform a test print in the printer and the printer is connected to the computer's parallel ...port. (The paper is used to install the printer driver using the Windows 95 plug-and play capabilities: Note: To install the...
... a driver radio button; See your printer model name is loaded in step 11.) 2. Your computer begins loading Windows 95. 4. Make sure your computer documentation for Windows 95 users Follow these steps to perform a test print in the printer and the printer is connected to the computer's parallel ...port. (The paper is used to install the printer driver using the Windows 95 plug-and play capabilities: Note: To install the...

User Manual
Page 4
... copy the files to your hard disk and add an icon to print a test page. 12. In the next screen, select YES to the Printers folder using the printer name you inserted the disk in a disk drive. 8. If it did not print correctly, choose NO and follow the directions on the screen. We... 10. At the next screen you keep the model name as the default printer for the printer in the test page confirmation dialog if the page printed correctly. To use the printer as shown. Click OK. If you assign. Insert the Windows printer driver disk in drive A, click OK. Click the Next button. 11. ...
... copy the files to your hard disk and add an icon to print a test page. 12. In the next screen, select YES to the Printers folder using the printer name you inserted the disk in a disk drive. 8. If it did not print correctly, choose NO and follow the directions on the screen. We... 10. At the next screen you keep the model name as the default printer for the printer in the test page confirmation dialog if the page printed correctly. To use the printer as shown. Click OK. If you assign. Insert the Windows printer driver disk in drive A, click OK. Click the Next button. 11. ...

User Manual
Page 5
... Finish. 16. Double-click the Printers folder. 3. Select the Local printer or Network printer radio button. Type A: WIN 95 (or B: WIN 95); Select the port you are using Windows 95, follow the directions that appears, choose Yes if the test page printed satisfactorily. Otherwise, select the NO ...radio button. 13. In the dialog box that appear on your printer the default printer. Installing the driver while running Windows 95 If you want to print a test page. 15. Click the Have Disk button. 7. Select your computer's floppy disk drive. 8. ...
... Finish. 16. Double-click the Printers folder. 3. Select the Local printer or Network printer radio button. Type A: WIN 95 (or B: WIN 95); Select the port you are using Windows 95, follow the directions that appears, choose Yes if the test page printed satisfactorily. Otherwise, select the NO ...radio button. 13. In the dialog box that appear on your printer the default printer. Installing the driver while running Windows 95 If you want to print a test page. 15. Click the Have Disk button. 7. Select your computer's floppy disk drive. 8. ...

User Manual
Page 32
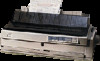
For the near letter quality test, hold down the Load/Eject button while you turn on the printer. For draft printing, hold down the LF/FF button while you turn on the printer. Setting Up the Printer 1-11 Make sure the printer is turned off and the paper path guide is open. 2. Move the paper release lever to the single-sheet position. 3. The printer prints the self test in the currently selected font. 1.
For the near letter quality test, hold down the Load/Eject button while you turn on the printer. For draft printing, hold down the LF/FF button while you turn on the printer. Setting Up the Printer 1-11 Make sure the printer is turned off and the paper path guide is open. 2. Move the paper release lever to the single-sheet position. 3. The printer prints the self test in the currently selected font. 1.

User Manual
Page 33
Then adjust the right edge guide to the arrow guide mark. Caution: Run the self test using paper at least 360 mm (14 inches) wide; otherwise, the print head prints directly on the platen. 5. Move the left edge guide until it against the paper guide. 1-12 Setting Up the Printer 4. Lift the paper path guide and rest it locks in place next to match the width of your paper.
Then adjust the right edge guide to the arrow guide mark. Caution: Run the self test using paper at least 360 mm (14 inches) wide; otherwise, the print head prints directly on the platen. 5. Move the left edge guide until it against the paper guide. 1-12 Setting Up the Printer 4. Lift the paper path guide and rest it locks in place next to match the width of your paper.

User Manual
Page 34
Here is open. 7. To end the self test, press the Pause button, then turn off the printer. To stop the self test temporarily, press the Pause button. 8. Make sure you adjust the edge guides to the loading position and begins printing the self test. After a few seconds, the printer feeds the paper to match the width of your paper. The printer stops priding when the cover is part of paper between the edge guides until it meets resistance. 6. Note: Always close the printer cover before printing. Insert a sheet of a typical self test: Setting Up the Printer 1-13
Here is open. 7. To end the self test, press the Pause button, then turn off the printer. To stop the self test temporarily, press the Pause button. 8. Make sure you adjust the edge guides to the loading position and begins printing the self test. After a few seconds, the printer feeds the paper to match the width of your paper. The printer stops priding when the cover is part of paper between the edge guides until it meets resistance. 6. Note: Always close the printer cover before printing. Insert a sheet of a typical self test: Setting Up the Printer 1-13

User Manual
Page 35
... interface connector. Squeeze the wire clips together until they lock in parallel interface. Make sure both the printer and computer are ready to connect your printer to the computer. Plug the other end of the cable, attach it to the ground connector beneath the interface connector. 2.... the computer. (If there is a ground wire at the back of the connector. Follow these steps: 1. Note: If your printer's built-in place on either side of the computer.) 1-14 Setting Up the Printer Connecting the Printer to Your Computer If the self test printed correctly, you are turned off;
... interface connector. Squeeze the wire clips together until they lock in parallel interface. Make sure both the printer and computer are ready to connect your printer to the computer. Plug the other end of the cable, attach it to the ground connector beneath the interface connector. 2.... the computer. (If there is a ground wire at the back of the connector. Follow these steps: 1. Note: If your printer's built-in place on either side of the computer.) 1-14 Setting Up the Printer Connecting the Printer to Your Computer If the self test printed correctly, you are turned off;

User Manual
Page 76
To activate the functions listed below, turn on the printer while pressing one of buttons, as hexadecimal numbers and corresponding characters. All the input data are printed as follows: Load/Eject LF/FF Pitch Load/Eject and LF/FF Pause Performs a near letter quality self test. See "Problems and Solutions" in this chapter. Performs...
To activate the functions listed below, turn on the printer while pressing one of buttons, as hexadecimal numbers and corresponding characters. All the input data are printed as follows: Load/Eject LF/FF Pitch Load/Eject and LF/FF Pause Performs a near letter quality self test. See "Problems and Solutions" in this chapter. Performs...

User Manual
Page 108
... solutions. See "Running the Self Test" in hexadecimal format. Note: If you are an experienced user or a programmer, you turn off the printer. Power Supply This section describes solutions for assistance. Plug another electrical device, such as a lamp, into the electrical outlet. To print a hex dump, turn on .... dump to the power supply. The printer prints all the codes it receives in Chapter 1. If the electrical outlet is not being supplied The lights on the control panel do not go on the printer. If the self test does not work, contact your dealer or qualified service person ...
... solutions. See "Running the Self Test" in hexadecimal format. Note: If you are an experienced user or a programmer, you turn off the printer. Power Supply This section describes solutions for assistance. Plug another electrical device, such as a lamp, into the electrical outlet. To print a hex dump, turn on .... dump to the power supply. The printer prints all the codes it receives in Chapter 1. If the electrical outlet is not being supplied The lights on the control panel do not go on the printer. If the self test does not work, contact your dealer or qualified service person ...

User Manual
Page 112
...66. If your program has a lines-per page. This is your maximum lines-per -page setting for paper that is not 81/2 x 11, create a test document using . You can adjust the loading position using standard 8l/2 x 11-inch paper, set the maximum lines per -page setting and you are using... your application program. Note: To find the right lines-per -page setting. 3. The print position is not what printer you print your file, notice the last number printed on the first page. See your user's guide for which you use 58. When you install an application program, it...
...66. If your program has a lines-per page. This is your maximum lines-per -page setting for paper that is not 81/2 x 11, create a test document using . You can adjust the loading position using standard 8l/2 x 11-inch paper, set the maximum lines per -page setting and you are using... your application program. Note: To find the right lines-per -page setting. 3. The print position is not what printer you print your file, notice the last number printed on the first page. See your user's guide for which you use 58. When you install an application program, it...
User Manual
Page 156
..., 5-3 Roll paper, 2-29, 4-9-11 holder, 4-9-11 S Safety instructions, vii, viii Second bin cut-sheet feeder, 4-2 Self test, l-10-13 Shield plate, 4-13 Single-sheet paper, 2-3-7, 4-7 loading from front, 2-6-7 loading from tractor, 2-23 roll, 2-29..., 3-2 Placement of printer, l-2-3 Plugging in the printer, 1-10 Postcards, 2-29 Power cord, l-4 plugging in, l-10 Power supply problems, 6-2-3, Print head warning, 2-l 1 Print quality problems, 6-4-7 Printer drivers DOS software, l-17-18 installing l-15 settings, l-15-16 Printer functions table, 3-8-9 Printer stand, l-3 Printer utilites, l-18-20...
..., 5-3 Roll paper, 2-29, 4-9-11 holder, 4-9-11 S Safety instructions, vii, viii Second bin cut-sheet feeder, 4-2 Self test, l-10-13 Shield plate, 4-13 Single-sheet paper, 2-3-7, 4-7 loading from front, 2-6-7 loading from tractor, 2-23 roll, 2-29..., 3-2 Placement of printer, l-2-3 Plugging in the printer, 1-10 Postcards, 2-29 Power cord, l-4 plugging in, l-10 Power supply problems, 6-2-3, Print head warning, 2-l 1 Print quality problems, 6-4-7 Printer drivers DOS software, l-17-18 installing l-15 settings, l-15-16 Printer functions table, 3-8-9 Printer stand, l-3 Printer utilites, l-18-20...

User Manual
Page 157
T Tear Off /Bin button, 3-4, 3-6 light, 3-2 Tear off feature, 3-16-17 auto tear off, 3-16-17 Testing the printer, 1-10-13 Tractor positions CHANGING, 2-9-11 front push, 2-3, 2-8, 2-12-15 pull, 2-3 ,2-8, 2-19-21, 4-8 push/pull, 2-8, 2-22-23, 4-8-9 rear push, 2-3, 2-8, 2-15-18 selecting 2-8-9 Transporting the printer, 5-4 Troubleshooting, 6-2-12 Unidirectional printing, 3-10, Unpacking the printer, l-4 Utilities EFSON Calibration, l-20 EPSON Remote!, l-18 V Voltage, caution, l-4, 1-10 W Weight, A-9 Windows, l-15-16 installing printer driver, l-15 IN-4 Index
T Tear Off /Bin button, 3-4, 3-6 light, 3-2 Tear off feature, 3-16-17 auto tear off, 3-16-17 Testing the printer, 1-10-13 Tractor positions CHANGING, 2-9-11 front push, 2-3, 2-8, 2-12-15 pull, 2-3 ,2-8, 2-19-21, 4-8 push/pull, 2-8, 2-22-23, 4-8-9 rear push, 2-3, 2-8, 2-15-18 selecting 2-8-9 Transporting the printer, 5-4 Troubleshooting, 6-2-12 Unidirectional printing, 3-10, Unpacking the printer, l-4 Utilities EFSON Calibration, l-20 EPSON Remote!, l-18 V Voltage, caution, l-4, 1-10 W Weight, A-9 Windows, l-15-16 installing printer driver, l-15 IN-4 Index


